MAX96705/MAX96711
Evaluation Kit
General Description
The MAX96705/MAX96711 coax evaluation kit (EV kit)
provides a proven design to evaluate the MAX96705 and
MAX96711 high-bandwidth gigabit multimedia serial link
(GMSL) serializers with spread spectrum and full-duplex
control channel, through the use of a standard FAKRA
coax or STP cable. The EV kit also includes Windows
Vista®- and Windows 7-compatible software that provides
a simple graphical user interface (GUI) for exercising
features of the device. The EV kit comes with either a
MAX96705GTJ+ or MAX96711GTJ+ IC installed.
For complete GMSL evaluation using a standard FAKRA
coax cable, order the MAX96705 or MAX96711 EV kit
and a companion deserializer board (the MAX96706 or
MAX96708 EV kit are referenced in this document). For
testing with STP cable, also order the MAXCOAX2STPHSD adapter kit and refer to its data sheet. Only one
adapter kit is required per link (connecting the serializer
and deserializer boards).
Evaluates: MAX96705/MAX96711
with Coax or STP Cable
Features
●● Accepts 16-Bit Parallel Input Data and Outputs
GMSL Serial Data through FAKRA Connectors
●● Windows Vista-, and Windows 7-Compatible
Software
●● USB-Controlled Interface (Cable Included)
●● USB Powered
●● Proven PCB Layout
●● Fully Assembled and Tested
Items Included in the EV Kit Package
DECRIPTION
QTY
MAX96705 or MAX96711 coax EV kit board
1
USB cable
1
MAX96705/MAX96711 EV Kit Files
FILE
DECRIPTION
Note: In the following sections, MAX96705/11 and the
term “serializer” refer to the MAX96705 or MAX96711 ICs
and MAX96706/08 and the term “deserializer” refer to the
MAX96706 or MAX96708 ICs.
MAXSerDesEV-N_Vxxxx_
Install.EXE
Installs the EV kit files on
your computer
Note: This document applies to both coax and STP EV
kits. This document covers coax cables, but the information provided applies equally to STP cables.
MAXSerDesEV-N.EXE
Graphical user interface
(GUI) program
CDM20600.EXE
Ordering Information appears at end of data sheet.
Windows and Windows Vista are registered trademarks and
registered service marks of Microsoft Corporation.
19-8432; Rev 1; 3/16
USB_Driver_Help_200.PDF
Installs the USB device driver
USB driver installation help
file
�MAX96705/MAX96711
Evaluation Kit
Quick Start
Required Equipment
●● MAX96705 or MAX96711 serializer EV kit
●● MAX96706 or MAX96708 deserializer EV kit
●● 2m FAKRA cable assembly (included with the
deserializer EV kit)
●● > 20MHz function generator
●● PC with Windows Vista or Windows 7 and a spare
USB port (direct 500mA connection required; do not
use a bus-powered hub)
●● 5V DC, 500mA power supply
Note: In the following sections, software-related items are
identified by bolding. Text in bold refers to items from the
EV kit software. Text in bold and underlined refers to
items from the Windows operating system.
Procedure
The EV kit is fully assembled and tested. Follow the steps
below to verify board operation:
Evaluates: MAX96705/MAX96711
with Coax or STP Cable
on the serializer board.
7) Verify that LED_PWR on the deserializer board lights
up, indicating that the deserializer board has power.
8) Verify that LED_PWR on the serializer board lights
up, indicating that the serializer board has power.
Both serializer and deserializer have a power-overcoax (POC) circuit that is active by default.
9) Verify that LOCK_LED on the deserializer
board lights up, indicating that the link has been
successfully established. If the LOCK_LED is
off, or ERR_LED is on, go to the Troubleshooting section and fix the problem before continuing.
Note: If you are working with an earlier version of
the deserializer IC, you must write value of 0xA6 to
register address 0x9b at slave address 0x90 to
enable the control channel. In the current revision of
the IC, this step is no longer needed.
10) Start the EV kit software by selecting Start |
Programs | Maxim Integrated | MAXSerDesEV-N |
MAXSerDesEV-N.
●● Search for MAX9288. Then select MAX9288 |
Design Resources | Software | GMSL SerDes
Evaluation Kit Software-Nuvoton.
11) The Configuration Settings window opens (see
Figure 2) and the GUI automatically searches for
any active listener in both I2C and UART mode and
identifies a valid GMSL product. Once a valid device
is identified, the corresponding configuration jumpers
are displayed to help users configure the serializer
and deserializer.
●● The installation application will try to download
and install the USB driver for the Nuvoton microcontroller. If the USB driver installation was not
successful, install the appropriate USB driver for
your PC available from the link below, and refer
to the USB_Driver_Help_200.PDF file, if needed:
www.ftdichip.com/Drivers/VCP.htm.
12) In case an operating evaluation board with a
Nuvoton microcontroller is not found, a window
appears (Figure 3) warning as such. Press OK to
continue and start the GUI anyway, or press Cancel to
terminate the application. See the Troubleshooting section at the end of this document and fix the
problem before continuing.
2) Verify that jumpers on the serializer board are in their
default positions, as shown in Figure 14.
13) When an operating Nuvoton microcontroller is found,
the GUI checks the firmware version in the microcontroller and prompts the user to update (Figure 4).
1) Visit www.maximintegrated.com/EVkitsoftware to
download and install the latest version of the EV kit
software:
3) Verify that jumpers on the deserializer board are in
their default positions, as shown in Figure 15.
4) Set up the system, as shown in Figure 1.
5) Connect the FAKRA cable from the OUT+ terminal on the serializer board to the IN0+ terminal
on the deserializer board. Both the serializer and
deserializer evaluation boards have power-over-coax
(POC) circuitry that is active by default, configured
such that the deserializer board is the source of the
power for the serializer board.
6) Connect the USB cable between the PC and USB
port on the Nuvoton microcontroller daughter board
www.maximintegrated.com
14) While the Configuration Settings window is open,
press the Identify Devices button to search for the
devices connected.
15) Only Link Type and Device Address selections on
the Configuration Settings window affects the EV
kit operation. Other items are for user reference only.
16) Press the Connect button to open the
Evaluation Kit window and the devices under test
(DUT) register maps (Figure 5). The GUI will read all
internal registers of the serializer and deserializer and
update the corresponding tabs.
Maxim Integrated │ 2
�Evaluates: MAX96705/MAX96711
with Coax or STP Cable
MAX96705/MAX96711
Evaluation Kit
17) Press the Read All MAX96705 button in the Serializer group box to read all the serializer registers.
18) Press the MAX96705 Des tab (Figure 6) and
then press the Read All MAX96706 button in the
Deserializer group box to read all the deserializer
registers.
NUVOTON
MICROCONTROLLER
DAUGHTER BOARD
COMPUTER
USB
DB1
19) Select any of the other tabs to evaluate other
serializer/deserializer (SerDes) functions.
PCLK
DB1
SERILIZER
(USB POWERED)
+5VIN
DESERIALIZER
2m COAX CABLE
OUT+
IN+
POWER OVER COAX (POC)
Figure 1. Serializer Test Setup Block Diagram
Table 1. Jumper Description*
JUMPER
SIGNAL
SHUNT
POSITION
J1
+12V
—
+12V AC adapter input
J2
+5VIN
—
+5V power-supply input positive terminal
J3
GND
—
+5V power-supply input negative terminal
J4
OUT+
—
GMSL OUT+ FAKRA connector
J5
OUT-
—
GMSL OUT- FAKRA connector
J6
EXT_UC
—
4-pin header to apply user microcontroller
J11
U15 ch3
Open**
VLC3 = U15 level shifter, channel 3 low side
VLC4 = U15 level shifter, channel 4 low side
J13
U15 ch4
Open**
VHC3 = U15 level shifter, channel 3 high side
VHC4 = U15 level shifter, channel 4 high side
J23
J25
GPIO5/LMN1
U4_SCL
L
Connected to GND
H
Connected to IOVDD
Open**
Not connected
Short**
μC connected to U4 oscillator
Open
L
J26
J27
IDT_OE
FSEL0
H**
FSEL1
www.maximintegrated.com
U4 oscillator output enabled
L**
U4 oscillator FSEL0 pin pulled low
H
U4 oscillator FSEL0 pin pulled high
U4 oscillator FSEL0 pin not connected (internal low)
L**
U4 oscillator FSEL1 pin pulled low
H
U4 oscillator FSEL1 pin pulled high
RX
UC_RX/SDA
U4 oscillator output not enabled
U4 oscillator OE pin not connected
Open
J29
μC not connected to U4 oscillator
Open
Open
J28
FUNCTION
U4 oscillator FSEL1 pin not connected (internal low)
U1 RX/SDA pin connected to μC RX pin
SDA**
U1 RX/SDA pin connected to μC SDA pin
Open
U1 RX/SDA pin left open
Maxim Integrated │ 3
�Evaluates: MAX96705/MAX96711
with Coax or STP Cable
MAX96705/MAX96711
Evaluation Kit
Table 1. Jumper Description* (continued)
JUMPER
SIGNAL
J30
GPIO2
J32
J33
J35
J38
GPIO3
GPIO4/LMN0
U4_SDA
PCLK_IN
SHUNT
POSITION
Short
Open**
Short
Open**
UC_TX/SCL
GPIO1/BWS
Connected to IOVDD
Not connected
Short**
μC connected to U4 oscillator
Open
μC not connected to U4 oscillator
IDT**
U1 PCLKIN connected to U4 output
SMA
U1 PCLKIN connected to PCLK_SMA connector
GND
GND terminal for externally applied PCLK to J38.1
Open
U1 PCLKIN pin not connected
U1 TX/SCL pin connected to μC SDA pin
Open
U1 TX/SCL pin left open
H
H**
L**
CONF0
H
Open
L**
J43
CONF1
J44
HIM_HI
J45
GPO_LOW
J46
IOVDD_DUT
www.maximintegrated.com
U1 TX/SCL pin connected to μC RX pin
SCL**
Open
J42
Shorted to GND
H
L
LCCN
Shorted to IOVDD
Open**
Open
J41
Shorted to GND
Connected to GND
L**
J40
Shorted to IOVDD
L
TX
J39
FUNCTION
H
Connected to GND
Connected to IOVDD
Not connected
Connected to GND
Connected to IOVDD
Not connected
Connected to GND
Connected to IOVDD
Not connected
Connected to GND
Connected to IOVDD
Open
Not connected
Short
U1 GPO/HIM pin pulled up to IOVDD
Open**
Short
U1 GPO/HIM state depends on J45
U1 GPO/HIM pin connected to IOVDD
Open**
U1 GPO/HIM state depends on J44
Short**
U1 GPO/HIM pin connected to IOVDD
Open
Apply ammeter to measure current drawn by U1 IOVDD
Maxim Integrated │ 4
�Evaluates: MAX96705/MAX96711
with Coax or STP Cable
MAX96705/MAX96711
Evaluation Kit
Table 1. Jumper Description* (continued)
JUMPER
J47
SIGNAL
MS/HVEN
SHUNT
POSITION
L
Connected to GND
H
Connected to IOVDD
Open**
J48
PWDN
L
H**
DBL-L
J50
J51
TX/SCL/DBL
POC+
U15_TC/SCL
POC-
EXSDAPU
J55
EXSCLPU
J56
J57
LFR+
LFR-
LFL+
5V POC is sourced by the serializer
POC5VIN**
5V POC is expected from the deserializer
POC12V
LFL-
No POC
5V POC is sourced by the serializer
POC5VIN**
5V POC is expected from the deserializer
POC12V
+5V
12V POC can be applied by either the serializer or deserializer
No POC
Reference voltage for external μC signals set to +3.3V
Reference voltage for external μC signals set to +5V
Reference voltage for external μC signals applied to J6.VDD_REF
Short**
On-board pullup applied on external μC SDA signal
Open
External μC SDA signal must be pulled up externally
Short**
On-board pullup applied on external μC SCL signal
Open
External μC SCL signal must be pulled up externally
Short**
Line fault can be monitored by the remote device on the OUT+ terminal
(LFAVDD must be short and LFR-, LFL+, LFL- must be open)
Open
Line fault monitored by local device or OUT- terminal
Short
Line fault can be monitored by the remote device on the OUT- terminal
(LFAVDD must be short and LFR+, LFL+, LFL- must be open)
Short
Short
Open**
www.maximintegrated.com
12V POC can be applied by either the serializer or deserializer
POC5VOUT
Open**
J59
U1 TX/SCL/DBL pin is connected to U15_TX/SCL
POC5VOUT
Open**
J58
U1 TX/SCL/DBL pin connected to GND
No POC
Open
J54
U1 powered up
Open
+3.3V**
VDD_REF
U1 powered down
U1 TX/SCL/DBL pin is connected to IOVDD
Open
J53
Not connected
DBL-H
Open
J52
FUNCTION
Line fault monitored by local device or OUT+ terminal
Line fault can be monitored by the local device on the OUT+ terminal
(LFAVDD must be short and LFR+, LFR-, LFL- must be open)
Line fault monitored by remote device or OUT- terminal
Line fault can be monitored by the local device on the OUT- terminal
(LFAVDD must be short and LFR+, LFR-, LFL+ must be open)
Line fault monitored by remote device or OUT+ terminal
Maxim Integrated │ 5
�Evaluates: MAX96705/MAX96711
with Coax or STP Cable
MAX96705/MAX96711
Evaluation Kit
Table 1. Jumper Description* (continued)
JUMPER
SIGNAL
J60
LFAVDD
SHUNT
POSITION
Short**
Open
+3.3V**
JU2
IOVDD
JU3
DVDD
JU4
AVDD
EXT
FUNCTION
Line-fault circuit powered, connected to AVDD
Line fault is powered, nonfunctional
U1 IOVDD set to on-board 3.3V
U1 IOVDD supplied through EXT-IOVDD terminal (J20)
+1.8V
U1 IOVDD set to on-board 1.8V
INT**
U1 DVDD supplied from internal source
EXT
U1 DVDD supplied through EXT-DVDD terminal (J19)
INT**
U1 AVDD supplied from internal source
EXT
U1 AVDD supplied through EXT-AVDD terminal (J18)
*Jumper selections in the Serializer/Deserializer group boxes on the Configurations Settings window are for reference only and
do not affect software operation.
**Default position.
Detailed Description of Software
To start the serializer evaluation kit GUI, select Start |
All Programs | Maxim Integrated | MAXSerDesEV-N |
MAXSerDesEV-N.
Configuration Settings Window
The Configuration Settings window is the first window
that opens after successful program launch. It allows the
user to specify serializer and deserializer board setup and
mode of operation (Figure 2).
Controller Group Box
In the Controller group box, select Coax or STP from
the Link Type drop-down list, I2C or UART from the Bus
drop-down list, and whether the Serializer or Deserializer
should be connected to the USB controller. Upon
changing any of these parameters, conflicting jumper
settings will be highlighted, guiding the user to check
and make the corresponding changes to the evaluation
boards. Only the Link Type and Device Address selections on the Configuration Settings window affect EV kit
operation. Other items, including jumper selection, are for
user reference only.
Serializer and Deserializer Jumper Selection Blocks
The Serializer and Deserializer Jumper Selection blocks
list jumpers on the evaluation boards of the selected
Device ID and displays the correct shunt positions based
on the conditions selected in the Controller block.
www.maximintegrated.com
Identify Devices Button
The Identify Devices button causes the GUI to scan
the system and hunt for slave addresses on the bus.
Upon successful communication, it reads the Device ID
register from the DUTs and displays the corresponding
jumper lists on the Serializer and Deserializer Jumper
Selection blocks. It is also possible to select a device from
the Device ID drop-down list and manually change the
slave address in the Device Address edit box. It is a good
practice to utilize the Identify Devices button and
verify communication with the DUTs before attempting
to Connect.
Figure 14 shows jumper settings on the serializer PCB
for coax cable and I2C communication with a USB cable
connected to the serializer board. Refer to the respective
SerDes IC data sheets for detailed configuration information. See Table 1 for the serializer jumper descriptions.
Connect Button
The Connect button opens the Evaluation Kit window.
The GUI reads the SerDes registers and updates the
register maps for both. Successful register map updates
are indicated by green LED indicators. In case of a
communication problem, the LED indicators turn red.
Cancel - Do not Connect Button
The Cancel- Do Not Connect button opens the
Evaluation Kit main window without attempting to
connect to the microcontroller. Although there is no
communication with the microcontroller, all functions and
tabs corresponding to the selected Device IDs on the
Evaluation Kit window become active once there.
Maxim Integrated │ 6
�MAX96705/MAX96711
Evaluation Kit
Evaluates: MAX96705/MAX96711
with Coax or STP Cable
Figure 2. MAXSerDesEV-N EV Kit Software: Configuration Settings Window (shown with MAX96705 and
MAX96706 EV Kits Connected)
www.maximintegrated.com
Maxim Integrated │ 7
�MAX96705/MAX96711
Evaluation Kit
Evaluates: MAX96705/MAX96711
with Coax or STP Cable
Figure 3. MAXSerDesEV-N EV Kit Software: Warning! (Nuvoton μController is NOT Detected!)
Figure 4. MAXSerDesEV-N EV Kit Software: Warning! (Microcontroller Firmware is Not the Latest Version)
Evaluation Kit Window
The Evaluation Kit window shown in Figure 5 provides
access to all internal registers and functions of the
DUTs by means of reading and writing registers through
different tabs, thus enabling the user to evaluate various
functions of the serializer and deserializer.
The Read All button updates the SerDes register maps
by reading the DUT’s internal registers.
The Serializer group box provides pushbuttons to update
the serializer’s register map from the DUT using the
Read All MAX96705 button. The Load button reads and
www.maximintegrated.com
updates from a previously saved file and the Save button
saves the existing register values into a new file.
The Deserializer group box provides pushbuttons to
update the deserializer’s register map from the DUT using
the Read All MAX96706 button. The Load button reads
and updates from a previously saved file and the Save
button saves the existing register values into a new file.
The Wake Up button applies the register write sequence
described in the IC data sheets to wake the DUTs from
sleep mode.
The Open Configuration button returns to the
Configuration Settings window.
Maxim Integrated │ 8
�MAX96705/MAX96711
Evaluation Kit
Evaluates: MAX96705/MAX96711
with Coax or STP Cable
MAX96705 Ser Tab
The MAX96705 Ser tab (Figure 5) lists the serializer’s register bitmaps. The Read and Write buttons in each register
group box allows access to each bit or group of bits that specify a function or condition, as defined in the respective
serializer IC data sheet. The color of the small LED indicator next to the Read/Write buttons indicates the communication
status. Green indicates successful communication and red indicates failed communication.
Figure 5. MAXSerDesEV-N EV Kit Software: Evaluation Kit Window (MAX96705 Ser Tab (Serializer))
www.maximintegrated.com
Maxim Integrated │ 9
�MAX96705/MAX96711
Evaluation Kit
Evaluates: MAX96705/MAX96711
with Coax or STP Cable
MAX96706 Des Tab
The MAX92706 Des tab (Figure 6) lists the deserializer’s register bitmaps. The Read and Write buttons in each register
group box allows access to each bit or group of bits that specify a function or condition, as defined in the respective
dserializer data sheet. The color of the small LED indicator next to the Read/Write buttons indicates the communication
status. Green indicates successful communication and red indicates failed communication.
Figure 6. MAXSerDesEV-N EV Kit Software: Evaluation Kit Window (MAX96706 Des Tab (Deserializer))
www.maximintegrated.com
Maxim Integrated │ 10
�MAX96705/MAX96711
Evaluation Kit
Evaluates: MAX96705/MAX96711
with Coax or STP Cable
Additional Features Tab
The Additional Features tab (Figure 7) provides pushbuttons for specific functions that connected devices can perform.
By pressing a button, a new window pops up, launching the specific function selected. Function buttons not supported
by the selected device are grayed out.
Figure 7. MAXSerDesEV-N EV Kit Software: Evaluation Kit Window (Additional Features Tab)
www.maximintegrated.com
Maxim Integrated │ 11
�MAX96705/MAX96711
Evaluation Kit
Evaluates: MAX96705/MAX96711
with Coax or STP Cable
On the Additional Features tab, press the Serializer Crossbar Switch button to launch the Serializer Crossbar
Switch Configuration function (Figure 8). This capability allows the rerouting of data between the parallel input/output
by the serializer. Refer to the respective IC data sheet for a detailed description and operation on the embedded crossbar
switches.
Figure 8. MAXSerDesEV-N EV Kit Software: Evaluation Kit Window (Serializer Crossbar Switch Configuration Window)
www.maximintegrated.com
Maxim Integrated │ 12
�MAX96705/MAX96711
Evaluation Kit
Evaluates: MAX96705/MAX96711
with Coax or STP Cable
On the Additional Features tab, press the Deserializer Crossbar Switch button to launch the Deserializer Crossbar
Switch Configuration function for the deserializer (Figure 9). This capability enables rerouting data between the parallel input/output by the deserializer. Refer to the respective IC data sheet for a detailed description and operation on the
embedded crossbar switches.
Figure 9. MAXSerDesEV-N EV Kit Software: Evaluation Kit Window (Deserializer Crossbar Switch Configuration Window)
www.maximintegrated.com
Maxim Integrated │ 13
�MAX96705/MAX96711
Evaluation Kit
Evaluates: MAX96705/MAX96711
with Coax or STP Cable
On the Additional Features tab, press the Timing Generator button to launch this function (Figure 10), which allows the
user to utilize the programmable video timing generator to generate/retime the input sync signals. Refer to the respective
IC data sheet for a detailed description.
Figure 10. MAXSerDesEV-N EV Kit Software: Evaluation Kit Window (Timing Generator Window)
www.maximintegrated.com
Maxim Integrated │ 14
�MAX96705/MAX96711
Evaluation Kit
Evaluates: MAX96705/MAX96711
with Coax or STP Cable
On the Additional Features tab, press the Equalizer Visualization button to launch this function (Figure 11), which
allows compensating for higher cable attenuation and higher frequencies. Refer to the respective IC data sheet for a
detailed description.
Figure 11. MAXSerDesEV-N EV Kit Software: Evaluation Kit Window (Equalizer Visualization Window)
www.maximintegrated.com
Maxim Integrated │ 15
�MAX96705/MAX96711
Evaluation Kit
Evaluates: MAX96705/MAX96711
with Coax or STP Cable
On the Additional Features tab, press the Show PRBS Test button to perform a PRBS test (Figure 12). Enter test
duration (maximum 32,767s = 9.1hrs) in the Duration edit box and press Start to start the test. At test completion, the
number of bit errors are read from the PRBSERR register, and displayed in the PRBS Error Counter box.
Log\Low Level Tab
The Log\Low Level tab (Figure 13) logs all activities between the GUI and DUTs.
The Register Access group box allows reads or writes of the specified slave and register addresses. Use the Send String
to EVKIT button to communicate with non-register-based devices (such as the MAX7324). The SerDes Baud Rate dropdown list sets the communications baud rate. Note that the baud rate should be changed in small increments/decrements
(one step change is forced by the GUI).
Detailed Description of Firmware
The Nuvoton microcontroller on the daughter board runs a custom firmware that ensures reliable communication
between the PC and DUTs. The firmware records 9-bit even-parity data received from the USB interface while RTS is set,
and plays back the 9-bit data with 1.5 stop bits timing when RTS is cleared. Data received from the DUTs is immediately
relayed to the USB port.
Detailed Description of Hardware
The MAX96705/MAX96711 coax EV kit provides a proven design and layout for the MAX96705 and MAX96711 GMSL
serializers, which was designed to be reliable with ease of use, flexibility, parallel input, and FAKRA coaxial cable serialized
output. On-board level translators and easy-to-use USB-PC connections are included on the EV kit.
Figure 12. MAXSerDesEV-N EV Kit Software: Evaluation Kit Window (Show PRBS Test Window, Expanded)
www.maximintegrated.com
Maxim Integrated │ 16
�MAX96705/MAX96711
Evaluation Kit
The MAX96705/MAX96711 coax EV kit board consists of
four principal functional blocks:
Evaluates: MAX96705/MAX96711
with Coax or STP Cable
Application Circuit
3) Power-supply block
The application circuit block includes the serializer and
all other components and circuits suggested in the
respective IC data sheet, and test points and provisions
to provide access to internal functions of the serializer for
evaluation of the product.
4) Oscillator (PCLK) circuit block
Power Supplies
1) Microcontroller daughter board
2) MAX96705/MAX96711 application circuit block
Microcontroller Daughter Board
The Nuvoton-based microcontroller daughter board
provides UART and I2C interfaces that communicate
with both serializer and deserializer boards when they
are powered on and properly configured. The Nuvoton
microcontroller is programmed with the latest firmware at
the time of manufacturing.
To use the EV kit with an externally applied controller,
remove the Nuvoton microcontroller board from the EV
kit board (DB1 position) and apply the RX/SDA, TX/SCL,
VDD, and GND signals from the user microcontroller to the
corresponding signals on J6 of the serializer board. Use
one of the logic levels from the VDD_REF, J53 header, or
apply externally.
On-board LDO regulators U2, U3, and U12 generate
various voltage levels required to operate the EV kit board.
There are four options to power the board:
1) USB port (default)
2) 12V AC adapter
3) 5V power supply applied power over coax cable
4) Power jumper (JU1 selects from the four power
sources)
To operate the EV kits with voltage levels different from
what are generated by on-board regulators, move desired
IOVDD (JU2), DVDD (JU3), and AVDD (JU4) shunt from
INT to EXT positions and apply the external voltage to the
corresponding wire-loop terminal.
Figure 13. MAXSerDesEV-N EV Kit Software: Evaluation Kit Window (Log\Low Level Tab)
www.maximintegrated.com
Maxim Integrated │ 17
�MAX96705/MAX96711
Evaluation Kit
Oscillator (PCLK) Circuit Block
An on-board custom oscillator (U4) to supply PCLK is
provided to facilitate the serializer/deserializer evaluation. This is an I2C-programmable oscillator with four
custom preprogrammed and jumper-selectable
frequencies. FSEL0 and FSEL1 jumpers positions select
one of the preprogrammed frequencies per list below:
FSEL1 FSEL0
PCLK (MHz)
L
L
25.0
L
H
37.0
H
L
78.0
H
H
104.0
Evaluates: MAX96705/MAX96711
with Coax or STP Cable
Place jumper IDT_EN (J26) in the “L” position to disable the oscillator output. To operate the the oscillator at a frequency other than the four preprogrammed
frequencies, refer to the oscillator data sheet available at
www.idt.com/products/clocks-timing/quartz-crystaloscillator-ics-xo-crystal-clock-oscillators-and-lowpower-oscillator-circuits/8n0q001-quad-frequencyprogrammable-xo-0, or contact the manufacturer.
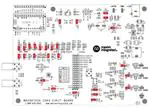
Figure 14. MAX96705/MAX96711 Coax EV Kit Jumper Settings for Coax Link and I2C Communication
www.maximintegrated.com
Maxim Integrated │ 18
�MAX96705/MAX96711
Evaluation Kit
Evaluates: MAX96705/MAX96711
with Coax or STP Cable
Figure 15. MAX96706/MAX96708 Coax EV Kit Jumper Settings for Coax Link and I2C Communication
Troubleshooting
Possible causes of board test failure:
1) Coax cable not properly connected between the
serializer OUT+ to the deserializer IN+.
2) PCLKIN not applied (e.g., FG output is disabled):
Verify signal at the pins on the board.
3) PCLKIN and function generator output are not correct: Verify signal at the pins on the board.
4) Incorrect jumper setting on the deserializer board:
Reverify.
5) Incorrect jumper setting on the serializer board:
Reverify.
www.maximintegrated.com
6) Bus selection on the GUI is not consistent with jumpers’ position on the boards: Check and verify that
USB cable is properly connected.
7) USB port has locked: Exit application GUI, remove
USB cable from the board, reinsert and relaunch the
GUI.
8) Nuvoton μC is not communicating: Exit application
GUI, remove USB cable from the board, reinsert and
relaunch the GUI.
9) Deserializer board is faulty: Try a different board
(if available).
10) Serializer board is faulty: Try a different board
(if available).
Maxim Integrated │ 19
�Evaluates: MAX96705/MAX96711
with Coax or STP Cable
MAX96705/MAX96711
Evaluation Kit
Component Suppliers
SUPPLIER
PHONE
WEBSITE
Amphenol RF
800-627-7100
www.amphenolrf.com
Hong Kong X’tals Ltd.
852-35112388
www.hongkongcrystal.com
Integrated Device Technology (IDT)
908-766-4941
www.idt.com
Murata Americas
770-436-1300
www.murataamericas.com
ON Semiconductor
602-244-6600
www.onsemi.com
Rosenberger Hochfrequenztechnik GmbH
TDK Corp.
011-49-86 84-18-0
847-803-6100
www.rosenberger.de
www.component.tdk.com
Note: Indicate that you are using the MAX96705 or MAX96711 when contacting these component suppliers.
Component List
Click on the links below for component information,
schematics, and PCB layout diagrams:
●● MAX96705/MAX96711 EV Kit BOM
●● MAX96705/MAX96711 EV Kit Schematics
●● MAX96705/MAX96711 EV Kit PCB Layout
Ordering Information
PART
TYPE
MAX96705COAXEVKIT#
EV Kit
MAX96711COAXEVKIT#
EV Kit
MAXCOAX2STP-HSD#
Adapter Kit
#Denotes RoHs compliant.
Note: The MAX96705 and MAX96711 coax EV kits are
normally ordered with a companion board:
• MAX96706 coax EV kit (MAX96706COAXEVKIT#)
• MAX96708 coax EV kit (MAX96708COAXEVKIT#)*
www.maximintegrated.com
Maxim Integrated │ 20
�MAX96705/MAX96711
Evaluation Kit
Evaluates: MAX96705/MAX96711
with Coax or STP Cable
Revision History
REVISION
NUMBER
REVISION
DATE
PAGES
CHANGED
0
12/15
Initial release
—
1
3/16
Removed future product designation from MAX96711COAXEVKIT# in Ordering
Information
20
DESCRIPTION
For pricing, delivery, and ordering information, please contact Maxim Direct at 1-888-629-4642, or visit Maxim Integrated’s website at www.maximintegrated.com.
Maxim Integrated cannot assume responsibility for use of any circuitry other than circuitry entirely embodied in a Maxim Integrated product. No circuit patent licenses
are implied. Maxim Integrated reserves the right to change the circuitry and specifications without notice at any time.
Maxim Integrated and the Maxim Integrated logo are trademarks of Maxim Integrated Products, Inc.
© 2016 Maxim Integrated Products, Inc. │ 21
�TITLE: Bill of Materials
DATE: 12/2015
DESIGN: max96705_711_evkit_a
NOTE: DNI = DO NOT INSTALL ; DNP = DO NOT PROCURE
REF_DES
DNI/DNP QTY
VALUE
C1
-
1
1500PF
C2
-
1
10UF
C3, C8, C18, C30, C32, C108,
C115, C127
-
8
10UF
C4, C6, C7, C9, C16, C17,
C106, C107, C116, C117
-
10
0.1UF
C5, C34, C64, C114
-
4
100UF
C10, C13, C103, C130
-
4
10UF
C11, C14, C19, C20, C53, C54,
C57, C58, C104
-
9
4.7UF
C12, C33, C62, C63
-
4
0.22UF
C15, C21, C22, C27, C28, C35,
C61
-
7
0.1UF
DESCRIPTION
MFG PART #
CAPACITOR; SMT (0603); CERAMIC CHIP;
1500PF; 50V; TOL=10%; MODEL=C SERIES;
HIGH TEMPERATURE; TG=-55 DEGC TO +150
DEGC; TC=X8R
C1608X8R1H152K080
CAPACITOR; SMT (1210); CERAMIC CHIP;
10UF; 16V; TOL=20%; MODEL=; TG=-55
C1210C106M4RAC;
DEGC TO +125 DEGC; TC=X7R
C3225X7R1C106M200AB
CAPACITOR; SMT (0603); CERAMIC CHIP;
10UF; 16V; TOL=20%; TG=-25 DEGC TO +85
DEGC; TC=JB
C1608JB1C106M080AB
CAPACITOR; SMT (0603); CERAMIC CHIP;
0.1UF; 25V; TOL=10%; MODEL=C SERIES;
TG=-55 DEGC TO +125 DEGC; TC=X7R
C1608X7R1E104K080AA
CAPACITOR; SMT (1210); CERAMIC CHIP;
100UF; 10V; TOL=20%; MODEL=CL SERIES;
TG=-55 DEGC TO +85 DEGC; TC=X5R
CL32A107MPVNNN
CAPACITOR; SMT (1206); CERAMIC CHIP;
10UF; 10V; TOL=20%; MODEL=C SERIES; TG=55 DEGC TO +85 DEGC; TC=X5R
C3216X5R1A106M160
CAPACITOR; SMT (0603); CERAMIC; 4.7UF; C1608X5R0J475M080AB;
6.3V; TOL=20%; MODEL=C SERIES; TG=-55 GRM188R60J475ME19;
DEGC TO +85 DEGC; TC=X5R
JMK107BJ475MA-T
CAPACITOR; SMT (0603); CERAMIC CHIP;
0.22UF; 50V; TOL=10%; MODEL=C SERIES;
TG=-55 DEGC TO +125 DEGC; TC=X7R
C1608X7R1H224K080
C0402X7R160-104KNE;
CL05B104KO5NNNC;
GRM155R71C104KA88;
C1005X7R1C104K;
CAPACITOR; SMT (0402); CERAMIC CHIP;
0.1UF; 16V; TOL=10%; TG=-55 DEGC TO
CC0402KRX7R7BB104;
+125 DEGC; TC=X7R;
EMK105B7104KV
1
MANUFACTURER
TDK
KEMET/TDK
TDK
TDK
SAMSUNG ELECTRONICS
TDK
TDK/MURATA/TAIYO YUDEN
TDK
VENKEL LTD./SAMSUNG
ELECTRONICS/MURATA/TDK/YAGEO
PHICOMP/TAIYO YUDEN
�REF_DES
DNI/DNP QTY
VALUE
C23-C26, C36, C60, C97
-
7
1000PF
C29, C85, C96, C99, C100
-
5
0.1UF
C31
-
1
470UF
C118
-
1
100UF
C129
-
1
2200PF
D4, D5
-
2
B360B-13-F
D8
L4, L5, FB1, FB3, FB5, FB6,
FB8, FB14
-
1
SML-210VTT86
-
8
120
TP1, GND1-GND4, TP_12V
-
6
N/A
H1-1-H1-3
-
3
PBC16SAAN
H2
-
1
PPPC141LFBN-RC
H3
-
1
PPTC031LFBN-RC
H4
-
1
PPPC021LFBN-RC
DESCRIPTION
MFG PART #
CAPACITOR; SMT (0402); CERAMIC CHIP;
1000PF; 50V; TOL=10%; MODEL=C SERIES;
TG=-55 DEGC TO +125 DEGC; TC=X7R
CAPACITOR; SMT (0402); CERAMIC; 0.1UF;
16V; TOL=10%; MODEL=GRM SERIES; TG=55 DEGC to +85 DEGC; TC=X5R
CAPACITOR; SMT (CASE_F); ALUMINUMELECTROLYTIC; 470UF; 16V; TOL=20%;
MODEL=CR SERIES; TG=-55 DEGC TO +105
DEGC
CAPACITOR; SMT (7343); TANTALUM CHIP;
100UF; 16V; TOL=20%; MODEL=TQC SERIES
CAPACITOR; SMT (0402); CERAMIC CHIP;
2200PF; 50V; TOL=10%; MODEL=C SERIES;
TG=-55 DEGC TO +125 DEGC; TC=X7R
DIODE; SCH; SCHOTTKY BARRIER DIODE;
SMB; PIV=60V; Io=3A; -55 DEGC TO +125
DEGC
DIODE; LED; SML-21 SERIES; RED; SMT
(0805); PIV=2V; IF=0.02A
INDUCTOR; SMT (0603); FERRITE-BEAD; 120;
TOL=+/-25%; 3A
TEST POINT; PIN DIA=0.1IN; TOTAL
LENGTH=0.3IN; BOARD HOLE=0.04IN; RED;
PHOSPHOR BRONZE WIRE SILVER PLATE
FINISH;
CONNECTOR; MALE; THROUGH HOLE;
BREAKAWAY; STRAIGHT; 16PINS; -65 DEGC
TO +125 DEGC
CONNECTOR; FEMALE; THROUGH HOLE; LFB
SERIES; 2.54MM CONTACT CENTER;
STRAIGHT; 14PINS
CONNECTOR; FEMALE; THROUGH HOLE;
HEADER; STRAIGHT THROUGH; 3PINS; -40
DEGC TO +105 DEGC
CONNECTOR; FEMALE; THROUGH HOLE; LFB
SERIES; 2.54MM CONTACT CENTER;
STRAIGHT; 2PINS
2
MANUFACTURER
C1005X7R1H102K050BA
TDK
GRM155R61C104KA88
MURATA
PCR1C471MCL6
NICHICON
16TQC100MYF
PANASONIC
C1005X7R1H222K050BA
TDK
B360B-13-F
DIODES INCORPORATED
SML-210VTT86
ROHM
BLM18SG121TN1
MURATA
5000
KEYSTONE
PBC16SAAN
SULLINS ELECTRONICS CORP.
PPPC141LFBN-RC
SULLINS ELECTRONICS CORP
PPTC031LFBN-RC
SULLINS
PPPC021LFBN-RC
SULLINS ELECTRONICS CORP
�REF_DES
DNI/DNP QTY
VALUE
J1
-
1
PJ-202BH
J2, J3, J18-J20, J34
-
6
MAXIMPAD
J4, J5
-
2
59S2AX-400A5-Z
J6
-
1
PEC04SAAN
J7
-
1
PBC14SAAN
J11, J13, J21, J22, J25, J30,
J32, J35, J44-J46, J54, J55
-
13
PCC02SAAN
J23, J26-J29, J33, J39-J43, J47,
J48, J53
-
14
PCC03SAAN
J38, J50-J52, JU2
-
5
PEC04SAAN
J56-J60
-
5
PEC02SAAN
JU1
-
1
PBC05SAAN
JU3, JU4
-
2
PEC03SAAN
L1, L8
-
2
330NH
L2, L7
-
2
6.8UH
L3, L6
-
2
100UH
L25
-
1
1.5UH
MECH1-MECH4
-
4
1902B
DESCRIPTION
MFG PART #
CONNECTOR; MALE; THROUGH HOLE; PJ202BH; DC POWER JACK; RIGHT ANGLE;
RIGHT ANGLE; 3PINS
EVK KIT PARTS; MAXIM PAD; WIRE;
NATURAL; SOLID; WEICO WIRE; SOFT
DRAWN BUS TYPE-S; 20AWG
CONNECTOR; MALE; THROUGH HOLE;
RIGHT ANGLE PLUG FOR PCB; RIGHT ANGLE;
5PINS
CONNECTOR; MALE; THROUGH HOLE;
BREAKAWAY; STRAIGHT; 4PINS
CONNECTOR; MALE; THROUGH HOLE;
BREAKAWAY; STRAIGHT; 14PINS; -65 DEGC
TO +125 DEGC
CONNECTOR; MALE; THROUGH HOLE;
BREAKAWAY; STRAIGHT THROUGH; 2PINS; 65 DEGC TO +125 DEGC
CONNECTOR; MALE; THROUGH HOLE;
BREAKAWAY; STRAIGHT THROUGH; 3PINS; 65 DEGC TO +125 DEGC
CONNECTOR; MALE; THROUGH HOLE;
BREAKAWAY; STRAIGHT; 4PINS
CONNECTOR; MALE; THROUGH HOLE;
BREAKAWAY; STRAIGHT; 2PINS
CONNECTOR; MALE; THROUGH HOLE;
BREAKAWAY; STRAIGHT; 5PINS; -65 DEGC
TO +125 DEGC
CONNECTOR; MALE; THROUGH HOLE;
BREAKAWAY; STRAIGHT; 3PINS
INDUCTOR; SMT (0603); FERRITE CORE;
330NH; TOL=+/-5%; 0.63A
INDUCTOR; SMT (1210); WIREWOUND CHIP;
6.8UH; TOL=20%; 0.62A
INDUCTOR; SMT (2424); WIREWOUND CHIP;
100UH; TOL=20%; 0.92A
INDUCTOR; SMT; FERRITE-BEAD; 1.5UH;
TOL=+/-20%; 27A
STANDOFF; FEMALE-THREADED; HEX; 440IN; 3/8IN; NYLON
3
MANUFACTURER
PJ-202BH
CUI INC.
9020 BUSS
WEICO WIRE
59S2AX-400A5-Z
ROSENBERGER
PEC04SAAN
SULLINS ELECTRONICS CORP.
PBC14SAAN
SULLINS ELECTRONICS CORP.
PCC02SAAN
SULLINS
PCC03SAAN
SULLINS
PEC04SAAN
SULLINS ELECTRONICS CORP.
PEC02SAAN
SULLINS
PBC05SAAN
SULLINS ELECTRONICS CORP.
PEC03SAAN
SULLINS
LQW18CNR33J00
MURATA
LBC3225T6R8MR
TAIYO YUDEN
LQH6PPN101M43L
MURATA
7443330150
WURTH ELECTRONICS INC.
1902B
GENERIC PART
�REF_DES
DNI/DNP QTY
VALUE
DESCRIPTION
EVKIT PART-NUVOTON MICRO CONTROLLER
TRAN; N-CHANNEL POWER TRENCH
MOSFET; NCH; NSOIC8 ; PD-(2.5W); I-(7.6A);
V-(40V)
CONNECTOR; FEMALE; THROUGH HOLE;
CONN SOCKET SMA STR DIE CAST PCB;
STRAIGHT; 5PINS
RESISTOR; 1206; 0.015 OHM; 5%; 200PPM;
1W; THICK FILM
RESISTOR, 0402, 14.3K OHM, 1%, 100PPM,
0.0625W, THICK FILM
RESISTOR; 0603; 24.9K OHM; 1%; 100PPM;
0.10W; THICK FILM
RESISTOR; 0603; 41.2K OHM; 1%; 100PPM;
0.10W; METAL FILM
RESISTOR; 0603; 11K OHM; 1%; 100PPM;
0.10W; THICK FILM
RESISTOR, 0603, 2.2K OHM, 1%, 100PPM,
0.10W, THICK FILM
RESISTOR; 0402; 0 OHM; 0%; JUMPER;
0.063W; THICK FILM
RESISTOR; 0603; 45.3KOHM; 1%; 100PPM;
0.10W; THICK FILM
RESISTOR; 0201; 4.99K OHM; 1%; 100PPM;
0.05W ; THICK FILM
RESISTOR; 0201; 49.9K OHM; 1%; 100PPM;
0.05W ; THICK FILM
RESISTOR; 0603; 1K; 1%; 100PPM; 0.10W;
THICK FILM
RESISTOR, 0603, 2 OHM, 1%, 100PPM,
0.10W, THICK FILM
RESISTOR, 0603, 2K OHM, 1%, 100PPM,
0.10W, THICK FILM
RESISTOR; 0201; 2K OHM; 1%; 200PPM;
0.05W; THICK FILM
RESISTOR; 0603; 30K OHM; 1%; 100PPM;
0.10W; THICK FILM
MISC2
-
1
MAXEVCNTR-NUV#
N1, N2
-
2
FDS8449
PCLK_SMA
-
1
5-1814832-1
R1
-
1
0.015
R2
-
1
14.3K
R3, R5, R38
-
3
24.9K
R4
-
1
41.2K
R6, R58
R7, R9, R11, R13-R15, R28,
R29, R34
-
2
11K
-
9
2.2K
R12, R27, R37, R39
-
4
0
R16, R19
-
2
45.3K
R17, R20
-
2
4.99K
R18, R21
-
2
49.9K
R22, R36
-
2
1K
R23
-
1
2
R24, R25, R30, R31
-
4
2K
R26, R32
-
2
2K
R33
-
1
30K
MFG PART #
4
MANUFACTURER
MAXEVCNTR-NUV#
MAXIM
FDS8449
FAIRCHILD SEMICONDUCTOR
5-1814832-1
TYCO
ERJ-8BWJR015V
PANASONIC
CRCW040214K3FK
VISHAY DALE
CRCW060324K9FK
VISHAY DALE
CRCW060341K2FK
VISHAY DALE
CR0603-FX-1102ELF
BOURNS
CRCW06032K20FK
VISHAY DALE
CRCW04020000ZS
VISHAY DALE
CRCW060345K3FK; ERJ-3EKF4532V
VISHAY DALE/PANASONIC
CRCW02014K99FK
VISHAY DALE
CRCW020149K9FK
VISHAY DALE
CRCW06031001FK; ERJ-3EKF1001V
VISHAY DALE; PANASONIC
CRCW06032R00FN
VISHAY DALE
CRCW06032K0FK; ERJ-3EKF2001V
VISHAY DALE/PANASONIC
ERJ-1GEF2001C
PANASONIC
CRCW060330K0FK
VISHAY DALE
�REF_DES
DNI/DNP QTY
VALUE
R74
-
1
30K
R75, R76
-
2
0
R100
-
1
1K
SCREW1-SCREW4
-
4
P440.375
SU1-SU25
-
25
STC02SYAN
U1
-
1
MAX96705GTJ
U2,U3,U12
-
3
MAX1792EUA33
U4
-
1
IDT8N0Q001
U15
-
1
MAX3378EEUD+
U23
-
1
MAX16952AUE/V+
MISC1
DNI
1
AK67421-1-R
C37, C59, C128
DNP
3
OPEN
DB1
DNP
1
TEENSY 3.1
DESCRIPTION
MFG PART #
RESISTOR; 0402; 30K OHM; 1%; 100PPM;
0.063W; THICK FILM
RESISTOR; 0603; 0 OHM; 5%; JUMPER;
0.10W; THICK FILM
RESISTOR; 0603; 1K OHM; 1%; 100PPM;
0.10W; THICK FILM
MACHINE SCREW; SLOTTED; PAN; 4-40IN;
3/8IN; NYLON
TEST POINT; JUMPER; STR; TOTAL
LENGTH=0.256IN; BLACK; INSULATION=PBT
CONTACT=PHOSPHOR BRONZE; COPPER
PLATED TIN OVERALL
IC; HS81 PRELIMINARY; PACKAGE OUTLINE
32 TQFN; 0.50MM PITCH; 21-0140/T3255-8;
MAX96705
IC; VREG; LOW-DROPOUT LINEAR
REGULATOR; UMAX8
EVKIT PART; IC; IDT8N0Q001; CD10
PACKAGE OUTLINE 7X5 BODY; 2.54MM
PITCH; CUSTOM PART ONLY
IC; TRANS; +/-15KV ESD-PROTECTED, 1UA,
16MBPS, QUAD LOW-VOLTAGE LEVEL
TRANSLATOR; TSSOP14
IC; CTRL; STEP-DOWN CONTROLLER WITH
LOW OPERATING CURRENT; TSSOP16-EP
CONNECTOR; MALE; USB; USB2.0 MICRO
CONNECTION CABLE; USB B MICRO MALE
TO USB A MALE; STRAIGHT; 5PINS-4PINS
PACKAGE OUTLINE 0603 NON-POLAR
CAPACITOR
EVKIT PART; MODULE; CTRL; TEENSY USB
DEVELOPMENT BOARD; TH-37; CUSTOM
PART ONLY
TOTAL 234
5
MANUFACTURER
RC0402FR-0730KL
RC1608J000CS; CR0603-J/000ELF;RC0603JR-070RL
YAGEO PHICOMP
SAMSUNG
ELECTRONICS/BOURNS/YAGEO PH
CR0603-FX-1001ELF
BOURNS
P440.375
GENERIC PART
STC02SYAN
SULLINS ELECTRONICS CORP.
MAX96705GTJ
MAXIM
MAX1792EUA33
MAXIM
IDT8N0Q001
IDT
MAX3378EEUD+
MAXIM
MAX16952AUE/V+
MAXIM
AK67421-1-R
ASSMANN
N/A
N/A
TEENSY 3.1
PJRC
�8
7
J1
PJ-202BH
6
4
3
1
2
TP_12V
+12V
D5
B360B-13-F
5
A
C
+
1
3
C118
100UF
2
C116
C115
0.1UF
10UF
+12V
D
C130
1
5
6
7
8
D
R74
30K
C129
2200PF
C128
OPEN
IN
15 DH
10 PGOOD
FB 7
FSYNC 4
R76
FOSC 3
R2
BST 16
6 COMP
9 OUT
U23
MAX16952AUE/V+
0
14.3K
LX 14
CS 8
N1
FDS8449
+5V0
SGND
0.1UF
C117
A
D4
B360B-13-F
L25
R1
1.5UH
0.015
C
POC5V
REG+5V
1
2
4 +5VIN
J2
+5VIN
C2
C114
10UF
100UF
USB+5V
JU1
USB+5V
C3
C4
C5
C6
10UF
0.1UF
100UF
0.1UF
J3
D
5
11
17
EP PGND
IN
DH
G S
1
2
3
13 BIAS
12 DL
4
5
DH
IN
EN 2
5
6
7
8
DL
D
SUP
3
C127
10UF
10UF
DL
IN
4
0
1
2
3
N2
FDS8449
C
GND
R75
G S
C
C1
1500PF
C106
C108
C107
0.1UF
10UF
0.1UF
K
OUT 7
2 IN
OUT 8
4 SHDN
1K
A
1 IN
6 SET
+1V8IO
R58
D8
SML-210VTT86
LED_PWR
+1V8IO
RST 3
C103
C104
10UF
4.7UF
IOVDD
1.8V
EXT
1
FB5
120
3
J20
EXT-IOVDD
11K
JU2
R38
B
4
R100
U12
MAX1792EUA33
FB14
120
IOVDD
24.9K
2
+5V0
5 GND
9 EP
+5V0
3.3V
C20
C19
4.7UF
4.7UF
B
J34
GND
FB1
120
C7
C8
C9
0.1UF
10UF
0.1UF
1 IN
OUT 7
2 IN
OUT 8
4 SHDN
6 SET
+3V3
R4
RST 3
+3V3
GND1
GND2
GND3
GND4
X2
X3
X4
DVDD
C10
C11
10UF
4.7UF
2
U2
MAX1792EUA33
5 GND
9 EP
+5V0
1
FB8
120
3
J19
EXT-DVDD
41.2K
JU3
DVDD
R3
24.9K
C58
C57
4.7UF
4.7UF
AVDD
X1
A
FB3
120
C16
C18
C17
0.1UF
10UF
0.1UF
1 IN
OUT 7
2 IN
OUT 8
4 SHDN
6 SET
+1V8VDD
R6
RST 3
2
U3
+1V8VDD
MAX1792EUA33
5 GND
9 EP
+5V0
1
FB6
120
3
A
J18
EXT-AVDD
JU4
C13
C14
10UF
4.7UF
AVDD
C54
C53
4.7UF
4.7UF
PROJECT TITLE:
MAX96705_711_EVKIT_A
DRAWING TITLE:
11K
R5
SIZE
24.9K
DATE:
HARDWARE NUMBER:
B
ENGINEER:
DRAWN BY:
REV:
A
TEMPLATE REV:
SHEET 2 OF 5
1.5
8
7
6
5
4
3
2
1
�8
7
6
5
4
+3V3
3
1
2
+5V0
J53
VDD_REF
D
IOVDD
1
3
3.3V
D
2
5V
R7
R9
2.2K
2.2K
VDD_REF
2
2
IOVDD
J22
J60
0.1UF
14
VL VCC
C
R11
R13
2.2K
2.2K
J6
8 3-STATE
LSH_SCL
TX/SCL/DBL
J11
3
I/O VCC3 11
I/O VCC2 12
I/O VCC4 10
VHC4
IN
UC_RX/SDA
IN
UC_TX/SCL
IN
POC+
R17
R20
4.99K
4.99K
IN
LF-
IN
C64
C61
C60
100UF
0.1UF
1000PF
R30
R21
49.9K
49.9K
B
R31
R32
2K
2K
2K
L3
L2
L1
100UH
6.8UH
330NH
R12
OUT+
1
0
2
IN
J56
J4
J57
LFR+
2
4
3
5
C62
0.22UF
R18
LFR1
R37
0
OPEN
4
LF+
C59
1
+12V
POC12V
J59
LFL-
2
3
IN
1
J51
C
POC5VOUT
2
POC5VIN
LMN1
LFL+
J13
2
POC5V
B
45.3K
J58
LF+
+5V0
IN
2
VLC4
4
DBL-L
4 I/O VL3
5 I/O VL4
LMN0
VHC3
VLC3
U15_TX/SCL
I/O VCC1 13
7 GND
TX/SCL/DBL I69
DBL-H
1
1
2
J50
2 I/O VL1
3 I/O VL2
R19
45.3K
1
IOVDD
2
2
6 NC
9 NC
1
1
OUT
1
LSH_SDA
RX/SDA
VDD_REF
EXT_RX/SDA
GND
EXT_TX/SCL
1
2
3
4
R16
2
1
U15
MAX3378EEUD+
LFAVDD
J55
EXSCLPU
2
0.1UF
J54
EXSDAPU
1
C100
1
C99
1
1
SDAPU
1
SCLPU
1
J21
2
2
2
AVDD
+5V0
POC5VOUT
IN
2
POC5VIN
J52
POC-
3
1
R39
+12V
C33
0.22UF
C34
C35
C36
100UF
0.1UF
1000PF
IN
0
OPEN
4
POC12V
A
LF-
C37
R24
R25
R26
R27
2K
2K
2K
0
L6
L7
L8
100UH
6.8UH
330NH
OUT-
1
A
J5
2
4
3
5
POC5V
PROJECT TITLE:
MAX96705_711_EVKIT_A
DRAWING TITLE:
SIZE
DATE:
HARDWARE NUMBER:
B
ENGINEER:
DRAWN BY:
REV:
A
TEMPLATE REV:
SHEET 3 OF 5
1.5
8
7
6
5
4
3
2
1
�8
7
6
5
4
3
1
2
DVDD
AVDD
C15
C23
0.1UF
1000PF
IOVDD_DUT
J46
D
B
IN
DIN5
1
1
L
I102
H1-2
H1-1
1
1
1
2
2
2
3
3
3
4
4
4
5
5
5
6
6
6
7
7
7
8
8
8
9
9
9
10
10
10
11
11
11
12
12
12
13
13
13
14
14
14
15
15
15
16
16
16
IN
DIN6
IN
DIN7
IN
DIN8
IN
DIN9
IN
DIN10/GPIO2
IN
IN
DIN11/GPIO3
DIN12/GPIO4/LMN0
IN
DIN13/GPIO5/LMN1
IN
DIN14/HS
IN
DIN15/VS
IOVDD
IOVDD
R34
2.2K
IOVDD
PCLKIN
16
PWDN
15
MS/HVEN
26
27
28
30
31
32
1
2
3
4
6
7
8
9
10
11
DIN0
13
14
GPO/HIM
17
18
19
LCCEN
24
23
TX/SCL/DBL
C26
C27
1000PF
0.1UF
2
D
IOVDD_DUT
U1
MAX96705GTJ
C
DIN1
DIN2
DIN3
DIN4
DIN5
DIN6
DIN7
DIN8
OUT+
21
C63
0.22UF
OUT-
20
C12
0.22UF
DIN9
I109
OUT+
I110
OUT-
DIN10/GPIO2
DIN11/GPIO3
DIN12/GPIO4
DIN13/GPIO5/DE
B
DIN14/HS
DIN15/VS
GPIO1/BWS
CONF0
CONF1
1
GPIO2
1
I158
H
DIN10/GPIO2
BWS
2.2K
I152
DIN12/GPIO4/LMN0
2
1
2.2K
R28
2.2K
1
3
H
LMN0
I151
J42
2
LMN0
3
2
2.2K
3
H
LMN1
EP
A
H
J43
2
CONF1
PROJECT TITLE:
GPIO4/LMNO
1
H
CONF0
J33
R29
IOVDD
IOVDD
33
DIN11/GPIO3
L
1
I159
L
3
3
1
RX/SDA
J41
LCCN
GPIO3
2
TX/SCL/DBL
RX/SDA
2
2
J32
R15
H
J40
I157
DIN13/GPIO5/LMN1
I156
LMN1
IOVDD
L
3
2
1
J30
R14
A
25
12
DIN4
L
2
IOVDD
IN
2
29
DIN3
1000PF
H
5
22
IN
C25
0.1UF
AVDD
DIN2
C22
AVDD
IN
J48
PWDN
3
DIN1
1000PF
PCLKIN
IOVDD
H1-3
IN
0.1UF
IOVDD
MS/HVEN
H
DIN0
C24
IOVDD
3
IN
C21
DVDD
1
J47
C
IOVDD
MAX96705_711_EVKIT_A
L
DRAWING TITLE:
J44
2
J45
1
R33
1
SIZE
2
30K
ENGINEER:
GPO_LOW
HIM_HI
J23
DRAWN BY:
REV:
A
TEMPLATE REV:
GPIO5/LMN1
8
DATE:
HARDWARE NUMBER:
B
SHEET 4 OF 5
1.5
7
6
5
4
3
2
1
�8
6
R23
2
+
C30
C29
C28
0.1UF
10UF
0.1UF
L
C31
470UF
L5
120
D
C32
10UF
2
VDD
OE
1
7
DNU
DNU
R36
1K
4
FSEL0
R22
1K
5
FSEL1
1
GND
USB+5V
34
35
8
37
2
L
2
3
L
1
2
+3V3
J26
IDT_OE
H
2
3
3
2
3
36
J27
FSEL0
H
1
J28
4
IDTVDD
IDTVDD
FSEL1
H
5
1
D
IDTVDD
1
1
IDTVDD
7
VIN
33
TNZ_RX1
I22
2
0-RX1
AGND
32
TNZ_TX1
I23
3
1-TX1
3.3V
31
4
2
23-A9
30
5
3
22-A8
29
6
4
21-A7
28
7
5-TX1
20-A6
27
19-A5
26
18-A4
25
L4
120
C96
C97
0.1UF
1000PF
C85
0.1UF
U4
IDT8N0Q001
6
Q
I52
PCLK_IDT
J35
C
U4_SDA
2
1
I11
2
1
9
10
SDATA
SCLK
GND
TNZ_SCL0
I10
3
TNZ_SDA0
C
J25
U4_SCL
DB1
TEENSY 3.1
PCLK_SMA
PCLK_SMA
5 4 3 2
J38
5
4
3
2
1
PCLK_IN
3
B
I15
GND
6
9
7-RX3
I92
TNZ_SCL0
I93
TNZ_SDA0
4
10
8-TX3
17-A3
24
11
9-RX2
16-A2
23
12
10-TX2
15-A1
22
13
11
14-A0
21
14
12
13
20
14
13
12
11
10
9
8
7
6
5
4
3
2
1
IDT
I42
15
A14/DAC
I25
VIN
GND
+3.3V
TNZ_A9
TNZ_A8
TNZ_A7
TNZ_A6
TNZ_SCL0
TNZ_SDA0
TNZ_A3
TNZ_A2
TNZ_A1
TNZ_A0
13
A
19
VBAT
3
TNZ_RX1
A
PROGRAM
TP1
TX
18
J39
UC_TX/SCL
2
I29 UC_TX/SCL
17
SCL
GND
I24
1
TNZ_SCL0
B
J7
PCLKIN
3.3V
PCLK_IDT
SMA
2
1
DNI
8
16
I45
1
1
TNZ_SDA0 I26
SDA
J29
UC_RX/SDA
2
I28 UC_RX/SDA
PROJECT TITLE:
MAX96705_711_EVKIT_A
RX
3
DRAWING TITLE:
SIZE
TNZ_TX1I27
DATE:
HARDWARE NUMBER:
B
ENGINEER:
DRAWN BY:
REV:
A
TEMPLATE REV:
SHEET 5 OF 5
1.5
8
7
6
5
4
3
2
1
�This document contains information considered proprietary,
and shall not be reproduced wholly or in part,
nor disclosed to others without specific written permission.
HARDWARE NAME:MAX96705_711_EVKIT_A
HARDWARE NUMBER:
ENGINEER:
DESIGNER:
DATE: 07/29/2015
ODB++/GERBER:
SILK_TOP
+5VIN
J21
SCLPU
VBAT
H4
GND3
VDD_REF
J54
EXSDAPU
+
C5
+5V
J55
EXSCLPU
L5
C3
C6
D5
+5VIN
R23
12
11
10-TX2
9-RX2
8-TX3
7-RX3
6
5-TX1
4
3
2
1-TX1
-
J1
C4
C31
0-RX1
J3
+3.3V
C32
GND
+12V
GND
J2
R9
J22
SDAPU
USB
GND
3.3V
DB1
J53
VDD_REF
C118
C129
JU1
POWER
R76
R74
CT_SCL
R7
PROGRAM
GND
VHC4
EXT_RX_SDA
VLC4
EXT_TX/SCL
VHC3
A14-DAC
TEENSY 3.1
J6
VLC3
CT_SDA
13
U15
H2
H3
EXT_UC
J13
USB+5V
J11
14-A0
15-A1
16-A2
17-A3
18-SDA
19-SCL
20-A6
21-A7
22-A8
23-A9
3.3V
VIN
AGND
J7
C115
C116
REG+5V
TP1
R2
C128
POC5V
U23
TP_12V
C130
C127 C117
J45
J46
H
J30
GPIO3 R15
J32
R28
DIN15/VS,DIN13/VS
DIN14/HS,DIN/HS
CONF1/0
DIN9
I
U
I
U
I
U
I
U
MAX96705
L
J28
FSEL1
SMA
GND
IDT
H
J38
PCLK_IN
H
L
J26
MAX96705_711
1-888-629-4642
COAX
EVKIT
BOARD
H
www.maximintegrated.com
1/6
L
C19
C20
GND1
FB8
J19
EXT-DVDD
INT
EXT
C53
JU4
AVDD
U2
R5
R6
C57
C58
C106
FB14
FB1
J27
FSEL0
DBL-H
EXT
C54
C11
C10
R22
R36
DIN1
DIN0
U15_TX/SCL
MAX96711
R3
R4
U4
PCLK_IDT
DIN3
H1-3
H1-2
H1-1
J50
TX/SCL/DBL
C107
C108
DIN4
INT
C7
DIN5
DIN2
DBL-L
FB5 EXT-IOVDD
JU3
DVDD
U12
C9
C8
C30
C29
C28
DIN6
C104
C103
DIN7
12V
J51
JU2
IOVDD
+1.8V
R38
R58
PCLK_SMA
J20
DIN8
C16
U1
5VIN
F
F
R
R
F
F
R
R
C17
C18
C63
C
C
C
C
T
T
T
T
C14
C13
LL
LM
LH
ML
MM
MH
HL
HM
D8
+3.3V
R100
DIN10/GPIO2
5VOUT
R1
DIN12/GPIO4,LMN0
C12
OUT+
C114
DIN13/GPIO5,LMN1
5VIN
POC+
L25
C1 R75
EXT
J52
GND2
D4
H
12V
J4
N1
J44
DIN11/GPIO3
POC-
N2
R33
L
5VOUT
J5
GND4
HIM_HI
GPIO2 R14
J33
L
GPIO4/LMN0
H
R29 GPI05/LMN1
GPIO1/BWS
H
J23
L
IOVDD_DUT
J58
LFL+
J59
LFL-
J56
L
R34
LFR+
LFRJ57
H
R16
R19
H
J40
L
MS/HVEN
LCCN
H
J47
PWDN
J48
L
GPO_LOW
H
J41
L
J60
LFAVDD
OUT-
H
U4_SDA
J35
J25
J42
L
SDA
U4_SCL
SCL
J43
L
CONF0
RX
CONF1
TX
UC_TX/SCL
J29
UC_RX/SDA
C2
J39
FB6
J18
EXT-AVDD
J34
U3
GND
FB3
IDT_OE
REV-A
7/15 JG
�This document contains information considered proprietary,
and shall not be reproduced wholly or in part,
nor disclosed to others without specific written permission.
HARDWARE NAME:MAX96705_711_EVKIT_A
HARDWARE NUMBER:
ENGINEER:
DESIGNER:
DATE: 07/29/2015
ODB++/GERBER:
2/6
TOP
�This document contains information considered proprietary,
and shall not be reproduced wholly or in part,
nor disclosed to others without specific written permission.
HARDWARE NAME:MAX96705_711_EVKIT_A
HARDWARE NUMBER:
ENGINEER:
DESIGNER:
DATE: 07/29/2015
ODB++/GERBER:
3/6
INNER_LAYER2
�This document contains information considered proprietary,
and shall not be reproduced wholly or in part,
nor disclosed to others without specific written permission.
HARDWARE NAME:MAX96705_711_EVKIT_A
HARDWARE NUMBER:
ENGINEER:
DESIGNER:
DATE: 07/29/2015
ODB++/GERBER:
4/6
INNER_LAYER3
�This document contains information considered proprietary,
and shall not be reproduced wholly or in part,
nor disclosed to others without specific written permission.
HARDWARE NAME:MAX96705_711_EVKIT_A
HARDWARE NUMBER:
ENGINEER:
DESIGNER:
DATE: 07/29/2015
ODB++/GERBER:
5/6
BOTTOM
�This document contains information considered proprietary,
and shall not be reproduced wholly or in part,
nor disclosed to others without specific written permission.
HARDWARE NAME:MAX96705_711_EVKIT_A
DATE: 07/29/2015
ODB++/GERBER:
LSH_SDA
J53
C99
R13
J54
R11
C100
J55
J1
LSH_SCL
J6
C96
C97
SILK_BOT
J3
J13
DESIGNER:
J11
ENGINEER:
J2
L4
C85
HARDWARE NUMBER:
DB1
J21
J22
GND3
JU1
TP1
J44
J32
J30
J33
J23
J46
J40
J47
J45
J48
J58
J60
J41
J42
J59
J56
J43
J29
J35
J57
J39
GND4
J25
TP_12V
R24
C37
R25
C34
L8
R26
J20
JU2
R27
J52
C22
C21
JU4
J18
C24
C25
JU3
J19
C23
C15
C36
C35
C33
C62
C60
C61
L7
R39
C26
C27
L6
R20
R21
L3
R18
R17
R31
L2
R12
J50
J51
DBL-L
J27
U15_TX/SCL
GND1
DBL-H
J28
J34
J26
R32
L1
C64
C59
R30
R37
PCLK_SMA
J38
6/6
�


 工商网监
湘ICP备2023018690号
工商网监
湘ICP备2023018690号
