MANUAL
ENGLISH VERSION
TECHNICAL
DOCUMENTATION
Thermo Protection
Cooling Case
TPCC / DM
TPCC / T / DM
www.psi-technics.com
�Company Headquarters
PSI Technics GmbH
Rudolf-Diesel-Str. 21a
D-56220 Urmitz, Germany
Phone +49 2630 91590 - 0
Fax +49 2630 91590 - 99
info@psi-technics.com
www.psi-technics.com/EN/
Copyright and Trademarks
c 2007-2016 , PSI Technics GmbH All rights reserved.
Copyright
All trademarks are the property of their respective owners.
Release Notice
This is the April 2016 release (Version 3.3) of the TPCC User Manual. It applies to the
TPCC/DM, T/DM, CLV and LMS models of PSI Technics’ Thermo Protection Cooling
Case (TPCC). The following limited warranties give you specific legal rights. You may
have others, which vary from state/jurisdiction to state/jurisdiction. Hardware Limited
Warranty: PSI Technics warrants that this TPCC hardware product (the ‘Product’) shall
be free from defects in materials and workmanship and will substantially conform to PSI
Technics’ applicable published product specifications for a period of one (1) year, starting
from the date of purchase. This limited warranty does not apply to software or firmware
products.
Warranty Remedies
PSI Technics’ sole liability and your exclusive remedy under the warranties set forth above
shall be, at PSI Technics’ option, to repair or replace any Product that fails to conform
to such warranty (‘Nonconforming Product’), or refund the purchase price paid by you for
any such Nonconforming Product, upon your return of any Nonconforming Product to PSI
Technics, together with a copy of the original proof of purchase, a full description of the
application the product is used for as well as a description of the problem. The product
must be packaged for safe transportation.
PSI Technics GmbH
Rudolf-Diesel-Str. 21a
D-56070 Urmitz, Germany
Phone +49 2630 91590 - 0
Fax +49 2630 91590 - 99
support@psi-technics.com
www.psi-technics.com/EN/
�Warranty Exclusions and Disclaimer
These warranties shall apply only in the event and to the extent that: (i) the Product is
properly and correctly installed, configured, interfaced, stored, handled, operated, serviced
and maintained in accordance with PSI Technics’ relevant user manual(s) and product
specifications, and; (ii) the Product is not modified or misused. The preceding warranties
shall not apply to, and PSI Technics shall not be responsible for: defects or performance
problems resulting from (i) the combination or utilization of the Product with products,
information, data, systems or devices not made, supplied or specified by PSI Technics;
(ii) the operation of the Product under any specification other than, or in addition to, PSI
Technics’ standard specifications for its products; (iii) the unauthorized modification or use
of the Product; (iv) the removal of the product’s serial numbers or the altering, defacing
or removal of any other markings or parts of the Product; (v) damage caused by accident,
lightning or other electrical discharge, excessive current/voltage or temperature, fresh or
salt water immersion or spray; or (vi) normal wear and tear on consumable parts (e.g.,
batteries). PSI Technics GmbH does not warrant and cannot be held liable for the results
resulting from the use of this product. The warranties above state the entire liability of PSI
Technics GmbH and your exclusive remedies relating to the performance of the product.
Except as otherwise expressly provided herein, the product and accompanying documentation and materials are provided AS-IS and without express or implied warranties of any
kind by either PSI Technics or anyone who has been involved in its creation, production,
installation or distribution, including but not limited to, the implied warranties of merchantability and fitness for a particular purpose, title and non-infringement. The stated
express warranties are in lieu of all obligations or liabilities on the part of PSI Technics
arising out of, or in connection with, any products or software. Some states and jurisdictions do not allow limitations on duration or the exclusion of an implied warranty, so the
above limitation may not apply to you.
Limitation of Liability
The entire liability of PSI Technics GmbH under any provision herein shall be limited to
the amount that was paid by you for the product. To the maximum extent permitted by applicable law, in no event shall PSI Technics GmbH or its suppliers be liable for any indirect,
special, incidental or consequential damages whatsoever, under any circumstances or legal
theory relating in any way to the use, quality or performance of products, software and
accompanying documentation and materials, (including, without limitation, damages for
loss of business profits, business interruption, loss of business information, or any other pecuniary loss, and any claims of third parties), regardless of whether PSI Technics has been
advised of any such loss and regardless of the course of dealings which develops between
you and PSI Technics. Because some states and jurisdictions do not allow the exclusion
or limitation of liability for consequential or incidental damages, the above limitation may
not apply to you. Regardless of the above, if you purchased this product in the European
Union, the aforementioned warranty provisions may not apply to you. Please contact PSI
Technics GmbH to obtain applicable warranty information.
PSI Technics GmbH
Rudolf-Diesel-Str. 21a
D-56070 Urmitz, Germany
Phone +49 2630 91590 - 0
Fax +49 2630 91590 - 99
support@psi-technics.com
www.psi-technics.com/EN/
�TPCC Professional - User Manual
Changes and Revisions
Ver.
1.09
1.10
2.00
2.01
2.02
2.03
2.04
3.00
3.10
3.20
3.21
3.22
3.3
Date
02/23/2011
05/09/2011
07/30/2012
08/28/2012
12/28/2012
05/10/2013
06/29/2013
12/11/2013
09/16/2014
11/06/2014
10/21/2015
03/03/2016
04/06/2016
04/06/2016
Table 1: Changes
Author
J. Geukes
A. Neumann
M. Speich
M. Speich
J. Geukes
J. Geukes
J. Geukes
M. Henn
G. Holzbach
G. Holzbach
G. Holzbach
G. Holzbach
G. Holzbach
and Revisions
Changes
Modification
Modification
New Version
Modification
Modification
Modification
Cable Feed Update
Combined version
Board Update
Error Monitoring Update
Modification
Modification
New Company Structure
Version 3.3
Revision
J. Geukes
J. Geukes
M. Niecking
J. Geukes
J. Geukes
J. Geukes
J. Geukes
J. Geukes
J. Geukes
J. Geukes
J. Geukes
G. Holzbach
G. Holzbach
IV
�TPCC Professional - User Manual
Preface
Welcome to PSI Technics
Thank you for choosing the PSI Technics Thermo Protection Cooling Case
(TPCC). The TPCC Professional is a thermal protection system specifically designed for protecting sensors that are used in high-temperature
environments. It was designed for use with a variety of sensors that are
used in industrial applications, such as laser distance meters and data light
barriers. The TPCC is made of state-of-the-art materials and equipped
with temperature controls. It is an extremely powerful system, based on
state-of-the-art technology with thermoelectric components.
Industrial environments are often subject to very harsh conditions, such as
dust, humidity or extreme temperatures. These conditions, however, are rarely
considered during the development of sensors and structural components.
Excessive temperatures can cause electronic components and sensors to
malfunction. Most often, these components and sensors play a critical role
in production processes and failures or malfunctions can result in extremely
costly outages.
PSI Technics addressed this problem by developing the TPCC product family. The TPCC product range comprises powerful solutions that prevent
temperature-induced sensor failures.
04/06/2016
Version 3.3
V
�TPCC Professional - User Manual
Table of Contents
Changes and Revisions . . . . . . . . . . . . . . . . . . . . . . . . . .
Preface
VI
. . . . . . . . . . . . . . . . . . . . . . . . . . . . . . . . . . VII
Contents . . . . . . . . . . . . . . . . . . . . . . . . . . . . . . . . . . VIII
1 Introduction
1.1
1
Overview . . . . . . . . . . . . . . . . . . . . . . . . . . . . . .
2 TPCC Professional
2.1
2.2
2.3
1
2
General Description . . . . . . . . . . . . . . . . . . . . . . . .
2
2.1.1
Package Contents . . . . . . . . . . . . . . . . . . . . . .
4
2.1.2
Product Specifications . . . . . . . . . . . . . . . . . . .
6
2.1.3
TPCC Front . . . . . . . . . . . . . . . . . . . . . . . .
7
2.1.4
Top View . . . . . . . . . . . . . . . . . . . . . . . . . .
11
2.1.5
Back . . . . . . . . . . . . . . . . . . . . . . . . . . . . .
12
2.1.6
TPCC Dimensions . . . . . . . . . . . . . . . . . . . . .
13
Safety . . . . . . . . . . . . . . . . . . . . . . . . . . . . . . . .
15
2.2.1
Safety Overview . . . . . . . . . . . . . . . . . . . . . .
15
2.2.2
Cabling . . . . . . . . . . . . . . . . . . . . . . . . . . .
15
2.2.3
Transport . . . . . . . . . . . . . . . . . . . . . . . . . .
15
2.2.4
TPCC Glass Pane . . . . . . . . . . . . . . . . . . . . .
16
2.2.5
Environmental Specifications . . . . . . . . . . . . . . .
16
2.2.6
Power Supply . . . . . . . . . . . . . . . . . . . . . . . .
16
2.2.7
Electromagnetic Interference (EMI) . . . . . . . . . . .
16
2.2.8
Maintenance . . . . . . . . . . . . . . . . . . . . . . . .
17
Mechanical Installation and Alignment . . . . . . . . . . . . . .
18
2.3.1
Mounting the TPCC Using Threaded Holes . . . . . . .
18
2.3.2
Mounting the TPCC Using Clearance Holes . . . . . . .
19
2.3.3
Installing the Upper Housing . . . . . . . . . . . . . . .
20
2.3.4
Aligning the TPCC for Use with Optical Sensors . . . .
20
04/06/2016
Version 3.3
VI
�TPCC Professional - User Manual
2.4
2.5
2.6
2.7
Wiring . . . . . . . . . . . . . . . . . . . . . . . . . . . . . . . .
21
2.4.1
Cables . . . . . . . . . . . . . . . . . . . . . . . . . . . .
23
2.4.2
Power Supply . . . . . . . . . . . . . . . . . . . . . . . .
23
2.4.3
Cable Connections . . . . . . . . . . . . . . . . . . . . .
23
2.4.4
Cable Feeds . . . . . . . . . . . . . . . . . . . . . . . . .
24
2.4.5
Connecting the Cables . . . . . . . . . . . . . . . . . . .
26
2.4.6
Pin Allocation . . . . . . . . . . . . . . . . . . . . . . .
27
2.4.7
Error Monitoring (optional) . . . . . . . . . . . . . . . .
28
2.4.8
Connecting the Solid-state Relay . . . . . . . . . . . . .
29
2.4.9
Installing the Solid-state Relay . . . . . . . . . . . . . .
30
Operating the TPCC . . . . . . . . . . . . . . . . . . . . . . . .
31
2.5.1
SICK DME3000/4000/5000 Distance Meters . . . . . .
32
2.5.2
SICK DS/DT500 Distance Meters . . . . . . . . . . . .
32
2.5.3
SICK DMT-DML Distance Meters . . . . . . . . . . . .
32
2.5.4
SICK DL100/DL100 Hi Distance Meters . . . . . . . . .
32
2.5.5
SICK CLV631/690 Bar Code Scanners . . . . . . . . . .
32
2.5.6
SICK LMS400 Distance Meters . . . . . . . . . . . . . .
32
2.5.7
SICK WL12G Reflex Sensor . . . . . . . . . . . . . . . .
33
2.5.8
SICK Lector 620 Professional / ICR620 Bar Code Reader 33
2.5.9
SICK DT20 Hi . . . . . . . . . . . . . . . . . . . . . . .
33
Troubleshooting . . . . . . . . . . . . . . . . . . . . . . . . . . .
34
2.6.1
Troubleshooting the TPCC . . . . . . . . . . . . . . . .
34
Cable Length . . . . . . . . . . . . . . . . . . . . . . . . . . . .
35
2
. . . . . . . . . . . . . . .
35
2
. . . . . . . . . . . . . . .
36
Recommended Connectors . . . . . . . . . . . . . . . . . . . . .
37
2.7.1
2.7.2
2.8
R
Cable Cross-Section 1.5mm
Cable Cross-Section 2.5mm
3 Reader Comment Form
40
4 Notes
42
04/06/2016
Version 3.3
VII
�TPCC Professional - User Manual
5 Support
43
5.1
General . . . . . . . . . . . . . . . . . . . . . . . . . . . . . . .
43
5.2
Service and Support . . . . . . . . . . . . . . . . . . . . . . . .
43
6 List of Figures, List of Tables and
Appendix
44
List of Figures . . . . . . . . . . . . . . . . . . . . . . . . . . . . . .
45
List of Tables . . . . . . . . . . . . . . . . . . . . . . . . . . . . . . .
47
A Appendix
48
A.1 Appendix - Mounting Instructions (Adapter Plate) . . . . . . .
04/06/2016
Version 3.3
48
VIII
�TPCC Professional - User Manual
1
1
INTRODUCTION
Introduction
This user manual describes different models of PSI Technics’ “Thermo Protection Cooling Case” with thermostatic control. Although a variety of
sensors can be used with the TPCC, this manual focuses on the use of
SICK DMT-DML, DME3000/4000/5000 DL100/100 Hi, DS/DT500, WL12G,
R
Lector
620/ICR620, CLV631/CLV609, LMS400 and DT20 Hi sensors.
1.1
Overview
This technical documentation is an important tool for installing and using PSI
Technics’ TPCC Professional System. It is designed for technically trained
staff and is aimed at facilitating the installation and use of the system.
Warning - A warning indicates situations that could lead to
potential damage. Read this information carefully to prevent
damage, errors or malfunctions.
Prior to installing and using the TPCC, PSI Technics recommends analyzing
the environmental conditions at the operating site. To support this process,
PSI Technics offers a thermal imaging spot analysis using a thermal imaging
camera as well as a long-term temperature analysis that lasts over a period of
several days.
NOTE - Inspect each shipment immediately upon receipt and report
any damages to PSI Technics.
04/06/2016
Version 3.3
1
�TPCC Professional - User Manual
2
2.1
TPCC Professional
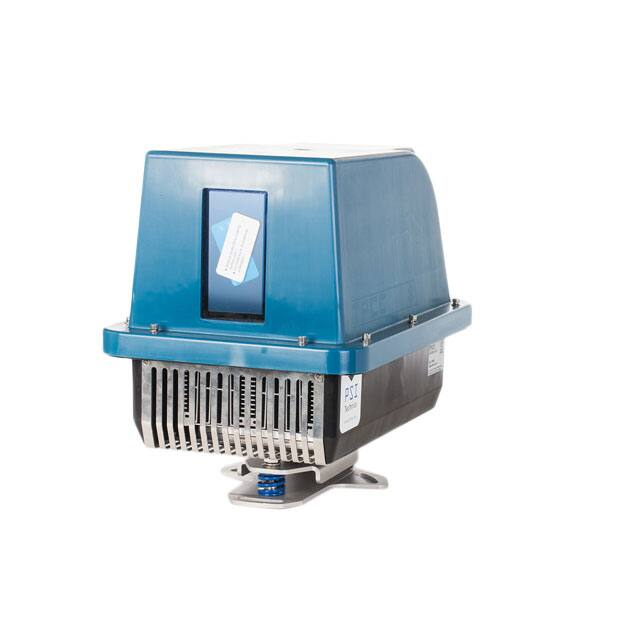
General Description
The TPCC Professional System consists of the Thermo Protection Cooling
Case. It extends the sensors’ application range to an environmental temperature of 176◦F (+80◦C).
The sensor is mounted on adapter plates that are specific to the sensor (as
shown in the Appendix, Figures 25-35) and must be installed inside the TPCC
Professional housing. The compact form of the TPCC allows for easy installation on site. When the TPCC is operated within the admissible ambient
temperature range, the sensor will be kept at a permissible operating temperature at all times.
Different models of the TPCC Professional System are available (see Table
2). The appropriate version depends on the type of sensor you are using.
The TPCC/T/DM model is used for SICK DMT/DML distance meters. The
differentiating feature of the ’T’ model is the front pane that is mounted inside
the tube and is tilted along the beam axis. This construction ensures a smooth
operation of SICK DMT/DML sensors. The bottom of the tube has a small
outlet hole that allows condensation to escape. The tube is integrated into the
upper part of the ’T’ model housing.
Table 2 below contains an overview of the TPCC models that can be used for
the different sensors described in this manual. The glass panel for the sensor
assembly is located either at the front or at the top of the corresponding TPCC
model housing.
04/06/2016
Version 3.3
2
�TPCC Professional - User Manual
Table 2: Overview of Sensors and Corresponding TPCC Models
Sensor
SICK DMT-DML
SICK DME3000 /
DME4000/DME5000
SICK DL 100/100 Hi
SICK DS/DT500
SICK WLG12
R
SICK Lector
620
Professional / ICR 620
SICK
CLV631/CLV690
SICK LMS400
SICK DT20 Hi
04/06/2016
DM
X
X
T/DM
X
CLV
LMS
X
X
X
X
X
X
X
Version 3.3
3
�TPCC Professional - User Manual
2.1.1
Package Contents
The TPCC includes the following standard components:
• Lower housing with cooling unit
• Sensor-specific upper housing
• Adapter plate for mounting the sensor
• Sensor mounting screws for adapter plate
• Solid state relay (SSR) for wear-free cooling control
• Dessicant bag
• Different types of cable feeds (4 types)
– 1 40 x 40 mm cable feed with large feed-through
– 2 20 x 20 mm cable feeds with large feed-through
– 1 20 x 20 mm cable feed with small feed-through
– 3 20 x 20 mm cable feeds without feed-through
NOTE - Please note that the mounting screws for installing the
TPCC in the customer’s facility are NOT part of the delivery, since
the mounting screws depend on the installation and may vary. However, the TPCC can generally be mounted on the clamping and alignment bracket using three M10 screws (see Figure 9 in section 2.3).
04/06/2016
Version 3.3
4
�TPCC Professional - User Manual
In addition, the following components can be ordered for a particular
sensor:
• 24VDC/20 power supply
• Circuit breaker
• TPCC cable (YSLYCY 7 x 1.5 mm2 )
• Sensor cable
• Sensor connectors
• Installation kit
(includes all required components for operating the TPCC)
– Power supply
– Fuse
– Terminal board
– Single-core cable
– Grounding bar with mount
– Shielding terminal
NOTE - If a particular item that you would like to order is not listed
in the specifications section or on the fax order form, please send an
email to info@psi-technics.com, we will provide the corresponding
order details.
04/06/2016
Version 3.3
5
�TPCC Professional - User Manual
2.1.2
Product Specifications
TPCC Specifications: The protective case for industrial use is made of
lightweight material (Polyamide-6) that provides excellent damping and insulation properties. The TPCC provides:
• Easy installation and alignment of the Y/Z axes
• 24V power supply
• Automatic deactivation at excessive temperatures (over-temperature
shutdown)
• Operating temperature range: -4◦F to 176◦F (-20◦C to +80◦C)
R
• SKINTOP
CUBE Screw-type terminal block cable feeds
• Designed for industrial applications
• Thermostatic Control
• Weight: 15.43 lbs (7 kg)
• IP protection: IPX5 when mounted horizontally
Available as an option:
• Error message in case of over-temperature shutdown, isolated switching
contact
• Error message when one or both fans are failing, isolated switching contact
04/06/2016
Version 3.3
6
�TPCC Professional - User Manual
2.1.3
TPCC Front
The main feature at the front of the TPCC/DM is the centered protective
glass panel (or the tube mounted in the TPCC/T/DM). The TPCC/CLV,
and TPCC/LMS models have a closed front and the glass panel is located at
the top of the TPCC housing. The protective glass panel is the opening the
sensor uses for data collection and for calculating distances or reading data.
The glass panel should be cleaned on a regular basis to avoid measurement
errors or error messages. In addition, the sensor’s working range must be taken
into account when mounting the TPCC.
NOTE - Inspect each shipment immediately upon receipt and report
any damages to PSI Technics.
04/06/2016
Version 3.3
7
�TPCC Professional - User Manual
Warning - During transport, the glass panel of the TPCC/DM,
TPCC/CLV and TPCC/LMS models is protected by a cover.
This cover must be removed prior to installing the TPCC Professional System. The TPCC/T/DM version does not require
a separate protective cover as the housing design provides adequate protection for the glass panel during transport. The air
supply holes shown in Figure 5 and the air vent holes shown in
Figures 1, 2 and 4 must be kept clean and free of obstructions
at all times during operation.
Warning - During operation, a laser beam is emitted through the
glass panel. To prevent potential eye injuries, never look directly at
the glass panel or through it while the device is running.
04/06/2016
Version 3.3
8
�TPCC Professional - User Manual
Figure 1: TPCC/DM Front
Figure 2: TPCC/T/DM Front
04/06/2016
Version 3.3
9
�TPCC Professional - User Manual
Figure 3: TPCC/CLV & TPCC/LMS Front
04/06/2016
Version 3.3
10
�TPCC Professional - User Manual
2.1.4
Top View
Figure 4: TPCC/CLV & TPCC/LMS Top View
04/06/2016
Version 3.3
11
�TPCC Professional - User Manual
2.1.5
Back
Figure 5: TPCC Back - All Models
R
The SKINTOP
CUBE screw-type terminal block cable feeds that supply
power to the TPCC and the enclosed sensor are located at the back of the
R
TPCC housing. The SKINTOP
CUBE cable feed system can be customized
depending on the number of required cable feeds. Unused terminal blocks must
be protected with a blind cap (see Section 2.4.4). The air vent and air supply
holes are located underneath the terminal blocks.
Warning - The air vent and air supply holes must be kept clean
and free of obstructions. Do not place any objects inside these
holes.
04/06/2016
Version 3.3
12
�TPCC Professional - User Manual
2.1.6
TPCC Dimensions
Figure 6: TPCC Back View - All Models
Figure 7: TPCC/DM and CLV Models - Side View
04/06/2016
Version 3.3
13
�TPCC Professional - User Manual
Figure 8: TPCC/T/DM with Tube - Side View
An aperture (’A’) in the TPCC/T/DM model with a diameter of 5 mm at the
bottom of the tube in front of the glass pane permits condensation to escape,
as shown in Figure 8.
Warning - Aperture (’A’) should be checked on a regular basis
and kept free of obstructions.
04/06/2016
Version 3.3
14
�TPCC Professional - User Manual
2.2
2.2.1
Safety
Safety Overview
Warning - For your own safety, please read the following warnings carefully before using the system. Always keep this manual at hand for easy reference. To prevent personal injuries and
property damage, strictly follow all instructions and procedures
described in this manual. The system is an electromechanical
device and may malfunction. To prevent potential malfunctions,
appropriate safety measures must be taken prior to installing
and operating the TPCC. This is especially important for systems that are critical for production.
Warning - The internal components are sensitive to static electricity. Never modify, disassemble or repair the system yourself.
All modifications must be performed by authorized service personnel.
Warning - The system must be correctly installed, mounted
and connected prior to initial operation.
2.2.2
Cabling
Warning - Always turn off the TPCC before connecting or removing any feeds or cables to avoid potential damage.
2.2.3
Transport
Warning - Only transport the TPCC inside the specially designed cover. Use the sturdy cardboard cover to transport the
TPCC. Proper packaging ensures that the TPCC is protected
from damage during transport.
04/06/2016
Version 3.3
15
�TPCC Professional - User Manual
2.2.4
TPCC Glass Pane
Warning - All TPCC models (except the TPCC/T/DM) have
a protective film on both sides of the glass pane. Remove the
protective films prior to operating the TPCC. The glass pane
of the TPCC/T/DM does not require a protective film as the
integrated tube provides sufficient protection.
2.2.5
Environmental Specifications
• Operating temperature: -4◦F to 176◦F (-20◦C to +80◦C)
• Operating temperature with integrated heating: -40◦F to 176◦F
(-40◦C to +80◦C)
• Storage temperature: -22◦F to 122◦F (-30◦C to +50◦C)
2.2.6
Power Supply
• Rated voltage: 24 VDC
• Operating current: 11 A maximum
2.2.7
Electromagnetic Interference (EMI)
Electric Welding
Warning - Electric welding creates an electromagnetic field.
This electromagnetic field induces a strong electromagnetic
noise. Remove all TPCC feeds and cable connections prior to
performing electric welding close to the device.
Warning - Always disconnect the power supply prior to performing any welding on the housing.
04/06/2016
Version 3.3
16
�TPCC Professional - User Manual
2.2.8
Maintenance
Depending on the operating conditions of the TPCC Professional, the TPCC’s
cooling element should be inspected and cleaned every six months. A cooling
element that is clogged with dirt can obstruct the airflow and affect the TPCC’s
cooling performance. Use canned compressed air with a small air nozzle that
can be inserted via the fan vent holes to clean the cooling element. This also
ensures that the fans are protected against over-revving that could be caused
by a compressed air blast.
Warning - Disconnect the TPCC from the power supply prior
to performing maintenance on the housing.
Warning - Ensure that the fans are working properly after the
cooling element has been cleaned.
04/06/2016
Version 3.3
17
�TPCC Professional - User Manual
2.3
2.3.1
Mechanical Installation and Alignment
Mounting the TPCC Using Threaded Holes
1. The clamping and alignment bracket is already attached to the TPCC.
To mount the TPCC with the alignment bracket, drill 3 holes into the
mounting surface (diameter (Ø) 8.5 mm) to hold the clamping and alignment bracket (shown in Figure 9).
2. Tap the three drill holes (M10).
3. Insert screws, washers and spring rings (not included) and lightly tighten
the screws, as shown in Figure 9.
4. Align the TPCC.
5. After aligning the TPCC, securely tighten the screws with a torque
wrench.
Figure 9: Mounting the TPCC
04/06/2016
Version 3.3
18
�TPCC Professional - User Manual
2.3.2
Mounting the TPCC Using Clearance Holes
1. The clamping and alignment bracket is already attached to the TPCC.
To mount the TPCC with the alignment bracket, drill 3 holes into the
mounting surface (Ø 10.5 mm) to hold the clamping and alignment
bracket (shown in Figure 9).
2. Insert and lightly tighten the screws (1), washers (4), spring rings (5)
and nuts (6), as shown in Figure 10 (2=Mounting area, 3=Clamping
and alignment bracket). Please note that the mounting components are
not included and must be ordered separately.
3. Align the TPCC.
4. After aligning the TPCC, securely tighten the screws with a torque
wrench.
Figure 10: Mounting the TPCC Using Clearance Holes
04/06/2016
Version 3.3
19
�TPCC Professional - User Manual
2.3.3
Installing the Upper Housing
After mounting the sensor inside the TPCC according to the mounting
instructions provided in Appendix A, the TPCC’s upper housing must be
mounted on the lower housing. The screws of the upper housing must first
be hand-tightend and then tightened with a torque of 1N m using a torque
wrench to ensure that the device is protected to IPX5.
Warning - The TPCC is only protected to IPX5 when mounted
horizontally. If the TPCC needs to be mounted in a different
position an appropriate mechanical protection must be used to
protect the air outlet from spray water.
2.3.4
Aligning the TPCC for Use with Optical Sensors
Mount the TPCC so that the sensor beam always hits the center of the object
or reflector, regardless of the distance from the TPCC. For additional information on aligning the sensor, please refer to the corresponding documentation
of the sensor manufacturer.
04/06/2016
Version 3.3
20
�TPCC Professional - User Manual
2.4
Wiring
General
All cables leading from the TPCC Professional system to the temperature
controls must be installed safely and securely. Only cables that are appropriate
for use with the TPCC Professional system should be connected to the device.
Warning - The existing board has been replaced with a new
version (Rev. 2). The schematics and wiring information on
the following pages refer to this new board. It will be shipped
as a default board with all TPCC models starting August 2014.
The old and new board versions are shown in the pictures below. For TPCC
models that were ordered prior to August 2014 and include an old board
version, please use the wiring schematic for the old board in the manual version
that was included in your shipment.
Figure 11: New Board
04/06/2016
Figure 12: Old Board
Version 3.3
21
�04/06/2016
+A1
Modified
electrical cabinet
0
Version 3.3
Date
-SSR1
+3
-4
Name
+2
-1
110V Power Supply
by Customer
/
Signal1_+
2
1
2
Signal2_+
g.holzbach
jg
Signal2_Output
/
Signal1_Output
21.10.2015
/
/
B16A
-TPCC_F1
Review
Orig.
-X1
24V/20A
-TPCC_V1
Edited
L0
/
Date
L1
PE
/
/
1
6
PE
Replaced by
TPCC
U
2
Replaced by
SH
4
3
2
1
-X04
SH
6
5
4
3
PE
2
1
-X03
3
4
-TPCC1_W2
LiY - CY
4x0,75
-TPCC1_W1
YSLYCY
7x1,5
-TPCC1
-X1 1
2
+24VDC
Terminal Board
6
GND
3
-X3
TPCC wiring EN + Fehlerüberwachung
Thermo Protection Cooling Case
5
GND
4
SSR1:+3
5
7
not used
P28
1
-Q1
2
max. 100mA
over temperatur
TPCC1_NC_6
TPCC1_NC_5
SSR1:-1
-X2
8
+
=
-X2 10
Page
Page
max. 100mA
11
-Q2
fan error
9
10
9
10
TPCC Professional - User Manual
Figure 13 contains a schematic representation of the TPCC Professional wiring.
Figure 13: TPCC Professional Wiring
22
�TPCC Professional - User Manual
2.4.1
Cables
2.4.2
Power Supply
Feed the power supply cable through the cable screw located at the bottom of
the back housing.
• Recommended cable: YSLYCY 7 x 1.5 mm2
Ensure that the +24 VDC feed has the right polarity to avoid damaging the
components. Cable length is limited to 82 ft (25 m).
2.4.3
Cable Connections
1. To connect the cables, remove the top of the TPCC housing.
2. Feed the cables through the screw-type cable feed connections and connect them to the terminal block. For additional information, please refer
to sections 2.4.4, 2.4.5, 2.4.6 and 2.4.8 in this manual.
04/06/2016
Version 3.3
23
�TPCC Professional - User Manual
2.4.4
Cable Feeds
Figure 14: Cable Feeds at the Back of the TPCC Housing
R
The TPCC models have a modular SKINTOP
CUBE cable feed. The
40x40mm gasket must be used for the power supply cable feed. Several gasket
inserts for the sensor cable feeds are included in the delivery. Unused feeds
must be protected with corresponding blind caps to ensure that the device is
protected to IPX5.
04/06/2016
Version 3.3
24
�TPCC Professional - User Manual
Figure 15: Cable Feeds and Frame Installation Overview
R
SKINTOP
CUBE screw-type terminal block cable feeds consist of two parts
(clip modules) that are positioned around the cable and pushed together until
the parts click into place. The cable feeds are positioned inside the corresponding frame and secured to the frame with the clamping brackets.
To remove the cables, proceed in reverse order. To remove the clip modules
from the cable, the holding clips of the clip modules must first be unlatched,
then the clip modules must be pulled apart.
04/06/2016
Version 3.3
25
�TPCC Professional - User Manual
2.4.5
Connecting the Cables
Connecting the Cables to the Terminal Board
The terminal board contains the connections for the +24VDC power supply,
the GND connector and the switch contact for the solid-state relay (X1, see
Figure 16).
It also contains the connections for the cooling elements, fans and temperature
monitoring (X2, see Figure 16), the optional error outputs, a protective circuit
that protects the sensor from transient interference such as surges or bursts,
and a separate ground connection (X3, see Figure 16).
Figure 16: Terminal Board
04/06/2016
Version 3.3
26
�TPCC Professional - User Manual
2.4.6
Pin Allocation
Figure 17 shows the terminal board pin allocation.
Figure 17: Terminal Board Pin Allocation
+24VDC, GND and PE on terminal -X1 are the power supply connections of
the TPCC Professional and must be connected according to the diagram shown
in Figure 17. Except for the optional error monitoring described in section 2.4.7
the pins on terminal -X2 are connected by PSI Technics. Terminal -X3 is used
to ground the TPCC’s aluminum profile. It is connected with the adapter plate
mounting screws and does not have to be connected separately.
Please note that the labels SSR1, SSR2, and SSR3 refer to the terminal for
the solid-state relay.
04/06/2016
Version 3.3
27
�TPCC Professional - User Manual
2.4.7
Error Monitoring (optional)
The TPCC enables integrated error monitoring for the fans and the overtemperature set point.
Potential errors can be read from an isolated switching contact on terminal
block X2. In addition, the board has two red indicator LEDs that indicate a
fault status. The different switching states are described in the table below.
Table 3: Error Monitoring Switching States
Error
Fan 2 defective
Fan 1 defective
Fans 1 and 2 defective
Over-temperature
Output 1
Switched
Switched
Switched
Locked
Output 2
Locked
Locked
Locked
Switched
LED1
ON
ON
ON
OFF
LED2
OFF
OFF
OFF
ON
• Error output 1 (terminal X2:11 - X2:10) transmits an over-temperature
error.
• Error output 2 (terminal X2:2 - X2:1) transmits a failure of one or both
fans.
If these signals should be monitored by a PLC, please use the connection
diagram in Figure 17.
04/06/2016
Version 3.3
28
�TPCC Professional - User Manual
2.4.8
Connecting the Solid-state Relay
Connect the solid-state relay (SSR) as shown in the following Figure.
The SSR LED indicates the SSR operating state. When the LED lights up the
SSR output is connected and the TPCC is operating in cooling mode. When the
LED is not illuminated the interior temperature of the TPCC is either below
the minimum threshold of 86◦F (+30◦C) or above the maximum threshold
of 122◦F (+50◦C). The minimum threshold protects the laser distance meter
from being cooled down too much; the maximum threshold protects the laser
distance meter from overheating.
Figure 18: Connecting the Solid-state Relay
04/06/2016
Version 3.3
29
�TPCC Professional - User Manual
2.4.9
Installing the Solid-state Relay
The solid-state relay should be installed in a freely accessible location within
the control cabinet. Use the mounting holes shown in Figure 19 to install the
solid-state relay inside the cabinet.
Figure 19: Installing the Solid-state Relay
04/06/2016
Version 3.3
30
�TPCC Professional - User Manual
2.5
Operating the TPCC
The system can be operated once the installation is complete. To guarantee
a smooth operation of the TPCC Professional System, the system should
be commissioned by authorized service personnel or by specifically trained
personnel.
Warning - The TPCC models are only protected to IPX5 when
mounted horizontally. If the TPCC needs to be mounted in a
different position an appropriate mechanical protection must be
used to protect the air outlet from spray water.
Warning - Prior to operating the TPCC, ensure that all cables
are properly connected as shown in the connection diagrams in
section 2.4.5. After all of the connections have been checked and
are properly connected, the system can be switched on.
Warning - To ensure that the device is protected to IPX5 the
screws that secure the upper housing to the lower housing must
be tightened with a torque of 1N m using a torque wrench.
04/06/2016
Version 3.3
31
�TPCC Professional - User Manual
2.5.1
SICK DME3000/4000/5000 Distance Meters
When using SICK DME3000/4000/5000 sensors, ensure that the lateral guide
plates of the TPCC mount lie flat against the sensor. Mount the sensor according to the instructions in Appendix A, Figures 26 and 25.
2.5.2
SICK DS/DT500 Distance Meters
For mounting SICK DS/DT500 sensors, please refer to the instructions in
Appendix A, Figure 27.
2.5.3
SICK DMT-DML Distance Meters
When using a SICK DMT-DML sensor, blanking should be enabled. Blanking
is used to ignore objects that are located directly in front of the sensor to avoid
measurement errors that can be caused by dirt on the glass pane and to ensure
accurate readings even when the glass pane is slightly dirty. When blanking is
enabled, the specified sensor data will be collected at a minimum range of 2.0
m. Mount the sensor according to the instructions in Appendix A, Figure 28.
2.5.4
SICK DL100/DL100 Hi Distance Meters
When using a SICK DL100 or 100 Hi distance meter a 90-degree angle connector must be used to connect the sensor. Mount the sensor according to the
instructions in Appendix A, Figure 29.
2.5.5
SICK CLV631/690 Bar Code Scanners
When using SICK CLV631/690 sensors, ensure that the lateral guide plates
of the TPCC mount lie flat against the sensor. Mount the sensor according to
the instructions in Appendix A, Figures 30 and 31.
2.5.6
SICK LMS400 Distance Meters
When using a SICK LMS400 sensor, ensure that the lateral guide plates of the
TPCC mount lie flat against the sensor. Mount the sensor according to the
instructions in Appendix A, Figure 32.
04/06/2016
Version 3.3
32
�TPCC Professional - User Manual
2.5.7
SICK WL12G Reflex Sensor
When using a SICK WL12G reflex sensor, the sensor’s transmission power
must be adjusted using the sensor potentiometer. The sensor has a switching
threshold at a measurement signal damping of 8%. The TPCC’s glass panel
has a transmission percentage of 98% at the corresponding signal wavelength
range. Mount the sensor according to the instructions in Appendix A, Figure
33.
2.5.8
R
620 Professional / ICR620 Bar Code
SICK Lector
Reader
When using a SICK ICR620 sensor the internal sensor light must be adjusted
to prevent it from reflecting on the TPCC’s glass panel. It may be necessary
to disable the internal sensor light and use an external light instead. Mount
the sensor according to the instructions in Appendix A, Figure 34.
2.5.9
SICK DT20 Hi
When using a SICK DT20 Hi sensor, ensure that the lateral cooling plates located on the inside are mounted first. After the inner plates have been mounted,
mount the outer cooling plates. The outer cooling plates must be lightly pressed
against the sensors when mounted on the adapter plate to ensure optimum
cooling. Mount the sensor according to the instructions in Appendix A, Figure
35.
04/06/2016
Version 3.3
33
�TPCC Professional - User Manual
2.6
2.6.1
Troubleshooting
Troubleshooting the TPCC
If problems occur during the operation of the TPCC Professional System,
please check the following and provide PSI Technics support (support@psitechnics.de) with a detailed description of the problem:
1. Ensure that the correct voltage is used
• Check the power supply unit
• Ensure that the +24 VDC feed is connected to TPCC terminals
X1.1 - X1.2.
2. Check the environmental temperature
• If the environmental temperature exceeds the maximum threshold,
the TPCC’s internal temperature is too high and the system will
shut down automatically.
• The system will restart once the temperature is within the specified
temperature thresholds.
3. Error Monitoring
• The optional error monitoring errors can be read from an isolated
switching contact on terminal block X2. In addition, the board has
two red indicator LEDs that indicate a fault status. The different
switching states are described in the table 3 in chapter 2.4.7.
4. Visually check the fans
• If the optional failure output is not available on the TPCC the
proper function of the fans must checked manually. the If one of
the fans is no longer working, the system must be shut down.
04/06/2016
Version 3.3
34
�TPCC Professional - User Manual
2.7
Cable Length
Cable Cross-Section 1.5mm2
2.7.1
Power Supply Unit Value Setting [U] = V
30,00
28,00
26,00
24,00
0
5
10
15
20
25
Distance [s] = m
Figure 20: Line Drop, 1.5mm2 Cable Cross-Section
PSI Technics recommends a maximum cable length of 82 ft (25 m). When
using the maximum cable length the power supply needs to be adjusted as
shown in Figure 20.
04/06/2016
Version 3.3
35
�TPCC Professional - User Manual
2.7.2
Cable Cross-Section 2.5mm2
Figure 21: Line Drop, 2.5mm2 Cable Cross-Section
PSI Technics recommends a maximum cable length of 82 ft (25 m). When
using the maximum cable length the power supply needs to be adjusted as
shown in Figure 21.
04/06/2016
Version 3.3
36
�TPCC Professional - User Manual
2.8
Recommended Connectors
The recommended connectors depend on the sensor you are using. All connectors and cables are available from PSI Technics. Connectors can be ordered using the fax order form at the end of this manual or by visiting
http://www.psi-technics.com/EN/Contact.php.
SICK DME5000
When using a SICK DME5000 Profibus-type distance meter, PSI Technics
recommends using a Profibus BUS IN connector (see Figure 22) and a Profibus
BUS OUT connector (see Figure 23) the part numbers are listed below.
BUS IN:
BUS OUT:
Part No. KT 1436
Part No. KT 1437
Figure 22: BUS IN
04/06/2016
Figure 23: BUS OUT
Version 3.3
37
�TPCC Professional - User Manual
SICK DMT/DML
For SICK DMT/DML distance meters with RS232/RS422 interfaces, PSI
Technics recommends using the following connector due to the sensor construction:
Part No.
KT 1440
The following 45-degree and 90-degree angle connectors are recommended for
use with the Profibus version of SICK DMT/DML distance meters:
Part No.
Part No.
KT 1438 (45-degree)
KT 1436 (90-degree)
SICK DL100 Hi
For SICK DL100 Hi distance meters the following connectors must be used
due to the sensor construction.
Part No. Ethernet connector 10391 (90-degree)
Part No. SSI
10341 (90-degree)
Part No. Power DC
10741 (90-degree)
Figure 24: 90-Degree Ethernet Connector
In addition, an angled cable socket must be used for the 8-pin SSI interface. For the SSI interface the same angled connector can be used as
for SICK DMT/DML sensors (Part number KT 1436 (90-degree)). Prefabricated cables in various lengths are available. Adapter cables for replacing
04/06/2016
Version 3.3
38
�TPCC Professional - User Manual
DME3000/4000/5000 sensors with DL100 Hi distance meters are also available from PSI Technics.
R
SICK Lector
620 Professional / ICR620
For SICK ICR620 sensors cables with straight connectors must be used.
NOTE - All connectors and cables are available from PSI Technics.
Connectors can be ordered using the fax order form at the end of
this manual or by visiting:
http://www.psi-technics.com/EN/Contact.php.
04/06/2016
Version 3.3
39
�TPCC Professional - User Manual
3
Reader Comment Form
TPCC Technical Documentation - TPCC
(DM, T/DM, CLV, LMS Models)
April 2016 / Version 3.3
We appreciate your comments and suggestions for improving this publication.
Which PSI Technics product do you use?
What are you using the PSI Technics product for?
Please circle a response for each of the statements below:
1 = Strongly agree 2 = Agree 3 = Neutral; 4 = Disagree; 5 = Strongly disagree
The manual is well organized
I can find the information I need
The information in the manual is accurate
The instructions are easy to understand
The manual contains sufficient examples
The examples are appropriate and helpful
The layout and format are attractive and useful
The illustrations are clear and helpful
1
1
1
1
1
1
1
1
2
2
2
2
2
2
2
2
3
3
3
3
3
3
3
3
4
4
4
4
4
4
4
4
5
5
5
5
5
5
5
5
Please answer the following questions:
Which sections do you use the most?
What do you like most about the manual?
What could be improved?
04/06/2016
Version 3.3
40
�TPCC Professional - User Manual
Reader Comment Form
We appreciate your feedback. Your feedback about the supporting documentation helps us to improve it with each revision. Please use one of the following
methods to send us your comments or suggestions:
• Email your feedback to support@psi-technics.com
• Fill in the Reader Comment Form and mail it to the address listed on
the bottom of the form
If this manual does not include a Reader Comment Form, please send your
feedback to the address listed at the beginning of this manual. Please use the
following subject line:
Subject: TPCC/DM, T/DM, CLV and LMS Reader Comment Form
Please send us your feedback using one of the following methods:
Mail to:
PSI Technics
Subject: TPCC
Rudolf-Diesel-Str. 21a
D-56220 Urmitz
Germany
Fax to:
+49 2630 91590 - 99
Subject: TPCC
Email to:
support@psi-technics.com
Subject: TPCC
All comments and suggestions become the property of
PSI Technics.
04/06/2016
Version 3.3
41
�TPCC Professional - User Manual
4
Notes
04/06/2016
Version 3.3
42
�TPCC Professional - User Manual
5
Support
5.1
General
Technical Support
If you have a problem and cannot find the information you need in the product
documentation, contact your local PSI Technics office or PSI Technics support.
You can also request support:
• Via the PSI Technics website www.psi-technics.com/EN/
• By sending a support request email to:
support@psi-technics.com
5.2
Service and Support
German Headquarters
PSI Technics GmbH
Rudolf-Diesel-Str. 21a
D-56070 Urmitz, Germany
Phone +49 2630 91590 - 0
Fax +49 2630 91590 - 99
04/06/2016
US Office
P.O. Box 23761
Pleasant Hill, CA 94523
U.S.A.
tom.anderson@psi-technics.com
Phone: +1 925-287-0904
Version 3.3
43
�TPCC Professional - User Manual
6
List of Figures, List of Tables and
Appendix
Contents
List of Figures
. . . . . . . . . . . . . . . . . . . .
45
List of Tables . . . . . . . . . . . . . . . . . . . . .
47
04/06/2016
Version 3.3
44
�TPCC Professional - User Manual
LIST OF FIGURES
List of Figures
1
TPCC/DM Front . . . . . . . . . . . . . . . . . . . . . . . . . .
9
2
TPCC/T/DM Front . . . . . . . . . . . . . . . . . . . . . . . .
9
3
TPCC/CLV & TPCC/LMS Front . . . . . . . . . . . . . . . .
10
4
TPCC/CLV & TPCC/LMS Top View . . . . . . . . . . . . . .
11
5
TPCC Back - All Models . . . . . . . . . . . . . . . . . . . . .
12
6
TPCC Back View - All Models . . . . . . . . . . . . . . . . . .
13
7
TPCC/DM and CLV Models - Side View . . . . . . . . . . . .
13
8
TPCC/T/DM with Tube - Side View
. . . . . . . . . . . . . .
14
9
Mounting the TPCC . . . . . . . . . . . . . . . . . . . . . . . .
18
10
Mounting the TPCC Using Clearance Holes . . . . . . . . . . .
19
11
New Board . . . . . . . . . . . . . . . . . . . . . . . . . . . . .
21
12
Old Board . . . . . . . . . . . . . . . . . . . . . . . . . . . . . .
21
13
TPCC Professional Wiring
. . . . . . . . . . . . . . . . . . . .
22
14
Cable Feeds at the Back of the TPCC Housing . . . . . . . . .
24
15
Cable Feeds and Frame Installation Overview . . . . . . . . . .
25
16
Terminal Board . . . . . . . . . . . . . . . . . . . . . . . . . . .
26
17
Terminal Board Pin Allocation . . . . . . . . . . . . . . . . . .
27
18
Connecting the Solid-state Relay . . . . . . . . . . . . . . . . .
29
19
Installing the Solid-state Relay . . . . . . . . . . . . . . . . . .
30
20
2
35
2
Line Drop, 1.5mm Cable Cross-Section . . . . . . . . . . . . .
21
Line Drop, 2.5mm Cable Cross-Section . . . . . . . . . . . . .
36
22
BUS IN . . . . . . . . . . . . . . . . . . . . . . . . . . . . . . .
37
23
BUS OUT . . . . . . . . . . . . . . . . . . . . . . . . . . . . . .
37
24
90-Degree Ethernet Connector
. . . . . . . . . . . . . . . . . .
38
25
SICK DME3000 Mounting Instructions . . . . . . . . . . . . . .
49
26
SICK DME4000/DME5000 Mounting Instructions . . . . . . .
50
27
SICK DS/DT500 Mounting Instructions . . . . . . . . . . . . .
51
04/06/2016
Version 3.3
45
�TPCC Professional - User Manual
28
SICK DMT/DML Mounting Instructions . . . . . . . . . . . .
52
29
SICK DL100/DL100 Hi Mounting Instructions . . . . . . . . .
53
30
SICK CLV631 Mounting Instructions . . . . . . . . . . . . . . .
54
31
SICK CLV690 Mounting Instructions . . . . . . . . . . . . . . .
55
32
SICK LMS400 Mounting Instructions
. . . . . . . . . . . . . .
56
33
SICK WL12G Mounting Instructions . . . . . . . . . . . . . . .
57
R
34
SICK Lector 620 Professional / ICR620 Mounting Instructions
58
35
SICK DT20 Hi Mounting Instructions . . . . . . . . . . . . . .
59
04/06/2016
Version 3.3
46
�TPCC Professional - User Manual
LIST OF TABLES
List of Tables
1
Changes and Revisions . . . . . . . . . . . . . . . . . . . . . . .
2
Overview of Sensors and Corresponding TPCC Models . . . . .
3
3
Error Monitoring Switching States . . . . . . . . . . . . . . . .
28
04/06/2016
Version 3.3
VI
47
�TPCC Professional - User Manual
A
Appendix
Contents
A.1 Appendix
-
Mounting
Instructions
(Adapter Plate) . . . . . . . . . . . . . . . .
04/06/2016
Version 3.3
48
48
�TPCC Professional - User Manual
A
APPENDIX
Figure 25: SICK DME3000 Mounting Instructions
04/06/2016
Version 3.3
49
�TPCC Professional - User Manual
Figure 26: SICK DME4000/DME5000 Mounting Instructions
04/06/2016
Version 3.3
50
�TPCC Professional - User Manual
A
APPENDIX
Figure 27: SICK DS/DT500 Mounting Instructions
04/06/2016
Version 3.3
51
�TPCC Professional - User Manual
Figure 28: SICK DMT/DML Mounting Instructions
04/06/2016
Version 3.3
52
�TPCC Professional - User Manual
A
APPENDIX
Figure 29: SICK DL100/DL100 Hi Mounting Instructions
04/06/2016
Version 3.3
53
�TPCC Professional - User Manual
Figure 30: SICK CLV631 Mounting Instructions
04/06/2016
Version 3.3
54
�TPCC Professional - User Manual
A
APPENDIX
Figure 31: SICK CLV690 Mounting Instructions
04/06/2016
Version 3.3
55
�TPCC Professional - User Manual
Figure 32: SICK LMS400 Mounting Instructions
04/06/2016
Version 3.3
56
�TPCC Professional - User Manual
A
APPENDIX
Figure 33: SICK WL12G Mounting Instructions
04/06/2016
Version 3.3
57
�TPCC Professional - User Manual
R
Figure 34: SICK Lector
620 Professional / ICR620 Mounting Instructions
04/06/2016
Version 3.3
58
�TPCC Professional - User Manual
A
APPENDIX
Figure 35: SICK DT20 Hi Mounting Instructions
04/06/2016
Version 3.3
59
�Fax Order Form
Fax-Nr. +49 2630 91590 - 99
US customers: Please send this order form via email to
sales@psi-technics.com
Billing Address
Company:
Street:
ZIP/City:
Country:
Phone:
Fax:
Customer ID No.
VAT ID No.:
Shipping Address (if different)
Company:
Street:
ZIP/City:
Country:
Shipping Method:
Contact:
Phone:
Fax:
�Quantity
Part No.
G0009 002 0028
G0001 002 0028
G0005 002 0028
G0007 002 0028
G0017 002 0028
G0021-002-0028
G0026-002-0028
G0013-002-0028
G0029 002 0028
G0027-002-0028
10856
10465
10195
KT 1436
KT 1437
KT 1438
KT 1440
10391
10341
10734
KT 0800 000 0001
Date
PSI Technics GmbH
Rudolf-Diesel-Str. 21a
D-56220 Urmitz, Germany
Description
TPCC / DME 3000
TPCC / DME 4000/5000
TPCC / DS/DT-500
TPCC / DMT-DML
TPCC / DL 100/100Hi
TPCC / CLV 631-0000
TPCC / CLV 690-0000
TPCC / LMS 400
TPCC / WL12G-3B2531
TPCC / ICR620S-T11503
TPCC / DT20 Hi
TPCC Installation Accessory Kit
TPCC Power Supply Unit 230VAC/24VDC;
20A
BUS IN Profibus Connector 90-degree
DME5000
BUS OUT Profibus Connector 90-degree
DME5000
Profibus Connector for SICK DMT/DML 45degree
RS232/422 Connector for SICK DMT/ DML
Ethernet Connector DL100 (4-pin) 90-degree
SSI Connector DL100 (8-pin) 90-degree
Power DC Connector DL100 90-degree
Solid State Relay
Stamp/Signature
Phone: +49 2630 91590 - 0
Fax +49 2630 91590 - 99
Email: info@psi-technics.com
http://www.psi-technics.com
61
Managing Director:
Karl-Heinz F¨
orderer
�


 工商网监
湘ICP备2023018690号
工商网监
湘ICP备2023018690号
