Low Pin Count USB
Development Kit
User’s Guide
2008-2014 Microchip Technology Inc.
DS40001356C
�Low Pin Count USB Development Kit User’s Guide
Note the following details of the code protection feature on Microchip devices:
•
Microchip products meet the specification contained in their particular Microchip Data Sheet.
•
Microchip believes that its family of products is one of the most secure families of its kind on the market today, when used in the
intended manner and under normal conditions.
•
There are dishonest and possibly illegal methods used to breach the code protection feature. All of these methods, to our
knowledge, require using the Microchip products in a manner outside the operating specifications contained in Microchip’s Data
Sheets. Most likely, the person doing so is engaged in theft of intellectual property.
•
Microchip is willing to work with the customer who is concerned about the integrity of their code.
•
Neither Microchip nor any other semiconductor manufacturer can guarantee the security of their code. Code protection does not
mean that we are guaranteeing the product as “unbreakable.”
Code protection is constantly evolving. We at Microchip are committed to continuously improving the code protection features of our
products. Attempts to break Microchip’s code protection feature may be a violation of the Digital Millennium Copyright Act. If such acts
allow unauthorized access to your software or other copyrighted work, you may have a right to sue for relief under that Act.
Information contained in this publication regarding device
applications and the like is provided only for your convenience
and may be superseded by updates. It is your responsibility to
ensure that your application meets with your specifications.
MICROCHIP MAKES NO REPRESENTATIONS OR
WARRANTIES OF ANY KIND WHETHER EXPRESS OR
IMPLIED, WRITTEN OR ORAL, STATUTORY OR
OTHERWISE, RELATED TO THE INFORMATION,
INCLUDING BUT NOT LIMITED TO ITS CONDITION,
QUALITY, PERFORMANCE, MERCHANTABILITY OR
FITNESS FOR PURPOSE. Microchip disclaims all liability
arising from this information and its use. Use of Microchip
devices in life support and/or safety applications is entirely at
the buyer’s risk, and the buyer agrees to defend, indemnify and
hold harmless Microchip from any and all damages, claims,
suits, or expenses resulting from such use. No licenses are
conveyed, implicitly or otherwise, under any Microchip
intellectual property rights.
Trademarks
The Microchip name and logo, the Microchip logo, dsPIC,
FlashFlex, KEELOQ, KEELOQ logo, MPLAB, PIC, PICmicro,
PICSTART, PIC32 logo, rfPIC, SST, SST Logo, SuperFlash
and UNI/O are registered trademarks of Microchip Technology
Incorporated in the U.S.A. and other countries.
FilterLab, Hampshire, HI-TECH C, Linear Active Thermistor,
MTP, SEEVAL and The Embedded Control Solutions
Company are registered trademarks of Microchip Technology
Incorporated in the U.S.A.
Silicon Storage Technology is a registered trademark of
Microchip Technology Inc. in other countries.
Analog-for-the-Digital Age, Application Maestro, BodyCom,
chipKIT, chipKIT logo, CodeGuard, dsPICDEM,
dsPICDEM.net, dsPICworks, dsSPEAK, ECAN,
ECONOMONITOR, FanSense, HI-TIDE, In-Circuit Serial
Programming, ICSP, Mindi, MiWi, MPASM, MPF, MPLAB
Certified logo, MPLIB, MPLINK, mTouch, Omniscient Code
Generation, PICC, PICC-18, PICDEM, PICDEM.net, PICkit,
PICtail, REAL ICE, rfLAB, Select Mode, SQI, Serial Quad I/O,
Total Endurance, TSHARC, UniWinDriver, WiperLock, ZENA
and Z-Scale are trademarks of Microchip Technology
Incorporated in the U.S.A. and other countries.
SQTP is a service mark of Microchip Technology Incorporated
in the U.S.A.
GestIC and ULPP are registered trademarks of Microchip
Technology Germany II GmbH & Co. KG, a subsidiary of
Microchip Technology Inc., in other countries.
All other trademarks mentioned herein are property of their
respective companies.
© 2008-2014, Microchip Technology Incorporated, Printed in
the U.S.A., All Rights Reserved.
Printed on recycled paper.
ISBN: 978-1-63276-053-1
QUALITY MANAGEMENT SYSTEM
CERTIFIED BY DNV
== ISO/TS 16949 ==
DS40001356C-page 2
Microchip received ISO/TS-16949:2009 certification for its worldwide
headquarters, design and wafer fabrication facilities in Chandler and
Tempe, Arizona; Gresham, Oregon and design centers in California
and India. The Company’s quality system processes and procedures
are for its PIC® MCUs and dsPIC® DSCs, KEELOQ® code hopping
devices, Serial EEPROMs, microperipherals, nonvolatile memory and
analog products. In addition, Microchip’s quality system for the design
and manufacture of development systems is ISO 9001:2000 certified.
2008-2014 Microchip Technology Inc.
�Object of Declaration: Low Pin Count USB Development Kit
2008-2014 Microchip Technology Inc.
DS40001356C-page 3
�Low Pin Count USB Development Kit User’s Guide
NOTES:
DS40001356C-page 4
2008-2014 Microchip Technology Inc.
�LOW PIN COUNT USB DEVELOPMENT KIT
USER’S GUIDE
Table of Contents
Preface ........................................................................................................................... 7
Introduction ........................................................................................................ 7
Document Layout ............................................................................................... 7
Conventions Used in this Guide ........................................................................ 8
Recommended Reading .................................................................................... 9
The Microchip Web Site ..................................................................................... 9
Customer Support ............................................................................................ 10
Document Revision History ............................................................................. 10
Chapter 1: Overview ................................................................................................... 11
Introduction ......................................................................................................... 11
Highlights ............................................................................................................ 11
Low Pin Count USB Development Kit Contents ................................................. 11
Low Pin Count USB Development Board Construction and Layout ................... 13
PIC18F14K50 ICD Debug Header ..................................................................... 14
Getting Started and Using the Out-of-Box Demo Firmware ............................... 16
Using the Out-of-Box Demo Firmware/PC Software .......................................... 16
Chapter 2: Getting Started With USB Development ................................................ 16
Re-Programming the Microcontroller ................................................................. 18
Special considerations for programming the PIC18F14K50 .............................. 19
Using the PIC16F1454 and PIC16F1455 Devices with the Low pin Count USB
Development Kit Board........................................................................... 20
Chapter 3: Developing a USB Application ............................................................... 21
Tips when Developing a USB Application .......................................................... 23
Introduction ......................................................................................................... 25
Schematics ......................................................................................................... 27
Worldwide Sales and Service .................................................................................... 29
2008-2014 Microchip Technology Inc.
DS40001356C-page 5
�LOW PIN COUNT USB DEVELOPMENT KIT USER’S GUIDE
NOTES:
DS40001356C-page 6
2008-2014 Microchip Technology Inc.
�LOW PIN COUNT USB DEVELOPMENT KIT
USER’S GUIDE
Preface
NOTICE TO CUSTOMERS
All documentation becomes dated, and this manual is no exception. Microchip tools and
documentation are constantly evolving to meet customer needs, so some actual dialogs
and/or tool descriptions may differ from those in this document. Please refer to our web site
(www.microchip.com) to obtain the latest documentation available.
Documents are identified with a “DS” number. This number is located on the bottom of each
page, in front of the page number. The numbering convention for the DS number is
“DSXXXXXA”, where “XXXXX” is the document number and “A” is the revision level of the
document.
For the most up-to-date information on development tools, see the MPLAB® IDE online help.
Select the Help menu, and then Topics to open a list of available online help files.
INTRODUCTION
This chapter contains general information that will be useful to know before using the
Low Pin Count USB Development Kit. Items discussed in this chapter include:
•
•
•
•
•
•
Document Layout
Conventions Used in this Guide
Recommended Reading
The Microchip Web Site
Customer Support
Document Revision History
DOCUMENT LAYOUT
This document describes how to use the Low Pin Count USB Development Kit as a
development tool to emulate and debug firmware on a target board. The manual layout
is as follows:
•
•
•
•
Chapter 1. “Overview”
Chapter 2. “Getting Started With USB Development”
Chapter 3. “Developing a USB Application”
Appendix A. “Schematics”
2008-2014 Microchip Technology Inc.
DS40001356C-page 7
�Low Pin Count USB Development Kit User’s Guide
CONVENTIONS USED IN THIS GUIDE
This manual uses the following documentation conventions:
DOCUMENTATION CONVENTIONS
Description
Arial font:
Italic characters
Initial caps
Quotes
Underlined, italic text with
right angle bracket
Bold characters
N‘Rnnnn
Text in angle brackets < >
Courier New font:
Plain Courier New
Represents
Examples
Referenced books
Emphasized text
A window
A dialog
A menu selection
A field name in a window or
dialog
A menu path
MPLAB® IDE User’s Guide
...is the only compiler...
the Output window
the Settings dialog
select Enable Programmer
“Save project before build”
A dialog button
A tab
A number in verilog format,
where N is the total number of
digits, R is the radix and n is a
digit.
A key on the keyboard
Click OK
Click the Power tab
4‘b0010, 2‘hF1
Italic Courier New
Sample source code
Filenames
File paths
Keywords
Command-line options
Bit values
Constants
A variable argument
Square brackets [ ]
Optional arguments
Curly brackets and pipe
character: { | }
Ellipses...
Choice of mutually exclusive
arguments; an OR selection
Replaces repeated text
Represents code supplied by
user
DS40001356C-page 8
File>Save
Press ,
#define START
autoexec.bat
c:\mcc18\h
_asm, _endasm, static
-Opa+, -Opa0, 1
0xFF, ‘A’
file.o, where file can be
any valid filename
mcc18 [options] file
[options]
errorlevel {0|1}
var_name [,
var_name...]
void main (void)
{ ...
}
2008-2014 Microchip Technology Inc.
�Preface
RECOMMENDED READING
This user’s guide describes how to use the Low Pin Count USB Development Kit. Other
useful documents are listed below. The following Microchip documents are available
and recommended as supplemental reference resources.
Read me Files
For the latest information on using other tools, read the tool-specific Readme files in
the Readmes subdirectory of the MPLAB® IDE installation directory. The Readme files
contain update information and known issues that may not be included in this user’s
guide.
Design Center
Microchip has a USB design center which can be found on www.microchip.com/usb.
The following Microchip Application Notes are available and recommended as
supplemental reference resources.
THE MICROCHIP WEB SITE
Microchip provides online support via our web site at www.microchip.com. This web
site is used as a means to make files and information easily available to customers.
Accessible by using your favorite Internet browser, the web site contains the following
information:
• Product Support – Data sheets and errata, application notes and sample
programs, design resources, user’s guides and hardware support documents,
latest software releases and archived software
• General Technical Support – Frequently Asked Questions (FAQs), technical
support requests, online discussion groups, Microchip consultant program
member listing
• Business of Microchip – Product selector and ordering guides, latest Microchip
press releases, listing of seminars and events, listings of Microchip sales offices,
distributors and factory representatives
2008-2014 Microchip Technology Inc.
DS40001356C-page 9
�Low Pin Count USB Development Kit User’s Guide
CUSTOMER SUPPORT
Users of Microchip products can receive assistance through several channels:
•
•
•
•
Distributor or Representative
Local Sales Office
Field Application Engineer (FAE)
Technical Support
Customers should contact their distributor, representative or field application engineer
(FAE) for support. Local sales offices are also available to help customers. A listing of
sales offices and locations is included in the back of this document.
Technical support is available through the web site at: http://support.microchip.com
DOCUMENT REVISION HISTORY
Revision A (September 2008)
• Initial Release of this Document.
Revision B (February 2009)
• Corrected document errors
Revision C (March 2014)
• Significant updates for PIC16F145X related support, and to reflect changes in the
new revision of the PCB design.
DS40001356C-page 10
2008-2014 Microchip Technology Inc.
�LOW PIN COUNT USB DEVELOPMENT KIT
USER’S GUIDE
Chapter 1. Overview
1.1
INTRODUCTION
The Low Pin Count USB Development Kit provides an easy, low-cost way to evaluate
the functionality of Microchip’s PIC18F1XK50 and PIC16F145X USB microcontrollers.
The kit provides a hardware development platform which can help speed your next
USB design from concept to first prototype. The hardware works directly in conjunction
with the extensive USB firmware/software/drivers/utilities in the Microchip Libraries for
Applications (MLA), which provides all of the source code necessary for the
development of a complete USB application.
1.2
HIGHLIGHTS
This chapter discusses:
• Low Pin Count USB Development kit contents
• Low Pin Count USB Development Board construction and layout
1.3
LOW PIN COUNT USB DEVELOPMENT KIT CONTENTS
The Low Pin Count USB Development Kit contains the following:
•
•
•
•
•
•
•
•
(1) fully populated Low Pin Count USB Development Board
(1) PIC18F14K50 ICD populated expansion header
(1) PIC16F1459 sample silicon
(1) PICkit™ 3 Debugger/Programmer (included with DV164139-2, not included in
DM164127-2).
DB9 null modem mini adapter
10-pin male-male headers
USB cable (A to mini-B)
Quick Start Guide
2008-2014 Microchip Technology Inc.
DS40001356C-page 11
�Low Pin Count USB Development Kit User’s Guide
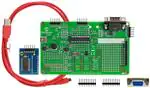
FIGURE 1-1:
DS40001356C-page 12
LOW PIN COUNT USB DEVELOPMENT KITS WITH AND
WITHOUT PICkit™ 3
2008-2014 Microchip Technology Inc.
�Low Pin Count USB Development Kit User’s Guide
1.4
LOW PIN COUNT USB DEVELOPMENT BOARD CONSTRUCTION AND
LAYOUT
The Low Pin Count USB Development Board and populated components are shown in
Figure 1-2.
FIGURE 1-2:
LOW PIN COUNT USB DEVELOPMENT BOARD
1. USB mini-B connector
2. PICkit 2/3 Style ICSP™ programming header (for programming PIC18F1XK50
devices)
3. LEDs connected to PORTC (RC0, RC1, RC2, RC3)
4. PIC18F1XK50 or PIC16F1459 microcontroller
5. PIC kit 2/3 Style ICSP programming header (for programming/debuggingPIC16F145X devices)
6. Footprint for RJ-11 connector
7. SSOP Expansion
8. RS-232 Connector
9. MAX3232 RS-232 line driver/receiver
10. PICkit Serial Analyzer header (Note: Not populated on some boards)
11. User-writable silk screen area
12. PICtail™ daughter board expansion header
13. Prototyping area
14. EUSART Transmit and Receive
15. External device expansion footprints
2008-2014 Microchip Technology Inc.
DS40001356C-page 13
�Low Pin Count USB Development Kit User’s Guide
16. 12 MHz crystal (not required for USB operation with the PIC16F145X devices,
but still included for use with the PIC18F1XK50 devices)
17. MCLR/RA3 push button (pressed = logic low)
18. Potentiometer (connects to RB4/AN10)
19. RC5 push button (pressed = logic low)
Note:
1.5
J2-J5, J7, J8, J10 and J16-J19 are shunted on the bottom side of the board
and thus the functions default connected even though no jumper is
installed. The PCB traces can be cut to optionally disable the circuitry
attached to each pin.
PIC18F14K50 ICD DEBUG HEADER
The PIC18F1XK50 microcontrollers are feature-rich, but low pin count, therefore
necessitating some level of pin functionality multiplexing. On the PIC18F1XK50
devices, the PGC/PGD pins are multiplexed with the USB D+/D- pins. Therefore, in
circuit firmware, debugging is not supported with the normal/production PIC18F14K50
silicon. However, in order to enable in-circuit debugging of PIC18F1XK50-based USB
designs, a dedicated In-Circuit Debugging (ICD) board is provided in the Low Pin Count
USB Development Kit, which contains special PIC18F14K50 silicon (with more pins
than normal) that demultiplexes the USB D+/D- pins from the ICSP™ program/debug
PGC/PGD pins. The dedicated/non-multiplexed PGC/PGD pins on this special device
allow for the active debugging of USB firmware projects, without interfering with the
D+/D- signaling necessary for normal USB communication.
No special debug header is necessary for debugging USB projects based on the
PIC16F145X microcontrollers. On these microcontrollers, there are two PGC/PGD pin
pairs, and in-circuit debugging operations can be performed using the RC0/PGD and
RC1/PGC pin pair, which are not multiplexed with any USB functionality.
FIGURE 1-3:
PIC18F14K50 POPULATED MPLAB® ICD DEBUG HEADER
To use the debug header, simply remove the PIC18F14K50 or PIC16F1459
microcontroller mounted in the DIP-20 socket (U1) on the Low Pin Count USB
Development Board. Using the pin headers provided, connect the debug header into
the MCU socket and connect a Microchip programmer/debug device, such as the
PICkit™ 2 or 3, to the provided connection header (J1 on the debug header board).
DS40001356C-page 14
2008-2014 Microchip Technology Inc.
�Low Pin Count USB Development Kit User’s Guide
When connecting the debug header, the “square pin” shown in the upper right quadrant
of Figure 1-3 is the microcontroller pin 1 (VDD), which should be electrically connected
to the pin 1 (VDD) of the U1 DIP-20 socket on the Low Pin Count USB Development Kit
board.
2008-2014 Microchip Technology Inc.
DS40001356C-page 15
�LOW PIN COUNT USB DEVELOPMENT KIT
USER’S GUIDE
Chapter 2. Getting Started With USB Development
2.1
GETTING STARTED AND USING THE OUT-OF-BOX DEMO FIRMWARE
The PIC16F1459 DIP-20 microcontroller that comes with the Low Pin Count USB
Development Kit board comes pre-programmed with some example USB demo
firmware. The example firmware demonstrates basic USB communication between the
USB microcontroller and a custom PC host software program (HID PnP Demo.exe).
In order to run the demo program, you will first need to download and install the
Microchip Libraries for Applications (MLA), which is a free-software package that
contains source code for a wide variety of example application related projects and
resources, both USB and non-USB related (ex: cap touch, ethernet, wireless, etc.).
Included among the USB resources in the MLA are firmware projects, example USB
PC software programs, drivers, documentation and other resources useful for
developing complete USB applications. The MLA package can be obtained from:
http://www.microchip.com/mla
The USB device firmware projects in the MLA provide pre-configured MPLAB X-based
build configurations for the standard Microchip USB demo boards/platforms, which
include the Low Pin Count USB Development Kit (LPC USB Development Kit, or
LPCUSBDK). Therefore, USB example projects in the MLA can be directly built and
targeted for the LPC USB Development Kit board, with no modifications required,
simply by opening the appropriate project and selecting the correct MPLAB X build
configuration.
The MLA is regularly updated with new/additional contents, documentation
improvements, bug fixes, and to add new microcontroller/demo board support.
Therefore, when starting design work on a new application project, it is recommended
to obtain the latest version of the MLA. However, this user’s guide document is written
based on Microchip Libraries for Application v2013-06-15. In future versions of the MLA
(which could be renamed to something other than “MLA”), the exact directory structure
of the relevant contents may differ somewhat from this document.
2.2
USING THE OUT-OF-BOX DEMO FIRMWARE/PC SOFTWARE
The programmed USB demo firmware (on the PIC16F1459 included with the Low Pin
Count USB Development Kit) can be used by:
1. Plug the demo board into an x86 or x64 Microsoft Windows®-based computer,
using the provided USB mini-B to full size A cable. The mini-B connector on the
demo board is “J1”.
2. The Low Pin Count USB Development Kit demo board is designed to be
USB-bus powered, and should automatically power-up and begin the USB
“enumeration” sequence (where the host begins sending the microcontroller
various standard device requests that all USB devices are required to respond
to, such as “get device descriptor”).
DS40001356C-page 16
2008-2014 Microchip Technology Inc.
�Low Pin Count USB Development Kit User’s Guide
3. The PC should automatically detect the USB device and begin installing standard
Human Interface Device (HID) class drivers for the USB device. No manual/user
installation of drivers should be necessary, as all standard x86/x64 Windows
OSes (as well as Mac OS X and Linux based OSes) provide out-of-box HID USB
drivers.
4. Once step #3 completes, the device should be ready to use, and custom PC
application software programs that were written to communicate with the USB
device should be able to find it and “connect” up to the device. The “HID PnP
Demo.exe” is one such program, which is provided in the MLA.
• The “HID PnP Demo.exe” program can be found in the MLA v2013-06-15 under
the folder: C:\[MLA install location]\USB\Device - HID - Custom Demos\
• Future versions of the MLA (subsequent to the v2013-06-15 release) are
anticipated to have a somewhat different directory structure/organization, and the
“HID PnP Demo.exe” file can likely be found under some other folder, which might
be: C:\[base install location]\apps\usb\device\hid_custom
5. Launch the “HID PnP Demo.exe” program executable. This is a custom PC
program that was originally written in Microsoft Visual C++ 2005 Express Edition.
Therefore, this program requires the NET framework v2.0 or later redistributable
package to run. Newer OSes (ex: Windows Vista® and later) already come with
this package pre-installed, but on older OSes it may be necessary to download
and install the redistributable from Microsoft, if it has not been previously
installed. Upon the successful opening of the program, a window like shown in
Figure 2-1should appear.
FIGURE 2-1:
HID PNP Demo.exe APPEARANCE WITH USB DEVICE
ATTACHED
Upon successful connection, the PC software opens endpoints on the USB device, and
periodically sends commands, requesting the demo board push button status (try
pressing the S1 push button on the Low Pin Count USB Development Kit demo board)
and the ADC reading for the pin with the potentiometer. Additionally, when the user
clicks the “Toggle LED(s)” button, a USB packet is sent to the firmware instructing it to
change the I/O pin states controlling the LEDs, to achieve the LED toggling effect. This
application therefore demonstrates two-way USB communications and “plug and play”
operation (try detaching and reattaching the demo board to/from the computer; the PC
application should automatically detect this and disconnect/reconnect to/from the
device).
2008-2014 Microchip Technology Inc.
DS40001356C-page 17
�Low Pin Count USB Development Kit User’s Guide
2.3
RE-PROGRAMMING THE MICROCONTROLLER
Once you have finished experimenting with the out-of-box demo firmware and PC
application software, the next step will be to re-program the microcontroller with new
firmware. To do this, it is recommended to start with one of the existing USB firmware
projects in the MLA. In order to build the project you will need to have MPLAB X and
the latest MPLAB X C8 compiler (available at www.microchip.com/xc8). After opening
the desired USB project, you will also need to make sure you select the correct MPLAB
X build configuration for the microcontroller you are using (ex: PIC18F14K50 or
PIC16F1459). The build configuration menu is shown in Figure 2-2, although the exact
appearance may vary depending on the version of the MLA that you are using. In the
drop down menu, the correct selection for the Low Pin Count USB Development Kit
Demo board is either the LPCUSBDK_18F14K50 (when U1 is populated with
PIC18F14K50) or LPCUSBDK_16F1459 (when U1 is populated with the PIC16F1459)
configurations. Please note, that the exact name/appearance in this menu may be
somewhat different (ex: different abbreviations) in other versions of the MLA.
FIGURE 2-2:
MPLAB X BUILD CONFIGURATION DROP DOWN MENU
Assuming the proper compiler is installed for the target device, the project should build,
normally without requiring any user modifications, when used with a native Microchip
USB demo board/platform, such as the Low Pin Count USB Dev Kit board.
The out of box demo firmware is based on the “hid_custom” demo firmware in the MLA
v2013-06-15. The MLA contains several other demos that can also be built and used
directly with the Low Pin Count USB Development Kit board. It is recommended to refer
to the USB Library Help documentation that comes with the MLA, to learn more about
these other USB demos/device class examples.
DS40001356C-page 18
2008-2014 Microchip Technology Inc.
�Low Pin Count USB Development Kit User’s Guide
2.4
SPECIAL CONSIDERATIONS FOR PROGRAMMING THE PIC18F14K50
When working with the PIC18F1XK50 device, it is important to be aware that the
microcontroller PGC/PGD pins are multiplexed with the USB D+/D- pins, which have
some implications when attempting to re-program the microcontroller.
In particular, when attempting to re-program the microcontroller, it is necessary to first
unplug the USB cable from the USB host, prior to performing the ICSP programming
operation. This is necessary to ensure that the ICSP programmer does not have I/O
pin contention with the USB host, which may detect the activity on the D+/D- (which are
the ICSP PGC/PGD pins), and incorrectly believe that a microcontroller is attempting
to communicate with it. If both the ICSP programmer and USB cable are
simultaneously attached, I/O pin contention can occur during the programming
operation, which may result in a failed program/verify operation, and/or the USB host
may think that the device is malfunctioning.
The official USB specifications contain a special provision whereby USB hubs are
supposed to disable USB hub downstream ports, which have “malfunctioning” USB
devices attached to them, that continuously generate erroneous and incorrect USB
traffic (which is known as “babble”). Although the USB microcontroller should never
generate this babble condition when correctly configured with the appropriate clock
settings and compliant USB firmware, during an ISCP programming operation (when
multiplexed with D+/D-), the host/hub may potentially interpret the ICSP signals (which
are not in any way related to USB) as erroneous USB traffic, causing the hub to disable
the USB port that the microcontroller is attached to. If this occurs, the situation can be
recovered by power-cycling the USB hub that the device is attached to, and/or
rebooting the computer. However, it is best to avoid this situation entirely, by ensuring
that the ICSP programmer and USB cable are never simultaneously plugged-in, unless
you are using the dedicated in-circuit debugger header board, which has
de-multiplexed D+/D- and PGC/PGD pin functions.
Therefore, to re-program the standard PIC18F14K50 silicon (rather than the dedicated
ICD device), it is recommended to:
1. Unplug the USB cable from the demo board (at the USB mini-B connector, not
by unplugging the USB A connector from the host/hub, since the USB cable still
represents a major parasitic capacitance, which depending upon size could still
interfere with ICSP operations).
2. Connect the ICSP programmer such as the PICkit™ 3 to the Low Pin Count USB
Development Kit board.
3. Within the MPLAB X IDE settings for the programmer, configure the programmer
to enable the option that allows the programmer to supply power to the target
board. Enable the power and configure the programmer to supply 3.3V nominal
to the VDD of the Low Pin Count USB Development Kit board.
4. Program the microcontroller with the ICSP programmer.
5. Once the program/verify sequence is successfully completed, unplug the ICSP
programmer, and then re-attach the USB cable to the mini-B connector to test
your newly programmed firmware project.
When developing with the PIC16F145X devices, or when developing with the
dedicated PIC18F14K50 with the ICD board, the above procedures are not necessary,
and it is fully acceptable to keep both the USB connector and ICSP
programmer/debugger simultaneously attached. For these devices, the D+/D- USB
pins and the PGC/PGD pins are not shared, and therefore, no contention is possible
between the programmer/debugger and USB host.
2008-2014 Microchip Technology Inc.
DS40001356C-page 19
�Low Pin Count USB Development Kit User’s Guide
When programming or debugging with the PIC16F145X devices, the ICSP
programmer/debugger should be attached to the PICkit style header J13, or ICD3 style
RJ11 jack J14 (J6 should not be used). However, if programming with the dedicated
ICD board for the PIC18F14K50, the ICSP programmer/debugger should be attached
to the J6 header on the dedicated ICD board.
2.5
USING THE PIC16F1454 AND PIC16F1455 DEVICES WITH THE LOW PIN
COUNT USB DEVELOPMENT KIT BOARD
The PIC16F1454 and PIC16F1455 devices are available in the 14-PDIP package,
which can potentially be used with the Low Pin Count USB Development Kit board. The
DIP socket U1 on the Low Pin Count USB Development is designed for 20-pin
microcontrollers (like the PIC18F14K50 and PIC16F1459). However, the 14-pin
PIC16F1454/PIC16F1455 devices are pinout similar to the higher pin count devices
(ex. PIC16F1459 and PIC18F14K50), and therefore can be plugged into the 20-DIP
socket U1 on the Low Pin Count Development Kit board.
To use the PIC16F1454 or PIC16F1455 14-PDIP devices with the Low Pin Count USB
Development Kit board, the microcontroller should be plugged in such that the
microcontroller is “left justified” in the 20-DIP socket U1. In other words, the
microcontroller pins 1-7 and 8-14 should be connected to the 20-DIP U1 socket pins
1-7 and 14-20, respectively.
When installed in the above described manner, most functionality of the demo board
will remain intact; however, special changes are required in order to use the RS-232
based UART interface with a PIC16F1454 or PIC16F1455 device. On these 14-pin
devices, the UART RX/TX pins are located on different port pins compared to the
higher pin count devices. Therefore, in order to connect the 14-pin device RX/TX pins
to the appropriate pins on the MAX3232 level translator device, the J20 and J22 pads
need to be populated with 2-pin, 100 ml spacing, standard jumper headers.
Additionally, both the J20 and J22 jumper headers should be shorted using standard
jumper caps.
When using the 20-pin microcontrollers (ex: PIC18F1XK50 and PIC16F1459), the
J20/J22 headers do not need to be populated, but if they are, the jumpers should be
left open.
DS40001356C-page 20
2008-2014 Microchip Technology Inc.
�LOW PIN COUNT USB DEVELOPMENT KIT
USER’S GUIDE
Chapter 3. Developing a USB Application
When developing a new USB application, it is suggested to evaluate all of the available
USB device classes and USB example firmware/software projects that are already
implemented in the MLA. A listing of the official USB Implementor’s Forum (USB-IF)
approved device class specifications can be found at:
http://www.usb.org/developers/devclass_docs#approved
The MLA contains example implementations of many of the different USB device
classes. A USB device class can be thought of as a higher-level specification/standard,
that “bolts on” to the existing USB 2.0 specifications (ex: usb_20.pdf, which includes
various specifications that all USB devices, regardless of class, must adhere to). These
additional specifications usually are associated with additional commands that the
firmware must implement/support, but makes the device somewhat standardized with
other similar devices of the same class, allowing for the sharing of the same/existing
USB drivers on the host, etc.
When creating a new USB application, in many cases, you may have a choice as to
what USB device class specifications you decide to base your design around. Each
class tends to have various pros and cons, which may be useful to know when
choosing the device class for your application. A brief summary of some of the more
popular, better known classes and what they are best suited for is provided below.
Human Interface Device (HID) class: This class is especially versatile. It is primarily
intended for implementing USB human interface type products (such as mice,
keyboards, game pads, touch screens and pen input digitizer tablets, etc.), but can also
be used for sending generic application-specific data not related to human interfacing
at all. For example, the PICkit 3 programmer implements the USB HID class, even
though it only sends “custom” data unrelated to interfacing with a human. All standard
Windows, Linux, and Mac OS X operating systems provide standard HID class USB
drivers and, therefore, the installation of such a device is normally fully “plug and play”
without the user having to download or install additional kernel mode components.
However, the primarily limitation of the HID class is that it only supports up to one
“interrupt” IN endpoint and one interrupt OUT endpoint, which are only allowed to
transmit/receive up to 64 bytes every 1 ms for a full-speed USB device. This restricts
the maximum data transfer rate to 64 kB/sec maximum, and is, therefore, best suited
for devices with relatively low bandwidth requirements.
Communication Device Class (CDC): This class is particularly useful for implementing
USB devices that appear on the host as legacy COMx serial port devices. This can be
convenient when migrating legacy hardware designs, which used to be based on real
RS232 based serial ports to USB. When using the CDC class, the USB device appears
and acts essentially the same as a real COMx serial port, and therefore, no PC
software changes are normally needed when migrating the hardware to USB. The
same PC software APIs for opening/reading/writing/closing COMx ports can still be
used with a CDC class USB device implementing a virtual COMx port. However, the
primary disadvantages of this class are:
2008-2014 Microchip Technology Inc.
DS40001356C-page 21
�Low Pin Count USB Development Kit User’s Guide
1. Requires an end user installed driver package on Windows-based OSes. This
can be especially problematic on Windows 8 64-bit, since this OS requires that
the driver package must contain a valid Microsoft Authenticode™ or Microsoft
WHQL signature to install. Although the driver packages in the MLA are WHQL
signed, any modifications to the driver package will “break” the signature,
requiring resigning.
2. As a legacy COMx port, it implements the input/output data flow as raw byte
streams instead of using packets/transfers. In general, it is easier and more
robust to implement higher level command/response style protocols using packets and transfers, which have clear beginning and end delimiters, rather than raw
byte streams with no out-of-band communication beyond the byte stream.
3. Typically inferior error case handling/reporting/auto-retry options in the driver, as
compared to other newer USB drivers, which are not restricted by the same error
case reporting mechanisms of legacy COMx ports.
4. Imperfect “plug and play” implementation. Legacy COMx ports were not plug and
play, and could not dynamically be attached/removed at runtime. However, all
USB devices are always required to support dynamic runtime
attachment/detachment. Although it is possible to unplug/reattach a CDC device,
the PC software interfacing with the CDC device must be modified to be aware
of plug and play events (and to automatically close the COMx port upon device
removal), in order to ensure that the device can work again upon re-attachment.
Other USB drivers/device classes are not hindered by these legacy restrictions.
Mass Storage Device (MSD) class: This device class is particularly useful for
implementing USB Flash media devices and readers. Once enumerated, USB MSD
devices appear as a new “drive” on the host. This device class is relatively dedicated
in purpose, and does not expose any user level APIs that can be used for sending
generic/unrelated USB data to/from the device. However, this class is often still useful,
especially when combined with other device classes in a “composite” USB device
configuration (where a USB device uses multiple interfaces to implement more than
one USB device class or function simultaneously).
Custom/Vendor Defined class: The custom/vendor defined class is not a “standard”
class, like the other USB device classes. This class does not have any additional class
specification documents associated with it (beyond the basic USB specs), as the
vendor is allowed to make up and implement their own higher level communication
protocol and command set as they see fit. This class is especially useful when sending
custom/arbitrary data, and the USB host drivers and APIs for this device class generally
tend to be “excellent”. This class is especially flexible and allows the designer to
implement any combination of control, interrupt, bulk, and isochronous endpoints
(subject to potential limitations of the host USB driver being used).
Under Windows, the Microsoft provided WinUSB driver implements the custom/vendor
class and exposes easy to use API functions for sending/receiving USB
packets/transfers to/from the device firmware. Additionally, the open source community
has created the libusb driver which allows for the development of cross platform PC
software applications that can work equally well on Windows, Mac OS X, and
Linux-based OSes, with a single PC software code base. Moreover, the good quality of
API documentation and flexibility of this device class make it quite easy to use.
Nonetheless, the custom nature of the device class requires a custom driver package
to be installed (even if using the Microsoft Windows provided WinUSB driver, except on
Windows 8, which allows USB devices to implement special USB “descriptors” to install
the WinUSB driver package automatically without user intervention), which is the
primary disadvantage of this device class.
DS40001356C-page 22
2008-2014 Microchip Technology Inc.
�Low Pin Count USB Development Kit User’s Guide
3.1
TIPS WHEN DEVELOPING A USB APPLICATION
When developing your first USB application, there are a few common problems that
you may at some point encounter, such as:
USB enumeration problems, with “Unknown Device” showing up in the Windows
Device manager (under the Universal Serial Bus controllers category)
These symptoms normally occur anytime that the USB device/firmware is working well
enough to successfully turn on the USB module (and the D+ or D- pull up resistor in the
microcontroller, which signals attachment to the USB host), but not well enough to
properly process and respond to required USB commands, which the host will send to
the device early in the USB enumeration sequence. Failure to respond to the
necessary host requests can be caused by a variety of factors, but the most common
ones to double check include:
1. Hardware problems on your circuit board. This should not be a problem when
using the Microchip Low Pin Count USB Development Kit board, but may be
encountered when migrating your design from the demo board to your own
custom hardware platform. The most common potential issues that deserve
double checking include:
• D+/D- connection problems. These microcontroller pins must be connected
directly to the same named pins on the USB cable or USB connector. D+ should
be tied to D+, and D- should be tied to D-. The pin pairs should not be swapped
(like done in UART-based systems). No additional resistance should be placed
in series with the pins between the microcontroller and USB connector (small
values 10 are normally harmless). Furthermore, any additional parasitic
capacitance added to the D+/D- nets (ex: due to possible external ESD
protection circuitry) should be kept to minimum (when operating at USB 12
Mbps full-speed data rate). For full-speed operation, values up to approximately
50 pF of additional capacitance are allowed (per pin, which needs to be
symmetrically implemented for both D+ and D-), but values larger than this may
begin to introduce USB signal quality distortions.
• VUSB/VUSB3V3 pin connection problems. This microcontroller pin feeds the
USB transceiver, and is therefore critical for providing good USB transmit signal
quality, and providing good USB signal reception capability. Refer to the device
data sheet for the correct connections/proper capacitance for this pin.
2. Software configuration problems, which may include:
• Oscillator settings and Configuration bits settings – make certain that the new
settings being used are genuinely compatible with USB operation. Although the
microcontroller may support operation at many frequencies and many clock
sources, only certain options are valid/compatible with active USB module
operation and will result in the correct USB transmit/receive bit rates matching
the USB specifications. Make sure they are correctly configured, and if using a
device without a crystal but with active clock tuning (ex: a PIC16F145X device),
make sure that the feature is enabled in the ACTCON register, sometime prior
to enabling the USB module.
• Problems with the hardware profile/default pins used in the project. If using the
MLA v2013-06-15, make sure the usb_config.h and Hardware Profile –
[platform name].h files are correctly configured for your platform. When using
the MLA v2013-12-20 and likely later versions of the MLA, make sure the
usb_config.h and system.h/system.c files are correctly configured for the
intended application hardware design.
2008-2014 Microchip Technology Inc.
DS40001356C-page 23
�Low Pin Count USB Development Kit User’s Guide
3. Other software problems introduced during the code editing/development
process. For these types of issues, it is suggested to develop the application
code under an SVN repository (so as to be able to revert back to “last known
good/working” code), and to consider investing in a hardware-based USB
protocol analyzer. USB protocol analyzers allow the user to capture raw USB
traffic moving across a USB bus segment, and formats the data for easy
viewing/interpretation to the user. Although relatively expensive, these hardware
tools can save significant amount of debugging time and frustration, as they
allow the developer a true glimpse into the actual operation of the USB link.
DS40001356C-page 24
2008-2014 Microchip Technology Inc.
�LOW PIN COUNT USB DEVELOPMENT KIT
USER’S GUIDE
Appendix A. Schematics
A.1
INTRODUCTION
This appendix contains the Low Pin Count USB Development Kit hardware
diagrams.The schematics provided in this user’s guide are for the
DM164127-2/DV164139-2 version of the hardware/PCB. Earlier versions of this board
exist (which do not have the “-2” suffix in the part number. For schematics for the older
versions of this board, refer to 41356B.pdf. A newer “-2” version of the board can be
identified by the silk screen text for header J13 (upper middle portion of the board). On
the original (non “-2” suffix) version of the board, the silk screen text for J13 reads
“PICkit Serial”. On the newer “-2” suffix boards, the J13 silk screen text reads “ICSP
PIC16F145X”.
The new version of the board primarily differs from prior versions of the board, in that
it re-purposes the J13 header (from being a PICkit Serial connection) to a dedicated
PIC16F145X programming/debug port), while adding the header J21 (a new PICkit
Serial connection). Additionally, the new boards have more smoothing capacitance on
VDD. The board revisions are software/firmware compatible with each other, although
it is recommended to add additional VDD capacitance (1-8 uF) if using an old revision
board.
2008-2014 Microchip Technology Inc.
DS40001356C-page 25
�Low Pin Count USB Development Kit User’s Guide
TABLE A-1:
LOW PIN COUNT USB DEVELOPMENT BOARD BILL OF
MATERIALS
QTY
1
DS40001356C-page 26
DESCRIPTION
IC, PIC16F1459, 20P DIP
1
IC SMT, MAX3232CPWR, DRVR/RCVR MLTCH RS232 16TSSO (U3)
5
CAP SMT, 0.1uF 0603 CER 16V 10% X7R (C6 - C10)
2
CAP SMT, 0.1uF 0805 CER 50V 10% X7R (C1, C3)
1
CAP SMT, 0.47uF 0805 CER 16V 10% X7R (C2)
2
CAP SMT, 22pF 0805 CER 100V 5% C0G (C4, C5)
4
RES SMT, 330-OHM 1/16W 1% 0603 (R8 - R11)
2
RES SMT, 1.0K-OHM 1/10W 1% 0805 (R1, R3)
1
RES SMT, 10K-OHM 1/10W 1% 0805 (R2)
1
RES SMT, 150K-OHM 1/10W 1% 0805 (R12)
4
RES SMT, 470-OHM 1/10W 1% 0805 (R4 - R7)
1
RES POT, 10K-OHM 1/2W THUMBWH CERM ST (POT 1)
4
LED, 565NM GREEN CLEAR 0805 T/R (D1 - D4)
1
OSC SMT, 12.000MHz CRYSTAL 18PF FUND SMD (HC49) (Y1)
1
SWITCH SMT, PUSH BUTTON SPST MOM 6MM 160GF/230GF (S1)
1
CONN SMT, RECPT, USB MINI-B 5POS RA (J1)
1
CONN, D-SUB, 9P PLUG RT ANGLE W/ JACK SCREWS (J15)
1
CONN, RECPT, 1x14 PIN 0.100" STR (J11)
2
CONN, HDR, 1x6 BREAKAWAY, 0.100" PITCH, 0.025 SQ, RA, (0.230/0.090) (J6,
J13)
1
CONN, HDR, 1x2, 0.100" PITCH, 0.025 SQ POST, TIN (0.135"/0.380"), POL (J9)
1
CONN, HDR, 1x3 BREAKAWAY, 0.100" PITCH, 0.025 SQ POST, GD (0.100"/0.230")
(J14)
1
SOCKET, 20P DIP 0.300W COLLET OPEN FRAME (@XU1)
1
-SPARE- LOCATION (U2, J2 - J5, J7, J8, J21)
2008-2014 Microchip Technology Inc.
�Low Pin Count USB Development Kit User’s Guide
A.2
SCHEMATICS
FIGURE A-1:
LOW PIN COUNT USB DEVELOPMENT KIT BOARD SCHEMATICS
(-2 SUFFIX VERSION)
GND 15
8 R2IN
6 V-
R1OUT 12
R2OUT 9
13 R1IN
7 T2OUT
11
T2IN 10
14 T1OUT
1
3
4
5
16 VCC
2 V+
PICkit™ 1
MHz
ICSP™ PIC18F1XK50
C1+
C1C2+
C2T1IN
ICSP™ PIC16F145X
ICSP™ PIC16F145X
PICkit™ SERIAL
2008-2014 Microchip Technology Inc.
DS40001356C-page 27
�Low Pin Count USB Development Kit User’s Guide
FIGURE A-2:
DEDICATED PIC18F14K50 ICD HEADER BOARD SCHEMATICS
U1
VDD
0.1 UF
1
C1
VSS 28
VDD
27
OSC1
2 RA5/OSC1/CLKI
PGD/D+/RA0
OSC2
3 RA4/AN3/OSC2/CLKO
PGC/D-/RA1 26
ICDDATA
ICDCLK
RA3
RC5
RC4
4 ICDDATA
VUSB
5 ICDCLK
NC
6 RA3/MCLR/VPP
7
RC5/CCP1/P1A/T0CKI
RC3
RC6
RC7
RB7
VREF-/INT1/C12IN1-/AN5/RC1
8 RC4/P1B/C12OUT/SRQ
11
NC
INT2/CVREF/C12IN2-/P1D/AN6/RC2
24
RC0
22
RC1
21
20
RC2
NC 19
NC
RC3/AN7/P1C/C12IN3-/PGM
12 RC6/AN8/SS/T13CKI
13
DVUSB
VREF+/INT0/C12IN+/AN4/RC0 23
9 NC
10
25
D+
ICDMCLR/VPP 18
17
SDA/SDI/AN10/RB4
DT/RX/AN11/RB5
RC7/AN9/SDO/T1OSCO14
14 RB7/TX/CK
SCL/SCK/RB6
16
15
ICDMCLR/VPP
RB4
J1
RB5
ICDMCLR/VPP
RB6
VDD
PIC18F1XK50-ICD_S028
ICDDATA
ICDCLK
1
VDD
3
GND
4
ICSPDAT
5
ICSPCLK
6
VDD
1
VDD
VSS
2
RA5/OSC1/CLKI
RA0/D+/PGD
OSC2
3
RA4/AN3/OSC2/CLKO
RA1/D-/PGC
RA3
4
RC4
RC3
RC6
RC7
RB7
T1G
U2
OSC1
RC5
VPP
2
5
6
7
8
9
10
RA3/MCLR/VPP
VUSB
20
19
18
17
D+
DVUSB
RC5/CPP1/P1A/T0CKI
RC0/AN4/C12IN+/INT0/VREF+ 16
RC0
RC4/P1B/C12OUT/SRQ
RC1/AN5/C12IN1-/INT1/VREF- 15
RC1
RC3/AN7/P1C/C12IN3-/PGM
RC2/AN6/P1D/C12IN2-/CVREF/INT2
RC6/AN8/SS/T13CKI/T1OSCI
RB4/AN10/SDI/SDA
RB5/AN11/RX/DT
RC7/AN9/SDO/T1OSCO
RB6/SCK/SCL
RB7/TX/CK
14
13
12
11
RC2
RB4
RB5
RB6
PIC18F1XK50-I/P
DS40001356C-page 28
2008-2014 Microchip Technology Inc.
�Worldwide Sales and Service
AMERICAS
ASIA/PACIFIC
ASIA/PACIFIC
EUROPE
Corporate Office
2355 West Chandler Blvd.
Chandler, AZ 85224-6199
Tel: 480-792-7200
Fax: 480-792-7277
Technical Support:
http://www.microchip.com/
support
Web Address:
www.microchip.com
Asia Pacific Office
Suites 3707-14, 37th Floor
Tower 6, The Gateway
Harbour City, Kowloon
Hong Kong
Tel: 852-2943-5100
Fax: 852-2401-3431
India - Bangalore
Tel: 91-80-3090-4444
Fax: 91-80-3090-4123
Austria - Wels
Tel: 43-7242-2244-39
Fax: 43-7242-2244-393
Denmark - Copenhagen
Tel: 45-4450-2828
Fax: 45-4485-2829
Atlanta
Duluth, GA
Tel: 678-957-9614
Fax: 678-957-1455
Austin, TX
Tel: 512-257-3370
Boston
Westborough, MA
Tel: 774-760-0087
Fax: 774-760-0088
Chicago
Itasca, IL
Tel: 630-285-0071
Fax: 630-285-0075
Cleveland
Independence, OH
Tel: 216-447-0464
Fax: 216-447-0643
Dallas
Addison, TX
Tel: 972-818-7423
Fax: 972-818-2924
Detroit
Novi, MI
Tel: 248-848-4000
Houston, TX
Tel: 281-894-5983
Indianapolis
Noblesville, IN
Tel: 317-773-8323
Fax: 317-773-5453
Los Angeles
Mission Viejo, CA
Tel: 949-462-9523
Fax: 949-462-9608
New York, NY
Tel: 631-435-6000
San Jose, CA
Tel: 408-735-9110
Canada - Toronto
Tel: 905-673-0699
Fax: 905-673-6509
Australia - Sydney
Tel: 61-2-9868-6733
Fax: 61-2-9868-6755
China - Beijing
Tel: 86-10-8569-7000
Fax: 86-10-8528-2104
China - Chengdu
Tel: 86-28-8665-5511
Fax: 86-28-8665-7889
China - Chongqing
Tel: 86-23-8980-9588
Fax: 86-23-8980-9500
China - Hangzhou
Tel: 86-571-8792-8115
Fax: 86-571-8792-8116
China - Hong Kong SAR
Tel: 852-2943-5100
Fax: 852-2401-3431
China - Nanjing
Tel: 86-25-8473-2460
Fax: 86-25-8473-2470
China - Qingdao
Tel: 86-532-8502-7355
Fax: 86-532-8502-7205
China - Shanghai
Tel: 86-21-5407-5533
Fax: 86-21-5407-5066
China - Shenyang
Tel: 86-24-2334-2829
Fax: 86-24-2334-2393
China - Shenzhen
Tel: 86-755-8864-2200
Fax: 86-755-8203-1760
China - Wuhan
Tel: 86-27-5980-5300
Fax: 86-27-5980-5118
China - Xian
Tel: 86-29-8833-7252
Fax: 86-29-8833-7256
India - New Delhi
Tel: 91-11-4160-8631
Fax: 91-11-4160-8632
India - Pune
Tel: 91-20-3019-1500
Japan - Osaka
Tel: 81-6-6152-7160
Fax: 81-6-6152-9310
Japan - Tokyo
Tel: 81-3-6880- 3770
Fax: 81-3-6880-3771
Korea - Daegu
Tel: 82-53-744-4301
Fax: 82-53-744-4302
Korea - Seoul
Tel: 82-2-554-7200
Fax: 82-2-558-5932 or
82-2-558-5934
France - Paris
Tel: 33-1-69-53-63-20
Fax: 33-1-69-30-90-79
Germany - Dusseldorf
Tel: 49-2129-3766400
Germany - Munich
Tel: 49-89-627-144-0
Fax: 49-89-627-144-44
Germany - Pforzheim
Tel: 49-7231-424750
Italy - Milan
Tel: 39-0331-742611
Fax: 39-0331-466781
Italy - Venice
Tel: 39-049-7625286
Malaysia - Kuala Lumpur
Tel: 60-3-6201-9857
Fax: 60-3-6201-9859
Netherlands - Drunen
Tel: 31-416-690399
Fax: 31-416-690340
Malaysia - Penang
Tel: 60-4-227-8870
Fax: 60-4-227-4068
Poland - Warsaw
Tel: 48-22-3325737
Philippines - Manila
Tel: 63-2-634-9065
Fax: 63-2-634-9069
Singapore
Tel: 65-6334-8870
Fax: 65-6334-8850
Taiwan - Hsin Chu
Tel: 886-3-5778-366
Fax: 886-3-5770-955
Spain - Madrid
Tel: 34-91-708-08-90
Fax: 34-91-708-08-91
Sweden - Stockholm
Tel: 46-8-5090-4654
UK - Wokingham
Tel: 44-118-921-5800
Fax: 44-118-921-5820
Taiwan - Kaohsiung
Tel: 886-7-213-7830
Taiwan - Taipei
Tel: 886-2-2508-8600
Fax: 886-2-2508-0102
Thailand - Bangkok
Tel: 66-2-694-1351
Fax: 66-2-694-1350
China - Xiamen
Tel: 86-592-2388138
Fax: 86-592-2388130
China - Zhuhai
Tel: 86-756-3210040
Fax: 86-756-3210049
2008-2014 Microchip Technology Inc.
03/25/14
DS40001356C-page 29
�