dsPIC33CH Curiosity
Development Board
User’s Guide
2018 Microchip Technology Inc.
Advance Information
DS50002762A
�Note the following details of the code protection feature on Microchip devices:
•
Microchip products meet the specification contained in their particular Microchip Data Sheet.
•
Microchip believes that its family of products is one of the most secure families of its kind on the market today, when used in the
intended manner and under normal conditions.
•
There are dishonest and possibly illegal methods used to breach the code protection feature. All of these methods, to our
knowledge, require using the Microchip products in a manner outside the operating specifications contained in Microchip’s Data
Sheets. Most likely, the person doing so is engaged in theft of intellectual property.
•
Microchip is willing to work with the customer who is concerned about the integrity of their code.
•
Neither Microchip nor any other semiconductor manufacturer can guarantee the security of their code. Code protection does not
mean that we are guaranteeing the product as “unbreakable.”
Code protection is constantly evolving. We at Microchip are committed to continuously improving the code protection features of our
products. Attempts to break Microchip’s code protection feature may be a violation of the Digital Millennium Copyright Act. If such acts
allow unauthorized access to your software or other copyrighted work, you may have a right to sue for relief under that Act.
Information contained in this publication regarding device
applications and the like is provided only for your convenience
and may be superseded by updates. It is your responsibility to
ensure that your application meets with your specifications.
MICROCHIP MAKES NO REPRESENTATIONS OR
WARRANTIES OF ANY KIND WHETHER EXPRESS OR
IMPLIED, WRITTEN OR ORAL, STATUTORY OR
OTHERWISE, RELATED TO THE INFORMATION,
INCLUDING BUT NOT LIMITED TO ITS CONDITION,
QUALITY, PERFORMANCE, MERCHANTABILITY OR
FITNESS FOR PURPOSE. Microchip disclaims all liability
arising from this information and its use. Use of Microchip
devices in life support and/or safety applications is entirely at
the buyer’s risk, and the buyer agrees to defend, indemnify and
hold harmless Microchip from any and all damages, claims,
suits, or expenses resulting from such use. No licenses are
conveyed, implicitly or otherwise, under any Microchip
intellectual property rights unless otherwise stated.
Microchip received ISO/TS-16949:2009 certification for its worldwide
headquarters, design and wafer fabrication facilities in Chandler and
Tempe, Arizona; Gresham, Oregon and design centers in California
and India. The Company’s quality system processes and procedures
are for its PIC® MCUs and dsPIC® DSCs, KEELOQ® code hopping
devices, Serial EEPROMs, microperipherals, nonvolatile memory and
analog products. In addition, Microchip’s quality system for the design
and manufacture of development systems is ISO 9001:2000 certified.
QUALITY MANAGEMENT SYSTEM
CERTIFIED BY DNV
Trademarks
The Microchip name and logo, the Microchip logo, AnyRate, AVR,
AVR logo, AVR Freaks, BeaconThings, BitCloud, CryptoMemory,
CryptoRF, dsPIC, FlashFlex, flexPWR, Heldo, JukeBlox, KEELOQ,
KEELOQ logo, Kleer, LANCheck, LINK MD, maXStylus,
maXTouch, MediaLB, megaAVR, MOST, MOST logo, MPLAB,
OptoLyzer, PIC, picoPower, PICSTART, PIC32 logo, Prochip
Designer, QTouch, RightTouch, SAM-BA, SpyNIC, SST, SST
Logo, SuperFlash, tinyAVR, UNI/O, and XMEGA are registered
trademarks of Microchip Technology Incorporated in the U.S.A.
and other countries.
ClockWorks, The Embedded Control Solutions Company,
EtherSynch, Hyper Speed Control, HyperLight Load, IntelliMOS,
mTouch, Precision Edge, and Quiet-Wire are registered
trademarks of Microchip Technology Incorporated in the U.S.A.
Adjacent Key Suppression, AKS, Analog-for-the-Digital Age, Any
Capacitor, AnyIn, AnyOut, BodyCom, chipKIT, chipKIT logo,
CodeGuard, CryptoAuthentication, CryptoCompanion,
CryptoController, dsPICDEM, dsPICDEM.net, Dynamic Average
Matching, DAM, ECAN, EtherGREEN, In-Circuit Serial
Programming, ICSP, Inter-Chip Connectivity, JitterBlocker,
KleerNet, KleerNet logo, Mindi, MiWi, motorBench, MPASM, MPF,
MPLAB Certified logo, MPLIB, MPLINK, MultiTRAK, NetDetach,
Omniscient Code Generation, PICDEM, PICDEM.net, PICkit,
PICtail, PureSilicon, QMatrix, RightTouch logo, REAL ICE, Ripple
Blocker, SAM-ICE, Serial Quad I/O, SMART-I.S., SQI,
SuperSwitcher, SuperSwitcher II, Total Endurance, TSHARC,
USBCheck, VariSense, ViewSpan, WiperLock, Wireless DNA, and
ZENA are trademarks of Microchip Technology Incorporated in the
U.S.A. and other countries.
SQTP is a service mark of Microchip Technology Incorporated in
the U.S.A.
Silicon Storage Technology is a registered trademark of Microchip
Technology Inc. in other countries.
GestIC is a registered trademark of Microchip Technology
Germany II GmbH & Co. KG, a subsidiary of Microchip Technology
Inc., in other countries.
All other trademarks mentioned herein are property of their
respective companies.
© 2018, Microchip Technology Incorporated, All Rights Reserved.
ISBN: 978-1-5224-3181-7
== ISO/TS 16949 ==
DS50002762A-page 2
Advance Information
2018 Microchip Technology Inc.
�dsPIC33CH CURIOSITY DEVELOPMENT
BOARD USER’S GUIDE
Table of Contents
Preface ........................................................................................................................... 5
Chapter 1. Introduction................................................................................................ 11
1.1 Schematics and Bill of Materials (BOM) ....................................................... 12
Chapter 2. Hardware .................................................................................................... 13
2.1 Powering the Board ...................................................................................... 13
2.1.1 USB Power ................................................................................................ 13
2.1.2 External Power .......................................................................................... 13
2.2 Using the Programmed Demo Firmware ...................................................... 14
2.3 Reprogramming and Debugging the dsPIC33CH128MP508 Device (U1) ...... 14
2.4 Using the Isolated USB-UART Interface ...................................................... 15
2.5 Circuit Details ............................................................................................... 15
2.5.1 Jumpers/Headers/Connectors ................................................................... 15
2.5.2 SMPS Hardware Overcurrent Protection ................................................... 16
2.5.3 SMPS Hardware Overvoltage Protection .................................................. 17
2.5.4 PWM DAC/DC Bias Generator .................................................................. 17
2.5.5 Transient Load Tester Circuit .................................................................... 18
2.6 Low-Side Current Sensing ........................................................................... 19
2.7 High-Side Current Sensing ........................................................................... 20
Appendix A. Schematics ............................................................................................. 21
Appendix B. Bill of Materials....................................................................................... 27
Worldwide Sales and Service .................................................................................... 30
2018 Microchip Technology Inc.
Advance Information
DS50000000A-page 3
�dsPIC33CH Curiosity Development Board User’s Guide
NOTES:
DS50000000A-page 4
Advance Information
2018 Microchip Technology Inc.
�dsPIC33CH CURIOSITY DEVELOPMENT
BOARD USER’S GUIDE
Preface
NOTICE TO CUSTOMERS
All documentation becomes dated, and this manual is no exception. Microchip tools and
documentation are constantly evolving to meet customer needs, so some actual dialogs and/
or tool descriptions may differ from those in this document. Please refer to our website
(www.microchip.com) to obtain the latest documentation available.
Documents are identified with a “DS” number. This number is located on the bottom of each
page, in front of the page number. The numbering convention for the DS number is
“DSXXXXXXXXA”, where “XXXXXXXX” is the document number and “A” is the revision level
of the document.
For the most up-to-date information on development tools, see the MPLAB® IDE on-line help.
Select the Help menu, and then Topics to open a list of available on-line help files.
INTRODUCTION
This preface contains general information that will be useful to know before using the
dsPIC33CH Curiosity Development Board. Topics discussed in this preface include:
•
•
•
•
•
•
•
•
Document Layout
Conventions Used in this Guide
Recommended Reading
Recommended Reading
The Microchip WebSite
Development Systems Customer Change Notification Service
Customer Support
Document Revision History
DOCUMENT LAYOUT
This user’s guide provides an overview of the dsPIC33CH Curiosity Development
Board. The document is organized as follows:
• Chapter 1. “Introduction” – This chapter introduces the dsPIC33CH Curiosity
Development Board and provides a brief overview of its features.
• Chapter 2. “Hardware” – This chapter describes some of the noteworthy
hardware features of the board.
• Appendix A. “Schematics” – This appendix provides schematic diagrams for
the dsPIC33CH Curiosity Development Board.
• Appendix B. “Bill of Materials (BOM)” – This appendix provides the component
list used in assembling the board.
2018 Microchip Technology Inc.
Advance Information
DS50002762A-page 5
�dsPIC33CH Curiosity Development Board User’s Guide
CONVENTIONS USED IN THIS GUIDE
This manual uses the following documentation conventions:
DOCUMENTATION CONVENTIONS
Description
Arial font:
Italic characters
Initial caps
Quotes
Underlined, italic text with
right angle bracket
Bold characters
N‘Rnnnn
Text in angle brackets < >
Courier New font:
Plain Courier New
Represents
Referenced books
Emphasized text
A window
A dialog
A menu selection
A field name in a window or
dialog
A menu path
MPLAB® IDE User’s Guide
...is the only compiler...
the Output window
the Settings dialog
select Enable Programmer
“Save project before build”
A dialog button
A tab
A number in verilog format,
where N is the total number of
digits, R is the radix and n is a
digit.
A key on the keyboard
Click OK
Click the Power tab
4‘b0010, 2‘hF1
Italic Courier New
Sample source code
Filenames
File paths
Keywords
Command-line options
Bit values
Constants
A variable argument
Square brackets [ ]
Optional arguments
Curly braces and pipe
character: { | }
Ellipses...
Choice of mutually exclusive
arguments; an OR selection
Replaces repeated text
Represents code supplied by
user
DS50002762A-page 6
Examples
Advance Information
File>Save
Press ,
#define START
autoexec.bat
c:\mcc18\h
_asm, _endasm, static
-Opa+, -Opa0, 1
0xFF, ‘A’
file.o, where file can be
any valid filename
mcc18 [options] file
[options]
errorlevel {0|1}
var_name [,
var_name...]
void main (void)
{ ...
}
2018 Microchip Technology Inc.
�Preface
RECOMMENDED READING
This user’s guide describes how to use the dsPIC33CH Curiosity Development Board.
The device-specific data sheets contain current information on programming the specific
microcontroller or Digital Signal Controller (DSC) devices. The following Microchip
documents are available and recommended as supplemental reference resources:
MPLAB® XC16 C Compiler User’s Guide (DS50002071)
This comprehensive guide describes the usage, operation and features of Microchip’s
MPLAB XC16 C compiler (formerly MPLAB C30) for use with 16-bit devices.
MPLAB® X IDE User’s Guide (DS50002027)
This document describes how to set up the MPLAB X IDE software and use it to create
projects and program devices.
dsPIC33CH128MP508 Family Data Sheet (DS70005319)
Refer to this document for detailed information on the dsPIC33CH Dual Core Digital
Signal Controllers (DSCs). Reference information found in this data sheet includes:
•
•
•
•
Device memory maps
Device pinout and packaging details
Device electrical specifications
List of peripherals included on the devices
dsPIC33/PIC24 Family Reference Manual Sections
Family Reference Manual (FRM) sections are available, which explain the operation of
the dsPIC® DSC MCU family architecture and peripheral modules. The specifics of
each device family are discussed in the individual family’s device data sheet.
2018 Microchip Technology Inc.
Advance Information
DS50002762A-page 7
�dsPIC33CH Curiosity Development Board User’s Guide
THE MICROCHIP WEBSITE
Microchip provides online support via our website at www.microchip.com. This website
is used as a means to make files and information easily available to customers.
Accessible by using your favorite Internet browser, the website contains the following
information:
• Product Support – Data sheets and errata, application notes and sample
programs, design resources, user’s guides and hardware support documents,
latest software releases and archived software
• General Technical Support – Frequently Asked Questions (FAQs), technical
support requests, online discussion groups, Microchip consultant program
member listing
• Business of Microchip – Product selector and ordering guides, latest Microchip
press releases, listing of seminars and events, listings of Microchip sales offices,
distributors and factory representatives
DEVELOPMENT SYSTEMS CUSTOMER CHANGE NOTIFICATION SERVICE
Microchip’s customer notification service helps keep customers current on Microchip
products. Subscribers will receive e-mail notification whenever there are changes,
updates, revisions or errata related to a specified product family or development tool of
interest.
To register, access the Microchip website at www.microchip.com, click on Customer
Change Notification and follow the registration instructions.
The Development Systems product group categories are:
• Compilers – The latest information on Microchip C compilers and other language
tools. These include the MPLAB® C compiler; MPASM™ and MPLAB 16-bit
assemblers; MPLINK™ and MPLAB 16-bit object linkers; and MPLIB™ and
MPLAB 16-bit object librarians.
• Emulators – The latest information on the Microchip MPLAB REAL ICE™
in-circuit emulator.
• In-Circuit Debuggers – The latest information on the Microchip in-circuit
debugger, MPLAB ICD 4.
• MPLAB X IDE – The latest information on Microchip MPLAB X IDE, the
Windows® Integrated Development Environment for development systems tools.
This list is focused on the MPLAB X IDE, MPLAB SIM simulator, MPLAB X IDE
Project Manager and general editing and debugging features.
• Programmers – The latest information on Microchip programmers. These include
the MPLAB PM3 device programmer and the PICkit™ 3 development
programmers.
DS50002762A-page 8
Advance Information
2018 Microchip Technology Inc.
�Preface
CUSTOMER SUPPORT
Users of Microchip products can receive assistance through several channels:
•
•
•
•
Distributor or Representative
Local Sales Office
Field Application Engineer (FAE)
Technical Support
Customers should contact their distributor, representative or field application engineer
(FAE) for support. Local sales offices are also available to help customers. A listing of
sales offices and locations is included in the back of this document.
Technical support is available through the website at: http://support.microchip.com
DOCUMENT REVISION HISTORY
Revision A (June 2018)
This is the initial released version of this document.
2018 Microchip Technology Inc.
Advance Information
DS50002762A-page 9
�dsPIC33CH Curiosity Development Board User’s Guide
NOTES:
DS50002762A-page 10
Advance Information
2018 Microchip Technology Inc.
�dsPIC33CH CURIOSITY DEVELOPMENT
BOARD USER’S GUIDE
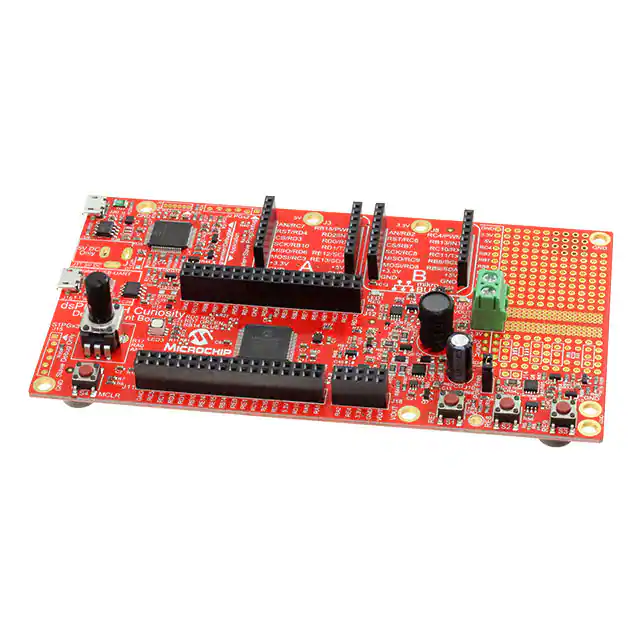
Chapter 1. Introduction
The dsPIC33CH Curiosity Development Board (DM330028) is intended as a
cost-effective development and demonstration platform for the dsPIC33CH128MP508
family of dual core, high-performance Digital Signal Controllers. Some of the board
hardware features are highlighted in Figure 1-1.
FIGURE 1-1:
dsPIC33CH CURIOSITY DEVELOPMENT BOARD
3
2
14
5
9
10
4
11
12
1
8
7
13
6
Hardware Features:
1. dsPIC33CH128MP508 dual core, 16-bit DSP target device.
2. Integrated PICkit™-On-Board (PKOB) programmer/debugger.
3. 2x mikroBUS™ interfaces for hardware expansion, compatible with a wide range
of existing click boards™ from MikroElektronika (www.mikroe.com).
4. 1x Red/Green/Blue (RGB) LED.
5. 2x general purpose red indicator LEDs.
6. 3x general purpose push buttons.
7. 1x MCLR Reset push button.
8. 10k potentiometer.
9. Galvanically isolated USB-UART interface, capable of up to 460,800 baud.
10. Female, 100 mil pitch, I/O pin access headers for probing and connecting to all
target microcontroller GPIO pins.
11. Configurable Switch Mode Power Supply (SMPS) test circuit that can be
operated in Buck, Boost, or Buck-Boost modes, using either Voltage mode or
Peak Current mode control.
12. Converter output voltage screw terminal.
13. Configurable load step transient generator.
14. General purpose through-hole and SMT prototyping area.
2018 Microchip Technology Inc.
Advance Information
DS50002762A-page 11
�dsPIC33CH Curiosity Development Board User’s Guide
1.1
SCHEMATICS AND BILL OF MATERIALS (BOM)
Schematics and the BOM for the dsPIC33CH Curiosity Development Board are located in
Appendix A. “Schematics” and Appendix B. “Bill of Materials (BOM)”, respectively.
DS50002762A-page 12
Advance Information
2018 Microchip Technology Inc.
�dsPIC33CH CURIOSITY DEVELOPMENT
BOARD USER’S GUIDE
Chapter 2. Hardware
2.1
POWERING THE BOARD
2.1.1
USB Power
The board is intended to be primarily powered from the PKOB USB micro-B connector
J20. Power is not sourced through USB connector J16, as it is part of the isolated
USB-UART interface. The official “USB 2.0 Specification” restricts USB applications to
consuming no more than 500 mA of USB VBUS power from the host. Polyfuse TH1 is
rated for 500 mA to enforce the USB current restrictions and to help protect the board,
or host, from damage in the event of unintended short circuits or SMPS output
overloads.
When operating the board from USB power, approximately 300 mA of VBUS current is
available to the SMPS circuit, as about 200 mA of the total should be reserved for use
by the other non-SMPS circuitry on the board (ex: primarily U1, U4, U11, R17,
LED5, etc.).
2.1.2
External Power
An external DC wall cube may optionally be connected if a DC barrel jack is installed
in the unpopulated footprint J17. If an external wall cube is used, it should be well
regulated and rated for 5.0V, ≤1.5A, with center pin positive. Compared to operating
from USB power, powering the board with an external wall cube enables more power
to be sourced by the SMPS circuit on the board. It is not necessary to use an external
power supply for standard operation at lower current levels (e.g., SMPS circuit output
load power of about Microchip Starter Kits>Starter Kits (PKOB)>dsPIC33CH
Curio…, as shown in Figure 2-1.
FIGURE 2-1:
DS50002762A-page 14
dsPIC33CH CURIOSITY PKOB TOOL SELECTION
Advance Information
2018 Microchip Technology Inc.
�Hardware
2.4
USING THE ISOLATED USB-UART INTERFACE
The board implements a galvanically isolated USB-UART interface based around the
MCP2221A chip. The MCP2221A implements the standard Communication Device
Class (CDC) – Abstract Control Model (ACM) protocol, and therefore, can use standard
USB drivers that are provided with modern Windows®, Mac® and Linux® operating
systems. Under most operating systems, the USB driver installation will be fully automatic. Under certain older operating systems, or if the device is attached to an older than
Windows 10 machine without an active internet connection, manual installation of the
drivers may be necessary. In this case, the driver package can be downloaded from:
www.microchip.com/mcp2221a
Details on how to access the serial port from Mac and Linux operating systems can also
be found in the associated collateral for the MCP2221A. Under Windows, after
successful USB driver installation, the device will appear as a “COMx” port object,
which standard serial terminal programs can open/read/write to and from.
2.5
CIRCUIT DETAILS
Some of the circuit blocks in the schematics may not have immediately obvious
purpose or method of operation. This section highlights some of these circuit elements
and provides an explanation for their intent and function.
2.5.1
Jumpers/Headers/Connectors
J1 – This is an unpopulated 2-pin, 100 mil jumper header, which may optionally be used
to insert a current meter in series with the U1 VDD current path to measure the microcontroller current consumption. In order to measure the U1 current, the trace on the
bottom of the PCB, that shorts the two pins of J1, should be cut and a 2-pin jumper
should be soldered into J1.
J2 – This is an unpopulated 6-pin staggered header interface, which can optionally be
used to connect an external programmer/debugger tool to the target microcontroller
U1. Ordinarily, it is not necessary to use J2, since the integrated programmer/debugger
(PKOB) circuit connects to the same U1 program/debug interface pins.
J3 – This is a female header that implements the mikroBUS Interface A, which can be
used to attach hardware daughter boards to expand the functionality of the
development board.
J8 – This is a female header that implements the mikroBUS Interface B, which can be
used to attach hardware daughter boards to expand the functionality of the
development board.
J10 – This jumper sets the -3 dB low-pass filter breakpoint frequency of the RC
network, composed of R54 + C26/C41. When the jumper is open, the low-pass filter
frequency is around 15.9 kHz, but with the jumper capped, it is around 1.4 kHz. When
a sufficiently high-frequency PWM waveform is generated on RC5, the low-pass filter
can smooth it into a near DC value, which is buffered by op amp U8, providing a
software controlled DAC capability.
J11 – This is a female I/O pin access header used for accessing the U1 microcontroller
I/O pins.
J12 – This is a female I/O pin access header used for accessing the U1 microcontroller
I/O pins.
2018 Microchip Technology Inc.
Advance Information
DS50002762A-page 15
�dsPIC33CH Curiosity Development Board User’s Guide
J13 – This jumper sets the effective resistor divider feedback ratio for the SMPS output
voltage when it is measured by the U1 ADC. When the SMPS is used to generate relatively low voltages (ex: 0V-6.5V), it is suggested to keep J13 capped to maximize
feedback circuit sensitivity. When the SMPS will be used to generate voltages above
6.5V, J13 should be opened to ensure the feedback voltage stays within the input
sensing range of the ADC.
J14 – This is an unpopulated 2-pin jumper location that can be used to disconnect the
SMPS transient generator circuitry from the output of the SMPS circuit. In order to
disconnect the transient generator circuit, it is suggested to populate J14 with a 2-pin
jumper header and to cut the trace (NT5) on the bottom of the PCB linking the pins
of J14.
J15 – This is an unpopulated 6-pin staggered header interface that can optionally be
used to connect an external programmer/debugger tool to the target microcontroller U1
when performing dual simultaneous debug of both the Master and Slave cores. The
J15 header connects to the Slave debug port, S1PGx3, and is only intended for use
during dual debug operations. For single core debug of either the Master or Slave,
either J2 or the PKOB circuit should be used. The holes for J15 are slightly staggered,
which provides some friction retention force, without requiring physical soldering, when
a straight male-male or right angle male-male header is installed in J15.
J16 – This is a standard female USB micro-B connector, which connects to the
MCP2221A USB-UART converter chip. This USB interface is a data interface only, as
it is galvanically isolated from the rest of the application circuitry and does not supply
power to the rest of the board.
J17 – This is an unpopulated footprint that may optionally be used to install a standard
DC barrel jack for externally powering the board from a regulated 5.0V wall cube.
J18 – This is a female I/O pin access header for accessing certain U1 microcontroller
I/O pins, along with the various power rails implemented on the development board.
J19 – This is an unpopulated 2-pin jumper header, that may optionally be used as an
attachment point for connecting an external frequency response analyzer tool, for
measuring the SMPS control loop phase/gain characteristics. The 20 Ohm load resistor
(R96) is connected directly across the J19 pins.
J20 – This is a standard female USB micro-B connector that is intended to be used to
power the board and provide a USB communication path when using the integrated
programmer/debugger (PKOB) circuit.
J21 – This is a 2-pin screw terminal that provides access to the SMPS VOUT and GND
nets. This is a convenient place for attaching external loads that may be powered by
the SMPS circuit.
2.5.2
SMPS Hardware Overcurrent Protection
The components, Q11, C22, R67, U10, and the high-side current sense resistors,
R59 + R74, implement a crude form of hardware-based overcurrent protection. In a
normal/real application SMPS design, overcurrent protection is often provided through
the use of comparator(s), which would typically be implemented using the comparators
and DACs inside the microcontroller. However, during initial firmware development, the
code for enabling the DACs + comparators may not have been written and debugged
yet, at the time of, say, accidentally dropping an oscilloscope ground lead onto the
demo board. This could result in an unanticipated random short circuit. In these
scenarios, the hardware overcurrent protection circuit implemented by Q11, U10 and
surrounding components can potentially help protect the circuit from damage.
DS50002762A-page 16
Advance Information
2018 Microchip Technology Inc.
�Hardware
During an overcurrent condition, when the current through R59 + R74 starts to exceed
approximately 1.2A (ex: 600 mV sense voltage), the base of Q11 will become forward
biased and it will begin to turn on. This will quickly charge the capacitor C22 to the
Schmitt trigger VIH input logic high threshold of the U10 logic chip (which is configured
as a Schmitt trigger OR gate). Once the VIH level is reached, the U10 output will go high
(independent of the RC14_S1PWM7H signal), thus turning off the high-side P-channel
MOSFET Q6.
At this point, the current through Q6 will drop to zero, Q11 will turn off, but C22 will
remain charged near the VIH level until it is eventually bled down to the VIL level through
R67. The U10 output will not immediately switch back on due to the Schmitt trigger
hysteresis voltage between the VIH and VIL input thresholds of U10. It takes approximately 40% of an RC time constant (between C22 + R67) for the VIL threshold to be
reached, which enforces a minimum Q6 off time of roughly 80 µs. This delay is sufficient for the L1 inductor current to drop all the way to zero due to the energy loss in the
diodes D2, D5 and the resistance in the freewheeling current path.
Therefore, even during short-circuit conditions with improperly implemented firmware
control signals, the average current can be maintained at a reasonably safe level. Once
the firmware for enabling and using the internal U1 comparators and DACs has been
developed/debugged, it is expected that the Q11 and related hardware overcurrent
protection components would be omitted, since they would become somewhat
redundant in the final application design.
2.5.3
SMPS Hardware Overvoltage Protection
The components, Q7, C15, R64, R65, R66 and U5, implemented a hardware-based
output overvoltage protection feature in a manner similar to the hardware overcurrent
protection circuit. When a conventional boost converter is operated open loop without
enough load on the output, the output voltage can theoretically rise to an indeterminate
high level, which can potentially avalanche the output Schottky diode, the boost
MOSFET or the output capacitors.
When the output voltage rises above approximately 16V, the output of the resistor
divider (R65 + R66) will become high enough to begin forward biasing the Q7 base and
turning on the transistor. This will quickly discharge C15 from 3.3V down to the VIL
Schmitt trigger input threshold of the Schmitt AND gate implemented by U5. This overrides the PWM control signal and shuts down Q2 until such time as the output
overvoltage condition has decayed away, and enough time has elapsed for R64 to
charge C15 back up to the VIH Schmitt trigger input threshold of U5 (automatically
re-enabling PWM activity on Q2).
In a typical/real SMPS application, the closed-loop output feedback control loop would
normally be responsible for preventing output overvoltage conditions from occurring.
However, during initial firmware development, the closed-loop control algorithms may
not yet be fully implemented and operational (or may be halted from normal operation,
for example, due to hitting a debug breakpoint in the firmware). In these scenarios, the
hardware output overvoltage protection circuitry can help to prevent potential circuit
damage.
2.5.4
PWM DAC/DC Bias Generator
The RC5_S1PWM2L net is intended to be driven with a fixed frequency PWM waveform. The low-pass filter, consisting of R54 + C26 (and C41 when jumper J10 is
capped), averages the PWM waveforms, and for a high PWM frequency, generates an
adjustable DC voltage. Op amp U8 buffers the DC voltage, providing a low-impedance
firmware adjustable DAC, where the output voltage is based on the PWM duty cycle
provided to the circuit.
2018 Microchip Technology Inc.
Advance Information
DS50002762A-page 17
�dsPIC33CH Curiosity Development Board User’s Guide
2.5.5
Transient Load Tester Circuit
The MOSFET Q8 and surrounding components implement an adjustable
constant-current sink that can be periodically pulsed on for a few milliseconds at a time
to generate momentary SMPS output load transient pulses. During control loop firmware development, it is often desirable to study the control system behavior in
response to large signal step changes.
By monitoring the SMPS output voltage waveforms in response to the load step
transient event, one can get an idea of the real world output voltage undershoot during
the transient and the subsequent overshoot that will occur after the transient load is
rapidly removed. Additionally, the transient response recovery waveform shapes can
also provide hints as to likely control loop stability and approximate phase margin.
Load step transient response curves exhibiting damped sinusoidal oscillating output
voltage, that takes a long time to recover to steady-state DC values, implies a control
loop with low phase margin, while an over damped RC-like recovery waveform implies
higher phase margin.
When the RC13_TRANSIENT logic signal is driven high, the MOSFET Q8 will begin to
turn on through the gate resistor R79. However, as the gate voltage rises, current will
begin to flow through the MOSFET and current sense resistor R94, which will create a
voltage that is sensed by Q9. When the voltage at the base of Q9 is sufficient to turn it
on, it will begin sinking current from the gate of Q8, preventing the gate voltage from
rising further and maintaining MOSFET Q8 in the linear region, where it behaves like a
voltage controlled constant-current sink.
Components, R83 and C40, provide compensation for the MOSFET Q8 gate waveform
to ensure small signal stable regulation of the constant current. The relative sizes of
R79 and R87 set the DC gain of the constant-current regulation control loop.
The value of current sense resistor R94 sets the current limit, but it is made adjustable
by biasing the base of Q9, up or down, via the resistor dividers R84 and R85. When the
S1PWM2L_DAC_ISET DC voltage level is high (e.g., near 3.3V), Q9 will always be
turned on, even with no current through R94 due to the resistor divider output (of
R84 + R85) being higher than the turn-on voltage of the BJT Q9. Conversely, when the
S1PWM2L_DAC_ISET DC voltage is low (e.g., near 0.0V), this decreases the voltage
appearing on the Q9 base, requiring larger currents through R94 before the MOSFET
Q8 gate voltage becomes limited.
Adjusting the PWM waveform duty cycle on RC5_S1PWM2L by +1.0% alters the Q8
constant-current sink value by approximately -12 mA. At 50% PWM duty cycle, the
approximate current sink level is around 390 mA, but will vary somewhat between
boards and at different ambient temperatures, as these will affect the Q9 turn-on
voltage. For exact current sink values, it is necessary to use closed-loop control by
measuring the RA2_TRANSIENTFB current sense voltage with the ADC at run time.
Then, using the resulting value to fine-tune adjust the PWM duty cycle on
RC5_S1PWM2L.
Since Q8 is driven in the linear region during the transient pulse, the instantaneous
power dissipation within the MOSFET can be quite high, potentially up to 15W if the
circuit is configured for 15V output and 1A pulse load current. This power dissipation
level cannot be sustained indefinitely without a substantial heat sink, but for short
pulses (ex: ≤100 ms based on the safe operating area graph in the MCP87130T
MOSFET data sheet), the thermal inertia of the MOSFET die and package allow the
junction temperature to stay below the 150ºC maximum of the device. However, in
between pulses, enough time must be allowed for the die and package to cool back to
room temperature, before the next pulse, in order to ensure reliable operation of the
circuit. It is therefore recommended to control RC13_TRANSIENT, so as to generate
short pulses (ex: ≤10 ms) with long off times between pulses (ex: pulse rate of ~5 Hz).
DS50002762A-page 18
Advance Information
2018 Microchip Technology Inc.
�Hardware
In the event of improper firmware control of the RC13_TRANSIENT net (e.g., DC logic
high or high time pulses > 10 ms), Q8 would potentially experience high sustained
power dissipation, and unless protected somehow, would be vulnerable to thermal
failure. To prevent this scenario, components, Q10, R88, C51, R90 and R91, implement a crude maximum on-time restricting sub-circuit, which is intended to limit the Q8
on time to roughly 10 ms maximum.
When RC13_TRANSIENT goes high, C51 begins charging through R88 and will
eventually reach approximately 2x the VBE forward voltage necessary to turn on Q10.
At this point, the output voltage of the resistor dividers, R90 and R91, rises high enough
that Q10 begins turning on, sinking current/voltage away from the gate of Q8 and eventually turning off the MOSFET Q8. When RC13_TRANSIENT is eventually driven logic
low, C51 discharges through R90 and R91, resetting the circuit automatically.
2.6
LOW-SIDE CURRENT SENSING
During Buck mode operation, it is sometimes desirable to be able to measure the
current during the off time of MOSFET Q6 if implementing some form of “peak valley”
or Average Current mode control algorithm. Low-side current sensing during the
MOSFET off time is possible via the current sense resistors, R63, R92 and R93. However, the voltage developed across the current sense resistors will be a negative
voltage with respect to ground. The signal is therefore connected to the inverting input
of one of the PGAs in the microcontroller, which can then be used to invert and amplify
the negative voltage into a positive voltage that can be measured by the ADC or used
by a comparator inside the device.
When supplying a negative input voltage to the PGA, it is important to maintain the I/O
pin voltage within the absolute maximum ratings from the device data sheet, which
allows for negative voltages only within VSS to (VSS – 300 mV) range. Therefore,
Schottky diode D9 and resistor R95 are used to clamp the negative voltages to within
the 0V to -300 mV range. However, it is important to be aware that the inverting inputs
to the PGAs on the device have approximately 10k typical input impedance from the
device data sheet, and therefore, the resistance of R95 will reduce the gain of the
amplifier for a given PGA setting. Such that, in this configuration, the firmware should
not rely on the absolute output voltage of the PGA to reflect the true current through the
sense resistors, unless the overall gain of the complete circuit is directly measured and
factored into the computations in the firmware.
2018 Microchip Technology Inc.
Advance Information
DS50002762A-page 19
�dsPIC33CH Curiosity Development Board User’s Guide
2.7
HIGH-SIDE CURRENT SENSING
The SMPS on-time current can be measured by the voltage developed across the
high-side current sense resistors, R59 and R74. However, the ISENSEH signal is
referenced to the +5V input rail of the SMPS circuit (not to ground), which prevents it
from being measured directly by the ADC or comparators in the microcontroller U1.
Therefore, the ISENSEH voltage signal is level shifted (to be ground referenced) and
amplified by the components, U7A, Q1, R52 and R98, with an effective gain of 3.3.
Components, R97 and R102, add a small DC bias (approximately -71 mV, before level
shifter gain or about +235 mV at RA3_ISENSEH), which appears at the
RA3_ISENSEH microcontroller pin as an intentional offset error in the current
measurement. This intentional DC biasing ensures that the current sense voltage
signal is always within the U1 comparator input sensing range and the internal DAC
reachable range, even when the Q6 current is exactly 0.0 mA with realistic comparator
and DAC offset voltages.
The final output voltage on RA3_ISENSEH is related to the Q6 current approximately,
as shown in Equation 2-1 and Equation 2-2 (where RA3_ISENSEH is the voltage in
volts measurable with the microcontroller ADC; VIN is the +5V rail input voltage, which
may be ~4.6V under load during operation and IQ6 is the current through the MOSFET
Q6 in amps). Equation 2-1 and Equation 2-2 were derived by simplifying and substituting resistor values into Equation 2-3 through Equation 2-6, which in turn, were derived
from the schematic implementation.
EQUATION 2-1:
RA3_ISENSEH 0.04877 • VIN + 1.626 • IQ6
EQUATION 2-2:
IQ6
RA3_ISENSEH – 0.04877 • VIN
1.626
EQUATION 2-3:
1 –1
1
Rsense =
+
= 0.5 Ohms
R74
R59
EQUATION 2-4:
ISENSEH_BIASED = (VIN – IQ6 • Rsense)
R102
(R102 + R97)
EQUATION 2-5:
RA3_ISENSEH =
R98
(VIN – ISENSEH_BIASED)
R52
EQUATION 2-6:
RA3_ISENSEH =
DS50002762A-page 20
[
R98
(VIN – IQ6 • Rsense)(R102)
VIN –
R52
R102 + R97
Advance Information
]
2018 Microchip Technology Inc.
�dsPIC33CH CURIOSITY DEVELOPMENT
BOARD USER’S GUIDE
Appendix A. Schematics
The schematics for the dsPIC33CH Curiosity Development Board (DM330028) are shown in Figure 1
through Figure 4.
2018 Microchip Technology Inc.
Advance Information
DS50002762A-page 21
�dsPIC33CH CURIOSITY BOARD SCHEMATIC REV. 1.0 (SHEET ONE OF FOUR)
AVDD
AVSS
RE8_S2
VPP/MCLR
VDD
GND
ICSPDAT
ICSPCLK
NC
RB0_OSCI
RB1_IBIAS2
RB2_ANB
RB3_PGD2
RB4_PGC2
RB5_S1PGD3
RB6_S1PGC3
RB7_CSB
RB8_SCLB
RB9_SDAB
RB10_SCKA
RB11
RB12
RB13_INTB
RB14_RGB_BLUE
RB15_PWMA
AN12/S1AN10/IBIAS3/RP48/RC0
AN13/S1ANA1/ISRC0/RP49/RC1
AN14/S1ANA0/ISRC1/RP50/RC2
CMP1B/S1AN8/S1CMP3B/RP51/RC3
RP52/S1PWM2H/RC4
RP53/S1PWM2L/RC5
RP54/S1AN11/S1CMP1B/RC6
AN15/ISRC2/RP55/S1AN12/RC7
RP56/ASDA1/SCK2/S1ASDA1/S1SCK1/RC8
RP57/ASCL1/SDI2/S1ASCL1/S1SDI1/RC9
RP58/S1PWM1H/RC10
RP59/S1PWM1L/RC11
RP60/PWM4H/RC12
RP61/PWM4L/RC13
RP62/S1PWM7H/RC14
RP63/S1PWM7L/RC15
1
2
3
4
5
6
J15
VPP/MCLR
VDD
GND
ICSPDAT
ICSPCLK
NC
RB3_PGD2
RB4_PGC2
RC0_PWMDACFB
RC1_VOUTFB
RC2
RC3_MOSIA
RC4_PWMB
RC5_S1PWM2L
RC6_RSTB
RC7_ANA
RC8_SCKB
RC9_MIS OB
RC10_RXB
RC11_TXB
RC12
RC13_TRANSIENT
RC14_S1PWM7H
RC15_S1PWM7L
10k
1%
3V3
R77
Buttons
1
DNP
Master and Slave Programming/Debug
(also connects to PKO B circuit output)
1
2
3
4
5
6
4.7k
RC7_ANA
RD4_RSTA
RD3_CSA
RB10_SCKA
RD6_MISOA
RC3_MOSIA
0603
RA4_S1MCLR3
RB5_S1PGD3
RB6_S1PGC3
3V3
C3
Slave Debug Only (during dual debug)
AN
RST
CS
SCK
MISO
MOSI
+3.3V
GND
PWM
INT
RX
TX
SCL
SDA
+5V
GND
16
15
14
13
12
11
10
9
RB15_PWMA
RD0_RXA
RD1_TXA
RE12_SCLA
RE13_SDAA
3
8 MHz Oscillator
S2
RE9_S3
10k
1%
R6
1k
0603
1%
1
4
2
3
S3
3V3
MCLR
Reset
Button
R7
4.7k
0603
1%
R8
1k
0603
1%
4
1
3
2
S4
G eneral Purpose LEDs
RB14_RGB_BLUE
RD7_RGB_GREEN
RD5_RGB_RED
R13
R12
R11
330R
RGB LED
RE0_LED1
330R
330R
RE1_LED2
L E D3
0.1 μF
25V
0603
RD2_INTA
1k
RA0_POT
5V
R1 0
820R
0603
1%
RED
3V3
R16
R17
10k
270R
1%
C2
20%
0.1 μF
25V
0603
0.1 μF
25V 0603
mikroBUS™ Interface B
Pin 25
Pin 25
C1 0
10 μF
25V
0805
Pin 26
C9
Pin 70
Pin 50
C8
0.1 μF
25V
0603
Pin 26
Pin 71
Pin 51
C7
0.1 μF 0.1 μF
25V
25V
0603 0603
Pin 32
Pin 11
C6
RED
L ED2
Prototyping Area
Pin 31
Pin 12
Pin 12
Pin 11
2018 Microchip Technology Inc.
C5
820R
0603
1%
P otentiometer
R14
U1VDD
1 μF
16V
0603
L ED1
R9
C4
J3
0.1 μF
25V 0603
RB0_OSCI
DS C 6011J I1A-008.0000
LED_RGB
1
2
3
4
5
6
7
8
3
OUT
0.1 μF
25V
0603
4
2
X1
VDD
STB
GND
R5
20k
1%
mikroBUS™ Interface A
3V3
R99 1%
4
1
2
C1
dsPIC33CH128MP508
HDR-2.54 1x6 STAGGERED
3V3
MCLR
15
28
29
33
63
65
30
40
46
47
66
67
5
6
7
8
3
S1
R4
1k
0603
1%
4
2
3
RE0
RE1
RE2
RE3
RE4
RE5
S1PGA3N2/RE6
RE7
RE8
RE9
RE10
RE11
ASCL2/RE12
ASDA2/RE13
RE14
RE15
U1
J2
34
35
41
43
45
55
56
58
60
61
75
76
78
80
1
3
3V3
1
2
RP64/S1PWM4L/RD0
OSC I/CLKI/AN5/RP32/S1AN5/RB0
RP65/S1PWM4H/RD1
OSCO/CLKO/AN6/IBIAS2/RP33/S1AN4/RB1
RP66/S1PWM8L/RD2
DACOUT/AN7/CMP1D/RP34/INT0/S1MCLR2/S1AN3/S1ANC0/S1ANC1/S1CMP1D/S1CMP2D/S1CMP3D/RB2
PGD2/AN8/RP35/S1PGD2/S1AN18/S1CMP3A/S1PGA3P1/RB3
RP67/S1PWM3L/RD3
RP68/S1PWM3H/RD4
PGC2/RP36/S1PGC2/S1AN9/S1PWM5L/RB4
RP69/S1PWM6L/RD5
PGD3/RP37/SDA2/S1PGD3/RB5
RP70/S1PWM6H/RD6
PGC3/RP38/SCL2/S1PGC3/RB6
RP71/S1PWM8H/RD7
TDO/AN9/RP39/S1MCLR1/S1AN6/S1PWM5H/RB7
SDO2/PCI19/S1SDO1/S1PCI19/RD8
PGD1/AN10/RP40/SCL1/S1PGD1/S1AN7/S1SCL1/RB8
PCI20/S1PCI20/RD9
PGC1/AN11/RP41/SDA1/S1PGC1/S1SDA1/RB9
ISRC3/S1AN13/S1CMP2B/RD10
TMS/RP42/PWM3H/RB10
S1AN17/S1PGA1P2/RD11
TCK/RP43/PWM3L/RB11
S1AN14/S1PGA2P2/RD12
TDI/RP44/PWM2H/RB12
S1ANN0/S1PGA1N2/RD13
RP45/PWM2L/RB13
PCI21/S1ANN1/S1PGA2N2/S1PCI21/RD14
RP46/PWM1H/RB14
PCI22/S1PCI22/RD15
RP47/PWM1L/RB15
HDR-2.54 Male 1x6 STAGGERED
3V3
3V3
R3
MCLR
2
4
17
19
22
24
37
39
42
44
57
59
62
64
77
79
RE0_LED1
RE1_LED2
RE2
RE3
RE4
RE5
RE6
RE7_S1
RE8_S2
RE9_S3
RE10
RE11
RE12_SCLA
RE13_SDAA
RE14
RE15
1k
0603
1%
1
1k
0603
1%
10k
1%
R2
6
R73
Advance Information
74
73
72
69
68
54
53
52
49
48
38
36
27
14
13
10
RD0_RXA
RD1_TXA
RD2_INTA
RD3_CSA
RD4_RSTA
RD5_RGB_RED
RD6_MISOA
RD7_RGB_GREEN
RD8_MOSIB
RD9
RD10
RD11
RD12_S1PGA2P2
RD13
RD14_ISENSEL
RD15
RE7_S1
B LUE
25
26
U1VDD
VSS
VSS
VSS
VSS
R1
RA0_POT
RA1_VINSENSE
RA2_TRANSIENTFB
RA3_ISENSEH
RA4_S1MCLR3
5
Current
measurement
point
16
18
20
21
23
G R E EN
11
32
50
70
AN0/CMP1A/RA0
AN1/S1AN15/RA1
AN2/S1AN16/RA2
AN3/IBIAS0/S1AN0/S1CMP1A/S1PGA1P1/RA3
AN4/IBIAS1/S1MCLR3/S1AN1/S1CMP2A/S1PGA2P1/S1PGA3P2/RA4
1
NT1
VDD
VDD
VDD
VDD
2
12
31
51
71
U1VDD
J1 1
DNP
Net Tie
4
2
3
3V3
3V3
MCLR
R ED
9
MCLR
C1 1
0.1 μF
25V
0603
3V3
RB2_ANB
RC6_RSTB
RB7_CSB
RC8_SCKB
RC9_MISOB
RD8_MOSIB
C12
(Local VDD/VSS bypass/decoupling for U1)
0.1 μF
25V
0603
1
2
3
4
5
6
7
8
AN
RST
CS
SCK
MISO
MOSI
+3.3V
GND
J8
PWM
INT
RX
TX
SCL
SDA
+5V
GND
16
15
14
13
12
11
10
9
1
2
3
RC4_PWMB
R19 1k
RC11_TXB
RB8_SCLB
RB9_SDAB
R20
100R 1% 0603
RB13_INTB
RC10_RXB
5V
I2C Pull-ups (DNP)
SC-70
1
2
3
6
5
4
SOT-23
Note: Not populated, typically installed on
mikroBUS daughter boards instead.
R21
DNP
RB9_SDAB
R22
DNP
RE12_SCLA
R78
DNP
R81
DNP
RB8_SCLB
C13
0.1 μF
25V 0603
6
5
4
RE13_SDAA
3V3
Designed with
Altium.com
dsPIC33CH Curiosity Development Board User’s Guide
DS50002762A-page 22
FIGURE A-1:
�dsPIC33CH CURIOSITY BOARD LAYOUT SCHEMATIC REV. 1.0 (SHEET TWO OF FOUR)
VBUS
DD+
ID
GND
1
2
3
4
5
I/O Pin Access Headers
U9_V DD
U9D_N
U9D_P
3V3
C29
0.1 μF
8
9
10
11
12
13
14
0603
1 μF 16V
C31
U9_G ND
U9
U9D_N
U9D_P
MCP2221A
GP3
SDA
SCL
VUSB
DD+
VSS
U9_G ND
7
6
5
4
3
2
1
GP2
UART TX
UART RX
RS T
GP1
GP0
VDD
1
2
3
U9_V DD
4
460.8 kB aud max
Advance Information
C33
0.1 μF
25V
C30
1 μF
16V
0603
U9_G ND
C32
0.1 μF
25V 0603
U11
VDD1
A1
A2
GND1
VDD2
Isolation
U9_G ND
25V 0603
R76
100k U9_G ND
B1
B2
GND2
SI8422AB -D-IS
8
7
6
5
RC11_TXB
RC10_RXB
R75
1k 1%
0603
RD12_S1PGA2P2
RC2
RC3_MOSIA
RB1_IBIAS2
RE6
RE7_S1
RB2_ANB
RE9_S3
RC8_SCKB
RD9
RD7_RGB_GREEN
RD5_RGB_RED
RB6_S1PGC3
RB7_CSB
RB8_SCLB
RE12_SCLA
RC1_VOUTFB
RC6_RSTB
RB0_OSCI
RD11
RD10
RC7_ANA
RE8_S2
RB3_PGD2
RB4_PGC2
RC9_MISOB
RD8_MOSIB
U1VDD
RD6_MISOA
RB5_S1PGD3
RE10
RE11
RB9_SDAB
5V
35 33 31 29 27 25 23 21 19 17 15 13 11 9 7 5 3 1
36 34 32 30 28 26 24 22 20 18 16 14 12 10 8 6 4 2
U9_V DD
J 16
RA1_VINSENSE
RA0_POT
RD13
RD15
RC15_S1PWM7L
RC13_TRANSIENT
RE1_LED2
RE0_LED1
RB14_RGB_BLUE
RE15
RE14
RB10_SCKA
RD1_TXA
RD3_CSA
RC11_TXB
RC5_S1PWM2L
J12
3V3
35 33 31 29 27 25 23 21 19 17 15 13 11 9 7 5 3 1
36 34 32 30 28 26 24 22 20 18 16 14 12 10 8 6 4 2
Isolated USB-UART Interface
USB micro-B TH/SMT
0
RE3
RE2
RC0_PWMDACFB
RD14_ISENSEL
MCLR
RC14_S1PWM7H
RC12
RB15_PWMA
RB13_INTB
RB12
RB11
RD0_RXA
RD2_INTA
RD4_RSTA
RC10_RXB
RE13_SDAA
RC4_PWMB
J11
HDR-2.54 Female 2x18
HDR-2.54 Female 2x18
HDR-2.54 Female 2x5
VOUT
5V
J18
U9_G ND
3V3
RE4
RA2_TRANSIENTFB
J17
DNP
D7
1
3
2
DNP
9 7 5 3 1
10 8 6 4 2
2018 Microchip Technology Inc.
FIGURE A-2:
RE5
RA4_S1MCLR3
RA3_ISENSEH
5V
NT3 Net Tie
0.5 mm
If installing J17, us e regulated 5V (5.5V max)
isolated wall cube with center pin positive.
Also recommended to cut NT2 and populate
D1 to prevent VBUS backdrive current.
VBUS5
D1
DNP
5V
NT2 Net Tie
0.5 mm
U12
C39
2.2 μF
10V
R18
0603 470R
0603
1%
6
VIN
5
NC
4
EN
3V3
1
VOUT
2
VOUT
3
GND
MIC5528 3V3
C23
2.2 μF
10V
0603
DS50002762A-page 23
Designed with
Power Supply
Altium.com
Schematics
LED5
Power Status (Green)
�dsPIC33CH CURIOSITY BOARD LAYOUT SCHEMATIC REV. 1.0 (SHEET THREE OF FOUR)
Input voltage mo nitoring
High-side current sense level shifter
5V
For Buck Mode: PWM Q6, Drive Q2 DC OFF
For Boost Mode: Drive Q6 DC OFF (logic high or tri-state) , PW M Q2
For Buck/Boost Mode: PWM Q6 and Q2 with s ame signal (Note: Q6 drive s hould be active-low, Q2 active-high)
330R
1%
1
1k
0603
1%
2 MMBT3906
Q11
1
820R
1%
RC14_S1PWM7H
2
3
3
R71
DNP
R67
C22
0.010 μF
25V
0603
Advance Information
20k
0603
1%
U10
I1
I0
R9 5
D9
BAT54
C3 8
R6 3
1R
1%
1206
1/4W
5,6,7,8
1R 1%
1206
1/4W
1
R66
Q2
VOUT
VOUT_FB
J19
C47
10 μF
25V
0805
1,2,3
MCP87130T
C34
10 μF
25V
0805
C35
10 μF
25V
0805
C53
10 μF
25V
0805
C55
10 μF
25V
0805
VOUT
R96 20R
C57
0805
1%
100 μF
25V
L ow ESR
Output voltage feedback circuit
J13
R70
4.7k
1%
R72
1
RC15_S1PWM7L
R80
4.7k
1%
C15
0.010 μF
25V 0603
2
3
U5
I1
6
I2
OUTB
B
DNP
6
GND
VCC
I0
T P LOOP Black
R90
20k
0603
C51 1%
0.1 μF
25V
0603
16V
1 μF
0603
3V3
J14
3
S1PWM2L_DAC_ISET
Q10
R91 2 MMBT3904
20k 1%
0603
R84
2.2k
0603
1%
3
1
0603
470R 1%
Q9
MMBT3904
2
R87 100R
0603
1%
DNP
5,6,7,8
4
Q8
MCP87130T
1,2,3
C40
0603
R54
J 10
C26
0.010 μF
25V
0603
0.1 μF 25V
0603
5
+A
VSS
2
1
1k
0603
1%
3
C24
-A
VDD
2
RC5_S1PWM2L
1
Net Tie
R83
1
RC1_VOUTFB
R55
100R 1%
0603
S1PWM2L DAC/DC Bias Generator/RC Filter
C21
4
Y
NC7SZ57P 6X
2
2018 Microchip Technology Inc.
TP5
DNP
7
-B
3V3
3V3
Adjustable constant-current transient load
Note: Q8 is driven in the linear region.
Limit (peak power) * (on-time) product to
maintain peak Q8 juntion temp