AR1100 Development Kit Quick Start Guide
Other Information
To obtain the most recent and complete documentation for this demonstration board, including:
- User's Guide
- Board Description
- Board Schematics
- Source Code
- Application Examples
- Links to Web Seminars
please refer to the Microchip web site: www.microchip.com
AMERICAS
Atlanta - 678-957-9614
Boston - 774-760-0087
Chicago - 630-285-0071
Cleveland - 216-447-0464
Dallas - 972-818-7423
Detroit - 248-538-2250
Indianapolis - 317-773-8323
Los Angeles - 949-462-9523
Phoenix - 480-792-7200
Santa Clara - 408-961-6444
Toronto - 905-673-0699
ASIA/PACIFIC
Australia - Sydney - 61-2-9868-6733
China - Beijing - 86-10-8569-7000
China - Chengdu - 86-28-8665-5511
China - Chongqing - 86-23-8980-9588
China - Hangzhou - 86-571-2819-3187
China - Hong Kong SAR - 852-2401-1200
China - Nanjing- 86-25-8473-2460
China - Qingdao - 86-532-8502-7355
China - Shanghai - 86-21-5407-5533
China - Shenyang - 86-24-2334-2829
China - Shenzhen - 86-755-8203-2660
China - Wuhan - 86-27-5980-5300
China - Xiamen - 86-592-2388138
China - Xian - 86-29-8833-7252
China - Zhuhai - 86-756-3210040
India - Bangalore - 91-80-3090-4444
India - New Delhi - 91-11-4160-8631
India - Pune - 91-20-2566-1512
Japan - Yokohama - 81-45-471-6166
Korea - Daegu - 82-53-744-4301
Korea - Seoul - 82-2-554-7200
Malaysia - Kuala Lumpur - 60-3-6201-9857
Malaysia - Penang - 60-4-227-8870
Philippines - Manila - 63-2-634-9065
Singapore - 65-6334-8870
Taiwan - Hsin Chu - 886-3-5778-366
Taiwan - Kaohsiung - 886-7-536-4818
Taiwan - Taipei - 886-2-2500-6610
Thailand - Bangkok - 66-2-694-1351
EUROPE
Austria - Wels - 43-7242-2244-39
Denmark - Copenhagen - 45-4450-2828
France - Paris - 33-1-69-53-63-20
Germany - Munich - 49-89-627-144-0
Italy - Milan - 39-0331-742611
Netherlands - Drunen - 31-416-690399
Spain - Madrid - 34-91-708-08-90
UK - Wokingham - 44-118-921-5869
08/02/11
Step 1: Confirm Contents
Make sure your development kit contains the following items:
•
•
•
•
•
•
•
•
•
Analog Resistive AR1100 Touch Screen Controller Board
5-wire resistive analog touch screen
6", 4-wire crossover touch screen cable
6", 5-wire crossover touch screen cable
6", 8-wire crossover touch screen cable
6', 8 pos. single-row socket to USB type A male connector communication cable
4-wire ZIF connector cable
6', 8 pos. single-row socket to female DB-9 RS-232 communication cable
mTouch™ sensing solution AR1100 Development Kit CD
Step 2: Connections
•
•
•
•
Connect either the USB or serial cable to your PC (do not use a USB hub).
Connect the Touch Sensor tail to the AR1100 Controller board.
Connect the AR1100 Controller board to the other end of the USB or serial cable.
(If connecting via USB, your PC should detect a new device being attached. Wait
for this process to complete before continuing).
If using a serial connection, provide 5V power to the serial connector leads.
Step 3: Installation
Insert the CD into your PC, click “Install Config Utility” and follow the installation
instructions.
Step 4: Print Out Calibration Template
Microchip Technology Inc. • 2355 West Chandler Blvd. • Chandler, AZ 85224-6199
www.microchip.com
The Microchip name and logo and the Microchip logo are registered trademarks of Microchip Technology Incorporated in the
U.S.A. and other countries. PICkit and PICtail are trademarks of Microchip Technology Incorporated in the U.S.A. and other
countries. All other trademarks mentioned herein are property of their respective companies.
© 2011, Microchip Technology Incorporated, Printed in the U.S.A. All Rights Reserved. 7/11
*DS41592A*
DS41592A
Print out the calibration template located in the REFERENCE folder of the CD.
Important: When printing the template, use page scaling set to ‘None’ on the Print Menu.
Step 5: Run Configuration Utility
Double-click the AR Configuration desktop icon to start the utility and follow the steps
in the Configuration Wizard for a five-wire sensor. After successful completion of the
wizard, open the Scribble tab on the Configuration Utility and test out the controller by
drawing some lines.
�
很抱歉,暂时无法提供与“DV102012”相匹配的价格&库存,您可以联系我们找货
免费人工找货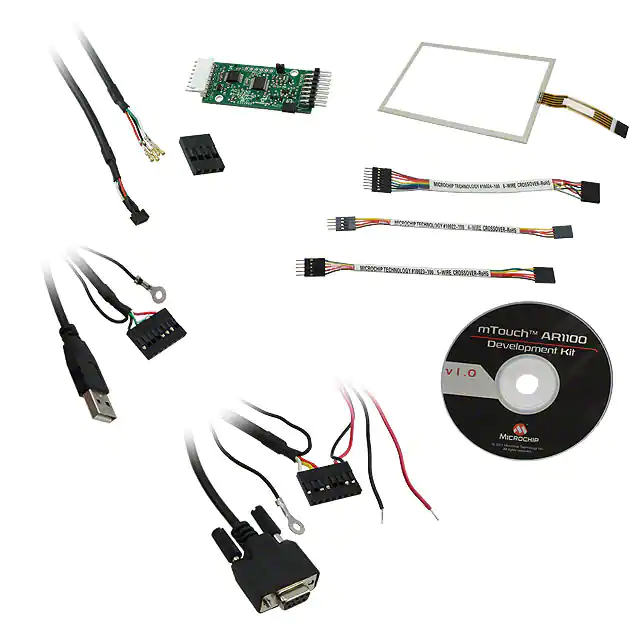


 工商网监
湘ICP备2023018690号
工商网监
湘ICP备2023018690号
