Hardware User Guide
UG-400
One Technology Way • P.O. Box 9106 • Norwood, MA 02062-9106, U.S.A. • Tel: 781.329.4700 • Fax: 781.461.3113 • www.analog.com
ezLINX iCoupler Isolated Interface Development Environment
FEATURES
EZLINX-IIIDE-EBZ
Plug and play system evaluation
Easy evaluation of 8 isolated physical layer communication
standards
Open source hardware
Open source software
iCoupler and isoPower technology
ADSP-BF548 Blackfin processor running uClinux
Sample PC application
Sample embedded uClinux application
64 MB RAM
32 MB flash
Extender connector for additional functionality
10649-001
APPLICATIONS
Isolated interfaces
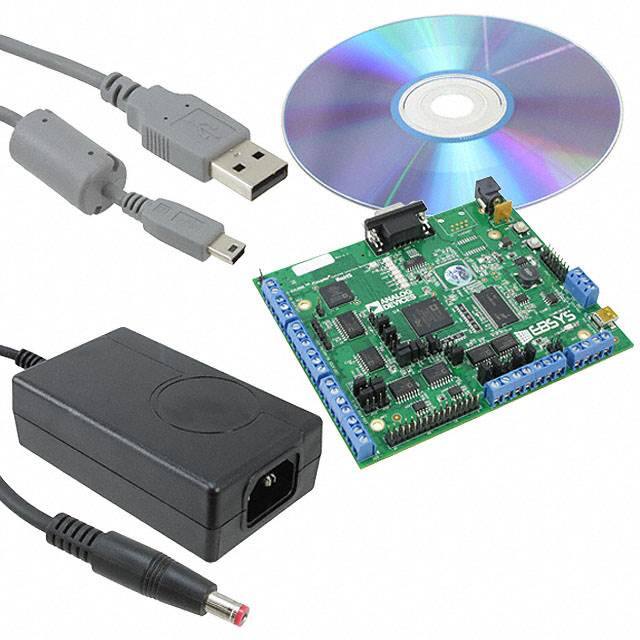
EVALUATION KIT CONTENTS
Figure 1.
EZLINX-IIIDE-EBZ
Power supply
ezLINX software DVD
USB A to mini USB B cable
GENERAL DESCRIPTION
The ezLINX™ iCoupler® isolated interface development
environment provides developers with a cost-effective, plug
and play method for evaluating eight digitally isolated physical
layer communication standards (USB, RS-422, RS-485, RS-232,
CAN, SPI, I2C, and LVDS). The Blackfin® ADSP-BF548 processor
runs the uClinux® operating system and allows for easy customization through the open source hardware and software platform.
Development time is significantly reduced for embedded designers
and system architects who are designing and evaluating isolated
communication standards. The interfaces on ezLINX use Analog
Devices, Inc., isolated transceivers with integrated iCoupler and
isoPower® digital isolator technology.
The hardware of the ezLINX iCoupler isolated interface development environment contains the ADSP-BF548 Blackfin processor
with 64 MB of RAM and 32 MB of flash memory. The isolated
physical layer communication standards are implemented using
Analog Devices isolated transceivers with integrated iCoupler and
isoPower technology. Devices used to implement these isolated
physical layer communication standards include the following:
•
Isolated USB using the ADuM3160
PLEASE SEE THE LAST PAGE FOR AN IMPORTANT
WARNING AND LEGAL TERMS AND CONDITIONS.
•
•
•
•
•
•
Isolated CAN using the ADM3053 signal and power
isolated CAN transceiver
Isolated RS-485 and RS-422 using the ADM2587E signal
and power isolated RS-485/RS-422 transceiver
Isolated RS-232 using the ADM3252E signal and power
isolated RS-232 transceiver
Isolated I2C using the ADuM1250 and ADuM5000
Isolated SPI using the ADuM3401, ADuM3402, and
ADuM5000
Isolated LVDS using the ADuM3442, ADuM5000,
ADN4663, and ADN4664
This evaluation board contains multiple parts with isoPower
technology, which uses high frequency switching elements to
transfer power through the transformer. Special care must be
taken during PCB layout to meet emissions standards. See the
AN-0971 Application Note, Recommendations for Control of
Radiated Emissions with isoPower Devices, for board layout
recommendations. The ezLINX PCB layout has not been verified
to pass radiated emissions specifications.
Rev. 0 | Page 1 of 20
�UG-400
Hardware User Guide
TABLE OF CONTENTS
Features .............................................................................................. 1
Isolated I2C .....................................................................................8
Applications ....................................................................................... 1
Isolated SPI .....................................................................................9
Evaluation Kit Contents ................................................................... 1
Isolated LVDS ............................................................................. 12
ezLINX-IIIDE-EBZ .......................................................................... 1
Power Input ................................................................................. 14
General Description ......................................................................... 1
3.3 V Power Supply .................................................................... 14
Revision History ............................................................................... 2
1.2 V, 2.5 V, and 5 V Power Supplies ........................................ 15
System Architecture ......................................................................... 3
Extender Connector ................................................................... 16
Isolated CAN ................................................................................. 4
RS-232 Console .......................................................................... 17
Isolated RS-485 and RS-422 ........................................................ 5
LEDs ............................................................................................. 18
Isolated USB .................................................................................. 6
Jumper Configurations .............................................................. 19
Isolated RS-232 ............................................................................. 7
REVISION HISTORY
8/12—Revision 0: Initial Version
Rev. 0 | Page 2 of 20
�Hardware User Guide
UG-400
SYSTEM ARCHITECTURE
SV(91), is added for additional functionality. The Ethernet
option is not fitted on the standard ezLINX hardware.
The system architecture block diagram of the ezLINX hardware
is shown in Figure 2. An extender connector, Hirose FX8-120P-
JTAG
HIROSE FX8-120P-SV(91)
LEDs
FACTORY
RESET
TW0
CAN1
SPI1
UART0
GPIO
RESET
SPI2
TW1
CAN0
UART2
UART3
UART1
SPI0
ADuM3401
ADuM3402
ADuM1250
ADM3053
ADM2587E
ADM3252E
ADM3202
ADuM3401
ADuM3402
ISOLATED
SPI2
ISOLATED
I2C
ISOLATED
CAN
ISOLATED
RS-485
ISOLATED
RS-232
CONSOLE
ISOLATED
SPI
USB
ADuM3160
ISOLATED
USB
SPORT2
ADuM3442
ISOLATED
LVDS
DDR
EBUI
ADSP-BF548
ETHERNET
SPORT3
SMC
GPIO
EBUI
PPIO
RTC
64MB
DDR
32MB
FLASH
*ETHERNET
NOT FITTED
25MHz
Figure 2. ezLINX Hardware Block Diagram
Rev. 0 | Page 3 of 20
10649-002
32.768kHz
JTAG
�UG-400
Hardware User Guide
ISOLATED CAN
the 3.3 V logic of the Blackfin ADSP-BF548. The RS pin (Pin 18)
is connected through a 0 Ω resistor to CAN_ISO_GND to
deactivate slew rate limiting.
The isolated CAN port is implemented using the ADM3053 signal
and power isolated CAN transceiver. The ADM3053 connects
to CAN0 of the ADSP-BF548 and is capable of functioning at
data rates of up to 1 Mbit/sec. Figure 3 shows a circuit diagram
of the implementation of the ADM3053 on the ezLINX hardware.
A 4-pin screw terminal connector, J8, is used for easy access to the
CANH (Pin 1 of J8), CANL (Pin 3 of J8), and CAN_ISO_GND
(Pin 2 and Pin 4 of J8) signals.
The AN-1123 Application Note, Controller Area Network (CAN)
Implementation Guide, provides more information about implementing CAN nodes.
The CAN node can be configured using Jumpers JP17 and JP18.
When both Jumpers JP17 and JP18 are fitted, the CAN node is
split terminated with 120 Ω and a common-mode capacitor of
47 nF. If termination is not required, remove JP17 and JP18. Table 4
shows the jumper configurations for all the interfaces on ezLINX.
The ADM3053 contains isoPower technology that uses high
frequency switching elements to transfer power through the
transformer. Special care must be taken during printed circuit
board (PCB) layout to meet emissions standards. Refer to the
AN-0971 Application Note, Recommendations for Control of
Radiated Emissions with isoPower Devices, for details on board
layout considerations.
The 5 V supply is connected to the VCC pin (Pin 8) to power the
isoPower isolated power supply of the ADM3053. This generates
an isolated 5 V on the VISOOUT pin (Pin 12) of the ADM3053 and
must be connected to the VISOIN pin (Pin 19). The 3.3 V supply
is connected to the VIO pin (Pin 6) to power the iCoupler signal
isolation of the ADM3053. This is to ensure compatibility with
3.3V 5V
CAN_ISO_5V
U17
1
3
7
9
10
TxD
RxD
CANH
CANL
NC
Rs
VREF
GND1
GND1
GND1
GND1
GND1
GND2
GND2
GND2
GND2
J8
19
1
2
17
15
3
18
14
JP18
+
VISOIN
JP17
4
SCREW_4
+
2
VIO
12
+
5
4
CAN0TX
CAN0RX
VISOOUT
VCC
6
+
8
R67
0R
11
13
16
20
R68
60R4
R69
60R4
ADM3053
C165
47nF
GND
CAN_ISO_GND CAN_ISO_GND
3.3V
C159
10uF
GND
C163
0.1uF
CAN_ISO_5V
C157
0.1uF
GND
C158
0.01uF
C162
10uF
C161
0.1uF
C164
0.1uF
C160
0.01uF
CAN_ISO_GND
Figure 3. ADM3053 Isolated CAN Implementation
Rev. 0 | Page 4 of 20
10649-003
5V
CAN_ISO_GND CAN_ISO_GND
�Hardware User Guide
UG-400
ISOLATED RS-485 AND RS-422
The 3.3 V supply is connected to the VCC pins (Pin 2 and Pin 8)
to power the isoPower isolated power supply and the iCoupler
signal isolation of the ADM2587E. This generates an isolated
3.3 V on the VISOOUT pin (Pin 12) of the ADM2587E, which is
connected to the VISOIN pin (Pin 19).
The isolated RS-485 and RS-422 port is implemented using the
ADM2587E signal and power isolated CAN transceiver. The
ADM2587E connects to UART2 of the ADSP-BF548 and is capable
of functioning at data rates of up to 500 kbit/sec. Figure 4 shows
a circuit diagram of the implementation of the ADM2587E on
the ezLINX hardware.
A 6-pin screw terminal connector, J7, is used for easy access to the
A (Pin 2 of J7), B (Pin 3 of J7), Z (Pin 4 of J7), Y (Pin 5 of J7), and
RS-485_ISO_GND (Pin 1 and Pin 6 of J7) signals.
The RS-485/RS-422 node can be configured using Jumpers JP3,
JP4, JP19, and JP40. To configure the node as a half-duplex RS-485
node, connect JP3, JP4, and JP40. When JP3 and JP4 are fitted,
A to Y are connected and B to Z are connected. When JP3 and
JP4 are removed, the node is configured as a full-duplex RS-422
node. When JP19 is fitted, the A and B pins are terminated with
120 Ω. If termination is not required, remove JP19. When JP40
is connected, a pull-up resistor of 10 kΩ is connected to the
RxD pin (Pin 4) of the ADM2587E. Table 4 shows jumper
configurations for all the interfaces on ezLINX.
The AN-960 Application Note, RS-485/RS-422 Circuit Implementation Guide, provides more information about implementing
RS-485 and RS-422 circuits.
The ADM2587E contains isoPower technology that uses high
frequency switching elements to transfer power through the
transformer. Special care must be taken during PCB layout to
meet emissions standards. Refer to the AN-0971 Application
Note, Recommendations for Control of Radiated Emissions with
isoPower Devices, for details on board layout considerations.
3.3V
R111
10K
JP3
3.3V
RS485_ISO_3.3V
+
VCC
VCC
VISOOUT
VISOIN
+
+
2
8
JP40
7
4
UART2TX
UART2RX
5
6
Y
Z
RE
DE
A
B
12
+
19
13
15
J7
1
18
17
2
GND1
GND1
GND1
GND1
GND2
GND2
GND2
GND2
11
14
16
20
3
JP19
4
+
1
3
9
10
+
JUMPER
+
#RE
DE
TxD
RxD
+
JUMPER
JP4
U16
5
6
R66
120R
ADM2587E
SCREW_6
RS485_ISO_GND
GND
RS485_ISO_GND
RS485_ISO_3.3V
C151
10uF
GND
C150
0.1uF
C155
0.1uF
C149
0.01uF
C154
10uF
C153
0.1uF
C156
0.1uF
C152
0.01uF
RS485_ISO_GND
Figure 4. ADM2587E Isolated RS-485 and RS-422 Implementation
Rev. 0 | Page 5 of 20
10649-004
3.3V
�UG-400
Hardware User Guide
ISOLATED USB
The VBUS1 pin (Pin 1) and VDD1 pin (Pin 3) of the ADuM3160 are
powered from the 5 V VBUS line of the USB mini connector and
can only be connected to a USB master. The VBUS2 pin (Pin 16)
and VDD2 pin (Pin 14) are powered from the 3.3 V generated by
the ezLINX power supply.
S9
S8
S7
S6
USB_ISO_GND USB_ISO_GNDUSB_ISO_GND
GND
GND
GND
3.3V
C123
0.01uF
24MHz
1
OE
GND VDD
4
R14
10K Y4
2
3.3V
GND
OUT
3
R18
33R
R59
10K
DNP
GND
C133
1uF
U4B
D2
F1
USB_VBUS
F2 USB_XI
USB_XO
G3
USB_ID
D3
USB_RSET
E2
USB_DM E1
B1
USB_VREF
USB_DP
ADSP_BF548
C134
0.01uF
3.3V 3.3V
C138
0.1uF
C137
0.1uF
GND
9
2
GND1 8
15 GND2
GND2
GND1
ADuM3160
1
VBUS1 3
VDD1
4
PDEN 5
SPU
12
13 PIN
SPD
U13
11
10 DDDD+
16
14 VBUS2
VDD2
R64
24R
R62
24R
6
UD- 7
UD+
R63
24R
R61
24R
C136
0.1uF
C135
0.1uF
R100
1K
LED10
LED
D8
PGB1010603
USB_ISO_GND
D7
PGB1010603
USB_ISO_GND
RV1
VARISTOR
FER4
600R
R65
1M
1
2
3
4
5
C139
0.01uF
9
8
7
6
J5
10649-005
VBUS
DD+
NC
GND
USB MINI B F
The isolated USB port is implemented using the ADuM3160 full
speed USB isolator. The ADuM3160 connects to the integrated
PHY of the ADSP-BF548’s USB controller and is capable of functioning at data rates of up to12 Mbit/sec. Figure 5 shows a circuit
diagram of the implementation of the ADuM3160 on the ezLINX
hardware.
Figure 5. ADuM3160 Isolated USB Implementation
Rev. 0 | Page 6 of 20
�Hardware User Guide
UG-400
VISO pins (Pin A10, Pin B10, and Pin C10) using Analog Devices
isoPower technology.
ISOLATED RS-232
The isolated RS-232 port is implemented using the ADM3252E
signal and power isolated RS-232 transceiver. The ADM3252E connects to UART3 of the ADSP-BF548 and is capable of functioning
at data rates of up to 460 kbit/sec. Figure 6 shows a circuit diagram
of the implementation of the ADM3252E on the ezLINX hardware.
A 3-pin screw terminal connector, J6, is used for easy access to the
TOUT1 (Pin 2 of J6), RIN1 (Pin 3 of J6), and RS232_ISO_GND
(Pin 1 of J6) signals.
The ADM3252E contains isoPower technology that uses high
frequency switching elements to transfer power through the
transformer. Special care must be taken during PCB layout to
meet emissions standards. Refer to the AN-0971 Application
Note, Recommendations for Control of Radiated Emissions with
isoPower Devices, for details on board layout considerations.
When the JP2 jumper is fitted, it implements a loopback of the
isolated RS-232 transmitter output (Pin TOUT1) to the receiver
input (Pin RIN1).
The VCC pins (Pin A2, Pin B1, and Pin B2) of the ADM3252E
are powered with 3.3 V and generate an isolated 3.3 V on the
JP2
+
+
JUMPER
J6
1
U44
UART3TX
D1
F1
UART3RX
H1
K1
TIN1
TIN2
ROUT1
ROUT2
TOUT1
TOUT2
RIN1
RIN2
C1+
C1-
C2+
C2-
3.3V
B1
A2
B2
VCC
VCC
VCC
VISO
VISO
VISO
V+
V-
C2
D2
E1
E2
F2
G1
G2
H2
J1
J2
K2
L2
C1
GND
GND
GND
GND
GND
GND
GND
GND
GND
GND
GND
GND
GND
NC1
NC2
DNC1
DNC2
GNDISO
GNDISO
GNDISO
GNDISO
GNDISO
GNDISO
GNDISO
D11
F11
2
3
H11
K11
Screw_3
C125
0.1uF
C11
E11
RS232_ISO_GND
C126
0.1uF
G11
G10
RS232_ISO_3.3V
A10
B10
C10
C141
0.1uF
B11
J11
A1
L1
C142
0.1uF
A11
L11
RS232_ISO_GND
D10
E10
F10
H10
J10
K10
L10
ADM3252E
RS232_ISO_GND
3.3V
RS232_ISO_3.3V
C130
0.1uF
GND
C236
10uF
C140
0.1uF
C237
10uF
RS232_ISO_GND
Figure 6. ADM3252E Isolated RS-232 Implementation
Rev. 0 | Page 7 of 20
10649-006
GND
�UG-400
Hardware User Guide
A 3-pin screw terminal connector, J22, is used for easy access to
the SDA (Pin 1 of J22), SCL (Pin 2 of J22), and I2C_ISO_GND
(Pin 3 of J22) signals.
ISOLATED I2C
The isolated I2C port is implemented using the ADuM1250 I2C
isolator and the ADuM5000 isoPower isolated dc-to-dc converter.
The ADuM1250 connects to TWI1 of the ADSP-BF548 and is
capable of functioning at a maximum frequency of 1 MHz.
Figure 7 shows a circuit diagram of the implementation of the
ADuM1250 and ADuM5000 on the ezLINX hardware.
The ADuM5000 contains isoPower technology that uses high
frequency switching elements to transfer power through the
transformer. Special care must be taken during PCB layout to
meet emissions standards. See the AN-0971 Application Note,
Recommendations for Control of Radiated Emissions with
isoPower Devices, for board layout recommendations.
The VDD1 pin (Pin 1)) of the ADuM1250 and the VDD1 pins
(Pin 1 and Pin 7) of the ADuM5000 are powered by 3.3 V. The
ADuM5000 generates an isolated 3.3 V, which is used to supply
power to the VDD2 pin (Pin 8) of the ADuM1250.
3.3V
I2C_ISO_3.3V
U18
1
VDD1
VDD2
SDA1
SCL1
SDA2
SCL2
R73
120R
8
R74
120R
J22
2
3
SDA1
SCL1
7
6
1
2
4
GND1
GND2
5
3
SCREW_3
ADuM1250
GND
3.3V
I2C_ISO_GND
I2C_ISO_3.3V
I2C_ISO_GND
C172
0.01uF
C173
0.01uF
GND
I2C_ISO_GND
3.3V
I2C_ISO_3.3V
U19
1
7
6
4
5
VDD1
VDD1
VISO
VISO
RCSEL
VSEL
RCIN
RCOUT
2
8
GND1
GND1
NC1
NC2
NC3
NC4
GNDISO
GNDISO
10
16
13
3
11
12
14
9
15
ADuM5000
GND
I2C_ISO_GND
3.3V
I2C_ISO_3.3V
C167
0.1uF
C166
0.1uF
C171
10uF
C170
0.1uF
C169
0.1uF
GND
I2C_ISO_GND
Figure 7. ADuM1250 and ADuM5000 Isolated I2C Implementation
Rev. 0 | Page 8 of 20
10649-007
C168
10uF
�Hardware User Guide
UG-400
ISOLATED SPI
Two isolated SPI ports are implemented using the ADuM3401,
the ADuM3402 iCoupler signal isolators, and the ADuM5000
isoPower isolated dc-to-dc converter. The isolated SPI0 implementation on the ezLINX hardware uses the ADuM3401. The
ADuM3401 connects to SPI0 of the Blackfin ADSP-BF548 and
is used to isolate the SCLK, MISO, SSEL1, and MOSI lines. The
ADuM3402 is used for isolating the SPI slave select lines. Figure 8
shows a circuit diagram of the implementation of isolated SPI1
using the ADuM3401, ADuM3402, and ADuM5000 on the
ezLINX hardware.
The isolated SPI2 implementation on the ezLINX hardware uses
the ADuM3401. The ADuM3401 connects to SPI2 of the ADSPBF548 and is used to isolate the SCLK, MISO, SSEL1, and MOSI
lines. The ADuM3402 is used for isolating the SPI slave select
lines. Figure 9 shows a circuit diagram of the implementation of the
isolated SPI2 using the ADuM3401, ADuM3402, and ADuM5000
on the ezLINX hardware.
The VDD1 pin (Pin 1) of the ADuM3401 and ADuM3402 and
the VDD1 pins (Pin 1 and Pin 7) of the ADuM5000 are powered
by 3.3 V. The ADuM5000 generates an isolated 3.3 V, which is
used to supply power to the VDD2 pin (Pin 16) of the ADuM3401
and ADuM3402.
Two 7-pin screw terminal connectors, J10 and J25, are used for easy
access to the SPISCK (Pin 1 of J10 and J25), SPIMOSI (Pin 2 of J10
and J25), SPISEL1/SPISS (Pin 3 of J10 and J25), SPIMISO (Pin 4
of J10 and J25), SPISEL2 (Pin 5 of J10 and J25), SPISEL3 (Pin 6 of
J10 and J25), and SPI_ISO_GND (Pin 7 of J10 and J25) signals.
To connect the isolated SPI0 as a master, connect Jumpers JP5,
JP7, JP9, JP11, JP13, JP15, JP21, and JP36 while leaving Jumpers
JP6, JP8, JP10, JP12, JP14, JP16, JP20, and JP37 open (see the
Warnings section). To connect the isolated SPI0 as a slave, connect
Jumpers JP6, JP8, JP10, JP12, JP14, JP16, JP20, and JP37 while
leaving Jumpers JP5, JP11, JP13, JP15, JP21, and JP36 (see the
Warnings section).
Table 1. Isolated SPI0 Connections
Jumper
JP5
JP6
JP7
JP8
JP9
JP10
JP11
JP12
JP13
JP14
JP15
JP16
JP20
JP21
JP36
JP37
SPI0 Master
Connect
Open
Connect
Open
Connect
Open
Connect
Open
Connect
Open
Connect
Open
Open
Connect
Connect
Open
SPI0 Slave
Open
Connect
Open
Connect
Open
Connect
Open
Connect
Open
Connect
Open
Connect
Connect
Open
Open
Connect
To connect the isolated SPI2 as a master, connect Jumpers JP22,
JP24, JP26, JP28, JP30, JP32, JP35, and JP38 while leaving
Jumpers JP23, JP25, JP27, JP29, JP31, JP33, JP34, and JP39 open
(see the Warnings section). To connect the isolated SPI2 as a slave,
connect Jumpers JP23, JP25, JP27, JP29, JP31, JP33, JP34, and
JP39 while leaving Jumpers JP22, JP24, JP26, JP28, JP30, JP32,
JP35, and JP38 open (see the Warnings section).
Table 2. Isolated SPI2 Connections
Jumper
JP22
JP23
JP24
JP25
JP26
JP27
JP28
JP29
JP30
JP31
JP32
JP33
JP34
JP35
JP38
JP39
SPI2 Master
Connect
Open
Connect
Open
Connect
Open
Connect
Open
Connect
Open
Connect
Open
Open
Connect
Connect
Open
SPI2 Slave
Open
Connect
Open
Connect
Open
Connect
Open
Connect
Open
Connect
Open
Connect
Connect
Open
Open
Connect
The ADuM5000 contains isoPower technology that uses high
frequency switching elements to transfer power through the
transformer. Special care must be taken during PCB layout to
meet emissions standards. See the AN-0971 Application Note,
Recommendations for Control of Radiated Emissions with
isoPower Devices, for board layout recommendations.
Warnings
JP20 and JP21
JP20 and JP21 should never both be connected because doing
so will create a short circuit between 3.3 V and GND.
JP34 and JP35
JP34 and JP35 should never both be connected because doing
so will create a short circuit between 3.3 V and GND.
Rev. 0 | Page 9 of 20
�UG-400
Hardware User Guide
3.3V
SPI_M_ISO_3.3V
U22
1
7
6
4
5
2
8
VDD1
VDD1
VISO
VISO
RCSEL
VSEL
RCIN
RCOUT
NC1
NC2
NC3
NC4
GND1
GND1
GNDISO
GNDISO
10
16
13
3
11
12
14
9
15
ADuM5000
3.3V
GND
SPI_M_ISO_GND
3.3V
SPI_M_ISO_3.3V
R106
10K
C175
0.1uF
U20
1
R75
33R
3
4
5
SPI0SCK
R76
33R
SPI0MOSI
R77
33R
JP7
+ +
6
JP8
7
+
+
2
8
#SPI0SEL1
JP9
+ +
SPI0MISO
VDD1
VDD2
VIA
VIB
VIC
VOA
VOB
VOC
VOD
VID
VE1
VE2
GND1
GND1
ADuM3401
GND2
GND2
GND
JP5
+ +
14
13
12
JP6
+
11
+
10
+
9
15
+
JP13
+ +
JP14
+ +
JP15
+
+
C178
0.1uF
C177
0.1uF
J10
1
2
3
4
5
6
7
SCREW_7
SPI_M_ISO_GND
+
JP16
+
3.3V
U21
3
4
+
JP37
5
6
VDD1
VDD2
VIA
VIB
VOA
VOB
VOC
VOD
VIC
VID
VE1
VE2
16
14
13
12
11
3.3V
7
#SPI0SEL2
2
8
JP20
+
+
R24
33R
GND1
GND1
ADuM3402
GND
+
+
3.3V
GND
GND2
GND2
10
9
15
SPI_M_ISO_GND
3.3V
SPI_M_ISO_3.3V
SPI_M_ISO_3.3V
JP21
C180
0.1uF
GND
C183
0.1uF
C182
0.1uF
GND
SPI_M_ISO_GND
C181
0.1uF
SPI_M_ISO_GND
Figure 8. ADuM3401, ADuM3402, ADuM5000 Isolated SPI1 Implementation
Rev. 0 | Page 10 of 20
10649-008
R23
33R
+
SPI_M_ISO_3.3V
1
+
+
JP12
SPI_M_ISO_GND
R107
10K
#SPI0SS
+
JP11
3.3V
#SPI0SEL3
C179
10uF
SPI_M_ISO_GND
GND
16
JP10
+
C174
0.1uF
SPI_M_ISO_3.3V
+
+
C176
10uF
3.3V
JP36
�Hardware User Guide
UG-400
3.3V
SPI_S_ISO_3.3V
U25
1
7
6
4
5
2
8
VDD1
VDD1
VISO
VISO
RCSEL
VSEL
RCIN
RCOUT
NC1
NC2
NC3
NC4
GNDISO
GNDISO
GND1
GND1
ADuM5000
GND
10
16
13
3
11
12
14
9
15
SPI_S_ISO_GND
SPI_S_ISO_3.3V
3.3V
3.3V
C192
10uF
R108
10K
+
3.3V
SPI_S_ISO_3.3V
C191
0.1uF
GND
C190
0.1uF
C195
10uF
C194
0.1uF
C193
0.1uF
SPI_S_ISO_GND
JP38
+
U42
1
VDD1
R103
33R
3
4
5
SPI2SCK
R104
33R
SPI2MOSI
R105
33R
JP24
+ +
6
JP25
+ +
7
2
8
#SPI2SEL1
JP26
+ +
SPI2MISO
VDD2
VIA
VIB
VIC
VOA
VOB
VOC
VOD
VID
VE1
VE2
GND1
GND1
ADuM3401
GND2
GND2
16
JP22
+ +
14
13
12
JP23
+ +
11
JP28
+ +
10
JP29
+ +
9
15
JP30
+ +
SPI_S_ISO_GND
GND
JP27
+ +
JP31
+ +
JP32
+ +
J25
1
2
3
4
5
6
7
SCREW_7
SPI_S_ISO_GND
JP33
+ +
3.3V
SPI_S_ISO_3.3V
3.3V
U43
1
R109
10K
VDD1
3
4
+
5
6
JP39
VDD2
VIA
VIB
VOA
VOB
VOC
VOD
VIC
VID
VE1
VE2
16
14
13
12
11
+
3.3V
7
R102
33R
+
R101
33R
2
8
JP34
+
#SPI2SEL2
#SPI2SEL3
GND1
GND1
ADuM3402
GND2
GND2
GND
10
9
15
SPI_S_ISO_GND
#SPI2SS
3.3V
SPI_S_ISO_3.3V SPI_S_ISO_3.3V
3.3V
C196
0.1uF
GND
GND
C234
0.1uF
GND
C235
0.1uF
C197
0.1uF
SPI_S_ISO_GND SPI_S_ISO_GND
Figure 9. ADuM3401, ADuM3402, ADuM5000 Isolated SPI2 Implementation
Rev. 0 | Page 11 of 20
10649-009
+
+
JP35
�UG-400
Hardware User Guide
ISOLATED LVDS
The isolated LVDS port is implemented using the ADuM3442
iCoupler signal isolator, the ADN4664 dual LVDS receiver, the
ADN4663 dual LVDS transmitter, and the ADuM5000 isoPower
isolated dc-to-dc converter. The ADuM3442 is connected to
SPORT2 of the ADSP-BF548. Figure 10 shows a circuit diagram
of the implementation of the isolated LVDS using the ADuM3442,
ADN4663, ADN4664, and ADuM5000 on the ezLINX hardware.
The VDD1 pin (Pin 1) of the ADuM3442 and the VDD1 pin (Pin 1 and
Pin 7) of the ADuM5000 are powered by 3.3 V. The ADuM5000
generates an isolated 3.3 V, which is used to supply power to the
VDD2 pin (Pin 16) of the ADuM3442, the VCC pin (Pin 1) of the
ADN4663, and the VCC pin (Pin 8) of the ADN4664.
A 32-pin header connector is used for easy access to the isolated
LVDS signals.
The ADuM5000 contains isoPower technology that uses high
frequency switching elements to transfer power through the
transformer. Special care must be taken during PCB layout to
meet emissions standards. See the AN-0971 Application Note,
Recommendations for Control of Radiated Emissions with
isoPower Devices, for board layout recommendations.
Rev. 0 | Page 12 of 20
�Hardware User Guide
UG-400
LVDS_ISO_3.3V_1
VCC
1
U28
2
DIN1
J24
DOUT1+
3
LVDS_ISO_3.3V_1
DIN2
DOUT2+
DOUT2-
1
3
5
7
9
11
13
15
17
19
21
23
25
27
29
31
6
5
ADN4663
4
U26
1
VDD1
VDD2
16
LVDS_ISO_GND
DT2PRI
DT2SEC
3
4
DR2PRI
DR2SEC
5
6
VOC
VOD
14
VOA 13
VOB
12
VIC 11
VID
VE1
VE2
VIA
VIB
2
4
6
8
10
12
14
16
18
20
22
24
26
28
30
32
Header_32
LVDS_ISO_3.3V_1
GND1
GND1
ADuM3442
9
GND2 15
GND2
U30
7
R84
100R
8
2
8
ROUT1
RIN1+
RIN1-
LVDS_ISO_GND
6
3.3V
ROUT2
C207
0.1uF
C199
0.1uF
GND
RIN2-
3.3V
2
LVDS_ISO_3.3V_1
1
1
7
3
6
4
4
5
R83
100R
5
LVDS_ISO_3.3V_1
ADN4664
RIN2+
GND
GND
LVDS_ISO_GND
10
VCC
7
LVDS_ISO_GND
2
8
LVDS_ISO_GND
U32
VDD1
VDD1
10
VISO 16
VISO
RCSEL
VSEL
RCIN
RCOUT
GND1
GND1
ADuM5000
3
NC1 11
NC2 12
NC3 14
NC4
9
GNDISO 15
GNDISO
GND
LVDS_ISO_3.3V_2
LVDS_ISO_GND
3.3V
DIN1
DOUT1+
LVDS_ISO_3.3V_2
DIN2
DOUT2+
DOUT2-
7
C212
10uF
8
6
TSCLK2
TFS2
3
4
RSCLK2
RFS2
5
6
VDD1
VDD2
GND
VOC
VOD
VE1
VE2
1
7
3.3V
4
5
GND
VDD1
VDD1
10
VISO 16
VISO
RCSEL
VSEL
RCIN
RCOUT
7
ROUT1
RIN1+
RIN1-
LVDS_ISO_GND
6
LVDS_ISO_3.3V_2
C209
0.1uF
R82
100R
8
U31
VCC
9
GND2 15
GND2
ROUT2
RIN2+
RIN2-
2
8
2
1
LVDS_ISO_GND
LVDS_ISO_GND
LVDS_ISO_3.3V_2
3.3V
4
R81
100R
C218
10uF
LVDS_ISO_GND
C217
0.1uF
GND
LVDS_ISO_3.3V_1
LVDS_ISO_3.3V_2
LVDS_ISO_3.3V_1
C200
0.01uF
C201
0.1uF
LVDS_ISO_GND
C202
0.01uF
9
GNDISO 15
GNDISO
GND
3
LVDS_ISO_GND
C198
0.1uF
GND1
GND1
ADuM5000
13
3
NC1 11
NC2 12
NC3 14
NC4
10
ADN4664
C208
0.1uF
U34
6
GND
GND
GND1
GND1
ADuM3442
C213
0.1uF
LVDS_ISO_3.3V_2
3.3V
LVDS_ISO_GND
5
2
8
C214
0.1uF
LVDS_ISO_GND
LVDS_ISO_3.3V_2
7
C215
10uF
ADN4663
16
14
VOA 13
VOB
12
VIC 11
VID
VIA
VIB
C210
0.1uF
5
U27
1
C211
0.1uF
4
3.3V
GND
DOUT13
LVDS_ISO_3.3V_1
1
VCC
U29
2
13
C203
0.1uF
C216
0.1uF
C221
10uF
C220
0.1uF
C219
0.1uF
LVDS_ISO_GND
LVDS_ISO_3.3V_2
C204
0.01uF
LVDS_ISO_GND
C205
0.1uF
C206
0.01uF
LVDS_ISO_GND
Figure 10. ADuM3442, ADN4663, ADN4664, and ADuM5000 Isolated LVDS Implementation
Rev. 0 | Page 13 of 20
10649-010
3.3V
GND
DOUT1-
7
8
�UG-400
Hardware User Guide
POWER INPUT
3.3 V POWER SUPPLY
An ac-to-dc desktop power supply is used to supply 7.5 V input
to the J1 barrel connector on the ezLINX hardware. This supply
connects to the UNREG_IN node of the circuit through a
protection circuit as shown in Figure 11.
The ADP1864 constant frequency, current-mode, step-down
dc-to-dc controller is used with an external P-channel MOSFET
to generate the regulated 3.3 V power supply for the ezLINX
hardware. The circuit implementation of the 3.3 V power
supply is shown in Figure 12.
J1
UNREG_IN
D2
MBRS540T3G
L1
190R
F1
5A
1
3
2
1
2
4
3
D9
SMBJ24CA
PWR CONN
C1
1nF
FER1
600R
C2
1nF
FER2
600R
GND
10649-011
PWR_SH_GND
GND
PWR_SH_GND
Figure 11. Power Input
UNREG_IN
C3
10uF
P_GND
U1
1
FB
ADP1864
R3
80.6K
PGATE
TP1
3.3V
3.3V
1
2
3
4
4
6
5
6
7
8
L2
2.5uH
D3
MBRS540T3G
SI4411DY
R4
255K
A_GND
AGND
3
CS
R1
0.05R
U2
2
C5
68pF
C4
470pF
IN
COMP
5
A_GND
P_GND
W2
W1
COPPER
COPPER
4A
A_GND
P_GND
GND
Figure 12. 3.3 V Power Supply
Rev. 0 | Page 14 of 20
C6
220uF
C7
4.7uF
TP2
GND
C245
0.01uF
P_GND P_GND P_GND
GND
10649-012
R2
24.9K
�Hardware User Guide
UG-400
1.2 V, 2.5 V, AND 5 V POWER SUPPLIES
low dropout regulator is used to regulate the UNREG_IN input
to 5 V (see Figure 15).
A P-channel MOSFET is used to regulate the 3.3 V input to
1.2 V (see Figure 13). The ADP1706 linear regulator is used to
regulate the 3.3 V input to 2.5 V (see Figure 14). The ADP3335
1.2V
3.3V
VROUT
TP3
1.2V
U3
1
5
L3
2
6
10uH
3
7
4
8
D4
FDS9431A
C10
C11
100uF
10uF
0.1uF
C8
ZHCS1000
100uF
GND
10649-013
C9
GND
GND
Figure 13. 1.2 V Power Supply
3.3V
TP6
2.5V
2.5V
U39
3
4
5
IN
OUT
IN
OUT
6
7
1
SENS
EN
EP
2
GND
SS
ADP1706
4.7uF
GND
GND
GND
C231
C233
10nF
4.7uF
10649-014
EP
C232
GND
8
GND
Figure 14. 2.5 V Power Supply
5V
UNREG_IN
TP5
U38
5V
7
8
1
IN
OUT
IN
OUT
3
OUT
6
4
2
SD
GND
5
NR
ADP3335
C229
C230
1uF
GND
GND
Figure 15. 5 V Power Supply
Rev. 0 | Page 15 of 20
10649-015
GND
1uF
�UG-400
Hardware User Guide
shows the circuit implementation of the J23 and J26 extender
connectors. Connector J26 is a 3-pin header connector that
allows the CAN1 signals of the ADSP-BF548 to be routed to an
external daughter board.
EXTENDER CONNECTOR
The Hirose FX8-120P-SV(91) extender connector is used for
daughter board connections. This allows additional
functionality to be added to the ezLINX hardware. Figure 16
J26
J23
CON3
CAN1RX
CAN1TX
#HIROSE_RESET
LAN_IRQ/UART0RX
GND
R71
100K
TMR8
TMR10
PD12
GND
PC12
PC10
PC8
PC5
PC6
#SPI1SS
#SPI1SEL3
#SPI1SEL2
PC7
DT3SEC
DR3SEC
PPI0_FS1
PPI0_D1
PPI0_D3
PPI0_D5
PPI0_D7
PPI0_D9
PPI0_D11
PPI0_D13
PPI0_D14
PPI0_D17
PPI0_D19
PPI0_D21
PPI0_D23
60
59
58
57
56
55
54
53
52
51
50
49
48
47
46
45
44
43
42
41
40
39
38
37
36
35
34
33
32
31
30
29
28
27
26
25
24
23
22
21
20
19
18
17
16
15
14
13
12
11
10
9
8
7
6
5
4
3
2
1
RESET_IN
UART_RX
GND
NC7
EEPROM_A0
NC6
NC5
NC4
GND
NC3
NC2
TMR_C
TMR_A
GPIO6
GND
GPIO4
GPIO2
GPIO0
SCL_1
SDA_1
GND
SPI_SEL1/SPI_SS
SPI_SEL_C
SPI_SEL_B
GND
SPORT_INT
SPORT_DT3
SPORT_DT2
SPORT_DT1
SPORT_DR1
SPORT_DR2
SPORT_DR3
GND
PAR_FS1
PAR_FS3
PAR_A1
PAR_A3
GND
PAR_CS
PAR_RD
PAR_D1
PAR_D3
PAR_D5
GND
PAR_D7
PAR_D9
PAR_D11
PAR_D13
PAR_D14
GND
PAR_D17
PAR_D19
PAR_D21
PAR_D23
GND
USB_VBUS
GND
GND
NC1
VIN
BMODE1
UART_TX
GND
NC8
NC9
NC10
NC11
NC12
GND
NC13
NC14
TMR_D
TMR_B
GPIO7
GND
GPIO5
GPIO3
GPIO1
SCL_0
SDA_0
GND
SPI_CLK
SPI_MISO
SPI_MOSI
SPI_SEL_A
GND
SPORT_TSCLK
SPORT_DT0
SPORT_TFS
SPORT_RFS
SPORT_DR0
SPORT_RSCLK
GND
PAR_CLK
PAR_FS2
PAR_A0
PAR_A2
GND
PAR_INT
PAR_WR
PAR_D0
PAR_D2
PAR_D4
GND
PAR_D6
PAR_D8
PAR_D10
PAR_D12
GND
PAR_D15
PAR_D16
PAR_D18
PAR_D20
PAR_D22
GND
VIO(+3.3V)
GND
GND
NC15
NC16
61
62
63
64
65
66
67
68
69
70
71
72
73
74
75
76
77
78
79
80
81
82
83
84
85
86
87
88
89
90
91
92
93
94
95
96
97
98
99
100
101
102
103
104
105
106
107
108
109
110
111
112
113
114
115
116
117
118
119
120
BMODE1
UART0TX
TMR9
PD13
PC13
PC11
PC9
SCL0
SDA0
SPI1SCK
SPI1MISO
SPI1MOSI
#SPI1SEL1
TSCLK3
DT3PRI
TFS3
RFS3
DR3PRI
RSCLK3
PPI0_CLK
PPI0_FS2
PPI0_D0
PPI0_D2
PPI0_D4
PPI0_D6
PPI0_D8
PPI0_D10
PPI0_D12
PPI0_D15
PPI0_D16
PPI0_D18
PPI0_D20
PPI0_D22
3.3V
HIROSE
GND
GND
Figure 16. Extender Connector Using Hirose FX8-120P-SV(91)
Rev. 0 | Page 16 of 20
10649-016
3
2
1
�Hardware User Guide
UG-400
RS-232 CONSOLE
DB-9 connector, J4. A circuit implementation of the RS-232
console is shown in Figure 17.
The RS-232 console connector is used for accessing the console
of the uClinux kernel running on the ADSP-BF548 processor. It
uses the ADM3202 RS-232 line driver and receiver to connect
to UART1 of the ADSP-BF548. The RS-232 signals connect to a
3.3V
J4
R58
10K
11
10
12
9
UART1RX
#UART1CTS
R57
10K
3.3V
GND
GND
R1OUT
R2OUT
T1OUT
T2OUT
R1IN
R2IN
14
7
13
8
C112
0.1uF
11
10
3.3V
DB9
1
3
C113
0.1uF
C111
0.01uF
T1IN
T2IN
4
5
C1+
C1-
C2+
C2ADM3202
GND
C115
0.1uF
V+
V-
2
6
GND
C114
0.1uF
GND
Figure 17. RS-232 Console Implementation
Rev. 0 | Page 17 of 20
10649-017
UART1TX
#UART1RTS
1
6
2
7
3
8
4
9
5
16
U12
VCC
R55
33R
GND
R56
10K
3.3V
15
3.3V
The RS-232 console is used to directly access the uClinux kernel
running on the ADSP-BF548. When the console is connected to
a RS-232 port on the PC, the kernel can be accessed through a
terminal program.
�UG-400
Hardware User Guide
LEDs
There are 10 LEDs on the ezLINX evaluation board. The red
LED6 illuminates to indicate when the reset button is being
pressed. The orange LED10 illuminates to indicate when the
isolated USB port is connected to a USB port on the PC. The
green LED7 illuminates to indicate when the board is powered.
The orange LED1 illuminates to indicate when the uClinux
kernel and application finishes booting up.
Table 4 describes the functionality and connections of the LEDs
for the ADSP-BF548 and other circuitry.
Table 3.
LED
LED1
ADSP-BF548 Port
PD6
LED2
LED3
LED4
LED5
LED6
LED7
LED8
LED10
PD7
PD8
PD9
PD10
PD11
Not Applicable
Not Applicable
Not Applicable
Function
Illuminates when the uClinux kernel and application finishes booting up. This LED can also be used
as a general-purpose indicator that can be turned on and off through software.
General-purpose indicator that can be turned on and off through software.
General-purpose indicator that can be turned on and off through software.
General-purpose indicator that can be turned on and off through software.
General-purpose indicator that can be turned on and off through software.
General-purpose indicator that can be turned on and off through software.
Illuminates when the 3.3 V power supply is available.
Illuminates when the reset button is pressed.
Illuminates when the VBUS voltage from the USB host is connected.
Rev. 0 | Page 18 of 20
�Hardware User Guide
UG-400
JUMPER CONFIGURATIONS
Table 4.
Interface
RS-485/RS-422
RS-232
CAN
SPI0
Configuration
Half-duplex configuration
Full-duplex configuration
120 Ω termination
Loopback TOUT1 to RIN1
Split terminate the bus with 120 Ω and a common-mode 47 nF
capacitor
No termination
Master mode
Slave mode
SPI2
Master mode
Slave mode
1
2
Jumpers Fitted
JP3, JP4, JP40
Not applicable
JP19
JP2
JP17, JP18
Jumpers Open
Not applicable
JP3, JP4, JP40
Not applicable
Not applicable
Not applicable
Not applicable
JP5, JP7, JP9, JP11,
JP13, JP15, JP20, 1
JP36
JP6, JP8, JP10, JP12,
JP14, JP16, JP21, JP37
JP22, JP24, JP26,
JP28, JP30, JP32,
JP35, 2 JP38
JP23, JP25, JP27,
JP29, JP31, JP33,
JP34, JP39
JP17, JP18
JP6, JP8, JP10, JP12,
JP14, JP16, JP21,1 JP37
Warning: JP20 and JP21 should never both be connected because doing so will create a short circuit between 3.3 V and GND.
Warning: JP34 and JP35 should never both be connected because doing so will create a short circuit between 3.3 V and GND.
Rev. 0 | Page 19 of 20
JP5, JP7, JP9, JP11,
JP13, JP15, JP20, JP36
JP23, JP25, JP27, JP29,
JP31, JP33, JP34,2 JP39
JP22, JP24, JP26, JP28,
JP30, JP32, JP35, JP38
�UG-400
Hardware User Guide
NOTES
I2C refers to a communications protocol originally developed by Philips Semiconductors (now NXP Semiconductors).
ESD Caution
ESD (electrostatic discharge) sensitive device. Charged devices and circuit boards can discharge without detection. Although this product features patented or proprietary protection
circuitry, damage may occur on devices subjected to high energy ESD. Therefore, proper ESD precautions should be taken to avoid performance degradation or loss of functionality.
Legal Terms and Conditions
By using the evaluation board discussed herein (together with any tools, components documentation or support materials, the “Evaluation Board”), you are agreeing to be bound by the terms and conditions
set forth below (“Agreement”) unless you have purchased the Evaluation Board, in which case the Analog Devices Standard Terms and Conditions of Sale shall govern. Do not use the Evaluation Board until you
have read and agreed to the Agreement. Your use of the Evaluation Board shall signify your acceptance of the Agreement. This Agreement is made by and between you (“Customer”) and Analog Devices, Inc.
(“ADI”), with its principal place of business at One Technology Way, Norwood, MA 02062, USA. Subject to the terms and conditions of the Agreement, ADI hereby grants to Customer a free, limited, personal,
temporary, non-exclusive, non-sublicensable, non-transferable license to use the Evaluation Board FOR EVALUATION PURPOSES ONLY. Customer understands and agrees that the Evaluation Board is provided
for the sole and exclusive purpose referenced above, and agrees not to use the Evaluation Board for any other purpose. Furthermore, the license granted is expressly made subject to the following additional
limitations: Customer shall not (i) rent, lease, display, sell, transfer, assign, sublicense, or distribute the Evaluation Board; and (ii) permit any Third Party to access the Evaluation Board. As used herein, the term
“Third Party” includes any entity other than ADI, Customer, their employees, affiliates and in-house consultants. The Evaluation Board is NOT sold to Customer; all rights not expressly granted herein, including
ownership of the Evaluation Board, are reserved by ADI. CONFIDENTIALITY. This Agreement and the Evaluation Board shall all be considered the confidential and proprietary information of ADI. Customer may
not disclose or transfer any portion of the Evaluation Board to any other party for any reason. Upon discontinuation of use of the Evaluation Board or termination of this Agreement, Customer agrees to
promptly return the Evaluation Board to ADI. ADDITIONAL RESTRICTIONS. Customer may not disassemble, decompile or reverse engineer chips on the Evaluation Board. Customer shall inform ADI of any
occurred damages or any modifications or alterations it makes to the Evaluation Board, including but not limited to soldering or any other activity that affects the material content of the Evaluation Board.
Modifications to the Evaluation Board must comply with applicable law, including but not limited to the RoHS Directive. TERMINATION. ADI may terminate this Agreement at any time upon giving written notice
to Customer. Customer agrees to return to ADI the Evaluation Board at that time. LIMITATION OF LIABILITY. THE EVALUATION BOARD PROVIDED HEREUNDER IS PROVIDED “AS IS” AND ADI MAKES NO
WARRANTIES OR REPRESENTATIONS OF ANY KIND WITH RESPECT TO IT. ADI SPECIFICALLY DISCLAIMS ANY REPRESENTATIONS, ENDORSEMENTS, GUARANTEES, OR WARRANTIES, EXPRESS OR IMPLIED, RELATED
TO THE EVALUATION BOARD INCLUDING, BUT NOT LIMITED TO, THE IMPLIED WARRANTY OF MERCHANTABILITY, TITLE, FITNESS FOR A PARTICULAR PURPOSE OR NONINFRINGEMENT OF INTELLECTUAL
PROPERTY RIGHTS. IN NO EVENT WILL ADI AND ITS LICENSORS BE LIABLE FOR ANY INCIDENTAL, SPECIAL, INDIRECT, OR CONSEQUENTIAL DAMAGES RESULTING FROM CUSTOMER’S POSSESSION OR USE OF
THE EVALUATION BOARD, INCLUDING BUT NOT LIMITED TO LOST PROFITS, DELAY COSTS, LABOR COSTS OR LOSS OF GOODWILL. ADI’S TOTAL LIABILITY FROM ANY AND ALL CAUSES SHALL BE LIMITED TO THE
AMOUNT OF ONE HUNDRED US DOLLARS ($100.00). EXPORT. Customer agrees that it will not directly or indirectly export the Evaluation Board to another country, and that it will comply with all applicable
United States federal laws and regulations relating to exports. GOVERNING LAW. This Agreement shall be governed by and construed in accordance with the substantive laws of the Commonwealth of
Massachusetts (excluding conflict of law rules). Any legal action regarding this Agreement will be heard in the state or federal courts having jurisdiction in Suffolk County, Massachusetts, and Customer hereby
submits to the personal jurisdiction and venue of such courts. The United Nations Convention on Contracts for the International Sale of Goods shall not apply to this Agreement and is expressly disclaimed.
©2012 Analog Devices, Inc. All rights reserved. Trademarks and
registered trademarks are the property of their respective owners.
UG10649-0-8/12(0)
Rev. 0 | Page 20 of 20
�