Welcome to your Wi-Fi Cloud IoT Development Kit!
The Wi-Fi Cloud IoT Development Kit provides all the contents
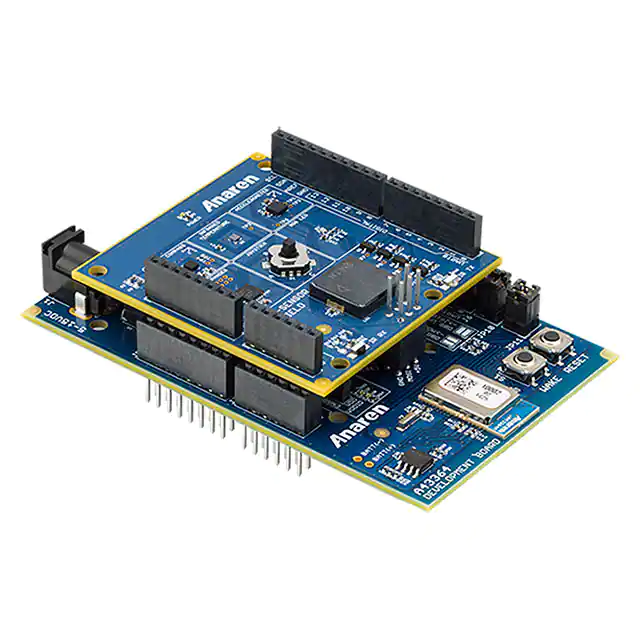
needed to program and evaluate your AIR for Wi-Fi A43364 module.
The kit comes with an A43364 Development Board embedding the
module, and with a Multi-Sensor Shield that incorporates several
sensors for fast and easy testing of a variety of peripherals.
Quick Start Guide
Used alongside Anaren Atmosphere
and the Atmosphere Cloud, the kit
can be stacked together and then
quickly programmed to establish
Wi-Fi connectivity between your
A43364 module and your device, all
while sending data between the
module and the cloud!
Wi-Fi Cloud IoT Development Kit
Anaren Atmosphere
Simply follow the instructions inside, and you will be connecting your
device to your Wi-Fi Cloud IoT Development Kit in minutes!
Kit Contents
A43364 Development Board
Multi-Sensor Shield
Learn more at atmosphere.anaren.com.
Additionally included with the kit is one USB 2.0 micro-B cable, one
external power adapter, and six extra shunt jumpers.
1704b
67150-0007
Also required to use the kit is a computer with Internet access and/or
a Wi-Fi-enabled mobile device.
�This Quick Start Guide will walk you through the steps to run the Wi-Fi Cloud IoT Development Kit demo project, connecting your kit with your
device (phone, tablet, or computer) and interacting with each of the kit’s sensors through a browser-based application. From there, you can
move beyond the initial demo to connect the project to the Atmosphere Cloud, or start developing your own projects using Atmosphere!
NOTE: Screen images shown may differ from what is displayed on your device.
Remove all of the kit’s contents from
the box. Connect the Multi-Sensor
Shield to the A43364 Development
Board by stacking them together (both
board’s text faces the same way).
Make sure the boards are oriented
properly and securely connected.
To connect to the network, enter its
password: 12345678. Once connected,
your device and kit have established a
local Wi-Fi connection between one
another. As long as the kit has power,
the connection can remain intact.
Plug your stacked development kit into
an outlet using the provided external
power adapter. Alternatively, you may
connect the kit to a computer using
the provided USB cable.
Open your device’s Internet browser,
and enter the following URL into the
address bar: 192.168.0.1. This is the kit’s
default IP address. When entered, the
browser will display the interface of the
demo project.
View the wireless networks that are
available on your device. Your kit will
now be displayed as the access point
“A43364_Factory_Demo,” which is the
name of the demo project currently
loaded onto it. Then select the
A43364_Factory_Demo network.
While connected, the demo project
will demonstrate all of the sensors used
on the Multi-Sensor Shield:
• Digital Compass
• Infrared temperature sensor
• LED Sliders
• Joystick
• Accelerometer
NOTE: High latency demo. If you encounter any
issues, press Reset on the board, and then
refresh the page.
Congratulations! You just connected your Wi-Fi Cloud IoT Development Kit with your device and used the demo project. Now that you’ve had
success working with the demo, it’s time to begin developing projects for yourself! Visit the Atmosphere website at atmosphere.anaren.com and
register now for a free account to gain access to the entire Atmosphere development ecosystem. The Atmosphere website also features the
Atmosphere wiki and Atmosphere community forums to help you get started and quickly learn how to use Atmosphere and the cloud.
Interested in seeing this demo project with its data hosted on the cloud? Check out the Atmosphere Cloud Factory Demo Tutorial on the
Atmosphere wiki to walk through a complete tutorial on enabling this demo project to have its data shown on the cloud.
�
很抱歉,暂时无法提供与“A43364A-MSDK1”相匹配的价格&库存,您可以联系我们找货
免费人工找货