User's Guide
SPRUHR4B – November 2013 – Revised June 2015
SOMPLC-F28PLC83 System on Module for Power Line
Communication
The SOMPLC-PLC83 is a self-contained hardware system on module (SOM) for power line
communication, including the analog front end and the digital modem on one single PCB. It is the ideal
plug-in tool for developers willing to easily and quickly evaluate the most popular narrowband power line
communication standards like PRIME/G3/P1901.2 in their application environment. After the developer
brings up the high voltage coupling, the SOM easily plugs into the application with standard
communication ports (UART, SPI, I2C, CAN) through a connector header interface. The SOM also plugs
into the TI data concentrator reference design and future PLC development tools. Hardware schematics
and Gerber files are also available to simplify integration into the application PCB.
1
2
3
4
5
6
7
Contents
SOMPLC Features ..........................................................................................................
SOMPLC Description........................................................................................................
Boot Modes (SW1 Positions) ...............................................................................................
UART SCI Communication .................................................................................................
SOMPLC 34-Pin Definition .................................................................................................
Mechanical Specification....................................................................................................
PLC SOM Programming ....................................................................................................
2
2
3
3
3
5
5
List of Figures
1
PCB Overview ................................................................................................................ 2
2
SW1 Boot Modes ............................................................................................................ 3
3
34-Pin Connector Top View ................................................................................................ 5
4
Programming Configuration Using XDS100 .............................................................................. 6
5
Port Configuration
6
Programming Progress Using XDS100 ................................................................................... 7
7
Programming Configuration Using Serial Port ........................................................................... 8
8
Programming Progress Using Serial Port ................................................................................ 9
...........................................................................................................
6
List of Tables
1
Supported Interfaces ........................................................................................................ 3
2
34-Pin Connector ............................................................................................................ 4
All trademarks are the property of their respective owners.
SPRUHR4B – November 2013 – Revised June 2015
Submit Documentation Feedback
SOMPLC-F28PLC83 System on Module for Power Line Communication
Copyright © 2013–2015, Texas Instruments Incorporated
1
�SOMPLC Features
1
SOMPLC Features
•
•
•
•
•
•
•
•
•
2
www.ti.com
Small size: 1.5 in x 1.9 in
PRIME and G3 Compatible
F28PLC83 PLC engine with VCU
CENELEC A functionality
AFE031 integrated analog front end
34-pin mini header for interfacing with other boards
Multiple serial communications interfaces available including UART, SPI, I2C, and CAN
Additional ADC interface
Additional GPIO interfaces
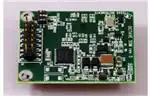
SOMPLC Description
Figure 1 shows an overview of the SOMPLC PCB and its components.
Figure 1. PCB Overview
2
SOMPLC-F28PLC83 System on Module for Power Line Communication
SPRUHR4B – November 2013 – Revised June 2015
Submit Documentation Feedback
Copyright © 2013–2015, Texas Instruments Incorporated
�Boot Modes (SW1 Positions)
www.ti.com
3
Boot Modes (SW1 Positions)
Figure 2 shows how to set the boot mode using switch SW1.
ON
FLASH Boot Mode (Default Setting)
Position 1: OFF
Position 2: OFF
1
2
ON
SCI-A Boot Mode
Position 1: OFF
Position 2: ON
1
2
Figure 2. SW1 Boot Modes
4
UART SCI Communication
To communicate with the SCI, the following requirements must be met.
Baud Rate = 57600
Message Data Bits = 8
Stop Bits = One
Parity = None
Handshake = None
RTS Enable = True
NOTE: There is no RS232 driver on the SOMPLC. Therefore, external communications with RS232
devices must be considered external to this design.
5
SOMPLC 34-Pin Definition
Table 1 shows the interfaces and connections that are supported on this module. Table 2 describes each
pin in the 34-pin connector.
Table 1. Supported Interfaces
Required Connections
•
•
•
•
•
SCI (UART)
Line
15 V
3V3
GND
SPRUHR4B – November 2013 – Revised June 2015
Submit Documentation Feedback
Optional Connections
•
•
•
•
•
•
•
•
ADC
GPIOs
SCI (UART)
CAN
SPI
I2C
Zero Cross
Analog Gnd
SOMPLC-F28PLC83 System on Module for Power Line Communication
Copyright © 2013–2015, Texas Instruments Incorporated
3
�SOMPLC 34-Pin Definition
www.ti.com
Table 2. 34-Pin Connector
4
Pin
Name
I/O
Electrical
1
L1
I/O
0 V (GND)
Description
2
L2
I/O
0 V (±6 V Peak)
3
NC
NC
-
Unused
4
NC
NC
-
Unused
5
GND
-
-
Ground
6
GND
-
-
Ground
7
V15
-
+15 V to +18 V
8
3V3
-
+3.14 V to 3.47 V
9
EN
I-I/O
-0.3 V to VCC + 0.3 V
10
ZC
I
-0.5 V to 6.5 V
11
RX-A
I
-0.3 V to VCC + 0.3 V
Asynchronous serial host transmit, SCI-A
Neutral (analog ground), connected to the PL coupler
Analog PLC signal, connected to the PL coupler
Power supply pin (+15V). Peak current 400 mA in transmit mode.
(average 100mA)
CPU and Logic Digital Power pin (+3.3V). Max current 1000mA.
System enable (logical level, active high). Controls power up and
power down of the module. When low, the module goes to power
down mode. This feature is NOT yet implemented in software or
GPIO13.
Buffered ZC input. The input signal MUST be isolated from the
power line before entering this pin.
12
TX-A
O
-0.3 V to VCC + 0.3 V
Asynchronous serial host receive, SCI-A
13
Phase B/GPIO
I-I/O
-0.3 V to VCC + 0.3 V
Phase B enable signal (for 3-phase selection) or GPIO5
14
Phase C/GPIO
I/O
-0.3 V to VCC + 0.3 V
Phase C enable signal (for 3-phase selection ) or GPIO10
15
SDAA
I/O
-0.3 V to VCC + 0.3 V
I2C data pin
16
SCLA
I
-0.3 V to VCC + 0.3 V
I2C clock pin
17
ADC-B0
I
-0.3 V to VCC + 0.3 V
Unused ADC input. (ADC-B0).
18
AGND
-
-
19
GPIO26
I/O
-0.3 V to VCC + 0.3 V
20
GND
-
-
21
GPIO27
I/O
-0.3 V to VCC + 0.3 V
Analog Ground.
Unused multi-purpose IO, GPIO26
Ground
Unused multi-purpose IO, GPIO27
22
GND
-
-
23
CAN RX/GPIO
I-I/O
-0.3 V to VCC + 0.3 V
Ground
CAN RX interface or GPIO30
24
CAN TX/GPIO
O-I/O
-0.3 V to VCC + 0.3 V
CAN TX interface or GPIO31
25
CLKA/GPIO
I
-0.3 V to VCC + 0.3 V
SPI clock or general purpose I/O (GPIO18).
26
STEA/GPIO
I
-0.3 V to VCC + 0.3 V
SPI slave transmit enable or general purpose I/O (GPIO19)
27
SIMOA/GPIO
I
-0.3 V to VCC + 0.3 V
SPI slave in, master out or general purpose I/O (GPIO16)
28
SOMIA/GPIO
O
-0.3 V to VCC + 0.3 V
SPI master in, slave out or general purpose I/O (GPIO17)
29
System RESET
I
-0.3 V to VCC + 0.3 V
Reset of SOMPLC (active Low)
30
GPIO04
I/O
-0.3 V to VCC + 0.3 V
Unused multi-purpose IO pin, GPIO04.
31
NC
NC
-
Unused
32
NC
NC
-
Unused
33
RX-B
I
-0.3 V to VCC + 0.3 V
Asynchronous serial host receive, SCI-B
34
TX-B
O
-0.3 V to VCC + 0.3 V
Asynchronous serial host transmit, SCI-B
SOMPLC-F28PLC83 System on Module for Power Line Communication
SPRUHR4B – November 2013 – Revised June 2015
Submit Documentation Feedback
Copyright © 2013–2015, Texas Instruments Incorporated
�Mechanical Specification
www.ti.com
6
Mechanical Specification
The connectors used on the SOMPLC are as follows:
• A male 0.05-mil header (2 x 17) is on the SOMPLC module.
– This connector is keyed so that the module cannot be placed backwards.
– An example part that fits this design is Sullins Connector Solutions part number SBH31-NBPB-D17SP-BK, Digi-Key part number: S9108-ND
• A female 0.05 mil receptacle (2x17) should be used on the host board to mate with the SOMPLC
module.
– This connector is keyed and should follow the appropriate orientation as the male connector.
– An Example Part that will fit this design is Sullins Connector Solutions part number SFH31-NPPBD17-SP-BK, Digi-Key part number: S9117-ND
The top view of the connector is shown in Figure 3.
1
2
3
4
5
6
7
8
9
10
11 12
13 14
15 16
17 18
19 20
21 22
23 24
25 26
27 28
29 30
31 32
33 34
Figure 3. 34-Pin Connector Top View
7
PLC SOM Programming
Depending on the end use of the SOM, different versions of the PLC software may be programmed to the
module.
7.1
Using the XDS100 and CodeSkin to Program the F28069 MCU
Programming with this method eliminates the need for CCS to load the release(.out) file. A .hex release
file is used instead and, therefore, CCS is not required.
1. Install the desired Texas Instruments PLC Development Package from www.ti.com/plc.
2. Download, install, and start the latest C2Prog from http://www.codeskin.com.
SPRUHR4B – November 2013 – Revised June 2015
Submit Documentation Feedback
SOMPLC-F28PLC83 System on Module for Power Line Communication
Copyright © 2013–2015, Texas Instruments Incorporated
5
�PLC SOM Programming
www.ti.com
3. Set switch SW1 to "FLASH Boot Mode" as described in Section 3.
4. Connect a Texas Instruments XDS100 class emulator to the SOMPLC module using the 14-pin JTAG
header.
5. Power up the SOMPLC module by applying both 15 V and 3.3 V through the 34-pin host connector.
6. Program the *.hex file (located in C:\Texas Instruments\\SW\bin) as shown in
Figure 4. Select "28069,67,66" in the Target pulldown list and "JTAG" in the Options pulldown list.
Figure 4. Programming Configuration Using XDS100
7. Click on the Configure Ports button and set the JTAG port to "XDS100v1".
Figure 5. Port Configuration
6
SOMPLC-F28PLC83 System on Module for Power Line Communication
SPRUHR4B – November 2013 – Revised June 2015
Submit Documentation Feedback
Copyright © 2013–2015, Texas Instruments Incorporated
�PLC SOM Programming
www.ti.com
8. Start flashing the F28069.
Figure 6. Programming Progress Using XDS100
9. After programming is complete, close the program and restart the SOMPLC module.
7.2
Using Code Composer Studio and JTAG Emulator to Program the F28069 MCU
If an XDS100 emulator is not available, Code Composer Studio (CCS) and an XDS510 or XDS560
emulator can be used to program the device. Install CCS v4.2.4 or higher before you start the following
procedure.
1. Install the desired Texas Instruments PLC Development Package from www.ti.com/plc.
2. Set switch SW1 to "FLASH Boot Mode" as described in Section 3. When a JTAG emulator is used, it is
capable of interrupting the set boot mode to gain control of the MCU. When the programming
procedure is complete it will be necessary for the mode to be set to "FLASH Boot Mode" for the
SOMPLC module to continue to work properly.
3. Power up SOMPLC module by applying both 15V and 3.3 V through the 34-pin host connector.
4. Connect the emulator to the SOMPLC module with the 14-pin JTAG cable.
5. Open CCS
6. Create a F28069 target configuration
7. Connect to F28069 device.
8. Load the PLC-specific *.out firmware located in c:\Texas Instruments\\SW\bin) CCS
flashes the firmware onto the F28069 device.
SPRUHR4B – November 2013 – Revised June 2015
Submit Documentation Feedback
SOMPLC-F28PLC83 System on Module for Power Line Communication
Copyright © 2013–2015, Texas Instruments Incorporated
7
�PLC SOM Programming
7.3
www.ti.com
Using a Serial Port (RS232 or SCI) to Program the F28069 MCU
In some situations, you can connect the SOMPLC module directly to a computer's serial port using RS232
communications. In this scenario, you must have a host board that can converting the RS232
communications protocol to work with the F28069 SCI-A port. In most cases, this can be done using an
external RS232 driver device such as the MAX3221ECPWR by Texas Instruments. If this is in place, the
following procedure can be used to program the MCU.
1. Install the desired Texas Instruments PLC Development Package from www.ti.com/plc.
2. Download, install, and start the latest C2Prog from http://www.codeskin.com.
3. Make sure the SOMPLC module is not powered on. Set switch SW1 to "SCI-A Boot Mode" as
described in Section 3.
4. Connect SOMPLC module to the RS232 host using the appropriate cable.
5. Power up the SOMPLC module by applying both 15 V and 3.3 V through the 34-pin host connector.
6. Program the *.hex file (located in c:\Texas Instruments\\SW\bin) as shown in
Figure 7. If a UART cable is used, serial port should be selected. Otherwise, if a USB-serial cable is
used, JTAG port should be selected.
Figure 7. Programming Configuration Using Serial Port
7. Start flashing the F28069.
8
SOMPLC-F28PLC83 System on Module for Power Line Communication
SPRUHR4B – November 2013 – Revised June 2015
Submit Documentation Feedback
Copyright © 2013–2015, Texas Instruments Incorporated
�PLC SOM Programming
www.ti.com
Figure 8. Programming Progress Using Serial Port
8. After programming is complete, close the program and remove the power supply from the SOMPLC
module.
9. Make sure the SOMPLC module is powered off. Set switch SW1 to "FLASH Boot Mode" as described
in Section 3.
10. The programming procedure is now complete. You may now apply power to the SOMPLC module.
SPRUHR4B – November 2013 – Revised June 2015
Submit Documentation Feedback
SOMPLC-F28PLC83 System on Module for Power Line Communication
Copyright © 2013–2015, Texas Instruments Incorporated
9
�Revision History
www.ti.com
Revision History
Changes from March 30, 2015 to June 30, 2015 ............................................................................................................. Page
•
Figure 3: Removed references to 'female' connector; maintained the use of '34-pin connector.' .............................. 5
NOTE: Page numbers for previous revisions may differ from page numbers in the current version.
10
Revision History
SPRUHR4B – November 2013 – Revised June 2015
Submit Documentation Feedback
Copyright © 2013–2015, Texas Instruments Incorporated
�IMPORTANT NOTICE
Texas Instruments Incorporated and its subsidiaries (TI) reserve the right to make corrections, enhancements, improvements and other
changes to its semiconductor products and services per JESD46, latest issue, and to discontinue any product or service per JESD48, latest
issue. Buyers should obtain the latest relevant information before placing orders and should verify that such information is current and
complete. All semiconductor products (also referred to herein as “components”) are sold subject to TI’s terms and conditions of sale
supplied at the time of order acknowledgment.
TI warrants performance of its components to the specifications applicable at the time of sale, in accordance with the warranty in TI’s terms
and conditions of sale of semiconductor products. Testing and other quality control techniques are used to the extent TI deems necessary
to support this warranty. Except where mandated by applicable law, testing of all parameters of each component is not necessarily
performed.
TI assumes no liability for applications assistance or the design of Buyers’ products. Buyers are responsible for their products and
applications using TI components. To minimize the risks associated with Buyers’ products and applications, Buyers should provide
adequate design and operating safeguards.
TI does not warrant or represent that any license, either express or implied, is granted under any patent right, copyright, mask work right, or
other intellectual property right relating to any combination, machine, or process in which TI components or services are used. Information
published by TI regarding third-party products or services does not constitute a license to use such products or services or a warranty or
endorsement thereof. Use of such information may require a license from a third party under the patents or other intellectual property of the
third party, or a license from TI under the patents or other intellectual property of TI.
Reproduction of significant portions of TI information in TI data books or data sheets is permissible only if reproduction is without alteration
and is accompanied by all associated warranties, conditions, limitations, and notices. TI is not responsible or liable for such altered
documentation. Information of third parties may be subject to additional restrictions.
Resale of TI components or services with statements different from or beyond the parameters stated by TI for that component or service
voids all express and any implied warranties for the associated TI component or service and is an unfair and deceptive business practice.
TI is not responsible or liable for any such statements.
Buyer acknowledges and agrees that it is solely responsible for compliance with all legal, regulatory and safety-related requirements
concerning its products, and any use of TI components in its applications, notwithstanding any applications-related information or support
that may be provided by TI. Buyer represents and agrees that it has all the necessary expertise to create and implement safeguards which
anticipate dangerous consequences of failures, monitor failures and their consequences, lessen the likelihood of failures that might cause
harm and take appropriate remedial actions. Buyer will fully indemnify TI and its representatives against any damages arising out of the use
of any TI components in safety-critical applications.
In some cases, TI components may be promoted specifically to facilitate safety-related applications. With such components, TI’s goal is to
help enable customers to design and create their own end-product solutions that meet applicable functional safety standards and
requirements. Nonetheless, such components are subject to these terms.
No TI components are authorized for use in FDA Class III (or similar life-critical medical equipment) unless authorized officers of the parties
have executed a special agreement specifically governing such use.
Only those TI components which TI has specifically designated as military grade or “enhanced plastic” are designed and intended for use in
military/aerospace applications or environments. Buyer acknowledges and agrees that any military or aerospace use of TI components
which have not been so designated is solely at the Buyer's risk, and that Buyer is solely responsible for compliance with all legal and
regulatory requirements in connection with such use.
TI has specifically designated certain components as meeting ISO/TS16949 requirements, mainly for automotive use. In any case of use of
non-designated products, TI will not be responsible for any failure to meet ISO/TS16949.
Products
Applications
Audio
www.ti.com/audio
Automotive and Transportation
www.ti.com/automotive
Amplifiers
amplifier.ti.com
Communications and Telecom
www.ti.com/communications
Data Converters
dataconverter.ti.com
Computers and Peripherals
www.ti.com/computers
DLP® Products
www.dlp.com
Consumer Electronics
www.ti.com/consumer-apps
DSP
dsp.ti.com
Energy and Lighting
www.ti.com/energy
Clocks and Timers
www.ti.com/clocks
Industrial
www.ti.com/industrial
Interface
interface.ti.com
Medical
www.ti.com/medical
Logic
logic.ti.com
Security
www.ti.com/security
Power Mgmt
power.ti.com
Space, Avionics and Defense
www.ti.com/space-avionics-defense
Microcontrollers
microcontroller.ti.com
Video and Imaging
www.ti.com/video
RFID
www.ti-rfid.com
OMAP Applications Processors
www.ti.com/omap
TI E2E Community
e2e.ti.com
Wireless Connectivity
www.ti.com/wirelessconnectivity
Mailing Address: Texas Instruments, Post Office Box 655303, Dallas, Texas 75265
Copyright © 2015, Texas Instruments Incorporated
�