24VSHIELDBTT6030TOBO1 数据手册
Protected Switch Shield with PROFET™+ 24V for Arduino
24V Protected Switch Shield with BTT6030-2ERA
and BTT6020-1ERA
About this document
Scope and purpose
This document describes how to use the 24V Protected Switch Shield with BTT6030-2ERA and BTT6020-1ERA.
Intended audience
Engineers, hobbyists and students who want to switch 24V loads in their Arduino projects.
Table of Contents
About this document ....................................................................................................................... 1
Table of Contents ........................................................................................................................... 1
1
1.1
1.2
1.3
24V Protected Switch Shield introduction ........................................................................ 2
24V Protected Switch Shield overview ................................................................................................... 2
Key features ............................................................................................................................................. 3
Block diagram of an automotive light control ....................................................................................... 5
2
2.1
2.2
2.3
2.4
24V Protected Switch Shield board description ................................................................. 6
Schematics .............................................................................................................................................. 6
Layout ...................................................................................................................................................... 7
Pin assignment ........................................................................................................................................ 9
Pin definitions and functions ................................................................................................................ 10
3
3.1
3.2
3.3
3.4
BTT6030-2ERA overview ................................................................................................ 11
Key features of the BTT6030-2ERA PROFETTM +24V .............................................................................. 11
Block diagram........................................................................................................................................ 12
Pin assignment ...................................................................................................................................... 13
Pin definitions and functions BTT6030-2ERA ....................................................................................... 13
4
4.1
4.2
4.3
4.4
BTT6020-1ERA overview ................................................................................................ 14
Keyfeatures of the BTT6030-2ERA PROFET™ +24V ............................................................................... 14
Block diagram........................................................................................................................................ 15
Pin assingsment .................................................................................................................................... 15
Pin assingsment .................................................................................................................................... 16
5
5.1
5.2
5.2.1
5.2.2
5.2.3
5.2.4
Getting Started............................................................................................................. 17
Target applications ............................................................................................................................... 17
Typical target applications ................................................................................................................... 17
Getting started: Shield ..................................................................................................................... 17
Getting started: Software................................................................................................................. 18
Software hints .................................................................................................................................. 21
Hardware hints ................................................................................................................................. 22
Revision History ............................................................................................................................ 24
User Manual
www.infineon.com
�Protected Switch Shield with PROFET™+ 24V for Arduino
1
1.1
24V Protected Switch Shield introduction
24V Protected Switch Shield overview
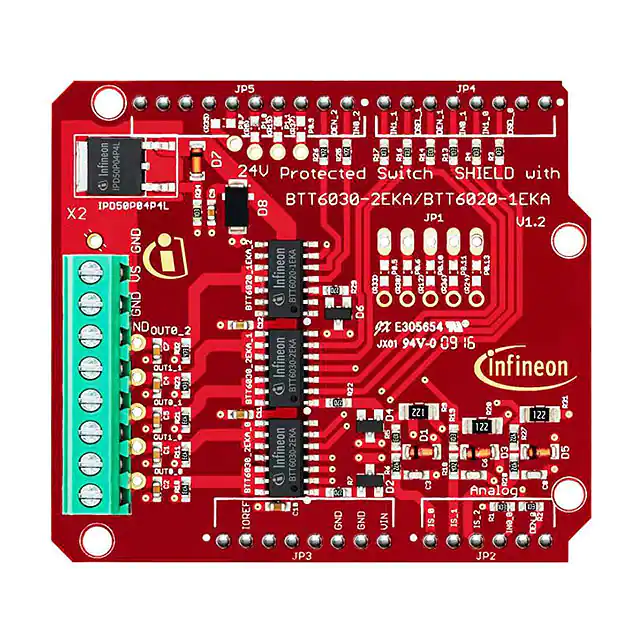
The 24V Protected Switch Shield adds advanced driving and diagnostic of generic loads to the Arduino projects.
The shield can be controlled with the general logic IO-Ports of a microcontroller. Either an Arduino Uno R3, the
XMC1100 Boot Kit or the more powerful XMC4700 Relax Kit and XMC4800 Relax Kit from Infineon can be used as
the master.
TM
On board of the 24V Protected Switch Shield are two BTT6030-2ERA and one BTT6020-1ERA PROFET + 24V.
Each of the BTT6030-2ERA features two 32 mΩ Smart high-side power switch-channels, whereas the BTT60201ERA features a single 20 mΩ channel. In total the shield provides five Smart High-Side Power Switch Channels.
Each is built by a vertical N-channel power MOSFET with charge pump.
Due to the integrated charge pump the channels can be controlled by standard digital IOs (3.3 V and 5 V
supported).
The 24V Protected Switch Shield can be easily connected to any Arduino compatible board like the XMC1100
Boot Kit via headers.
Figure 1
User Manual
24V Protected Switch Shield photo
2
�Protected Switch Shield with PROFET™+ 24V for Arduino
1.2
Key features
The 24V Protected Switch Shield has the following features:
An Arduino Uno R3, XMC1100 Boot Kit, or similar board connected to the shield can control the five power
channels via the general IO pins.
Drives resistive, capacitive and inductive loads with PWM or in DC (eg. truck bulbs, car bulbs, valves, motors,
relays, capacitors, LEDs…)
o Infineon PROFETTM devices have an integrated charge pump, internal protection features and a
current feedback to the ADC of the microcontroller
o Supply voltage: Functional range: 5V – 48V; Nominal range: 8V – 36V
o Nominal Current up to 5 A per channel restricted due to the limited power dissipation of the
PCB (BTT6020-1ERA nominal Current: 7 A)
o PWM (Pulse Width Modulation) via input pins up to 400 Hz
higher frequencies possible depending on load, input voltage and duty cycle
Diagnosis of the load / current feedback
o Accurate feedback on the state of the load to the ADC of the microcontroller (current
measurement & Fault detection).
o Possibility to build feedback loops from the load side to the microcontroller
Protection of load and driver circuit
o Protection against overcurrent on the load side via diagnosis feedback
o thermal protection of the driver
o Overcurrent protection on the driver side (see datasheet)
o Fault detection via IS pin
o Protection against high transient voltages (ESD, ISO pulses)
o Low conducted emissions
Reverse current blocking with IPD50P04P4L-11
User Manual
3
�Protected Switch Shield with PROFET™+ 24V for Arduino
Figure 2
User Manual
24V Protected Switch Shield driving a valve and water pump
4
�Protected Switch Shield with PROFET™+ 24V for Arduino
1.3
Block diagram of an automotive light control
Figure 3 depicts the Block diagram of the 24V Protected Switch shield. The IS pins of all 3 devices used for the
current sensing could be connected to a single analog digital converter at the µC. But for simplification each IS
pin is connected to an own analog digital converter. The microcontroller and its power supply are not part of
the shield.
Figure 3
User Manual
Application circuit for a 5 channel automotive light control with BTT6030-2ERA
5
�Protected Switch Shield with PROFET™+ 24V for Arduino
2
24V Protected Switch Shield board description
For a safe and sufficient functionality, discrete components are necessary. Refer to the Datasheet to check
which components are needed.
Figure 4, Figure 5 and Figure 6 show the schematics plus the corresponding layout of the 24V Protected Switch
Shield. The Bill of material (BOM) can be found in Figure 7.
2.1
Schematics
In Figure 4 the schematics of the 24V Protected Switch Shield is shown. The schematics are based on the
application circuit in the BTT6030-2ERA Datasheet.
Figure 4
User Manual
Schematics 24V Protected Switch Shield with PROFETTM+ 24V for Arduino
6
�Protected Switch Shield with PROFET™+ 24V for Arduino
2.2
Layout
Figure 5 and Figure 6 show the layout of the 24V Protected Switch Shield.
Figure 5
24V Protected Switch Shield – Bottom and top layers
Figure 6
24V Protected Switch Shield with PROFETTM+ 24V for Arduino – Layout
User Manual
7
�Protected Switch Shield with PROFET™+ 24V for Arduino
Part
Value
C1, C2, C4, C5, C7
C3, C6, C8
C9
C10, C11, C12
D1, D3, D5
D2, D4, D6
D7
D8
IPD50P04P4L-11
R1, R2, R3, R4, R5, R13,
R14, R16, R17, R19,
R34
R6, R18, R25, R26, R27,
R28
R7, R22, R29
R9, R20, R31
R10, R11 R21, R23, R32
BTT6030_2ERA
BTT6020_1ERA
(R8), (R12), (R15),
(R24), (R30), (R33)
R(35), R(36), R(37)
Package
10n /50V
100p /50V
68n /50V
100n /50V
6.8V
BAS21
10V
58V
HW_INFINEON
0603-CAP
0603-CAP
0603-CAP
0603-CAP
SMD-SOD80
SOT23
SMD- SOD80
SMA
PG-TO252-3-313
Capacitor
Capacitor
Capacitor
Capacitor
Zener Diode
Silicon Schottky Diode
Zener Diode
Supressor
MOSFET
10k
0603
Resistor
4.7k
0.027k
1.2k
47k
INFINEON
INFINEON
0603
0603
R1206
0603
TDSO_14
TDSO_14
Resistor
Resistor
Resistor
Resistor
2Ch PROFET™+ 24V
1Ch PROFET™+ 24V
10k
0603
Resistor
MKDS 1/ 8-3,5 TERMINAL
BLOCK PLUGGABLE, 8
POSITION
5-pin 2.54mm male
long header
6-pin 2.54mm male
long header
8-pin 2.54mm male
long header
10-pin 2.54mm male
long header
X2
JP1
JP2
JP3, JP4
JP5
Figure 7
User Manual
Description
Qty
Placing
5
3
1
3
3
3
1
1
1
yes
yes
yes
yes
yes
yes
yes
yes
yes
11
6
3
3
5
2
1
9
yes
yes
yes
yes
yes
yes
yes
no
1
yes
1
yes
1
yes
2
yes
1
yes
24V Protected Switch Shield with PROFETTM+ 24V for Arduino – Bill of Material (BOM)
8
�Protected Switch Shield with PROFET™+ 24V for Arduino
2.3
Pin assignment
To use the 24V Protected Switch Shield the necessary control signals can be applied directly at the connectors.
There is no need to use a microcontroller compatible with Arduino or XMC 1100 Boot Kit to get the 24V
Protected Switch Shield into an application. The control pins are logic level inputs which can be driven by any
other microcontroller or with logic level signals. Besides the supply voltage Vbat has to be provided to the Vbat
connector. Figure 8 shows the pinout/connectors of the 24V Protected Switch Shield.
User Manual
IS_0
IS_1
Figure 8
24V Protected Switch Shield connectors
9
�Protected Switch Shield with PROFET™+ 24V for Arduino
2.4
Pin definitions and functions
Table 1
Pin
Symbol
I/O
Function
GND
GND
-
Ground
D2
DSEL_0
I
D3
IN1_0
I
D4
IN0_1
I
D5
DEN_1
I
D6
DSEL_1
I
D7
IN1_1
I
D8
IN0_2
I
D9
DEN_2
I
A0
IS_0
O
A1
IS_1
O
A2
IS_2
O
A3
IN0_0
I
A4
DEN_0
I
OUTy_x
OUTy_x
O
Diagnostic select PROFETTM+ 24V device no. 0
Selects if the diagnosis of channel 0 or 1 is muxed to the IS Pin
Input 1 PROFETTM+ 24V device no. 0
Input to switch channel 1 on PROFETTM+ 24V device no. 0
Input 0 PROFETTM+ 24V device no. 1
Input to switch channel 0 on PROFETTM+ 24V device no. 1
Diagnosis enable PROFETTM+ 24V device no. 1
Turns diagnosis for PROFETTM+ 24V device no. 1 on or off
Diagnostic select PROFETTM+ 24V device no. 1
Selects if the diagnosis of channel 0 or 1 is muxed to the IS Pin
Input 1 PROFETTM+ 24V 1
Input to switch channel 1 on PROFETTM+ 24V device no. 1
Input PROFETTM+ 24V 2
Input to switch channel on PROFETTM+ 24V device no. 2
Diagnosis enable PROFETTM+ 24V 2
Turns diagnosis for PROFETTM+ 24V device no. 2 on or off
Sense PROFETTM+ 24V 0
Current sense of PROFETTM+ 24V device no. 0
Sense PROFETTM+ 24V 1
Current sense of PROFETTM+ 24V device no. 1
Sense PROFETTM+ 24V 2
Current sense of PROFETTM+ 24V device no. 2
Input 0 PROFETTM+ 24V device no. 0
Input to switch channel 0 on PROFETTM+ 24V device no. 0
Diagnosis enable PROFETTM+ 24V device no. 0
Turns diagnosis for PROFETTM+ 24V device no. 0 on or off
Power output of channel y on PROFETTM+ 24V device no. x
Vbat
VS
-
Supply
User Manual
10
�Protected Switch Shield with PROFET™+ 24V for Arduino
3
BTT6030-2ERA overview
The BTT6030-2ERA is a 32 mΩ dual channel Smart High-Side Power Switch, embedded in a TDSO-14, Exposed
Pad package, providing protective functions and diagnosis. The power transistor is built by an N-channel
vertical power MOSFET with charge pump. The device is integrated in Smart6 HV technology. It is specially
designed to drive lamps up to 2 x P21 W 24 V or 1 x 70 W 24 V, as well as LEDs in the harsh automotive
environment. For details please refer to the Datasheet.
3.1
Key features of the BTT6030-2ERA PROFETTM +24V
Two channel device
Very low stand-by current
3.3 V and 5 V compatible logic inputs
Electrostatic discharge protection (ESD)
Optimized electromagnetic compatibility
Logic ground independent from load ground
Very low power DMOS leakage current in OFF state
Green product (RoHS compliant)
AEC qualified
Figure 9 TDSO-14
User Manual
11
�Protected Switch Shield with PROFET™+ 24V for Arduino
3.2
Block diagram
Chann el 0
VS
voltage se nso r
interna l
power
supply
IN0
DEN
over
temperature
driver
logi c
ESD
protection
IS
gate co ntr ol
&
charge pu mp
T
clamp for
indu ctive l oad
over cu rrent
switch limi t
OUT 0
load curre nt sense a nd
ope n lo ad detection
forward vo ltag e d rop detection
VS
Chann el 1
T
IN1
Control and protectio n circuit e quivalent to channe l 0
DSEL
OUT 1
GND
Figure 10
User Manual
VisioDocument
Block diagram BTT6030-2ERA
12
�Protected Switch Shield with PROFET™+ 24V for Arduino
3.3
Pin assignment
Figure 11
Pin assignment BTT6030-2ERA (top view)
3.4
Pin definitions and functions BTT6030-2ERA
Table2
Pin
1
2
Symbol
GND
IN0
Function
Ground
3
DEN
4
5
IS
DSEL
Diagnostic ENable; Digital signal to enable/disable the
diagnosis of the device
Sense; Sense current of the selected channel
6
IN1
INput channel 1; Input signal for channel 1 activation
7, 11
NC
Not Connected; No internal connection to the chip
8, 9, 10
OUT1
OUTput 1; Protected high side power output channel 1
12, 13, 14
OUT0
OUTput 0; Protected high side power output channel 0
Cooling Tab
VS
Voltage Supply; Battery voltage
User Manual
INput channel 0; Input signal for channel 0 activation
Diagnostic SELection; Digital signal to select the channel to be
diagnosed
13
�Protected Switch Shield with PROFET™+ 24V for Arduino
4
BTT6020-1ERA overview
The BTT6020-1ERA is a 20 mΩ single channel Smart High-Side Power Switch, embedded in a TDSO-14, Exposed
Pad package, providing protective functions and diagnosis. The power transistor is built by an N-channel
vertical power MOSFET with charge pump. The device is integrated in Smart6 technology. It is specially
designed to drive lamps up to 5 x P21 W 24 V or 1 x 70 W 24 V, as well as LEDs in the harsh automotive
environment. For details please refer to the Datasheet.
4.1
Keyfeatures of the BTT6030-2ERA PROFET™+ 24V
One channel device
Very low stand-by current
3.3 V and 5 V compatible logic inputs
Electrostatic discharge protection (ESD)
Optimized electromagnetic compatibility
Logic ground independent from load ground
Very low power DMOS leakage current in OFF state
Green product (RoHS compliant)
AEC qualified
Figure 12
User Manual
TDSO-14
14
�Protected Switch Shield with PROFET™+ 24V for Arduino
4.2
Block diagram
VS
voltage se nso r
interna l
power
supply
driver
logi c
IN
DEN
over
temperature
gate co ntr ol
&
charge pu mp
ESD
protection
T
clamp for
indu ctive l oad
over cu rrent
switch limi t
load curre nt sense a nd
ope n lo ad detection
OUT
IS
forward vo ltag e d rop detection
GND
Figure 13
4.3
Figure 14
User Manual
Block diagram.emf
Block diagram BTT6020-1ERA
Pin assingsment
Pin assignment BTT6020-1ERA (top view)
15
�Protected Switch Shield with PROFET™+ 24V for Arduino
4.4
Pin assingsment
Table 3
Pin
1, 2, 7, 8, 9,
13, 14
3
4
Symbol
NC
Function
Not Connected; No internal connection to the chip
GND
IN
Ground
5
DEN
6
IS
Diagnostic ENable; Digital signal to enable/disable the
diagnosis of the device
Sense; Sense current of the selected channel
10, 11, 12
OUT
OUTput; Protected high side power output channel
Cooling Tab
VS
Voltage Supply; Battery voltage
User Manual
INput channel; Input signal for channel activation
16
�Protected Switch Shield with PROFET™+ 24V for Arduino
5
Getting Started
5.1
Target applications
The application targeted by the BT60xx devices is driving lamps in 24V Trucks and Transportation systems.
Besides lamps any other inductive, resistive and capacitive load within the electrical characteristics of the
PROFET™+24V can be driven by the BT60xx. In the 24V Protected Switch Shield two BTT6030-2ERA and one
BTT6020-1ERA are used. Each channel of the BTT6030 is capable of driving up to 4 A (both channels active). The
single channel of the BTT6020 is capable of driving up to 7 A. The limited thermal performance of the Shield
PCB limits the recommended maximum current to 5 A.
5.2
Typical target applications
With the 24V Protected Switch Shield up to five 24 V loads can be driven. The switches are controlled via the INx
(Input x) pins. The BTT60xx also provide a sense current at the IS pin. The Shield provides a fast and easy access
to 24 V load switching up to 1 x 5 A + 4 x 4 A.
5.2.1
Getting started: Shield
Choose loads compatible within the electrical characteristics in the Datasheets of the BTT60xx
o
E.g. 1 x 70 W 24 V lamp and 4 x 21 W 24 V lamps (Truck bulbs)
Choose a DC adapter. The nominal input of the Shield is 8 – 36 V DC. Maximum Voltage is 48 V
Connect the Shield to Arduino Uno R3 or XMC 1100 Boot Kit.
Connect power supply (5 V) to the Arduino Uno R3 or XMC 1100 Boot Kit (Micro USB). For the XMC Boot
Kit a standard mobile phone charger can be used.
Program the controller board with the lamp switching software (see 5.2.2).
Connect the Out connectors of the shield
o
70 W to OUT0_2
o
21 W to Out0_1, Out 1_1, Out 0_0 and Out 1_1
Connect the DC adapter to the Power Shield (Vbat, GND).
User Manual
17
�Protected Switch Shield with PROFET™+ 24V for Arduino
DSEL_0
IN1_0
IN0_1
DEN_1
DSEL_1
IN1_1
IN0_2
DEN_0
TM
3x PROFET + 24V:
TM
PROFET +2
DEN0_0
Vbat
GND
BTT6020-1ERA
TM
PROFET +1
OUT0_2
OUT1_1
BTT6030-2ERA
OUT0_1
OUT1_0
OUT0_0
PROFET +0
TM
BTT6030-2ERA
DEN0_0
IN0_0
IS_2
IS_1
IS_0
Figure 15
5.2.2
24V Protected Switch Shield connectors
Getting started: Software
A simple example software for the XMC1100 Boot Kit is provided.
Connect the XMC 1100 Boot Kit with a micro USB cable to the USB port of your PC.
Download and install DAVETM - Free Development Platform for Code Generation from the Infineon
website DAVETM. Download the software example from the Infineon website: Infineon24V_ProtectedSwitchShield_with_Profet+24V_for_Arduino_DAVE_Example_V10.zip-SW-v01_00-EN.zip
Start DAVETM and import project file
“Infineon-24V_ProtectedSwitchShield_with_Profet+24V_for_Arduino_DAVE_Example_V10.zip-SWv01_00-EN.zip”:
User Manual
18
�Protected Switch Shield with PROFET™+ 24V for Arduino
1: Select File Import:
2: Choose InfineonDAVE Project:
3: Select archive fileBrowse for the downloaded fileselect the projectclick finish:
User Manual
19
�Protected Switch Shield with PROFET™+ 24V for Arduino
4: Build the code:
5: Start the Debugger
6: The first time you start the Software a new debug configuration needs to be created. Select the GDB SEGGER
J-Link Debugger and click on new launch configuration. Keep all default values and click on Debug
User Manual
20
�Protected Switch Shield with PROFET™+ 24V for Arduino
7: Confirm the perspective switch
8: Run the code the loads will be powered via PWM
5.2.3
Software hints
The Software will drive the 5 channels in different PWM configurations. Here is the mapping between Profet
channel and PWM configuration:
Channel
Dutycycle
Frequency
PROFET0 Channel 0
100%
---
PROFET0 Channel 1
50%
200Hz
PROFET1 Channel 0
75%
320Hz
PROFET1 Channel 1
60%
400Hz
PROFET2
80%
120Hz
These values can be changed either via double click on the corresponding PWM APP:
User Manual
21
�Protected Switch Shield with PROFET™+ 24V for Arduino
Or during runtime using the API. To get information about the API right click on the APP and select APP Help:
The Help will open in a new Window. Selecting Apps Methods shows a documentation of all available
methods for this type of APP.
The Software does not only drive the loads in PWM. It also measures continuously the Sense signal and
calculates out of it the load current during the high phase of the PWM period. The calculated currents are then
stored in global variables enabling the user to process the values in his code e.g. for a protection strategy or to
calculate the power consumption. For more details on how the load current is calculated check the
documentation in the code. The provided software is an example and is not a reference software.
5.2.4
Hardware hints
The following connections of the PROFET Arduino Shield cannot be addressed by an Arduino Uno µC. At the µC
they are the analog inputs, but for the PROFET Arduino Shield digital outputs are needed!
PIN: A3 → DEN_0 Diagnose enable of BTT6030-2ERA
PIN: A4 → IN0_0 Input of BTT6030-2ERA
Therefore output OUT0_0 at Arduino Shield cannot be addressed and the diagnostic/sense current IS of both
outputs OUT0_0 and OUT1_0 cannot be monitored.
User Manual
22
�Protected Switch Shield with PROFET™+ 24V for Arduino
User Manual
23
�Protected Switch Shield with PROFET™+ 24V for Arduino
Revision History
Major changes since the last revision
Page or Reference
Description of change
V 1.0
Created the document
V 1.1
Updated document; new package BTT6030-2ERA and BTT6020-1ERA
User Manual
24
�Trademarks of Infineon Technologies AG
AURIX™, C166™, CanPAK™, CIPOS™, CoolGaN™, CoolMOS™, CoolSET™, CoolSiC™, CORECONTROL™, CROSSAVE™, DAVE™, DI-POL™, DrBlade™, EasyPIM™,
EconoBRIDGE™, EconoDUAL™, EconoPACK™, EconoPIM™, EiceDRIVER™, eupec™, FCOS™, HITFET™, HybridPACK™, Infineon™, ISOFACE™, IsoPACK™,
i-Wafer™, MIPAQ™, ModSTACK™, my-d™, NovalithIC™, OmniTune™, OPTIGA™, OptiMOS™, ORIGA™, POWERCODE™, PRIMARION™, PrimePACK™,
PrimeSTACK™, PROFET™, PRO-SIL™, RASIC™, REAL3™, ReverSave™, SatRIC™, SIEGET™, SIPMOS™, SmartLEWIS™, SOLID FLASH™, SPOC™, TEMPFET™,
thinQ!™, TRENCHSTOP™, TriCore™.
Trademarks updated August 2015
Other Trademarks
All referenced product or service names and trademarks are the property of their respective owners.
Edition
Published by
Infineon Technologies AG
81726 Munich, Germany
©ifx1owners.
2019 Infineon Technologies AG.
All Rights Reserved.
Do you have a question about this
document?
Email: erratum@infineon.com
Document reference
AppNote Number
IMPORTANT NOTICE
The information contained in this application note
is given as a hint for the implementation of the
product only and shall in no event be regarded as a
description or warranty of a certain functionality,
condition or quality of the product. Before
implementation of the product, the recipient of this
application note must verify any function and other
technical information given herein in the real
application.
Infineon
Technologies
hereby
disclaims any and all warranties and liabilities of
any kind (including without limitation warranties of
non-infringement of intellectual property rights of
any third party) with respect to any and all
information given in this application note.
The data contained in this document is exclusively
intended for technically trained staff. It is the
responsibility of customer’s technical departments
to evaluate the suitability of the product for the
intended application and the completeness of the
product information given in this document with
respect to such application.
For further information on the product, technology,
delivery terms and conditions and prices please
contact your nearest Infineon Technologies office
(www.infineon.com).
WARNINGS
Due to technical requirements products may
contain dangerous substances. For information on
the types in question please contact your nearest
Infineon Technologies office.
Except as otherwise explicitly approved by Infineon
Technologies in a written document signed by
authorized
representatives
of
Infineon
Technologies, Infineon Technologies’ products may
not be used in any applications where a failure of
the product or any consequences of the use thereof
can reasonably be expected to result in personal
injury.
�