Instruction Sheet
408-- 9177
Crimping Die Assemblies
47378- 1, 48756- 1, and 48757- 1
10,000 PSI Tooling
Color Code
408-- 8914
408-- 8956
409-- 10060
409-- 10081
Stationary
Dies
NOTE
i
Crimping Head 1752787-- 1
Crimping Head 1752877-- 1
Battery-- Operated Hydraulic Pump 1804111-- 1
Hydraulic Power Unit 1804700-- 1, - 2
Measurements are in millimeters [with inches in
brackets].
Reasons for reissue are provided in Section 7,
REVISION SUMMARY.
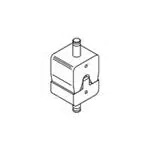
Wire Barrel
Crimping
Chamber
Locator
2. DESCRIPTION
The die assembly consists of two stationary dies and
two moving dies. The moving dies feature a
spring--loaded locator mounted on a block which aids
in positioning the terminal in the dies. Each die
contains a pin--key which is used for insulation crimp
adjustment. When mated, the dies form crimping
chambers which crimp the terminal wire barrel and
insulation barrel simultaneously. Each die is held in
the crimping head by a single setscrew. See Figure 1.
Insulation
Barrel
Crimping
Chamber
Socket Head
Cap Screw(s)
21 DEC 09 Rev C
Pin-- Key(s)
Moving
Dies
Locator
Block
Figure 1
The dies are color coded to match the terminal
insulation color. Observe the embossed wire size that
appears on both sides of the wire barrel of finished
crimps to ensure that it agrees with the wire size
stamped on the terminal tongue.
3. CRIMPING PROCEDURE
1. INTRODUCTION
Tyco Electronics Crimping Die Assemblies 47378--1,
48756--1, and 48757--1 are designed to be used with
Tyco Electronics Crimping Heads. The heads are
used in Tyco Electronics electric hydraulic pumps,
foot or hand pumps, or battery--powered pumps. The
die assemblies crimp AMPLI--BOND* Terminals and
PLASTI--GRIP* Terminals onto wire sizes 1/0 or 2/0
AWG with an insulation diameter of 17.37--18.72 mm
[.684--.737 in.].
This instruction sheet describes crimping procedures,
insulation crimp adjustments, and maintenance and
inspection. For information on tool setup and
operation, refer to the instructions packaged with the
crimping head, power unit, or hydraulic pump:
8,200 PSI Tooling
408-- 2453
408-- 9535
409-- 1950
409-- 5860
Crimping Head 69066
Crimping Head 58422-- 1
Hydraulic Power Unit 69120-- 1, - 2
Hydraulic Hand Pump 314979-- 1
DANGER
To avoid personal injury, ALWAYS keep fingers
clear of crimping dies when operating the
power unit.
1. Refer to Figure 2 and select the appropriate die
assembly for the wire size and terminal being
used.
NOTE
i
When a tight insulation support is required for
PLASTI--GRIP terminals, use the standard
expansion type die assembly.
2. Install the die assembly according to the
instructions packaged with the crimping head.
3. Strip the wire according to the dimensions
provided in Figure 2. DO NOT nick the wire
strands or use wires with nicked or missing
conductor strands.
4. With the yoke on the crimping head open, place
the terminal in the moving dies. Make sure the
bottom of the terminal tongue faces the stationary
TOOLING ASSISTANCE CENTER 1-- 800-- 722-- 1111
E2009 Tyco Electronics Corporation, Harrisburg, PA
PRODUCT INFORMATION 1-- 800-- 522-- 6752
All International Rights Reserved
TE logo and Tyco Electronics are trademarks.
*Trademark. Other products, logos, and company names used are the property of their respective owners.
This controlled document is subject to change.
For latest revision and Regional Customer Service,
visit our website at www.tycoelectronics.com
1 of 5
LOC B
�408- 9177
Die Assemblies 47378- 1, 48756- 1, and 48757- 1
dies and the terminal wire barrel rests against the
locator. See Figure 3.
5. Insert the stripped wire into the terminal wire
barrel. The end of the wire must be flush with, or
extend beyond, the edge of the wire barrel.
Wire Strip Length
18.64-- 20.24
[.734-- .797]
Equals Insulation
Barrel
“B” Equals Wire
Barrel
Note: Do Not Scale
from Illustration
PLASTI- GRIP Terminal
A
B
A
B
AMPLI- BOND Terminal
WIRE
DIE ASSEMBLY
COLOR
SIZE INSUL DIA PART
CODE
TYPE
(AWG)
(Max)
NO.
16.05 [.632] 48756--1 Standard Expansion
1/0
Blue
17.37 [.684] 47378--1
Large Expansion
2/0
17.37 [.684] 48757--1 Standard Expansion Yellow
6. Close the crimping head yoke and insert the
latch pin.
To avoid damage to the yoke, latch pin, or die
assembly, make sure that the latch pin is fully
inserted.
7. Hold terminal in position and activate power unit
to complete the crimp. Open the crimping head
yoke and remove the crimped terminal from the
dies.
NOTE
i
i
Always adjust both pin--keys in the same
position.
4. Remove the terminal from the crimping dies and
bend the wire back and forth once. The terminal
should retain its grip or support on the wire. If the
insulation crimp does not grip or support the wire
insulation, position the pin--keys in the next tighter
position and repeat the crimping procedure.
NOTE
i
AMPLI--BOND terminals contain a wire insulation
“grip” and PLASTI--GRIP terminals contain a wire
insulation “support.”
5. Repeat Steps 1 through 4 until the desired
insulation grip, or support, is obtained. DO NOT
use a tighter setting than is required.
5. MAINTENANCE AND INSPECTION
Figure 2
!
NOTE
3. Crimp a terminal to the wire, as described in
Section 3, CRIMPING PROCEDURE.
“A”
CAUTION
2. Hold the stationary insulation crimping die
against the pin--key to prevent the pin--key from
popping back out. Tighten the socket head cap
screws. Similarly, adjust the moving insulation
crimping die.
If the terminal sticks in the dies after crimping,
use a rocking motion on the terminal to release it
from the die.
Tyco Electronics recommends that a maintenance
and inspection program be performed periodically to
ensure dependable and uniform terminations. The die
assembly should be inspected once a month.
Frequency of inspection should be adjusted to suit
your requirements through experience.
Stationary
Die
Bottom of Terminal
Tongue Facing
Stationary Die
8. Check the termination to ensure the terminal
retains a grip on the wire. If an adjustment to the
insulation crimp is necessary, refer to Section 4,
INSULATION CRIMP ADJUSTMENT. Refer to
Figure 4 for a properly crimped terminal.
Moving
Die
4. INSULATION CRIMP ADJUSTMENT
Terminal Barrel
Resting Against
Locator
The insulation barrel crimping dies have three
positions: 1—Tight; 2—Medium; and 3—Loose.
1. Loosen the socket head cap screws on the
stationary die, then push the pin--key all the way in
for the loose position.
2 of 5
Tyco Electronics Corporation
Figure 3
Rev C
�408- 9177
Die Assemblies 47378- 1, 48756- 1, and 48757- 1
Terminal Crimp
Inspection
2
1
5
3
4
4
7
7
4
Wire must be fully inserted.
2
Crimp centered on wire barrel.
3
Correct color code and die combination must be used
(terminal insulation color matches color code on dies).
4
Wire size used must be the same as the wire size
embossed on terminal insulation and stamped on terminal
tongue.
End of wire conductor is flush with, or extends beyond,
end of terminal wire barrel.
Insulation barrel must contact wire insulation
(AMPLI-- BOND terminals contain wire insulation “grip” and
PLASTI-- GRIP terminals contain wire insulation “support”).
Refer to Section 4.
Bellmouth must be visible.
5
5
6
1
6
4
7
Figure 4
5.3. Gaging the Wire Barrel Crimping Chamber
Frequency of inspection depends on:
1. The care, amount of use, and handling of the
die assembly.
2. The type and size of the product crimped.
3. The degree of operator skill.
4. The presence of abnormal amounts of dust and
dirt.
5. Your own established standards.
Each die assembly is thoroughly inspected before
packaging. Since there is the possibility of damage
during shipment, the die assembly should be
inspected immediately upon arrival at your facility in
accordance with Paragraph 5.3, Gaging the Crimping
Chamber, and Figure 6.
5.1. Cleaning
1. Remove dust, moisture, and other contaminants
with a clean brush, or a soft lint--free cloth. Do
NOT use objects that could damage the dies.
2. Make certain the dies are protected with a THIN
coat of any good SAE 20 motor oil. Do NOT oil
excessively.
3. When the dies are not in use, mate and store
them in a clean, dry area.
5.2. Visual Inspection
1. Check all bearing surfaces for wear. If parts are
missing or defective, replace them by referring to
Figure 6.
2. Inspect the crimp area for flattened, chipped, or
broken areas. Although the crimping chamber may
gage within permissible limits, worn or damaged
die closure surfaces are objectionable and will
affect the quality of the crimp.
Rev C
This inspection requires the use of plug gages
conforming to the dimensions shown in Figure 5. Tyco
Electronics does not manufacture or market these
gages.
1. Remove die assembly from crimping head.
Refer to the instructions packaged with the
crimping head.
2. Remove the socket head cap screws and the
locator block from the moving die.
3. Remove oil and dirt from crimping surfaces and
plug gage elements.
4. Mate the dies until they are bottomed, but not
under pressure.
5. Using the suggested plug gage design, as
shown in Figure 5, align the GO element with the
wire barrel crimping chamber. Push the element
straight into the crimping chamber without using
force. The GO element must pass completely
through the crimping chamber, as shown in
Figure 5.
6. Align the NO--GO element and try to insert it
into the same crimping chamber. The element may
start entry, but will not pass completely through the
crimping chamber. See Figure 5.
If the crimping chamber conforms to the gage
inspection, the die assembly is considered
dimensionally correct and should be lubricated with a
THIN coat of any good SAE 20 motor oil. If the
crimping chamber does not conform to the plug gage
dimensions, the dies must be repaired before
returning them to service (refer to Section 6,
REPLACEMENT AND REPAIR).
For additional information concerning the use of the
plug gage, refer to Instruction Sheet 408--7424.
Tyco Electronics Corporation
3 of 5
�408- 9177
Die Assemblies 47378- 1, 48756- 1, and 48757- 1
Suggested Plug Gage Design for Wire Barrel Crimp
GO Dim.
NO-- GO Dim.
25.4 [1.00]
(Typ)
DIE
ASSEMBLY
47378--1
GAGE ELEMENT DIMENSIONS
GO
NO-- GO
10.185--10.193
[.4010--.4013]
10.335--10.338
[.4069--.4070]
GO Dim.
NO-- GO Dim.
6. REPLACEMENT AND REPAIR
The parts listed in Figure 6 are customer-replaceable. A complete inventory can be stocked
and controlled to prevent lost time when replacement
of parts is necessary. Order replacement parts
through your Tyco Electronics Representative, or call
1--800--526--5142, or send a facsimile of your
purchase order to 1--717--986--7605, or write to:
CUSTOMER SERVICE (38--35)
TYCO ELECTRONICS CORPORATION
P.O. BOX 3608
HARRISBURG, PA 17105--3608
For repair service, please contact an Tyco Electronics
Representative at 1--800--526--5136.
7. REVISION SUMMARY
Since the previous release of this sheet, the following
changes were made:
R
(Typ)
DIE
ASSEMBLY
25.4 [1.00]
(Typ)
12.7 [.500]
(Typ)
GAGE ELEMENT DIMENSIONS
RADIUS
GO
NO-- GO
“R”
48756--1
10.185--10.193
[.4010--.4013]
10.335--10.338
[.4069--.4070]
13.00
[.512]
48757--1
11.354--11.361
[.4470--.4473]
11.504--11.506
[.4529--.4530]
14.73
[.580]
S
S
S
S
Updated document to corporate requirements
Added new text to Section 1
Added new documents to Section 1
New logo and format
Crimping
Chamber
GO
Element
GO Gage Element Must
Pass Completely Through
the Crimping Chamber.
NO-- GO
Element
NO-- GO Gage Element May
Enter Partially, But Must
Not Pass Completely
Through the Length of the
Crimping Chamber.
Figure 5
4 of 5
Tyco Electronics Corporation
Rev C
�408- 9177
Die Assemblies 47378- 1, 48756- 1, and 48757- 1
1
2
7
10.54
[4.15]
8
12
9
6
5
4
11
10.26+0.08
[.404+.003]
10
3
44.2
[1.74]
5.99
[2.36]
Weight: 964 g [2 lb, 2 oz]
CUSTOMER REPLACEABLE PARTS
ITEM
1
2
PART NUMBER
307809--5
307809--6H
1--23030--6
3
307810--5
307810--6H
4
45859--1
48882 Y
5
313291--1
313291--2H
QTY PER DIE
ASSEMBLY
ANVIL
1
SCREW, Skt Hd Cap, Slflkg, Patch Type
4
INDENTER
1
INSERT, Insulation
2
ASSEMBLY, Pin--Key
2
SPRING, Compression
2
LOCATOR
1
6
2--22279--1
7
313338--1
8
7--59683--0
SPRING, Compression
2
9
1--22353--0
SCREW, Shldr, Slot Hd, 8--32
2
10
307333--2
BLOCK, Locator
1
11
3--21000--1
SCREW, Skt Hd Cap
2
12
306098--2
WASHER, Flat
4
H For Die Assembly 48757--1 only.
Y For Die Assembly 48756--1 only.
Rev C
DESCRIPTION
Figure 6
Tyco Electronics Corporation
5 of 5
�


 工商网监
湘ICP备2023018690号
工商网监
湘ICP备2023018690号
