OLED rocker IS evaluation kit / Operating manual
Nihon Kaiheiki Ind. Co., LTd. (NKK switches)
Please read this operating manual carefully before you use OLED rocker IS evaluation
kit.
1. Outline of OLED SmartSwitch & SmartDisplay evaluation kit
With this OLED rocker IS evaluation kit, users can let their own graphics or menus
be displayed on OLED rocker IS and can simulate operations through tree search
menus. The graphic data can be created or edited by “IS color editor” that we supply
as a free software. There are three pre-installed demo data as well.
2. Included in the kit
(1) OLED rocker IS evaluation kit main board
1 set
(2) OLED rocker IS (mounted on the main board)
1 pc
(3) microSD card (with sample data on it, inserted in the card slot)
(4) Operating manual (simplified version)
*
1pc
1 sheet
Please prepare three AAA alkaline batteries except above.
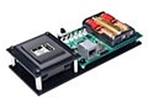
3. The name of each part and its function
① Power switch (right ON)
After turning on the switch, all LEDs ⑥ blink to ascertain that the power is
properly generated.
② microSD card slot
NKK switches
Rev.1.0
�If microSD card is not properly inserted, all LEDs keep glowing after turning
on the power. In that case, turn off the power and insert a microSD card into
this slot, then turn on the power again.
③ OLED rocker IS
④ RJ-11 jack (for downloading firmware)
⑤ Microcontroller [Microchip PIC24FJ48GA004-I/PT]
⑥ 6 LEDs for showing the menu selection status [color: red]
⑦ Battery box
Insert three AAA alkaline batteries into battery holders surely and properly.
⑧ OLED rocker IS harness and connector
Upper key
4. Operation
(1) To display sample menus
(a) If the attached microSD card is not inserted
Center key
in the microSD card slot, insert it.
(b) Turn on the power.
(c) Change the menus by pressing upper or
lower key. Choose a menu by pressing
center key.
Lower key
(2) To display your own menus
(a) Start “IS color editor” on your PC and create or edit graphic data.
(b) Save the graphic data in microSD card by using card writer. Use the
following folders and file names as described in 5.
(c) Insert the microSD card into the slot of the board.
(d) Follow the operations of from 4-(1)-(a) through 4-(1)-(c).
5. File names and folder allocation on microSD card and operations of
OLED rocker IS evaluation kit
(1) Image files to be displayed on OLED rocker IS evaluation kit shall be generated
and edited by “IS color editor”. Set the panel setting to “64 X 48” and “Black and
white” and create the data. (Please note that “black and white” images on IS
color editor and on OLED rocker IS are reverse.
(2) Files names and folder names are fixed and shall follow the following rules.
(a) Menu items display files
NKK switches
Rev.1.0
�Maximum 10 menu item display files can be placed in the same folder. File
names shall be:
select.001, select.002, select.003,…, select.009, select.010.
For example, texts or icons meaning as “Function 1” shall be with
select.001, “Function 2” with select.002.
(b) Special function files
select.000
This file is for returning to previous, upper layer of menus, when searching
in tree-structure menus. Image or icon shall indicate “one step back” or
“escape”.
select.800
If this file is placed in a layer (folder), the kit regards the layer as the
bottom. Image or icon can indicate, e.g. “return to top”.
select.999
This file is normally not displayed, but used to show the operator that
there are some errors in files. Image or icon shall simply indicate “error”.
(c) Folders for tree-structure menus
In tree-search menus, if one menu item is selected, sub menus are
displayed for further selection. In order to achieve tree-search, Windows
folders are used.
Top layer folder shall be ”layer01” just under the root folder.
Menu item display files such as “select.001, select.002, select.003,…,
select.009, select.010” shall be placed under “layer01” and at them same
time the folders “001”,”002”,…, “009”,”010” shall be also placed in the
same folder.
Sub menu item display files of select.001 shall be placed under the folder
“001”, and the ones of select.002 shall be under “002”. Sub menu item
display file names of select.001 shall be also select.001, select.002,
select.003,…, select.009, select.010” placed under ¥layer01¥001 folder.
(Please note that select.001 in layer01 and the one in ¥layer01¥001 are
usually not necessarily the same.) Further lower layers can be placed in
the same way. Maximum 6 layers can be used.
NKK switches
Rev.1.0
�An example of tree structure folders (sample data on the attached microSD,
4 layers and 6 menu item display files per each folder)
(1) Specifications for tree search on OLED rocker IS kit
(a) After the power is turned on, select.001 in layer01 folder is displayed
on OLED. (If select.001 does not exist, the select.* file with the
smallest extension number is displayed.)
(b) When upper key is pressed, the select.* file with next bigger file
extension number is displayed, excluding select.999. This is valid in all
layers.
(c) When lower key is pressed, the select.* file with next smaller file
extension number is displayed, excluding select.999. This is valid in all
layers.
(d) When the select.* file with the biggest extension number (including
select.800 and excluding select.999) is displayed and upper key is
pressed, the select.* file with the smallest extension number (including
select.000) is displayed. This is valid in all layers.
(e) When the select.* file with the smallest extension number (including
select.000) is displayed and the lower key is pressed, the select.* file
with the biggest extension number (including select.800 and excluding
select.999) is displayed. This is valid in all layers.
(f)
While select.001 is displayed and then center key of rocker IS is
pressed, the current folder will be moved to “layer01¥001” and
select.001 (if select.001 does not exist, the select.* file with the
smallest extension number) in “layer01¥001” folder will be displayed.
NKK switches
Rev.1.0
�The corresponding folder for each menu item display file is the same as
its number in file extension, namely “layer01¥002” for select.002,
“layer01¥003” for select.003, and so on. In the folder “layer01¥001”,
while select.001 in “layer01¥001”is displayed and then the center key
is pressed, the current folder will be moved to then “layer01¥001¥001”
and select.001 (if select.001 does not exist, the select.* file with the
smallest extension number) in “layer01¥001¥001” will be displayed.
Up to 10 layers including “layer01” layer can be used.
(g) If the current folder is except “layer01” and if select.000 is chosen, the
current folder will be up by one layer and the select.* file that was
displayed most recently in that folder will be displayed again.(For
example, if we choose select.003 in layer01 and move to the folder
“layer01¥003”and then choose select.000, we move to “layer01” and
select.003 in layer01 will be displayed again. If we move beyond two
layers or more, the last displayed file in each layer will be memorized
and by repeating to choose select.000 in each layer, the memorized
select.* file in upper layer will be displayed in series.)
(h) If there is select.800 in a folder, the folder is regarded as the bottom
layer. (Even if there are 001, 002,…,010 folders, they will be ignored.)
If select.001, select.002,…, or select.006 is chosen, corresponding LED
(counted from the left) will be glowed. If the file is chosen again, the
LED will be turned off. (The files from select.007 through select.010
can be placed at the bottom layer, but they just do not have the
corresponding LEDs.)If select.800 is chosen in the bottom layer, the
current folder will be then back to layer01, and all LEDs will be turned
off, and selet.001 in layer01 will be displayed. If select.000 in the
bottom layer is chosen and returned to one upper layer, all LEDs will
be turned off as well.
(i)
If there is no select.001 – select.010 file in each layer, select.999 will be
displayed as error. (If select.999 exists. The select.999 file is
recommended to be placed in all layers.) After select.999 is displayed
and any key is pressed, the previous image will be displayed again.
(j)
If center key is pressed while the relation between file names and
folder names are not correct, select.999 file will be displayed. Such
cases are:
①There is no folder (001 – 010) corresponding to select.001 – select.010.
NKK switches
Rev.1.0
�②There is no select.* file under any folder from 001 through 010.
After select.999 is displayed and any key is pressed, the previous
image will be displayed again.
6. Disclosure of the firmware, the circuit diagrams, and of the parts list.
(1) You can download the firmware (for PIC24F, C language), the circuit diagrams,
and the parts list of this evaluation kit from the following URL:
http://www.nkksmartswitch.com/support/ (registration is required)
(2) You need the following tools and software for modifying the firmware:
① Microchip MPLAB IDE
http://www.microchip.com/stellent/idcplg?IdcService=SS_GET_PAGE&nodeId=140
6&dDocName=en019469&part=SW007002
② MPLAB C Compiler for PIC24 v3.11(b) Student Edition
http://www.microchip.com/stellent/idcplg?IdcService=SS_GET_PAGE&nodeId=140
6&dDocName=en535364
③ Programmers for PIC24F
PICkit™ 2+AC164110 - RJ-11 to ICSP Adapter、
MPLAB REAL ICE, or others
(Left photo shows PICkit™ 2+AC164110- RJ-11
to ICSP Adapter connected to the evaluation kit.
7. Cautions on usage
(1)The board and the parts are exposed for reference in this kit. Please pay enough
attention to static electricity, moisture, dusts, or to spit, in order not damaging the kit.
(2)This kit is for evaluation purpose only and shall not be used for controlling actual
appliances. There are, however, extra I/O terminals equipped in this kit to be combined
with external appliances for evaluation. The source code must be added and modified to
use them.
(3)Insert the batteries in the right directions in the battery box.
(4)Do not use any other power supply except three AAA alkaline batteries.
(5)Do not turn on and off the power in a short interval.
(6)Use the evaluation kit in temperature from 0℃ to 40℃ in a room. Avoid dew
condensation.
(7)Please refer to the specification of rocker IS, if necessary.
NKK switches
Rev.1.0
�(8)Modifying or adding the firmware or the hardware shall be done in users’
responsibility. We do not guarantee the product after any modification.
(9)Disclosed firmware can be used only for PIC24F of Microchip.
(10) Some programs and header files in the firmware are copywrited works of
Microchip. Use them by following the terms and conditions provided by Microchip.
(11) Do not dismount rocker IS from the kit nor disconnect the harness from the
connector.
END
NKK switches
Rev.1.0
�