UM10883
PN7462 family Quick Start Guide - Development Kit
Rev. 1.6 — 14 May 2018
319816
User manual
COMPANY PUBLIC
Document information
Info
Content
Keywords
PN7462 family, Development Kit, Customer board, Quick Start Guide,
functional description of the customer board, NFC Cockpit
Abstract
This document describes PN7462 Controller Development Kits. It also
describes PN7462 software stack, gives directions to run example
application using the MCUXpresso IDE. Document provides PN7462
customer board configuration instructions, gives board hardware
overview and provides basic steps how to use NFC Cockpit application.
�UM10883
NXP Semiconductors
PN7462 family Quick Start Guide - Development Kit
Revision history
Rev
Date
Description
1.6
20180514
Added OM27462CDKP and PNEV7462C description, editorial changes
1.5
20180115
Reworked NFC Cockpit usage description
1.4
20170907
Updated Getting started description
PN7462 plugin for MCUXpresso not needed form version 10.0.2
Reworked NFC Cockpit installation description
1.3
20170511
Development Kit description added
MCUXpresso IDE support added
Board description and schematic updated
SW examples description updated
Abbreviation section added
1.2
20170216
PNEV7462B customer demo board V2.2 added
SW examples description updated
Guidelines how to upgrade firmware are updated
Figures updated
1.1
20161124
SW examples description updated
Guidelines how to import projects are updated
Figures updated
1.0
20160329
First release
Contact information
For more information, please visit: http://www.nxp.com
UM10883
User manual
COMPANY PUBLIC
All information provided in this document is subject to legal disclaimers.
Rev. 1.6 — 14 May 2018
319816
© NXP B.V. 2018. All rights reserved.
2 of 120
�UM10883
NXP Semiconductors
PN7462 family Quick Start Guide - Development Kit
1. Getting started
This document gives information about how to start software and hardware development
with PN7462 NFC Controller Development Kits: OM27462CDK [1] and OM27462CDKP
[2]. Development kit ensures easy and quick development of NFC applications running
on the PN7462 family [3] derivates. This guide gives extensive kit hardware overview and
describes board configuration options.
Document further describes PN7462AU FW and SW examples package. It gives step by
step instruction to install MCUXpresso IDE [4] and to run example application. It is also
provided extensive introduction to the PN7462 family software stack [5] and describes
each example in detail.
Finally, document describes NFC Cockpit [6], custom Windows application used in
prototyping and optimization.
In this document the terms „MIFARE DESFire card“, „MIFARE Classic card“ and
„MIFARE Ultralight card“ refer either to a MIFARE DESFire IC-based contactless card, a
MIFARE Classic IC-based contactless card or a MIFARE UItralight IC-based contactless
card.
1.1 Introduction to PN7462 NFC Controller Development Kits
Both, the OM27462CDK and the OM27462CDKP development kits are parts of the
PN7462 family product support package. Development Kits are designed to demonstrate
all functionalities of the PN7462 family and easies development of customized
applications and antenna design.
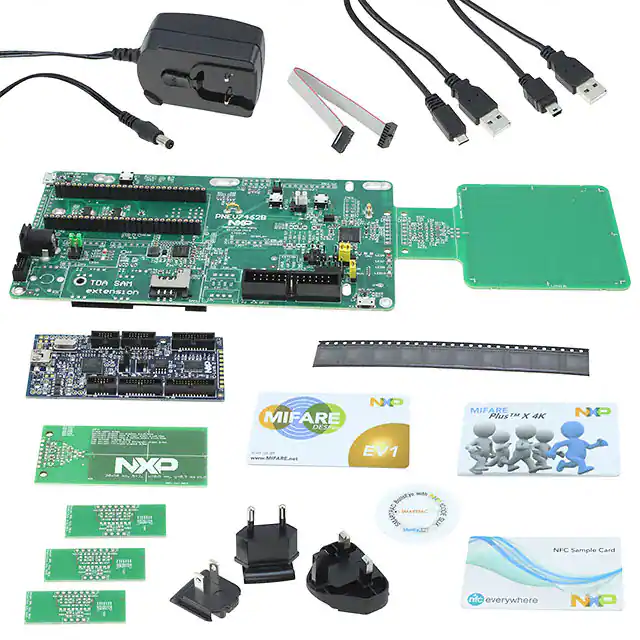
1.1.1 OM27462CDK
OM27462CDK Development Kit is based on the PNEV7462B board. Content of the
Development Kit is displayed on the following picture.
Fig 1.
UM10883
User manual
COMPANY PUBLIC
OM27462CDK Development Kit
All information provided in this document is subject to legal disclaimers.
Rev. 1.6 — 14 May 2018
319816
© NXP B.V. 2018. All rights reserved.
3 of 120
�UM10883
NXP Semiconductors
PN7462 family Quick Start Guide - Development Kit
Development Kit contains:
(1) PNEV7462B board with standard 65x65mm antenna
(2) 30x50mm antenna with matching components
(3) 3 PCBs for individual antenna matching
(4) Sample NFC cards and tags
(5) 2 USB cables; A to mini and A to micro
(6) 10 PN7462 samples
(7) 7.5V DC power supply
(8) LPC-Link 2 debug adapter (OM13054)
1.1.2 OM27462CDKP
OM27462CDKP Development Kit is based on the PNEV7462C board. Content of the
Development Kit is displayed on the following picture.
Fig 2.
OM27462CDKP Development Kit
Development Kit contains:
(1) PNEV7462C board with standard 65x65mm antenna
(2) 30x50mm antenna with matching components
(3) 3 x PCBs for individual antenna matching
(4) Sample NFC cards and tags
(5) 2 x USB cables: A to mini and A to micro
(6) 5 x PN7462AU samples (HVQFN64)
UM10883
User manual
COMPANY PUBLIC
All information provided in this document is subject to legal disclaimers.
Rev. 1.6 — 14 May 2018
319816
© NXP B.V. 2018. All rights reserved.
4 of 120
�UM10883
NXP Semiconductors
PN7462 family Quick Start Guide - Development Kit
(7) LPC-Link 2 debug adapter (OM13054)
(1) Control Panel\Hardware and Sound\Devices and Printers
Fig 3.
Properly enumerated USB CCID reader
At this point a favorite PC/SC application can be started and tested with cards contained
in the kit.
UM10883
User manual
COMPANY PUBLIC
All information provided in this document is subject to legal disclaimers.
Rev. 1.6 — 14 May 2018
319816
© NXP B.V. 2018. All rights reserved.
5 of 120
�UM10883
NXP Semiconductors
PN7462 family Quick Start Guide - Development Kit
2. Hardware overview of the PNEV7462B board
2.1 PNEV7462B concept
The basic concept of the PNEV7462B board is to enable hardware and software
evaluation of typical PN7462 family design and to support prototyping own antenna
circuitry. The supporting NFC Cockpit tool enables antenna tuning, DPC calibration and
the related TX and RX optimization in run time.
After successful optimization, register settings can be stored in the PN7462AU EEPROM
as well as saved in configuration file and used as input in design time.
PN7462AU FW and SW Examples available on the product page, ranging from POS
demo, contact and contactless CCID reader, P2P application, NFC forum related
examples, are customized primarily for PNEV7462B/C board and supported by
MCUXpresso, Keil or IAR development tools.
2.2 PNEV7462B board
3
4
1
Fig 4.
7
8
5
2
9
11
10
6
PNEV7462B board
The board consists of the following blocks:
(1) PN7462AU circuitry with reset and download pushbuttons,
(2) External power supply connector (5.5/2.1 socket) and power supply selector,
(3) LDO regulator circuit for 3.3V and 5V
(4) LPCXpresso m-bed expansion circuit
(5) TDA8026 multiple smart card interface circuit
(6) Antenna coil and related matching circuit (marked in green and orange)
(7) Smart card socket (main slot on bottom PCB layer) and SIM size slots on top layer
(8) 65x65mm antenna coil
(9) 10-pin Cortex debug connector
(10) 26-pin shroud GPIO header and USB micro B female connector
UM10883
User manual
COMPANY PUBLIC
All information provided in this document is subject to legal disclaimers.
Rev. 1.6 — 14 May 2018
319816
© NXP B.V. 2018. All rights reserved.
6 of 120
�UM10883
NXP Semiconductors
PN7462 family Quick Start Guide - Development Kit
(11) Diagnostic LED block connected to PN7462AU
2.2.1 Power circuitry
The power circuit consists of the power socket, diode bridge, selection jumper JP41 and
two low dropout linear voltage regulators. Power options include USB and LPC-Link 2 but
for the best performance external power source is recommended.
Note:
PN7462B v2.1: external power supply 7.5V max.
PN7462B v2.2: external power supply 13.5V max.
(2) USB supply, external supply & and LPC supply
Fig 5.
PNEV7462B supply
2.2.2 PN7462AU block
The main part on the evaluation board is PN7462AU. It features a 32-bit ARM CortexM0-based NFC microcontroller offering a one chip solution to build contact and
contactless applications.
Key features are:
•
20 MHz Cortex-M0 core
-
•
UM10883
User manual
COMPANY PUBLIC
80/160 kB Flash, 12 kB RAM, 4 kB EEPROM
State-of-the-art RF interface: Full NFC, EMVCo 2.6
-
Read/Write, Card Emulation & Peer-to-Peer Modes
-
Transmitter current up to 250 mA
-
Full MIFARE family support,
•
DPC for optimized antenna performance
•
Extensive host and peripheral interfaces
-
Host/slave & master interfaces: I2C, SPI, USB, HSUART, I2CM, SPIM
-
Optional contact interface (PN7462): UART, ISO/IEC 7816, EMVCo 4.3
-
12 to 21 GPIOs
All information provided in this document is subject to legal disclaimers.
Rev. 1.6 — 14 May 2018
319816
© NXP B.V. 2018. All rights reserved.
7 of 120
�UM10883
NXP Semiconductors
PN7462 family Quick Start Guide - Development Kit
Fig 6.
PNEV7462B board schematic (PN7462 part)
2.2.3 LPCXpresso block
This block provides expansion interface for LPCXpresso MCU board providing standard
LPCXpresso/m-bed expansion connector (DIL54). LPCXpresso SPIM and I2CM
interfaces are routed to the PN7462AU host interface selector.
Additionally, board features a USB micro B connector (X1) routed to the LPC board USB
interface and the LPC board reset circuit. Diagnostic LED1-4 are connected to LPC port
pins.
UM10883
User manual
COMPANY PUBLIC
All information provided in this document is subject to legal disclaimers.
Rev. 1.6 — 14 May 2018
319816
© NXP B.V. 2018. All rights reserved.
8 of 120
�UM10883
NXP Semiconductors
PN7462 family Quick Start Guide - Development Kit
2.2.4 Smartcard interface
The PN7462AU integrates contact interface to enable communication with ISO7816 and
EMVCo contact smart cards, without the need for an external contact front end. It offers a
high level of security for the cards by performing current limitation, short-circuit detection,
ESD protection as well as supply supervision. Card slot/contactor is located on the board
bottom layer.
(1) Default setting for present pin (K1) is low active
Fig 7.
PNEV7462B contact slot interface
2.2.5 TDA SAM extension interfaces
The PN7462AU can handle more than one smart card by controlling an extra contact
interface TDA8026 product from NXP. In this use case, the PN7462AU is the main
controller for the electrical and protocol part for the main card slot, while the secondary
slots are electrically controlled by an extra contact front-end interface (TDA), the
PN7462AU being the protocol controller for these extra slots. TDA8026 I2C port is
connected to the PN7462 I2CM to enable IC configuration.
In this case, several smart cards can be activated at the same time, but the
communication with each smart card has to go sequentially: it is not possible to
communicate with two smart cards at the same time as there is only one protocol control
block for all cards.
TDA8026 is required to handle the smart card electrical interface. The connection
between the PN7462AU and the TDA is composed of 2 channels:
UM10883
User manual
COMPANY PUBLIC
-
The host interface control, where the PN7462AU is the master, controlling the
TDA behavior: card activation, deactivation, TDA configuration (voltage level,
clock division, slew rates…)
-
The ISO7816 link: the PN7462AU handles the ISO7816 communication protocol
and uses the TDA as a level shifter for the clock and I/O signals.
All information provided in this document is subject to legal disclaimers.
Rev. 1.6 — 14 May 2018
319816
© NXP B.V. 2018. All rights reserved.
9 of 120
�UM10883
NXP Semiconductors
PN7462 family Quick Start Guide - Development Kit
(1) 2 optional SAM slots can be assembled
Fig 8.
UM10883
User manual
COMPANY PUBLIC
PNEV7462B TDA8026 part schematics
All information provided in this document is subject to legal disclaimers.
Rev. 1.6 — 14 May 2018
319816
© NXP B.V. 2018. All rights reserved.
10 of 120
�UM10883
NXP Semiconductors
PN7462 family Quick Start Guide - Development Kit
2.2.6 Antenna coil and related matching circuit
In general, there are two antenna tunings possible with PNEV7462B board:
-
asymmetrical
-
symmetrical
The asymmetrical tuning is the standard tuning as taken from the existing NXP NFC
frontend design recommendations. It uses EMC cut off frequencies >17MHz, which
results in an asymmetrical transfer function, but shows a good detuning and loading
behavior. The asymmetrical transfer function has some disadvantages regarding the
pulse shapes and receiver performance, and requires a slightly reduced Q factor of the
antenna coil circuit itself.
Symmetrical coupling is used with DPC (Dynamic Power Control) feature of the PN7462
and offers an improved overall RF performance. This requires the antenna to be
“symmetrically” tuned and it requires the AGC to correlate with the driver current ITVDD.
and it requires the dynamic power control to be properly calibrated. The DPC Antenna
tuning (“symmetrical tuning with DPC) combines the advantages of enough field strength
at 4cm with the automatic power control to limit the maximum field strength at a close
distance. This tuning assures passing related EMVCo tests.
2.2.6.1
Default board antenna
Default 65x65 mm board antenna is designed to use symmetrical tuning (see Fig 9). This
antenna is not an optimal antenna as such, but intends to demonstrate the performance
and register settings of the PN7462 under typical design constraints like LCD or another
metallic object (e.g. PCB) inside the antenna area. Inside of the antenna area is filed of
10x10 fields simulating metallic object in real application.
UM10883
User manual
COMPANY PUBLIC
All information provided in this document is subject to legal disclaimers.
Rev. 1.6 — 14 May 2018
319816
© NXP B.V. 2018. All rights reserved.
11 of 120
�UM10883
NXP Semiconductors
PN7462 family Quick Start Guide - Development Kit
Fig 9.
Default 65x65 antenna matching diagram - symmetrical
The antenna connection uses the standard tuning circuit Fig 10. The EMC filter is
typically a second order low pass filter as shown in Fig 18, and contains an inductor (L0)
and a capacitor (C0). The cut off frequency defines the overall detuning behavior as well
as the transfer function of the antenna circuit. For symmetrical (DPC) tuning, EMC filter is
designed with a cut off frequency of fEMC = 14,8 MHz, and the antenna impedance is
tuned to Z = 20Ω.
(1) Standard tuning circuit
Fig 10. Matching circuit principle
UM10883
User manual
COMPANY PUBLIC
All information provided in this document is subject to legal disclaimers.
Rev. 1.6 — 14 May 2018
319816
© NXP B.V. 2018. All rights reserved.
12 of 120
�UM10883
NXP Semiconductors
PN7462 family Quick Start Guide - Development Kit
(1) The matching components might be adapted due to antenna layout changes.
Fig 11. Antenna and matching
Table 1 lists components for the “symmetric” matching.
Table 1.
Assembled matching components
Component
General component
Value
PNEV7462B
L0
L4/ L7
470nH
Comment
PNEV7462B V2.1->
0603LS-471NXJBC
PNEV7462B V2.2->
36502AR47JTDG
C0
C1
UM10883
User manual
COMPANY PUBLIC
C28/ C31
100pF
C29/ C32
27pF
C38/ C44
120pF
C35/ C49
33pF
All information provided in this document is subject to legal disclaimers.
Rev. 1.6 — 14 May 2018
319816
C0 split in 3 parallel
capacitors
© NXP B.V. 2018. All rights reserved.
13 of 120
�UM10883
NXP Semiconductors
PN7462 family Quick Start Guide - Development Kit
General component
Component
PNEV7462B
Value
Comment
C37/ C47
1pF
C1 split in 2 parallel
capacitors
C21
C40/ C46
120pF
C22
C41/ C43
68pF
Rs
R117/ R119
2,2Ω
R118/ R120
2,2Ω
Rs split in 2 parallel
resistors
Note: Without proper DPC calibration the loading and detuning might exceed the ITVDD
limit, if the symmetrical tuning is used. This might destroy the NFC reader IC
2.2.6.2
PCB for individual antenna matching
Development kit contains 3 PCB boards for individual antenna matching. This boards are
intended for prototyping custom asymmetrical or symmetrical (DPC) antenna design.
Default matching circuit can be replaced by individual antenna matching PCB.
2.3 PNEV7462B board available versions
Following Versions of the PNEV7462B board are available
2.3.1
•
PNEV7462B V2.1
•
PNEV7462B V2.2
PNEV7462B V2.1
The V2.1 of the customer evaluation board is the initial version of the board that comes
with the launch of the PN7462AU chip.
Fig 12. PNEV746B V2.1
UM10883
User manual
COMPANY PUBLIC
All information provided in this document is subject to legal disclaimers.
Rev. 1.6 — 14 May 2018
319816
© NXP B.V. 2018. All rights reserved.
14 of 120
�UM10883
NXP Semiconductors
PN7462 family Quick Start Guide - Development Kit
2.3.2
PNEV7462B V2.2
The V2.2 of the customer evaluation board is the replacement and latest version of the
customer evaluation board incl. FCC certification. Functionality of the V2.2 is the same
as of V2.1.
Fig 13. PNEV7462B V2.2
Design changes V2.1 to V2.2:
UM10883
User manual
COMPANY PUBLIC
•
External supply maximum value increased from 7.5V to12V
•
Different routing (PNEV7462B V2.1 stays the board reference design which can be
obtained from the NXP DocStore [8]). Layout recommendations for NFC readers can
be found in AN11090.
•
Changed EMC filter components
All information provided in this document is subject to legal disclaimers.
Rev. 1.6 — 14 May 2018
319816
© NXP B.V. 2018. All rights reserved.
15 of 120
�UM10883
NXP Semiconductors
PN7462 family Quick Start Guide - Development Kit
3. Configuration of the PNEV7462B board
3.1 Board power settings
There are three power supply options on the PNEV7462B board. It can be powered
either from an external off-board power supply on DC power connector, from LPC USB
connector X1 and from USB port on connector X3.
Jumper JP41setting (Fig 14) needs to be done to prepare the board for one of the power
supply options.
Fig 14. Board Power settings
3.1.1 PN7462AU supply options
The boards offer several ways of supplying the PN7462AU IC. The main chip supply
(VBUS) can be set to 5V, 3.3 V or USB supply. The corresponding setting is described in
Fig 15
(1)
(2)
(1) PNEV7462B V2.1
(2) PNEV7462B V2.2
Fig 15. VBUS supply jumper setting
UM10883
User manual
COMPANY PUBLIC
All information provided in this document is subject to legal disclaimers.
Rev. 1.6 — 14 May 2018
319816
© NXP B.V. 2018. All rights reserved.
16 of 120
�UM10883
NXP Semiconductors
PN7462 family Quick Start Guide - Development Kit
3.1.2 Power supply status LED
If all jumpers are set correctly, the following LEDs should light green:
3V3, 5 V and VBUS. In Fig 16 the position of the three different LED’s is shown.
Fig 16. Supply indicator
3.1.3 Supply options for PVDD, VUP_TX and TVDD
The PN7462AU allows different options of supplying PVDD_IN, PVDDM_IN as well as
for TVDD_IN and VUP_TX.
The default setting is to use the internal supply for PVDD as well as TVDD. That means
default setting is PVDD_IN connected to PVDD_OUT, and TVDD_IN connected to
TVDD_OUT.
The default setting on the board is marked in Fig 17.
UM10883
User manual
COMPANY PUBLIC
All information provided in this document is subject to legal disclaimers.
Rev. 1.6 — 14 May 2018
319816
© NXP B.V. 2018. All rights reserved.
17 of 120
�UM10883
NXP Semiconductors
PN7462 family Quick Start Guide - Development Kit
(2)
(1)
(1) PNEV7462B V2.1 (red marked are the default settings)
(2) PNEV7462B V2.2 (red marked are the default settings)
Fig 17. Default supply connection of the PN7462AU using all blocks
To change settings, the corresponding shortcut resistors (marked in Fig 17) needs to be
placed to the corresponding position (default settings are marked in green):
Table 2.
Supply options
Supply options
VUP_TX
3V3
5V
VBUS
EXT
TVDD_IN
TVDD_OUT
3V3
5V
VBUS
EXT
PVDD_IN
3V3
PVDD_OUT
PVDDM_IN
3V3
PVDD_OUT
Note:
If PVDD is externally supplied, the Jumper 42 (PVDD_OUT) needs to be set. By setting
this Jumper the PVDD_OUT is shorted to GND and the PN7462AU turns off the PVDD
LDO.
UM10883
User manual
COMPANY PUBLIC
All information provided in this document is subject to legal disclaimers.
Rev. 1.6 — 14 May 2018
319816
© NXP B.V. 2018. All rights reserved.
18 of 120
�UM10883
NXP Semiconductors
PN7462 family Quick Start Guide - Development Kit
3.2 Host interface configuration
The PN7462AU supports interfacing one out of the four different host: USB 2.0 full speed
with USB 3.0 hub connection capability, HSUART for serial communication, supporting
standards speeds from 9600 bit/s to 115200 bit/s, and faster speed up to 1.288 Mbit/s,
SPI with half duplex and full duplex capability with speeds up to 7 Mbit/s and I2C
supporting standard mode, fast mode and high-speed mode with multiple address
support.
The PN7462AU connects to host through four pads with alternate function: ATX_A,
ATX_B, ATX_C and ATX_D. The ATX pads are routed at the JP32 10-pin header,
according the following table:
Table 3.
PN7462 HIF pins
Pin name
Description
JP32 pin
ATX_A
HSU_RX/I2C_SCL/SPI_NSS
1
ATX_B
HSU_TX/I2C_SDA/SPI_MOSI
3
ATX_C
HSU_RTS_N/SPI_MISO/USB_DP
5
ATX_D
HSU_CTS_N/SPI_MOSI/USB_DM
7
3.2.1.1 USB Host Interface configuration
The yellow marked jumpers on the following picture shows how the board needs to be
set for using the USB host interface of the chip. The USB micro connector X3 is located
in the lower right corner of the board.
Fig 18. Host Interface selection – USB mode
3.2.1.2
I2C Host Interface configuration
The yellow marked jumpers (Fig 18) needs to be set for using the I2C host interface of
the chip with LPCXpresso expansion board. This will connect the I²C SCL of the
PN7462AU to the I/O P0 (28) and also the I²C SDA of the PN7462AU to the I/O P0(27) of
the LPCXpresso board.
UM10883
User manual
COMPANY PUBLIC
All information provided in this document is subject to legal disclaimers.
Rev. 1.6 — 14 May 2018
319816
© NXP B.V. 2018. All rights reserved.
19 of 120
�UM10883
NXP Semiconductors
PN7462 family Quick Start Guide - Development Kit
Fig 19. Host Interface selection - I2C mode
In case that external host needs to be connected to the PN7462 over I²C interface then
corresponding I²C interface lines can be accessed directly on the JP32 according the
Table 3 and additional jumper configuration is not needed.
3.2.1.3
SPI Host Interface configuration
The yellow marked jumpers (Fig 20) needs to be set for using the SPI host interface of
the chip. This will connect the SPI_MOSI of the PN7462AU to the I/O P0(18), SPI_MISO
to the I/O P0(17), SCK to the I/O P0(15), and also the NSS of the PN7642AU to the I/O
P0(16) of the LPCXpresso board.
Fig 20. Host Interface selection - SPI
In case that external host needs to be connected to the PN7462 over SPI interface then
corresponding SPI interface lines can be accessed directly on the JP32 according the
Table 3 and additional jumper configuration is not needed.
UM10883
User manual
COMPANY PUBLIC
All information provided in this document is subject to legal disclaimers.
Rev. 1.6 — 14 May 2018
319816
© NXP B.V. 2018. All rights reserved.
20 of 120
�UM10883
NXP Semiconductors
PN7462 family Quick Start Guide - Development Kit
3.2.1.4
HSUART Interface configuration
The yellow marked jumpers (Fig 21) needs to be set to select HSUART host interface.
This will connect the UART_RX of the PN7462AU to the I/O P0(0), UART_TX of the
PN7462AU to the I/O P0(1) of the LPCXpresso board extension m-bed connector.
Fig 21. Host Interface selection - HSU
In case that external host needs to be connected to the PN7462 over HSUART interface
then corresponding HSUART interface lines (RX, TX, CTS, RTS) can be accessed
directly on the JP32 according the Table 3 and additional jumper configuration is not
needed.
3.2.2 Debug interface
The PNEV7462B board is equipped with a SWD interface. The SWD 10-pin Cortex
connector is placed in the bottom left corner of the board. LPC-Link 2 standalone debug
probe can be used to flash or debug application on the PN7462AU as illustrated on the
Fig 22.
LPC-LINK2
Fig 22. JTAG/SWD debug probe connector
UM10883
User manual
COMPANY PUBLIC
All information provided in this document is subject to legal disclaimers.
Rev. 1.6 — 14 May 2018
319816
© NXP B.V. 2018. All rights reserved.
21 of 120
�UM10883
NXP Semiconductors
PN7462 family Quick Start Guide - Development Kit
4. Hardware overview of the PNEV7462C board
4.1 PNEV7462C board concept
The basic concept of the PNEV7462C board is to enable hardware and software
evaluation of typical PN7462 family design and to support prototyping own antenna
circuitry. The supporting NFC Cockpit tool enables antenna tuning, DPC calibration and
the related TX and RX optimization in run time.
After successful optimization, register settings can be stored in the EEPROM as well as
saved in configuration file and used as input in design time.
PN7462AU FW and SW Examples available on the product page, ranging from POS
demo, contact and contactless CCID reader, P2P application, NFC forum related
examples, are customized primarily for PNEV7462B/C board and supported by
MCUXpresso, Keil or IAR development tools.
4.2 PNEV7462C board overview
Fig 23. PNEV7462C board
The board consists of the following blocks:
1. PN7462AU circuitry with reset and download pushbuttons and power configurations
2. External power supply connector (5.5/2.1 socket) and power supply selector
3. Power supply status LEDs for 3.3V and 5V
4. Antenna matching circuit and antenna connector
5. 65x65mm antenna coil
6. HIF (host interface) SPI, I2C and USART pins
7. SWD interface (10-pin Cortex debug connector)
UM10883
User manual
COMPANY PUBLIC
All information provided in this document is subject to legal disclaimers.
Rev. 1.6 — 14 May 2018
319816
© NXP B.V. 2018. All rights reserved.
22 of 120
�UM10883
NXP Semiconductors
PN7462 family Quick Start Guide - Development Kit
8. GPIO header and LEDs
9. USB interface - micro USB connector X3
Note: on the bottom side is placed smartcard connector
4.2.1 Power circuitry
The power circuit consists of the power socket, diode bridge, selection jumper JP2 and
two low dropout linear voltage regulators. Power options include USB and External but
for the best performance external power source is recommended.
Fig 24. PNEV7462C supply
4.2.2 PN7462AU block
The main part on the evaluation board is PN7462AU. It features a 32-bit ARM CortexM0-based NFC microcontroller offering a one chip solution to build contact and
contactless applications.
Key features are:
•
20 MHz Cortex-M0 core
-
•
UM10883
User manual
COMPANY PUBLIC
80/160 kB Flash, 12 kB RAM, 4 kB EEPROM
State-of-the-art RF interface: Full NFC, EMVCo 2.6
-
Read/Write, Card Emulation & Peer-to-Peer Modes
-
Transmitter current up to 250 mA
-
Full MIFARE family support,
•
DPC for optimized antenna performance
•
Extensive host and peripheral interfaces
-
Host/slave & master interfaces: I2C, SPI, USB, HSUART, I2CM, SPIM
-
Optional contact interface (PN7462): UART, ISO/IEC 7816, EMVCo 4.3
-
12 to 21 GPIOs
All information provided in this document is subject to legal disclaimers.
Rev. 1.6 — 14 May 2018
319816
© NXP B.V. 2018. All rights reserved.
23 of 120
�UM10883
NXP Semiconductors
PN7462 family Quick Start Guide - Development Kit
Fig 25. PNEV7462C board schematic (PN7462AU block)
4.2.3 Smartcard interface
The PN7462AU integrates contact interface to enable communication with ISO7816 and
EMVCo contact smart cards, without the need for an external contact front end. It offers a
high level of security for the cards by performing current limitation, short-circuit detection,
ESD protection as well as supply supervision. Card slot/contactor is located on the board
bottom side.
(3) Default setting for present pin (K1) is low active
Fig 26. PNEV7462C contact slot interface
UM10883
User manual
COMPANY PUBLIC
All information provided in this document is subject to legal disclaimers.
Rev. 1.6 — 14 May 2018
319816
© NXP B.V. 2018. All rights reserved.
24 of 120
�UM10883
NXP Semiconductors
PN7462 family Quick Start Guide - Development Kit
4.2.4 Antenna coil and related matching circuit
In general, there are two antenna tunings possible with the board:
-
asymmetrical
-
symmetrical
The asymmetrical tuning is the standard tuning as taken from the existing NXP NFC
frontend design recommendations. It uses EMC cut off frequencies >17MHz, which
results in an asymmetrical transfer function, but shows a good detuning and loading
behavior. The asymmetrical transfer function has some disadvantages regarding the
pulse shapes and receiver performance, and requires a slightly reduced Q factor of the
antenna coil circuit itself.
Symmetrical coupling is used with DPC (Dynamic Power Control) feature of the
PN7462AU and offers an improved overall RF performance. This requires the antenna to
be “symmetrically” tuned and it requires the AGC to correlate with the driver current
ITVDD. and it requires the dynamic power control to be properly calibrated. The DPC
Antenna tuning (“symmetrical tuning with DPC) combines the advantages of enough field
strength at 4cm with the automatic power control to limit the maximum field strength at a
close distance. This tuning assures passing related EMVCo tests.
4.2.4.1
Default board antenna
Default 65x65 mm board antenna is designed to use symmetrical tuning (see Fig 9). This
antenna is not an optimal antenna as such, but intends to demonstrate the performance
and register settings of the PN7462 under typical design constraints like LCD or another
metallic object (e.g. PCB) inside the antenna area. Inside of the antenna area is filed of
10x10 fields simulating metallic object in real application.
UM10883
User manual
COMPANY PUBLIC
All information provided in this document is subject to legal disclaimers.
Rev. 1.6 — 14 May 2018
319816
© NXP B.V. 2018. All rights reserved.
25 of 120
�UM10883
NXP Semiconductors
PN7462 family Quick Start Guide - Development Kit
Fig 27. Default 65x65 antenna matching diagram – symmetrical
The antenna connection uses the standard tuning circuit Fig 10. The EMC filter is
typically a second order low pass filter as shown in Fig 18, and contains an inductor (L0)
and a capacitor (C0). The cut off frequency defines the overall detuning behavior as well
as the transfer function of the antenna circuit. For symmetrical (DPC) tuning, EMC filter is
designed with a cut off frequency of fEMC = 14,8 MHz, and the antenna impedance is
tuned to Z = 20Ω.
(4) Standard tuning circuit
Fig 28. Matching circuit principle
UM10883
User manual
COMPANY PUBLIC
All information provided in this document is subject to legal disclaimers.
Rev. 1.6 — 14 May 2018
319816
© NXP B.V. 2018. All rights reserved.
26 of 120
�UM10883
NXP Semiconductors
PN7462 family Quick Start Guide - Development Kit
(5) The matching components might be adapted due to antenna layout changes.
Fig 29. Antenna and matching
Table 1 lists components for the “symmetric” matching.
UM10883
User manual
COMPANY PUBLIC
Table 1.
Assembled matching components
Component
General component
Value
PNEV7462C
Comment
L0
L4/ L7
470nH
36502AR47JTDG
C0
C28/ C31
100pF
C29/ C32
27pF
C0 split in 3 parallel
capacitors
C38/ C44
120pF
All information provided in this document is subject to legal disclaimers.
Rev. 1.6 — 14 May 2018
319816
© NXP B.V. 2018. All rights reserved.
27 of 120
�UM10883
NXP Semiconductors
PN7462 family Quick Start Guide - Development Kit
General component
Component
PNEV7462C
Value
Comment
C1
C35/ C49
33pF
C37/ C47
1pF
C1 split in 2 parallel
capacitors
C21
C40/ C46
120pF
C22
C41/ C43
68pF
Rs
R117/ R119
2,2Ω
R118/ R120
2,2Ω
Rs split in 2 parallel
resistors
Note: Without proper DPC calibration the loading and detuning might exceed the ITVDD
limit, if the symmetrical tuning is used. This might destroy the NFC reader IC
4.2.4.2
PCB for individual antenna matching
Development kit contains 3 PCB boards for individual antenna matching. This boards are
intended for prototyping custom asymmetrical or symmetrical (DPC) antenna design.
Default matching circuit can be replaced by individual antenna matching PCB.
UM10883
User manual
COMPANY PUBLIC
All information provided in this document is subject to legal disclaimers.
Rev. 1.6 — 14 May 2018
319816
© NXP B.V. 2018. All rights reserved.
28 of 120
�UM10883
NXP Semiconductors
PN7462 family Quick Start Guide - Development Kit
5. Configuration of the PNEV7462C
5.1 PNEV7462C Board power settings
The PNEV7462C can be powered either from an external off-board power supply on the
DC power connector or from the USB port on connector X3. Jumper JP2 setting (Fig 30)
needs to be done to select the power source.
(1) External power supply selected
(2) USB power supply selected
Fig 30. PNEV7462C board power source configuration
5.2 PN7462AU IC power supply options
The PN7462AU IC main supply voltage input of the microcontroller (VBUS) can be
configured to 5V, 3.3 V or USB, by setting theVBUS jumper as described in Fig 31
(1)
(2) VBUS 3.3V
VBUS 5V
(3) VBUS USB
Fig 31. PN7462AU VBUS configuration
5.3 Power supply status LEDs
If all board jumpers are correctly set, the following LEDs should light green:3V3, 5 V and
VBUS. In the Fig 32 the position of the status LED’s is shown.
UM10883
User manual
COMPANY PUBLIC
All information provided in this document is subject to legal disclaimers.
Rev. 1.6 — 14 May 2018
319816
© NXP B.V. 2018. All rights reserved.
29 of 120
�UM10883
NXP Semiconductors
PN7462 family Quick Start Guide - Development Kit
Fig 32. Power supply status LEDs
5.4 Supply options for PVDD, PVDD_M, VUP_TX and TVDD
The PN7462AU allows different options of supplying:
•
•
•
•
PVDD_IN (pad supply voltage input)
PVDD_M_IN (pad supply voltage input for master interfaces)
VUP_TX (supply of the contactless TX_LDO)
TVDD_IN (antenna driver supply voltage input)
5.4.1 Supply options for PVDD and PVDD_M
The default power setting for pad supply is to use the internal LDO supply for PVDD and
PVDDM, in this cases JP42 is open and resistor jumper R181 and R179 placed.
If external 3V3 supply is needed then R179 and R181 needs to be removed. JP42 closed
to turn off internal LDO and 3V3 directly soldered to the R179 and R181 pads marked
red Fig 33.
5.4.2 Supply options for VUP_TX
Internal contactless TX LDO is by default supplied from on board 5V LDO. In this case
resistor jumper R213 is placed and R188 removed.
To supply VUP_TX from external source from JP16 pin 2, R213 needs to be removed
and resistor jumper R188 needs to be placed. See Fig 33, jumper resistors are marked
green.
5.4.3 Supply options for TVDD
Antenna driver supply voltage input, TVDD_IN is by default supplied from the board’s 5V
LDO. In this case (on board 5V) jumper JP1 is closed (see Fig 25).
To supply TVDD_IN from external source from JP16 pin 3, the jumper resistor R191
needs to be placed and R189 needs to be removed. The jumper resistors R189 and
R191 are marked yellow on the Fig 33.
UM10883
User manual
COMPANY PUBLIC
All information provided in this document is subject to legal disclaimers.
Rev. 1.6 — 14 May 2018
319816
© NXP B.V. 2018. All rights reserved.
30 of 120
�UM10883
NXP Semiconductors
PN7462 family Quick Start Guide - Development Kit
To supply TVDD_IN from internal TX LDO, TVDD_IN needs to be shorted to
TVDD_OUT, this is assured by placing R189 jumper resistor and removing R191.
Internal TX LDO is activated by software and corresponding setting is in EEPROM
configuration.
Fig 33. Default power supply setting
5.5 Host interfaces
The PN7462AU supports interfacing one out of the four different host at the time:
•
•
•
•
USB 2.0 full speed with USB 3.0 hub connection capability,
HSUART for serial communication, supporting standards speeds from 9600 bit/s
to 115200 bit/s, and faster speed up to 1.288 Mbit/s,
SPI with half duplex and full duplex capability with speeds up to 7 Mbit/s
I2C supporting standard mode, fast mode and high-speed mode with multiple
address support.
The PN7462AU connects to host through four pads with alternate function: ATX_A,
ATX_B, ATX_C and ATX_D. These pads are routed at the JP32 8-pin header according
the following table:
Table 2. PN7462 HIF pins
Pin name
JP32
ATX_A
1
ATX_B
3
ATX_C
5
ATX_D
7
UM10883
User manual
COMPANY PUBLIC
Description
HSU_RX/I2C_SCL/SPI_NSS
HSU_TX/I2C_SDA/SPI_MOSI
HSU_RTS_N/SPI_MISO/USB_DP
HSU_CTS_N/SPI_MOSI/USB_DM
All information provided in this document is subject to legal disclaimers.
Rev. 1.6 — 14 May 2018
319816
© NXP B.V. 2018. All rights reserved.
31 of 120
�UM10883
NXP Semiconductors
PN7462 family Quick Start Guide - Development Kit
5.6 Debug interface
The PNEV7462C board has SWD interface port (JP4 10-pin Cortex connector). The
LPC-Link 2 standalone debug probe connects to this interface via flat cable from J7 as
illustrated on the following picture.
Fig 34. LPC-Link2 debug probe connected to the PNEV7462C
UM10883
User manual
COMPANY PUBLIC
All information provided in this document is subject to legal disclaimers.
Rev. 1.6 — 14 May 2018
319816
© NXP B.V. 2018. All rights reserved.
32 of 120
�UM10883
NXP Semiconductors
PN7462 family Quick Start Guide - Development Kit
6. NFC Cockpit getting started
The NFC Cockpit is a Windows application designed to help explore the functionality of
the PN7462 family and execute RF and antenna design related tests and
parametrization. It allows a direct register access as well as EEPROM read and write
access, and it allows to test and to calibrate the DPC and other features.
6.1 Board preparation
To use NFC Cockpit the PNEV7462B board must be configured to use USB host
interface as described in Fig 18, which is the default configuration. The use of an external
power supply is recommended as described in chapter 3.1.
6.2 NFC Cockpit installation
The NFC Cockpit can be downloaded from the NFC Cockpit product web page [4]. After
successful download, follow the installation wizard and finish the installation. The default
installation directory is C:\nxp\NxpNfcCockpit_vx.x.x.x, where x.x.x.x is version number.
6.3 Firmware, EEPROM settings and driver
NFC Cockpit requires a dedicated firmware running on the PN7462 family IC. This
firmware application implements CDC USB class device (VCOM). The NFC Cockpit
directs commands to the VCOM port and dedicated firmware executes commands on the
hardware level. An optional part of the same firmware binary is also the Secondary
Firmware application typically featuring some dedicated compliance test application that
needs to meet specific time constraints (for example EMVCo loopback). The Secondary
application can be started and stopped trough the NFC cockpit GUI from the primary part
of the Firmware application. During the execution of the Secondary application the
standard NFC Cockpit features are not available, this is because the execution flow is
transferred to the Secondary application.
NFC Cockpit firmware can be updated by using primary downloader functionality - MSD
mode (see chapter 8.10). Firmware binary is available with NFC Cockpit installation and
located in “\firmware\PN7462AU”.
Additionally, appropriate EEPROM settings needs to be updated, the EEPROM settings
binary is located in “\firmware\PN7462AU”. The EEPROM binary
is also updated by using primary downloader functionality (see chapter 8.10).
USB drivers needed for NFC Cockpit are part of the installation package and are
automatically installed.
6.4 NFC Cockpit getting started
After starting the NFC Cockpit Windows application, the communication link between the
PC and the PNEV7462B (via USB interface) is established automatically.
Fig 35 shows the activation of a MIFARE DESFire card with the following steps:
(1) click the button
(2) click the button
(3) click the button
UM10883
User manual
COMPANY PUBLIC
All information provided in this document is subject to legal disclaimers.
Rev. 1.6 — 14 May 2018
319816
© NXP B.V. 2018. All rights reserved.
33 of 120
�UM10883
NXP Semiconductors
PN7462 family Quick Start Guide - Development Kit
(4) click button
(5) enter 6A and press
The PN7462 NFC Cockpit shows the card responses like ATQA, SAK, and ATS.
Afterwards the ISO/IEC 14443-4 protocol can be used to exchange data. Once the
MIFARE DESFire command “Get Application ID” (0x6A) is sent, the card returns the
AIDs.
Note: Make sure that either the CRC is enabled or added manually in the data field.
(1)
0x6A = Get Application ID command of MIFARE DESFire EV1
Fig 35. NFC Cockpit: activation of a MIFARE DESFire EV1 card + Get Application ID
Similar functionality does exist for ISO/IEC 14443 A and B, for NFC type F, for ISO/IEC
15693 and I-Code ILT communication.
Be aware that a LOAD_RF_CONFIG command must be executed manually before the
corresponding protocol settings are loaded from the EEPROM into the registers. This can
be used to perform
(1)
(2)
(3)
(4)
(5)
(6)
(e.g. type A 106)
(using the EEPROM settings)
Select a TX register, e.g. RF_CONTROL_TX, enable TX_SET_BYPASS_SC_SHAPING
Change some register bits, and write back into RAM
shows the register changes (probing the field and checking the envelop)
This allows an easy and quick optimization of Tx and Rx parameters before changing the
EERPOM.
UM10883
User manual
COMPANY PUBLIC
All information provided in this document is subject to legal disclaimers.
Rev. 1.6 — 14 May 2018
319816
© NXP B.V. 2018. All rights reserved.
34 of 120
�UM10883
NXP Semiconductors
PN7462 family Quick Start Guide - Development Kit
(7) (e.g. type A 106)
(8) (using again the EEPROM settings)
6.5 PN7462 family register access
The NFC Cockpit allows the reading and writing of all the PN7462 family IC registers
(see Fig 36).
Selecting a register reads and shows the hexadecimal value as well as the
corresponding bit values. The input allows to change each bit separately as well as
writing hexadecimal values. Writing back the value changes the PN7462AU register.
On “mouse over”, the application displays a short description of the register parts.
Note: Some register content cannot be changed manually (“read only”) and some
content might be overwritten by the PN7462 family firmware.
(1) Register area is a RAM area, i.e. might be overwritten or changed automatically
Fig 36. PN7462 NFC cockpit register access
All registers, which are used in the LOAD_RF_CONFIG command, can be read from the
EEPROM. The user must select the register and the protocol.
All registers, which are used in the LOAD_RF_CONFIG command, can be written into
the EEPROM. The user must select the register and the protocol.
This allows an easy EEPROM update of the relevant Tx and Rx registers after
optimization in RAM.
6.6 PN7462 family EEPROM access
The NFC Cockpit allows four options for accessing EEPROM (see Fig 37):
•
UM10883
User manual
COMPANY PUBLIC
Read EEPROM - reads a single byte from EEPROM using byte address
All information provided in this document is subject to legal disclaimers.
Rev. 1.6 — 14 May 2018
319816
© NXP B.V. 2018. All rights reserved.
35 of 120
�UM10883
NXP Semiconductors
PN7462 family Quick Start Guide - Development Kit
•
Write EEPROM - writes a single byte into EEPROM using byte address
•
Dump EEPROM - stores the complete user area of the PN7462 family IC
EEPROM into a binary file. This can be used to generate a backup of all settings
or to transfer optimized settings onto another board or into own software.
•
Load EEPROM - loads a binary file and stores it into the user area of the
PN7462 family IC EEPROM.
Fig 37. PN7462 family IC direct EEPROM access
6.7 PN7462 family IC internal test bus
The NFC cockpit allows to use the PN7462 family IC internal test bus, to route digital and
analog test signals to the given test pins (GPIO1/2 and GPIO4/5), as shown in. All details
on the test signals can be found in [7].
UM10883
User manual
COMPANY PUBLIC
All information provided in this document is subject to legal disclaimers.
Rev. 1.6 — 14 May 2018
319816
© NXP B.V. 2018. All rights reserved.
36 of 120
�UM10883
NXP Semiconductors
PN7462 family Quick Start Guide - Development Kit
Fig 38. PN7462 family IC analog and digital test signals
The analog test signals can be directly selected at GPIO1 and 2. For the digital test
signals GPIO4 and 5 can be used.
Afterwards, a click on the button activates the chosen signals.
6.8 PN7462 family Dynamic Power Control
The DPC tab provides the functionality to easily perform a correlation test, a DPC
calibration and the DPC trimming (see Fig 39). The detailed functionality is described in
[10], but also the video tutorials might be a good help [12].
UM10883
User manual
COMPANY PUBLIC
All information provided in this document is subject to legal disclaimers.
Rev. 1.6 — 14 May 2018
319816
© NXP B.V. 2018. All rights reserved.
37 of 120
�UM10883
NXP Semiconductors
PN7462 family Quick Start Guide - Development Kit
Fig 39. PN7462 family IC DPC
6.9 PN7462 family Adaptive Wave Control
The PN7462 family IC DPC functionality offers the option to use a lookup table to
dynamically control the TX shaping. This feature is called Adaptive Wave Control (AWC).
The NFC Cockpit provides a AWC functionality to allow an easy optimization of the
shaping functions (see Fig 40).
Requirement: a properly tuned antenna is connected and the DPC is calibrated.
Note: It is recommended to disable the AWC, before starting the AWC function in the
NFC Cockpit to avoid confusion: the AWC itself is done inside the PN7462 FW, and the
NFC cockpit tries to overrule that in the AWC tab. Disabling the AWC changes the
EEPROM.
Note: It is recommended to store the complete EEPROM content (backup!) using the
before disabling the AWC. This allows an easy recovery at any time,
even if the EEPROM is messed up.
UM10883
User manual
COMPANY PUBLIC
All information provided in this document is subject to legal disclaimers.
Rev. 1.6 — 14 May 2018
319816
© NXP B.V. 2018. All rights reserved.
38 of 120
�UM10883
NXP Semiconductors
PN7462 family Quick Start Guide - Development Kit
(1) Example: Running in an endless loop for Type A @ 106 settings
Fig 40. PN7462 family IC AWC
6.9.1 Proposal for “static” Tx shaping adjustment
Step1: Save EEPROM for backup (), then disable the AWC ().
Step2: Operate the antenna in gear 0 (“unloaded”): (for e.g. Type A
106) and enable RF field ().
Step 3: and watch the current gear: must be 0!
Step 4: Check the pulse shape with a Reference PICC and an oscilloscope. Move the
sliders , and to
optimize the shaping.
Step 5: Note down the optimum settings and save the corresponding register settings
into the EEPROM (Read RF_CONTROL_TX register and write the value back into the
required EEPROM (e.g. TX ISO14443A 106).
Step 6:
Step 7: (with the same protocol, e.g. Type A 106) and then send single
or endless REQA. Check the wave shape in gear 0 position.
UM10883
User manual
COMPANY PUBLIC
All information provided in this document is subject to legal disclaimers.
Rev. 1.6 — 14 May 2018
319816
© NXP B.V. 2018. All rights reserved.
39 of 120
�UM10883
NXP Semiconductors
PN7462 family Quick Start Guide - Development Kit
6.9.2 Proposal for “dynamic” Tx shaping adjustment
Requirement: “static” TX shaping adjustment is done properly.
Step1: Save EEPROM for backup (), then disable the AWC (), if not done before.
Step2: Start in gear 0 (“unloaded”): (for e.g. Type A 106) and enable RF
field ().
Step 3: and watch the current gear: must be 0!
Step 4: Check the pulse shape with a Reference PICC and an oscilloscope: Must be ok.
Step 5: Load the antenna, until the gear changes to the next higher one. Move the sliders
, and to
optimize the shaping.
Step 6: -> This stores the AWC settings into the NFC Cockpit table.
The PN7462 EEPROM is not changed at all.
Step 7: Continue with Step 5, until the last gear is reached.
Step 8:
Step 9: -> This writes the new AWC data into the look
up table in the PN7462 EEPROM.
Step 10: (with the same protocol, e.g. Type A 106) and then send single
or endless REQA. Check the wave shape in all gear positions.
6.10 PN7462 family Rx Matrix test
The receiver settings of the PN7462 family IC normally need to be optimized to achieve
the best performance. This optimization can be done manually, using the test signals.
However, this manual optimization can be cumbersome, since on one hand some of the
register settings depend on each other, so it is almost impossible to derive a
deterministic adjustment. On the other enabling the test bus slightly changes the Rx
performance, so the behavior with enabled or disabled test but can be different.
Therefore, it is recommended to use a Matrix test, which simply tests all relevant
combination of register settings. The result matrix shows easily the optimum settings.
This Matrix test is provided in the NFC cockpit.
6.10.1 Rx parameters
Typically, 3 or 4 (or even more) receiver settings need to be optimized for each protocol
and antenna design:
•
RxGain:
0 ... 3
•
HPCF:
0 ... 3
•
MinLevel:
0 ... 15
•
MinLevelP:
0 ... 15 (only BPSK)
Even though the default values (as delivered with the PNEV7462B) can be taken as
reference and starting point, the optimum might be different from the default. Changing
UM10883
User manual
COMPANY PUBLIC
All information provided in this document is subject to legal disclaimers.
Rev. 1.6 — 14 May 2018
319816
© NXP B.V. 2018. All rights reserved.
40 of 120
�UM10883
NXP Semiconductors
PN7462 family Quick Start Guide - Development Kit
one parameter might require another parameter to change, too. At the end, even several
“optima” might occur, which show similar performance.
There might be external influence like noise (e.g. from an LCD or other electronic
circuitry) resulting in a different optimum.
So, it is very difficult to define a clear and deterministic approach to optimize these Rx
settings, especially without knowing the external influence. However, for a high-end
reader design these settings play a significant role for a good performance.
An easy solution is the Rx Matrix Test. This tool simply tries each combination of
settings, and reports the number of proper receptions.
6.10.2 Rx Matrix test principle
The Rx matrix controls the PNEV7462B evaluation board and allows to configure:
•
Free number of trials (per register combination)
•
Free number and combination of register bits
•
Free limit of minimum and maximum value
•
Free choice of “protocol” (RF Configuration)
•
Optional voltage level control of the LMA, using a Keysight AWG
The tool supports the digital and analog test signals, if needed. Especially the digital test
signal might be helpful to trigger a LMA test setup.
The Fig 41 shows the basic test setup, using a reference card, placed on the PCD
antenna in a certain distance. The reference card might a typical type A or B card (or any
other card that is supported by the PN7462 family IC).
(1) The PICC can be any type A or B card in principle, depending on the used protocol.
Fig 41. Basic Rx Matrix Test set up
UM10883
User manual
COMPANY PUBLIC
All information provided in this document is subject to legal disclaimers.
Rev. 1.6 — 14 May 2018
319816
© NXP B.V. 2018. All rights reserved.
41 of 120
�UM10883
NXP Semiconductors
PN7462 family Quick Start Guide - Development Kit
Of course, the real smart card does not allow to vary the load modulation level, which
helps to find the optimum (sensitivity). So, an extended test setup as shown in Fig 42 can
be used to control the LMA voltage level. This setup contains
•
Reference PICC (ISO, EMVCo or NFC)
•
Keysight Arbitrary wave generator (AWG [13])
•
NFC Cockpit with PNEV7462B
Fig 42. Enhanced Rx Matrix Test setup with AWG
The input parameters for the test matrix run are defined in an XML file (see 6.10.3.1).
The test can be started in the NFC Cockpit (). The test result is stored
as table, when the test is finished. The table can be opened with e.g. Microsoft Excel for
interpretation ().
6.10.3 Rx Matrix XML input file
The Rx Matrix Test requires the input configuration in an XML file. A few example XML
files (for type A, B, F, 15693 and I-Code ILT) are part of the NFC Cockpit package:
c:\nxp\NxpNfcCockpit_v\cfg\RxMatrix\RxMatrix_PN7462AU\
Refer also to 11 for one example for type A without AWG and one example for type B
with AWG.
Such an XML file defines all test parameters. The user can create (copy & paste) own
XML files, chose any from the existing XML files and then start the test.
6.10.3.1
Input parameters
Table 3.
Test input
Parameter
UM10883
User manual
COMPANY PUBLIC
Meaning
Example value
numberMaxOfPasses
How many trials per combination
10
skipAfterFailures
Continue with the next combination if more failures
occur than defined
4
delayMS
Additional delay between trials, if needed
0
fieldReset
Enable RF Reset, if needed (e.g. for type A card)
YES
All information provided in this document is subject to legal disclaimers.
Rev. 1.6 — 14 May 2018
319816
© NXP B.V. 2018. All rights reserved.
42 of 120
�UM10883
NXP Semiconductors
PN7462 family Quick Start Guide - Development Kit
Parameter
Meaning
Example value
protocolType
Defines the used protocol and bit rate
RM_A_106
Table 4.
Send Data input
Parameter
Meaning
Example value
shortFrame
Enables a short frame (e.g. for REQA)
YES
rxCRC
Enables the CRC check for the card response
NO
txCRC
Enables the CRC on the TX data
NO
timeOutInUs
Defines the time out of the test command in µs
1000
Byte(s) to be sent
These bytes are sent.
0x26
Table 5.
Read Data input
Parameter
Meaning
Example value
invertedMaskBytes
Allows to mask certain bytes (for e.g. the PUPI) in
the card response
0x00, 0x00
Bytes to be received
These bytes are checked as Rx data
0x44, 0x03
Optional, if AWG is connected:
Defines the LMA voltage level of the AWG from minimum to maximum value with given
step size.
Register settings:
Defines the register bits from minimum to maximum. Any accessible register can be
used.
Example scripts refer to 11 and find under
c:\nxp\NxpNfcCockpit_v\cfg\RxMatrix\RxMatrix_PN7462AU\
UM10883
User manual
COMPANY PUBLIC
All information provided in this document is subject to legal disclaimers.
Rev. 1.6 — 14 May 2018
319816
© NXP B.V. 2018. All rights reserved.
43 of 120
�UM10883
NXP Semiconductors
PN7462 family Quick Start Guide - Development Kit
6.11 NFC Cockpit with AWG
6.11.1 NI VISA installation
The NFC Cockpit supports the control of a Keysight AWG (see [13]) via USB. As a
prerequisite, the USB driver and National Instruments VISA driver package [14] have to
be installed.
Remark: This NI VISA version does not conflict with the CTC Advanced WavePlayer tool.
Make sure that the .NET development support is installed, as shown in Fig 43.
(1) Install the .NET (IVI) development support!
Fig 43. NI VISA installation
6.11.2 AWG setup and test for type A @ 106
The Fig 44 shows a typical setup for a type A response. After connecting the AWG the
type A protocol with 106 kbit/s can be chosen. The sample rate defines the number of
samples per half of a subcarrier cycle.
UM10883
User manual
COMPANY PUBLIC
All information provided in this document is subject to legal disclaimers.
Rev. 1.6 — 14 May 2018
319816
© NXP B.V. 2018. All rights reserved.
44 of 120
�UM10883
NXP Semiconductors
PN7462 family Quick Start Guide - Development Kit
(1) ATQA response for TX_IRQ as trigger
Fig 44. AWG setup for type A @ 106
The amplitude defines the peak voltage level of the LMA: the LMA output toggles
between 0V and the defined amplitude. The AWG output can directly drive a Reference
PICC modulation input.
Note: EMVCo LMA levels normally are in the range of 700 … 800 mV for minimum LMA
test in operating Volume 1. For compliance test it is recommended to use a calibrated
reference tool like e.g. the CTC Advanced WavePlayer.
The PICC response itself can be defined as hexadecimal data. The Fig 44 shows the
example of a MIFARE DESFire like ATQA, which does not contain a CRC, but SOF,
EOF and parity.
UM10883
User manual
COMPANY PUBLIC
All information provided in this document is subject to legal disclaimers.
Rev. 1.6 — 14 May 2018
319816
© NXP B.V. 2018. All rights reserved.
45 of 120
�UM10883
NXP Semiconductors
PN7462 family Quick Start Guide - Development Kit
The trigger delay defines the delay between AWG trigger input and the LMA sequence
start. The given 80µs define a standard FDT for type A, if the TX_IRQ signal is taken as
trigger signal.
generates the binary as well as the subcarrier
sequence, and automatically loads this sequence and related settings into the AWG.
A simple test can be done:
Step 1: Setup the hardware as shown in Fig 42. Place the Reference PICC close to the
PCD antenna.
Step 2: Setup the AWG in the NFC Cockpit as defined above.
Step 3: Enable the test bus and route TX_IRQ to a test pin (e.g. IRQ pin).
Step 4: Load Protocol with type A 106 and enable the RF Field.
Step 5: Send a single REQA. -> the ATQA should be received properly.
Note: After loading the settings and the sequence into the AWG, the AWG can be
switched to “local control”. This allows a faster direct control for manual tests of e.g. the
trigger delay or the LMA amplitude at the AWG without reloading all the settings again.
6.11.3 AWG setup and test for type B @ 106
The Fig 45 shows a typical setup for a type B response. After connecting the AWG the
type B protocol with 106 kbit/s can be chosen. The sample rate defines the number of
samples per half of a subcarrier cycle.
UM10883
User manual
COMPANY PUBLIC
All information provided in this document is subject to legal disclaimers.
Rev. 1.6 — 14 May 2018
319816
© NXP B.V. 2018. All rights reserved.
46 of 120
�UM10883
NXP Semiconductors
PN7462 family Quick Start Guide - Development Kit
(2) ATB response 0x50AEF9ACD3058901013381E1 with TX_IRQ as trigger.
Fig 45. AWG setup for type B @ 106
The amplitude defines the peak voltage level of the LMA: the LMA output toggles
between 0V and the defined amplitude. The AWG output can directly drive a Reference
PICC modulation input.
Note: EMVCo LMA levels normally are in the range of 700 … 800 mV for minimum LMA
test in operating Volume 1. For compliance test it is recommended to use a calibrated
reference tool like e.g. the CTC Advanced WavePlayer.
The PICC response itself can be defined as hexadecimal data. The Fig 45 shows the
example of a ATQB (0x50AEF9ACD3058901013381E1), which does not yet contain a
CRC, but SOF and EOF.
adds the CRC to the given string (0xE012).
UM10883
User manual
COMPANY PUBLIC
All information provided in this document is subject to legal disclaimers.
Rev. 1.6 — 14 May 2018
319816
© NXP B.V. 2018. All rights reserved.
47 of 120
�UM10883
NXP Semiconductors
PN7462 family Quick Start Guide - Development Kit
The trigger delay defines the delay between AWG trigger input and the LMA sequence
start. The given 300µs define a standard TR0 for type B, if the TX_IRQ signal is taken as
trigger signal.
generates the binary as well as the subcarrier
sequence, and automatically loads this sequence and related settings into the AWG.
A simple test can be done:
Step 1: Setup the hardware as shown in Fig 42. Place the Reference PICC close to the
PCD antenna.
Step 2: Setup the AWG in the NFC Cockpit as defined above.
Step 3: Enable the test bus and route TX_IRQ to a test pin (e.g. IRQ pin).
Step 4: Load Protocol with type B 106 and enable the RF Field.
Step 5: Send a single REQB. -> the ATQB should be received properly.
Note: After loading the settings and the sequence into the AWG, the AWG can be
switched to “local control”. This allows a faster direct control for manual tests of e.g. the
trigger delay or the LMA amplitude at the AWG without reloading all the settings again.
6.11.4 Rx Matrix test with AWG
The Rx Matrix test allows to control the LMA level of the PICC response, if the AWG is
setup as described above.
The type B script file example as shown in 11.2 can be used to check the Rx
performance in e.g. 2cm operating distance (see Fig 46).
Fig 46. Rx Matrix test run example with AWG
UM10883
User manual
COMPANY PUBLIC
All information provided in this document is subject to legal disclaimers.
Rev. 1.6 — 14 May 2018
319816
© NXP B.V. 2018. All rights reserved.
48 of 120
�UM10883
NXP Semiconductors
PN7462 family Quick Start Guide - Development Kit
The Fig 47 shows the result of such a test run to indicate the sensitivity limit with RxGain
= 2, HPCF = 2, MinLevel = 3 and MinLevel = 6.
(1) The graph shows pass rate versus LMA input level @ Reference PICC
(2) With RxGain = 2 the performance is less than optimum.
Fig 47. Rx Matrix Result example with AWG
6.12 PN7462 family Low Power Card Detection
The NFC Cockpit allows the configuration and test of the Low Power Card Detection
(LPCD) of the PN7462 family IC as shown in Fig 48.
(1) LPCD has not been started yet.
Fig 48. PN7462 family LPCD
UM10883
User manual
COMPANY PUBLIC
All information provided in this document is subject to legal disclaimers.
Rev. 1.6 — 14 May 2018
319816
© NXP B.V. 2018. All rights reserved.
49 of 120
�UM10883
NXP Semiconductors
PN7462 family Quick Start Guide - Development Kit
6.13 Secondary FW - EMVCo Loopback application
The FW might contain additional applications (see 6.3), which can then be started via the
Secondary FW tab.
The default Secondary FW application is:
EMVCo Loopback: Test application for EMVCo L1 certification
The EMVco Loopback (or other application) can be started by pressing the button and the function can be stopped by pressing the button.
Fig 49. PN7462 family FW tab with EMVCo Loopback function
6.14 PN7462 family Scripting
The NFC Cockpit allows to use a simple script language to program own scripts for test
purpose. This feature is mainly developed for the CLRC663, and the number of
implemented commands for the PN7462 family IC is limited.
There is a sample script, which simply resets RF filed of the PN7462 family IC:
c:\nxp\NxpNfcCockpit_v\scripts\pn7462AU_RfOnOff.nncscript
UM10883
User manual
COMPANY PUBLIC
All information provided in this document is subject to legal disclaimers.
Rev. 1.6 — 14 May 2018
319816
© NXP B.V. 2018. All rights reserved.
50 of 120
�UM10883
NXP Semiconductors
PN7462 family Quick Start Guide - Development Kit
7. Software application stack
The PN7462 family firmware is a modular software written in C language, which provides
an API that enables customers to create their own contact and contactless software
stack and applications for the PN7462 Family [5]. This API facilitates all operations and
commands required in contact and contactless applications such as reading or writing
data to cards or tags, exchanging data with other NFC-enabled devices or allowing NFC
reader ICs to emulate cards as well.
The PN7462 family software application stack consists of 4 main layers.
• Application & example layer
• Protocol abstraction layer – PAL
• Hardware abstraction layer – HAL
• OSAL (FreeRTOS) and utilities layer
Fig 50. Static overview of PN7462 family firmware
UM10883
User manual
COMPANY PUBLIC
All information provided in this document is subject to legal disclaimers.
Rev. 1.6 — 14 May 2018
319816
© NXP B.V. 2018. All rights reserved.
51 of 120
�UM10883
NXP Semiconductors
PN7462 family Quick Start Guide - Development Kit
Fig 51. Architecture diagram
7.1 Hardware abstraction layer – HAL
Hardware abstraction layer – HAL is responsible for the CPU, communication, memory
and utility peripherals. HAL composed of a set of HW functions, HW ISR and OSAL
functions.
The HW functions can further be divided to:
1. Atomic functions: functions configuring the HW, but don´t result in any event from the
HW, EEPROM, Flash, CRC, RNG, PMU/ PCR.
2. Blocking functions: functions configuring the HW and wait till one or more expected
events occurs from the HW. CLIF HAL, CT HAL, I2CM/ SPIM HAL
3. Non-blocking functions: functions configuring the HW and expect one or more
events, but don´t wait till it occurs. The events are notified to the caller of the
function. Timer, Host interface.
The HW ISR handles HW events (interrupts) and signals of the blocking functions or
notifies non-blocking functions. The HW ISR also handles time critical HW configuration
or functions.
7.2 Protocol abstraction layer – PAL
Protocol abstraction layer – PAL implement HW independent communication protocols
for contactless and contact interface and it is composed of two libraries.
NxpNfcRdLib library implement contactless protocol and application components.
Followed ISO/IEC contactless standards protocols are available:
• ISO14443-3A: Contactless proximity card air interface communication at 13.56MHz
for the Type A and Jewel contactless cards.
UM10883
User manual
COMPANY PUBLIC
All information provided in this document is subject to legal disclaimers.
Rev. 1.6 — 14 May 2018
319816
© NXP B.V. 2018. All rights reserved.
52 of 120
�UM10883
NXP Semiconductors
PN7462 family Quick Start Guide - Development Kit
• ISO14443-3B: Contactless proximity card air interface communication at 13.56MHz
for the Type B contactless cards.
• ISO14443-4: Specifies a half-duplex block transmission protocol featuring the special
needs of a contactless environment and defines the activation and deactivation
sequence of the protocol.
• ISO14443-4A: Transmission protocol for Type A contactless cards.
• MIFARE (R): Contains support for MIFARE authentication and data exchange.
• ISO15693: Contactless protocol for vicinity RFID. It operates on 13.56MHz and uses
magnetic coupling between the reader and transponder.
• ISO18000-3M3: Contactless protocol for vicinity RFID. It is especially suited for
applications where reliable identification and high anti-collision rates are required.
• FeliCa (JIS: X6319): Contactless RFID smart card system from Sony.
• ISO/IEC 18092: NFC Interface and Protocol standard that enables NFC Data
Exchange protocol.
The contact protocol library implements the components for the contactless protocol,
such as EMV ATR Parser, T=0 protocol, T=1 protocol. This library also handles the
timing compliance violations.
7.3 Application layer – AL
In the application layer customer applications, shall be implemented and can directly use
HAL APIs or APIs from the PAL libraries.
The contactless example (or application) is either NFC Forum Polling Loop or EMV
Polling Loop that branches to dedicated examples depending on the card detected such
as MIFARE Classic, MIFARE Ultralight, MIFARE DESFire, EMV PayPass transactions
(PPSE). There exists a compile time macro phExMain_Cfg.h to decide whether the
example is NFC Forum or EMV Polling Loop.
The contact example (or application) is an EMV contact (PPSE application on JCOP
card) application that uses the T=1 protocol and the ATR processing of the protocol
library.
7.4 OSAL and utilities layer
The OSAL and Utilities layer is used to abstract Free-RTOS messages, to handle events,
signals and messages between HW functions and to handle HW ISR.
Utilities layer includes a set of utilities which are grouped and encapsulated together in
an independent set of functions. Utilities components provide an interface for protocol
libraries to use HAL APIs such as CRC, RNG etc.
Note:
Detailed description how to use OSAL and utilities layer refer to the CHM help file.
UM10883
User manual
COMPANY PUBLIC
All information provided in this document is subject to legal disclaimers.
Rev. 1.6 — 14 May 2018
319816
© NXP B.V. 2018. All rights reserved.
53 of 120
�UM10883
NXP Semiconductors
PN7462 family Quick Start Guide - Development Kit
7.5 Component view
7.5.1 Contactless component view
In contactless component view (Fig 52) for the “phExMain” example is shown.
Fig 52. Contactless architecture view
UM10883
User manual
COMPANY PUBLIC
All information provided in this document is subject to legal disclaimers.
Rev. 1.6 — 14 May 2018
319816
© NXP B.V. 2018. All rights reserved.
54 of 120
�UM10883
NXP Semiconductors
PN7462 family Quick Start Guide - Development Kit
7.5.2 Contact component view
In the Fig 53 contact component view for the “phExMain” example is shown.
Fig 53. Contact architecture view
7.6 Building a project from bottom to top
In order to use the PN7462 family firmware, a stack of components has to be initialized
from bottom to top. Every component in the software stack has to be initialized before it
can be used. The referred initialization of each layer generates a data context which
feeds the immediate upper layer. Some of the components may need a data context
coming from the same layer to be used as an entry point.
The Fig 54 illustrates the mentioned implementation for the initialization procedure of a
“phExtMain” application.
Fig 54. Project initialization order
UM10883
User manual
COMPANY PUBLIC
All information provided in this document is subject to legal disclaimers.
Rev. 1.6 — 14 May 2018
319816
© NXP B.V. 2018. All rights reserved.
55 of 120
�UM10883
NXP Semiconductors
PN7462 family Quick Start Guide - Development Kit
7.7 RTOS and it´s usage
The PN7462 family FW is using FreeRTOS. The port.c file in the OpenRTOS source is
modified to support disabling/enabling of scheduler (SysTick timer) and context switch
(PendSV) during FW critical sections. The Cortex-M0 port is already available from
FreeRTOS.
The FreeRTOS provides flexibility to develop multi-application environment. It provides
the creation of multiple tasks. The FreeRTOS will handle multiple tasks with its
scheduler. It is also possible to prioritize the tasks according to our requirement.
The FreeRTOS provides the message queues which are used to communicate between
the tasks. The tasks can wait for the messages and if not available scheduler suspends
these tasks which are waiting, and allow the other tasks to run.
The FreeRTOS provides the events which are used to communicate inside the tasks.
The tasks can go to suspended state waiting for the events as well. Whenever the events
occur the scheduler wakes up that particular task and allows it to run.
For more information on FreeRTOS please refer the following link
http://www.freertos.org/
The Fig 55 FreeRTOS Usage (below) provides the structure of FreeRTOS and its
relation to PN7462AU FW Application.
The Flash boot performs the boot reason handling and initialization of common HALs.
See Below are the lists of examples available in current release to demonstrate the HW
and FW features of PN7462AU IC.
In general, the FreeRTOS Scheduler has 2 default tasks running which are Idle task and
Timer task whose priority is kept lower than the application tasks.
Fig 55. FreeRTOS usage diagram
UM10883
User manual
COMPANY PUBLIC
All information provided in this document is subject to legal disclaimers.
Rev. 1.6 — 14 May 2018
319816
© NXP B.V. 2018. All rights reserved.
56 of 120
�UM10883
NXP Semiconductors
PN7462 family Quick Start Guide - Development Kit
8. Managing the PN7462 family SW projects with MCUXpresso IDE
8.1 Development environment
For developing PN7462 family firmware and customer applications all components listed
in the Table 6 are required.
Table 6.
Item
Development environment
Version
Purpose
PNEV7462B or PNEV7462C
2.1/2.2 or 1.0
Engineering development board
LPC-Link 2
1.0/2.0
Standalone debug probe
MCUXpresso IDE
>10.0.2
Development IDE
PN7462AU FW and SW
examples
>5.12.00
Installer package
Fig 56 gives general overview of the development environment elements and their
interconnections:
Fig 56. Overview of PN7462AU development environment
UM10883
User manual
COMPANY PUBLIC
All information provided in this document is subject to legal disclaimers.
Rev. 1.6 — 14 May 2018
319816
© NXP B.V. 2018. All rights reserved.
57 of 120
�UM10883
NXP Semiconductors
PN7462 family Quick Start Guide - Development Kit
8.2 Installation of the MCUXpresso IDE
The MCUXpresso IDE enables powerful application development for NXP MCUs based
on ARM® Cortex®-M cores, including LPC and Kinetis microcontrollers. The
MCUXpresso IDE offers advanced editing, compiling and debugging features with the
addition of MCU-specific debugging views, code trace and profiling, multicore debugging,
and more. Feature-rich IDE optimized for ease-of-use, based on industry standard
Eclipse and GCC providing a powerful application development environment, Supports
Freedom, Tower, LPCXpresso and your custom development boards with debug probes
from NXP, P&E, and SEGGER. Available in full-featured free (code size unlimited) and
affordable professional editions (including MCUXpresso IDE email support and advanced
trace features).
This tool can freely be downloaded from the MCUXpresso website 0. Before one can
download the software, it is necessary to create an account. Creating an account is
absolutely free.
If a Pro Edition activation code as not been installed, then MCUXpresso IDE will start as
a Free Edition. There is no Activation process required to use the MCUXpresso IDE Free
Edition. There are also no restrictions in code generation size or binary programming
size. However, some advanced debug features will not be available.
The installation starts after double-clicking the installer file.
Fig 57. MCUXpresso installation
Make sure, the checkbox for installing the NXP debug drivers is activated.
During the installation, the user will be asked to install additional drivers (SEGGER JLink,
P&E). This installation shall be accepted.
UM10883
User manual
COMPANY PUBLIC
All information provided in this document is subject to legal disclaimers.
Rev. 1.6 — 14 May 2018
319816
© NXP B.V. 2018. All rights reserved.
58 of 120
�UM10883
NXP Semiconductors
PN7462 family Quick Start Guide - Development Kit
Fig 58. Windows security dialog
After the setup wizard, has finished, the newly installed IDE can be launched.
Fig 59. MCUXpresso IDE
Note: With MCUXpresso version prior to 10.0.2 PN7462 plugin is needed.
8.3 Installing PN7462AU FW and SW examples package
The PN7462 FW and SW examples are provided as a Windows installer package
available on the product page or through the NXP DocStore [8]. It is assumed that
examples are installed on development PC. The archive file containing SW and FW
examples is located in the:\NXP
Semiconductors\PN7462AUPspPackageFull-vXX_XX_XX\PN7462AU Software folder.
8.4 Updating PN7462AU EEPROM configuration
Before running or debugging the example applications, the PN7462AU needs to be
updated with the latest EEPROM configuration. EEPROM update is described in the
chapter 8.8. The EEPROM configuration file is located in the
\PN7462AU\phHal\phCfg\user_ee.bin file.
UM10883
User manual
COMPANY PUBLIC
All information provided in this document is subject to legal disclaimers.
Rev. 1.6 — 14 May 2018
319816
© NXP B.V. 2018. All rights reserved.
59 of 120
�UM10883
NXP Semiconductors
PN7462 family Quick Start Guide - Development Kit
8.5 Importing provided SW example projects
The use of Quickstart Panel provides fast access to the most commonly used features of
the MCUXpresso IDE. Quickstart Panel easies importing, creating, building and
debugging projects.
Project import consists of following steps:
• Start the MCUXpresso IDE and select new workspace
• Select the option “Import project(s)” (see picture below)
• Browse to the software package .zip archive
• MCUXpresso unzips the software package
• The software package is ready for use
Fig 60. Importing project to MCUXpresso IDE (1)
In the “Quickstart Panel” window, click on Import project(s) from file system…
The dialog for importing projects opens.
UM10883
User manual
COMPANY PUBLIC
All information provided in this document is subject to legal disclaimers.
Rev. 1.6 — 14 May 2018
319816
© NXP B.V. 2018. All rights reserved.
60 of 120
�UM10883
NXP Semiconductors
PN7462 family Quick Start Guide - Development Kit
Fig 61. Importing project to MCUXpresso IDE (2)
Browse to the PN7462AU-FW_vXX.XX.XX_Full.zip” and click “Next”.
UM10883
User manual
COMPANY PUBLIC
All information provided in this document is subject to legal disclaimers.
Rev. 1.6 — 14 May 2018
319816
© NXP B.V. 2018. All rights reserved.
61 of 120
�UM10883
NXP Semiconductors
PN7462 family Quick Start Guide - Development Kit
Fig 62. Select project
Select projects to be imported and then click “Finish”. Selected examples will be imported
to the workspace.
When the import process is finished, the development and editing the code can start.
UM10883
User manual
COMPANY PUBLIC
All information provided in this document is subject to legal disclaimers.
Rev. 1.6 — 14 May 2018
319816
© NXP B.V. 2018. All rights reserved.
62 of 120
�UM10883
NXP Semiconductors
PN7462 family Quick Start Guide - Development Kit
Fig 63. Project Workspace with all examples
8.6 Building projects
Building projects in a workspace can be started trough Quickstart Panel - ‘Build all
projects’ command. Alternatively, a single project can be selected in the “Project Explorer
View” and built separately. Note that building a single project may also start a build of
any associated library projects.
The project can be built as shown in the Fig 64.
UM10883
User manual
COMPANY PUBLIC
All information provided in this document is subject to legal disclaimers.
Rev. 1.6 — 14 May 2018
319816
© NXP B.V. 2018. All rights reserved.
63 of 120
�UM10883
NXP Semiconductors
PN7462 family Quick Start Guide - Development Kit
Fig 64. Building a project
As a part of the build process, the binary file for flash in AXF format is created. This
binary file can be used to update PN7462AU flash via USB mass storage interface or by
using flash tool or debug in MCUXpresso IDE. In case that “Binaries” folder is not visible
in the project structure, refresh the project (right click on project and select “Refresh”).
Fig 65. Build output - flash binary file
UM10883
User manual
COMPANY PUBLIC
All information provided in this document is subject to legal disclaimers.
Rev. 1.6 — 14 May 2018
319816
© NXP B.V. 2018. All rights reserved.
64 of 120
�UM10883
NXP Semiconductors
PN7462 family Quick Start Guide - Development Kit
The project settings, compiler and link flags can be changed in the project properties
dialog. To open the project properties dialog, select appropriate project in the “Project
Explorer View” and click “Edit ‘selected-project’ project settings”.
Build result can be monitored on the build console Successful build Fig 66.
Fig 66. Successful build
8.7 Running and debugging the example projects
This description shows how to run the PN7462AU “PN7462AU_ex_phExMain” example
application for the PN7462AU customer development board in debug mode. The same
basic principles will apply for all other examples. In cases where example will need
additional configuration this will be detailed described in the example description.
The PNEV7462B customer board needs to be connected to the host PC running the
MCUXpresso software via LPC-Link 2, as shown in Fig 67.
UM10883
User manual
COMPANY PUBLIC
All information provided in this document is subject to legal disclaimers.
Rev. 1.6 — 14 May 2018
319816
© NXP B.V. 2018. All rights reserved.
65 of 120
�UM10883
NXP Semiconductors
PN7462 family Quick Start Guide - Development Kit
USB LPC
LPC1769 µHost
PN7462AU DUT
External power
supply
USB PN7462AU
LPC-LINK2
Fig 67. Connecting LPC Link2 to the PNEV7462B board
When debug is started, the application is automatically downloaded to the target and it´s
programmed to the flash memory; a default breakpoint is set on the first instruction in
main (), the application is started (by simulating a processor reset), and code is executed
until the default breakpoint is hit.
To start debugging your application on the PN7462AU, simply highlight the project in the
Project Explorer and then in the Quick start Panel click Debug, as shown in Fig 68. The
MCUXpresso IDE will first build application and then start debugging.
UM10883
User manual
COMPANY PUBLIC
All information provided in this document is subject to legal disclaimers.
Rev. 1.6 — 14 May 2018
319816
© NXP B.V. 2018. All rights reserved.
66 of 120
�UM10883
NXP Semiconductors
PN7462 family Quick Start Guide - Development Kit
Fig 68. Launch debug session
Fig 69. Selecting debug probe
UM10883
User manual
COMPANY PUBLIC
All information provided in this document is subject to legal disclaimers.
Rev. 1.6 — 14 May 2018
319816
© NXP B.V. 2018. All rights reserved.
67 of 120
�UM10883
NXP Semiconductors
PN7462 family Quick Start Guide - Development Kit
Fig 70. Project debugging
After the software upload, the execution of the application starts immediately.
UM10883
User manual
COMPANY PUBLIC
All information provided in this document is subject to legal disclaimers.
Rev. 1.6 — 14 May 2018
319816
© NXP B.V. 2018. All rights reserved.
68 of 120
�UM10883
NXP Semiconductors
PN7462 family Quick Start Guide - Development Kit
8.7.1 Break points
PN7462AU supports 4 breakpoints and 2 watch points. In usual way, double click on the
left vertical editor strip to set the break points. The execution of the application will be
stopped when the break point is reached.
Fig 71. Inserting breakpoints
UM10883
User manual
COMPANY PUBLIC
All information provided in this document is subject to legal disclaimers.
Rev. 1.6 — 14 May 2018
319816
© NXP B.V. 2018. All rights reserved.
69 of 120
�UM10883
NXP Semiconductors
PN7462 family Quick Start Guide - Development Kit
8.7.2 Debug traces
The debug traces can be seen on console as shown in Fig 72.
Fig 72. Debug view and debugger traces
UM10883
User manual
COMPANY PUBLIC
All information provided in this document is subject to legal disclaimers.
Rev. 1.6 — 14 May 2018
319816
© NXP B.V. 2018. All rights reserved.
70 of 120
�UM10883
NXP Semiconductors
PN7462 family Quick Start Guide - Development Kit
8.7.3 Peripheral view
MCUXpresso IDE provides direct access to all the peripheral registers of the PN7462AU.
To see the peripheral registers, follow the steps as shown below.
(1) Go to Window Show view Other
(2) Select “Peripherals+”
Fig 73. Peripheral view
Select the appropriate register or IP to watch or change the register values. As shown
below, we see the fields and description of the EEPROM Controller.
UM10883
User manual
COMPANY PUBLIC
All information provided in this document is subject to legal disclaimers.
Rev. 1.6 — 14 May 2018
319816
© NXP B.V. 2018. All rights reserved.
71 of 120
�UM10883
NXP Semiconductors
PN7462 family Quick Start Guide - Development Kit
(1) Select the relevant peripheral
(2) Register, bit fields and description in the relevant view
Fig 74. PN7462AU EECTRL peripheral view
UM10883
User manual
COMPANY PUBLIC
All information provided in this document is subject to legal disclaimers.
Rev. 1.6 — 14 May 2018
319816
© NXP B.V. 2018. All rights reserved.
72 of 120
�UM10883
NXP Semiconductors
PN7462 family Quick Start Guide - Development Kit
8.8 Updating PNEV7462B/C board firmware (flash and EEPROM memory)
PN7462AU flash memory can be updated either by using SWD interface and LPC-Link 2
debug probe or from primary bootloader mode (USB MSD).
8.9 Updating flash/EEPROM via SWD interface
Ensure that LPC-Link2 is connected to PNEV7462B board (see Fig 75) and follow the
steps below.
Fig 75. HW setup for the flashing via LPC-Link 2
Click icon (Fig 76) on the menu bar to start LinkServer GUI Flash programmer tool:
Fig 76. Starting flash tool in MCUXpresso
Once the flash tool started the correct connection and flash driver file needs to be
specified. For PN7462AU-C03-00 the correct flash driver is PN7xxxxx_158k.cfx when
updating flash memory content and the base address is 0x203000. When updating
EEPROM settings appropriate driver is PN7xxxxx_EE_3_5k.cfx and the base address is
0x201200.
UM10883
User manual
COMPANY PUBLIC
All information provided in this document is subject to legal disclaimers.
Rev. 1.6 — 14 May 2018
319816
© NXP B.V. 2018. All rights reserved.
73 of 120
�UM10883
NXP Semiconductors
PN7462 family Quick Start Guide - Development Kit
(1) Select conection script, flash driver and binary file
(2) Ensure that all the options are set properly and click OK
Fig 77. Build output - flash binary file
After selecting binary file flash process starts, and report is shown.
(3) Flash report appears
Fig 78. Program flash report
UM10883
User manual
COMPANY PUBLIC
All information provided in this document is subject to legal disclaimers.
Rev. 1.6 — 14 May 2018
319816
© NXP B.V. 2018. All rights reserved.
74 of 120
�UM10883
NXP Semiconductors
PN7462 family Quick Start Guide - Development Kit
8.10 Updating flash and EEPROM via USB MSD interface
PN7462AU flash and EEPROM content can be updated via USB interface (primary
download mode). To mount a PNEV7462B/C as a USB Mass storage drive:
1. Ensure that “HIF selection” is USB, see Fig 79 (to be skipped with PNEV7462C
board)
2. USB Port of the PC running Windows OS is connected to the micro USB port
labelled X3 on the PNEV7462B
3. Press “RST_N” switch + Press “DWL_REQ” switch
4. Release “RST_N” and keep holding “DWL_REQ”
5. Release “DWL_REQ” button after about two seconds
Fig 79. PN7462AU as USB mass storage device
Now the PNEV7462B is detected by the PC as an USB MSD.
Fig 80. PN7462AU IC detected as USB mass storage device for flash/ EEPROM upgrade
UM10883
User manual
COMPANY PUBLIC
All information provided in this document is subject to legal disclaimers.
Rev. 1.6 — 14 May 2018
319816
© NXP B.V. 2018. All rights reserved.
75 of 120
�UM10883
NXP Semiconductors
PN7462 family Quick Start Guide - Development Kit
When the PN7462AU is mounted as a USB mass storage device, the files listed in the
table below are visible in the device root.
Table 7.
File
Files found in USB mass storage
Description
CRP_.BIN
PN7462AU´s user flash code (see Table 8 for description of )
CRPSTA_.BIN
Status of previous write operation to user flash (see Table 9 for description
of )
DRP_.DAT
PN7462AU´s user EEPROM date (see Table 8 for description of )
DRPSTA_.DAT
Status of previous write operation to user EEPROM (see Table 9 for
description of )
PN7462AU USB mass storage supports various data/ code protection levels.
Table 8.
Code and data protection level
Description
00
Read and write allowed
01
Cannot read. Write allowed. Only applicable sectors erased before writing
02
Cannot read. All sectors of the applicable memory are erased before writing.
03
Cannot read. Cannot write via USB mass storage.
Table 9.
Status of read write operating code
Description
0
Last write operation was successful
1
Memory region formatted
2 – or anything else
Failed
3
Fresh memory (FLASH/ EEPROM has never been downloaded via USB
mass storage)
To update the flash or EEPROM via USB once the device is in USB primary download
mode, the following instructions are to be followed:
1. Navigate to the newly mounted PN7462AU drive.
2. Delete CRP_.bin file in case the flash area needs to be updated or
DRP_.bin file in case the EEPROM area needs to be updated.
3. Copy the flash or EEPROM binary to the new drive.
4. PN7462AU should automatically un-mount and re-mount itself.
5. The update was successful, if the following status files are present on the USB MSD.
CRPSTA_00.bin for the flash memory,
DPRSTA_00.bin for the EEPROM memory.
6. Press the “RST_N” switch and PN7462AU starts executing the new flash code.
UM10883
User manual
COMPANY PUBLIC
All information provided in this document is subject to legal disclaimers.
Rev. 1.6 — 14 May 2018
319816
© NXP B.V. 2018. All rights reserved.
76 of 120
�UM10883
NXP Semiconductors
PN7462 family Quick Start Guide - Development Kit
9.
PN7462AU software examples
9.1 General overview
For a detailed description of examples, please refer to the [5].
Before running examples assure the proper EEPROM configuration is updated (see 8.4).
9.1.1 Application messages – debug printouts
The examples are supporting debug messages printouts via the LPC-Link 2 debug probe
directly to the MCUXpresso IDE console. The LPC-Link 2 probe needs to be connected
to the board (Fig 75). “Debug build” configuration enables printout of application
messages. Printout messages are displayed in the Debug Messages Console View.
Console view can be opened in menu “Window → Show View → Console” or by clicking
the shortcut keys “Alt+Shift+Q C”.
9.1.2 LEDs status specifications
All examples are programmed in way that LEDs on the board shows the current status of
the running example. At the polling, all LEDs are turning on in a circular sequence and
when any card is detected the Fig 81 represent the meaning of the LED pattern.
Fig 81. LEDs status
UM10883
User manual
COMPANY PUBLIC
All information provided in this document is subject to legal disclaimers.
Rev. 1.6 — 14 May 2018
319816
© NXP B.V. 2018. All rights reserved.
77 of 120
�UM10883
NXP Semiconductors
PN7462 family Quick Start Guide - Development Kit
9.2 PN7462AU_ex_phExMain – (CLIF + CTIF functionality)
The “phExMain” is the main example demonstrating CLIF and CTIF functionalities. CLIF
functionality covering NFC Forum operation modes: R/W mode, card mode and P2P
mode. The “phExMain” is the root of many sub examples described below. For task and
interface managing, the application can be configured to use FreeRTOS or not.
Contactless operation:
1. Reader mode
Supports TypeA, TypeB, Felica, ISO15693, ISO18000p3m3 protocols. Example
application can support only one card per technology. Supports up-to read and
write for all protocols. Supports proprietary cards MIFARE Classic, MIFARE
Ultralight EV1 and MIFARE Ultralight C till read and write. Supports authentication
and reauthentication for MIFARE Classic and inventory read command for ICODE
SLIX. Since Inventory read is a manufacturer specific proprietary command, thus,
inventory read will work only for NXP manufactured ICODE cards one of which is
ICODE SLIX. Supports Topaz/Jewel Tags - Command supported RID, READ8,
WRITE-NE8
2. Peer to peer mode
Supports Active F 212 till PSL request only. Supports Passive A 106 and performs
DEP exchange. API Given for active DEP transmit for f212.
3. Card mode
Emulates as Type A Card and support till RATS exchange.
Contact card operations:
ISO7816 Profile – implementation in source file phExMain_Ct.c: Supports SCosta card
(ISO7816 profile) presence check, activation, PPS Exchange for higher baud rate,
APDU exchange with card according to card's protocol (Either T0 or T1). Supports
reading and writing binaries to SCosta card for selected EF.
9.2.1 Demo setup
This section describes in detail the setup and execution environment required for
phExMain application.
The following devices are required to run the example:
1. PNEV7462B/C
2. LPC-Link 2 board
3. Power adapter
4. Contactless cards: Type A, Type B, Type F
5. Contact card ISO7816 compatible
UM10883
User manual
COMPANY PUBLIC
All information provided in this document is subject to legal disclaimers.
Rev. 1.6 — 14 May 2018
319816
© NXP B.V. 2018. All rights reserved.
78 of 120
�UM10883
NXP Semiconductors
PN7462 family Quick Start Guide - Development Kit
External power
supply
LPC-LIN K2
Fig 82. HW setup for the main example
9.2.2 Features
“phExMain” example is covering the following features:
Table 10.
Feature
“phExMain” Example features
supported
CLIF Interface
Yes
CT Interface
Yes
NXP NFC Reader Library
Yes
CT Reader Library
Yes
FreeRTOS
Yes
Non RTOS
Yes
Standby mode
Yes
HIF/MIF Interface
No
9.2.3 FreeRTOS usage in this example
Example can be built in two configuration modes, with FreeRTOS and without FreeRTOS
support.
By setting precompile directive “#PHFL_HALAPI_WITH_RTOS” or
“#PHFL_HALAPI_NO_RTOS” the mode of the configuration is specified.
To build example in one or another mode, comment/uncomment proper directive in the
“APP_NxpBuild.h” file.
In case of FreeRTOS mode, 3 tasks are used to control application flow:
• System Task which switches between CLIF functionality and CT functionality and
handles system functions such as going to standby
UM10883
User manual
COMPANY PUBLIC
All information provided in this document is subject to legal disclaimers.
Rev. 1.6 — 14 May 2018
319816
© NXP B.V. 2018. All rights reserved.
79 of 120
�UM10883
NXP Semiconductors
PN7462 family Quick Start Guide - Development Kit
• CLIF Task which executes NFC A, B, F reader application or EMV application and
discovery loop
• CT Task which does an activation of a JCOP contact card, selects the T=1 protocol
and executes EMV Card application.
In case of non RTOS support one main task is taking control on the application flow.
9.2.4 Operation with standby and without standby
Based on the compile time options, system task is responsible for managing different
operation modes. The application can be in:
• Standby mode with wakeup timer and CT presence as wakeup configuration.
• Full power mode with GP Timer1 and CT presence interrupt enabled.
The standby feature can be enabled/disabled at compile time with the precompile
directive. To enable standby mode “#PHFL_ENABLED_STANDBY” directive needs to be
uncomment and can be found in the “APP_NxpBuild .h” file.
In this configuration, the FW by default puts the IC to standby and enables the wakeup
sources such as contact card presence, wakeup timer and RF level detector (only for
listen mode). The wakeup timer duration is taken from EE configuration (by default:
300ms). The IC wakes up at every wakeup timer duration and polls for contact card
presence and if not present, polls for contactless technologies (or LPCD).
When a contactless or contact card is detected, the FW executes the corresponding
application and returns back to standby.
In case “Standby” feature is disabled, the FW uses General Purpose Timer 1 as wakeup
timer and CT presence interrupt to either branch to Contactless application or Contact
application respectively.
The below 2 diagrams explain the Standby and Non-Standby scenarios. See Section 7.7
for further reference regarding RTOS.
UM10883
User manual
COMPANY PUBLIC
All information provided in this document is subject to legal disclaimers.
Rev. 1.6 — 14 May 2018
319816
© NXP B.V. 2018. All rights reserved.
80 of 120
�UM10883
NXP Semiconductors
PN7462 family Quick Start Guide - Development Kit
Fig 83. phExMain standby flow
UM10883
User manual
COMPANY PUBLIC
All information provided in this document is subject to legal disclaimers.
Rev. 1.6 — 14 May 2018
319816
© NXP B.V. 2018. All rights reserved.
81 of 120
�UM10883
NXP Semiconductors
PN7462 family Quick Start Guide - Development Kit
7
Fig 84. phExMain non standby flow
9.2.5 MIFARE Classic
The MIFARE Classic example is implementing basic read/write functionality using a
MIFARE Classic card with a predefined default key. If a Type A card is detected with
SAK of 0x8 (1K MIFARE Classic card) or 0x18 (4K MIFARE Classic card), then the
MIFARE Classic example is executed. The example performs initial authentication of
block X and then reads/write to this sector. Further the example performs authentication
of another block (say X +1) using the session key established during initial authentication
(this is called re-authentication). It then performs read/write to this block X+1. See the
function phExMain_MiFareClassic() and phExMain_MifareOperations()
Supported Functionality:
1. Authentication & Re-Authentication
2. Read/Write
Implementation in the “phExMain_MiFareClassic.c” file.
UM10883
User manual
COMPANY PUBLIC
All information provided in this document is subject to legal disclaimers.
Rev. 1.6 — 14 May 2018
319816
© NXP B.V. 2018. All rights reserved.
82 of 120
�UM10883
NXP Semiconductors
PN7462 family Quick Start Guide - Development Kit
9.2.6 MIFARE Ultralight
The MIFARE Ultralight example is implementing basic read/write functionality using a
non-secure MIFARE Ultralight card. If a Type A card is detected with SAK 0x00, then
MIFARE Ultralight example is executed.
The example performs read and write to predefined pages of the card.
Supported functionality:
1. Read
2. Write
• Since the stack also supports Type 2 tag, a check is performed to see if the card is
NDEF tag or MIFARE Ultralight tag
Implementation in the “phExMain_MiFareUltralight.c” file.
9.2.7 MIFARE DESFire
If the detected SAK is 0x20 (expected card is MIFARE DESFire EV1), then ISO14443-4
Type A reader example is executed. The MIFARE DESFire example implements L4
exchange of “GetVersion” command at 106, 212, 424 and 848 kbps. No other commands
are currently exchanged as they require authentication and crypto operations (which are
not currently supported in the release).
Supported functionality:
1. Get Version at 106/212/424/848 kbps
Implementation in the “phExMain_TypeA_L4Exchange.c” file.
9.2.8 Jewel reader
If the ATQA of a Type A card denotes jewel card, the jewel example is executed.
The jewel example assumes a non-secure jewel card. The example performs read and
write to predefined blocks of the card.
Supported functionalities:
1. Read
2. Write
• Since the stack also supports Type 1 tag, a check is performed to see if the card is
an NDEF tag or jewel card.
Implementation in the “phExMain_Jewel.c” file.
9.2.9 ISO15693 – ICODE SLIX
The example performs read and write to predefined blocks of the card.
Supported functionality:
1. Read single block
UM10883
User manual
COMPANY PUBLIC
All information provided in this document is subject to legal disclaimers.
Rev. 1.6 — 14 May 2018
319816
© NXP B.V. 2018. All rights reserved.
83 of 120
�UM10883
NXP Semiconductors
PN7462 family Quick Start Guide - Development Kit
2. Write single block
3. Datarate Tx - 26kbit/s (1out of 4 coding) and Rx 26kbit/s
Implementation in the “phExMain_ISO15693.c” file.
9.2.10 ISO18000-3.3 – ICODE ILT
The example performs read and write to predefined blocks of the card.
Supported functionality:
1. Read block
2. Write word
3. TX TARI = 9.44 and RX 424_2 Manchester Period
Implementation in the “phExMain_ISO18000p3m3.c” file.
9.2.11 Type B eZLINK/ SLE card
If the detected technology is Type B, then ISO14443-4 Type B reader is executed.
This example is used demonstrate the ISO144434 exchange of APDUs to a Type B card
at all baud rates.
Supported functionality:
1. Get Challenge106/212/424/848 kbps
2. No encryption
Implementation in the “phExMain_TypeB_L4Exchange.c” file.
9.2.12 Type F (FeliCa tag)
This example is used to read and write FeliCa frames to FeliCa tags at 212/424 kbps.
Since the stack supports Type 3 tags, check is performed to see if the card is a NDEF
tag or FeliCa card.
Supported functionality:
1. CHECK
2. UPDATE
3. 212/424 kbps
Implementation in the “phExMain_FeliCa.c” file.
9.2.13 ISO14443-4 card mode (till activation)
During listen, the example can be configured to either act as ISO14443-4 card emulator
(SAK = 0x20) or NFC-DEP Target (SAK = 0x40). This configuration is done via #define
macro in phExMain_Clif.h
If the SAK is 0x20, discovery loop detects peer ISO14443A reader, the
phExMain_CardMode is executed, that responds to RATS from the reader. This example
UM10883
User manual
COMPANY PUBLIC
All information provided in this document is subject to legal disclaimers.
Rev. 1.6 — 14 May 2018
319816
© NXP B.V. 2018. All rights reserved.
84 of 120
�UM10883
NXP Semiconductors
PN7462 family Quick Start Guide - Development Kit
does not demonstrate L4 APDUs exchange (it is done in phExHCE and
phExNFCForum).
9.2.14 Passive and active ISO18092 initiator (till activation)
During active poll mode, if ATR_REQ is received or during passive poll mode, if SAK
denotes 0x40, then the example implemented in phExMain_PasIni.c/ phExMain_ActIni.c
is executed. These examples simply transmit a DEP_REQ command with arbitrary
payload to peer target. The purpose of this example is only to demonstrate integration of
ISO18092.
9.2.15 Passive ISO18092 target (till activation)
During listen, the example can be configured to either act as ISO14443-4 card emulator
(SAK = 0x20) or NFC-DEP Target (SAK = 0x40). This configuration is done via #define
macro in phExMain_Clif.h.
If the SAK is 0x40, discovery loop detects peer ISO18092 initiator, the phExMain_PasTgt
is executed, that responds to ATR_REQ from the initiator. This example further waits for
a NFC-DEP frame from the initiator.
9.2.16 Contact Example
If the IC boots because of CT presence wakeup reason or if the CT presence interrupt is
generated, the System task starts the CT task. The CT task performs the Contact
application. The contact application activates the card, and determines the card is of
EMVCo payment card or nonpayment card. If payment card is detected, the application
further communicates with the card to know which type of card (Master card, VISA or
AMEX card), and prints the information.
Supported ISO7816 Functionality:
1. ATR Parsing
2. Create MF
3. Create EF
4. Select EF
5. Write Binary
6. Read Binary
7. Delete EF
8. SCOSTA Card
9. TA1 = 97
10. Supports Class A (DCDC always in double mode)
9.2.17 RTOS task management
The phExMain example can be executed in both RTOS. In RTOS environment, three
tasks are created.
1. System task
a. Creates CLIF task
b. Creates CT task
UM10883
User manual
COMPANY PUBLIC
All information provided in this document is subject to legal disclaimers.
Rev. 1.6 — 14 May 2018
319816
© NXP B.V. 2018. All rights reserved.
85 of 120
�UM10883
NXP Semiconductors
PN7462 family Quick Start Guide - Development Kit
c. Waits for PMU/PCR exception events
d. Waits for CLIF Task completion if standby is enabled
e. Waits for CT Task completion if standby is enabled
f. Enter low power mode (standby)
2. CLIF task
a. Starts GP timer for listen duration if standby is not enabled and wait for GP timer
expiry
b. Configure external RF on detection
c. If boot reason is WUC counter or GP timer expiry, perform polling mode of
discovery loop
d. If boot reason is RFLD or external RF is detected, perform listen mode of
discovery loop
e. Notify system task if polling/listening is completed and standby is enabled
3. CT task
a. Enable CT presence interrupt and wait for CT presence interrupt
b. If boot reason is CT presence or CT presence interrupt is detected, perform CT
example
c. Notify system task if polling/listening is completed and standby is enabled
Fig 85 and Fig 86 illustrate one instance of phExMain execution for both standby and
non-standby scenarios.
• Please note that the CLIF and CT tasks are independent and can concurrently
operate the CL and CT interfaces. During such concurrent operation, there is a
possibility that CT interface may be unstable. It is up to the application design to
configure interrupt and task priorities for a stable operation.
UM10883
User manual
COMPANY PUBLIC
All information provided in this document is subject to legal disclaimers.
Rev. 1.6 — 14 May 2018
319816
© NXP B.V. 2018. All rights reserved.
86 of 120
�UM10883
NXP Semiconductors
PN7462 family Quick Start Guide - Development Kit
Fig 85. PN7462AU phExMain sequence diagram for standby scenario with RTOS
UM10883
User manual
COMPANY PUBLIC
All information provided in this document is subject to legal disclaimers.
Rev. 1.6 — 14 May 2018
319816
© NXP B.V. 2018. All rights reserved.
87 of 120
�UM10883
NXP Semiconductors
PN7462 family Quick Start Guide - Development Kit
Fig 86. PN7462AU phExMain sequence diagram for non-standby scenario with RTOS
9.2.18 No-RTOS management
In case of No-RTOS the entry point from flash boot is phExMain_NoRTOS. The
functionality remains the same except that the CLIF example and the CT examples are
called from a single executive while loop based on timer interrupt or external RF
detection or CT presence interrupt.
UM10883
User manual
COMPANY PUBLIC
All information provided in this document is subject to legal disclaimers.
Rev. 1.6 — 14 May 2018
319816
© NXP B.V. 2018. All rights reserved.
88 of 120
�UM10883
NXP Semiconductors
PN7462 family Quick Start Guide - Development Kit
9.3 PN7462AU_ex_phExEMVCo (CLIF + CTIF functionality)
The “phExEMVCo” is an example which implements the polling for the EMVCo contact
and contactless cards and implement reference EMV transaction.
Application is based on the NFC Reader Library, CT Library and be run with or without
FreeRTOS.
9.3.1 Demo setup
This section describes in detail the setup and execution environment required for the
“phExEMVCo” application.
The following things are required for setup:
1. PNEV7462B/C board
2. LPC-Link 2 board
3. Power adapter
4. Contact and contactless EMVCo card
External power
supply
LPC-LIN K2
Fig 87. HW Setup for the “phExEMVCo”example
9.3.2 Features
“phExEMVCo” example features:
Table 11.
Feature
UM10883
User manual
COMPANY PUBLIC
“phExEMVCo” Example features
supported
CLIF Interface
Yes
CT Interface
Yes
NXP NFC Reader Library
Yes
CT Reader Library
Yes
FreeRTOS
Yes
All information provided in this document is subject to legal disclaimers.
Rev. 1.6 — 14 May 2018
319816
© NXP B.V. 2018. All rights reserved.
89 of 120
�UM10883
NXP Semiconductors
PN7462 family Quick Start Guide - Development Kit
Feature
supported
Non RTOS
Yes
Standby mode
No
HIF/MIF Interface
No
9.3.3 EMVCo polling loop
In this example EMVCo polling loop is enabled. In this profile, only Type A and B
technology polling is enabled and bail out is set such that both A and B techs are polled
even if one of them is detected. This is to ensure no two cards of same/different tech are
present in the POS for EMV transaction. Low Power Card Detection (LPCD) is disabled
in this profile.
9.3.4 EMV transaction
This example implements next EMV Transactions:
• SELECT (PPSE)
• SELECT command
• GET PROCESSING OPTIONS
• READ RECORD
• GENERATE AC
Supported EMV functionality:
• ATR Parsing accordingly to the EMV specifications
• Send Different AIDs to identify card
− Master Card: Credit or Debit
− Visa Card: Credit or Debit
− Master Card: Maestro (debit card)
− Master Card: Cirrus (interbank network)
− Master Card: Maestro UK
− Visa Card: Electron card
− Visa Card: V PAY card
− Visa Card: VISA Plus card
− Amex Card –
• Class A (DCDC always in double mode)
9.3.5 RTOS task management
• For information regarding RTOS task management, refer to Section 9.2.17
9.3.6 No RTOS management
• For information regarding No RTOS management, refer to Section 9.2.18
UM10883
User manual
COMPANY PUBLIC
All information provided in this document is subject to legal disclaimers.
Rev. 1.6 — 14 May 2018
319816
© NXP B.V. 2018. All rights reserved.
90 of 120
�UM10883
NXP Semiconductors
PN7462 family Quick Start Guide - Development Kit
9.4 PN7462AU_ex_phExRf (CL functionality)
The “phExRf” is an example which implements the polling for contactless cards without
NFC Reader Library support. Application use only HAL APIs and perform same CLIF
functionality as 0 “phExMain” example with the only difference that for the transaction
static predefined packets are used.
Application does not implement CT and “Standby” functionality and it is not based on the
FreeRTOS.
9.4.1 Demo setup
This section describes in detail the setup and execution environment required for
“phExRf” application.
The following devices are required to run the example:
1. PNEV7462B/C board
2. LPC-Link2 board
3. Power adapter
4. Contactless cards Type A, Type B, Type F, ISO15693
5. NFC Enabled Phone
External power
supply
LPC-LIN K2
Fig 88. HW setup for the “phExRF”example
9.4.2 Features
“phExRF” example is covering next features:
Table 12.
Feature
UM10883
User manual
COMPANY PUBLIC
“phExRf” Example features
supported
CLIF Interface
Yes
CT Interface
No
All information provided in this document is subject to legal disclaimers.
Rev. 1.6 — 14 May 2018
319816
© NXP B.V. 2018. All rights reserved.
91 of 120
�UM10883
NXP Semiconductors
PN7462 family Quick Start Guide - Development Kit
Feature
supported
NXP NFC Reader Library
No
CT Reader Library
No
FreeRTOS
No
Non RTOS
Yes
Standby mode
No
HIF/MIF Interface
No
9.4.3 Application Flow
The figure below demonstrates the application flow.
Fig 89. phExRF Example Application Flow
UM10883
User manual
COMPANY PUBLIC
All information provided in this document is subject to legal disclaimers.
Rev. 1.6 — 14 May 2018
319816
© NXP B.V. 2018. All rights reserved.
92 of 120
�UM10883
NXP Semiconductors
PN7462 family Quick Start Guide - Development Kit
9.5 PN7462AU_ex_phExRFPoll example (CL functionality)
The “phExRfPoll” is an example which implements the polling for contactless cards
without NFC Reader Library support for the optimization of the RF-signal. Through
defines in phExRfPoll.c the specific technology to poll for can be selected.
By setting breakpoints RF registers can be modified to change the signal.
9.6 PN7462AU_ex_phExCT (CT functionality)
This example implements simple polling for contact cards. Application use only HAL APIs
and perform same CTIF functionality as 0 “phExMain” example with the only difference
that for the transaction static predefined packets are used and example is not using any
library. phExCt performs activation of an EMVCo card. SELECT Master card APDU is
sent depending on the protocol supported by the card and expects RAPDU 0x90 0x00.
The example is also capable of determining the non-EMVCo card or non-Master card.
After the transactions, deactivation is performed. Also, this example demonstrates the
non-RTOS integration of application with HALs.
9.6.1 Demo setup
This section describes in detail the setup and execution environment required for
“phExCT” application.
The following devices are required to run the example:
1. PNEV7462B/C board
2. LPC-Link 2 board
3. Power adapter
4. Contact card ISO7816 compatible
External power
supply
LPC-LIN K2
Fig 90. HW setup for the “phExCT”example
UM10883
User manual
COMPANY PUBLIC
All information provided in this document is subject to legal disclaimers.
Rev. 1.6 — 14 May 2018
319816
© NXP B.V. 2018. All rights reserved.
93 of 120
�UM10883
NXP Semiconductors
PN7462 family Quick Start Guide - Development Kit
9.6.2 Features
phExCT” example is covering next features:
Table 13.
Feature
“phExRf” Example features
supported
CLIF Interface
No
CT Interface
Yes
NXP NFC Reader Library
No
CT Pal Library
No
FreeRTOS
No
Non RTOS
Yes
Standby mode
No
HIF/MIF Interface
No
9.6.3 Application Flow
The figure below demonstrates the application flow.
UM10883
User manual
COMPANY PUBLIC
All information provided in this document is subject to legal disclaimers.
Rev. 1.6 — 14 May 2018
319816
© NXP B.V. 2018. All rights reserved.
94 of 120
�UM10883
NXP Semiconductors
PN7462 family Quick Start Guide - Development Kit
Fig 91. phExCT Example Application Flow
9.6.4 EMVCo activation
The example performs EMVCo activation and EMVCo ATR parsing. It also determines
the protocol supported by the card.
9.6.5 SELECT master card
The example sends a SELECT master card APDU and expects a RAPDU 0x90 0x00.
UM10883
User manual
COMPANY PUBLIC
All information provided in this document is subject to legal disclaimers.
Rev. 1.6 — 14 May 2018
319816
© NXP B.V. 2018. All rights reserved.
95 of 120
�UM10883
NXP Semiconductors
PN7462 family Quick Start Guide - Development Kit
9.7 PN7462AU_ex_phExCTEMVCo (CT functionality)
The “phExCtEMVCo” is an example which implements the CT functionality with CT Pal
library support. Application use CT PAL library APIs and perform same CT functionality
as 0 “phExEMVCo” example with the only difference that for the transaction static
predefined packets are used. After the transactions, deactivation is performed. The
example is also capable of determining the Non-EMVCo card.
Application does not implement CLIF and “Standby” functionality and it is not based on
the FreeRTOS.
9.7.1 Demo setup
In this example, the same setup is used as in “phExEMVCo” example.
9.7.2 Features
“phExCT” example is covering next features:
Table 14.
Feature
“phExRf” Example features
supported
CLIF Interface
No
CT Interface
Yes
NXP NFC Reader Library
No
CT Pal Library
Yes
FreeRTOS
No
Non RTOS
Yes
Standby mode
No
HIF/MIF Interface
No
9.7.3 EMVCo activation
The example performs an EMVCo activation and EMVCo ATR parsing. It also
determines the protocol supported by the card and applies the protocol supported.
9.7.4 APDU transactions
The example is capable of sending select commands for nine pre-selected types of
EMVCO cards after successful activation.
1. Master Card: Credit or Debit
2. Visa Card: Credit or Debit
3. Master Card: Maestro (debit card)
4. Master Card: Cirrus (inter-bank network)
5. Master Card: Maestro UK
6. Visa Card: Electron card
7. Visa Card: V PAY card
8. Visa Card: VISA Plus card
9. Amex Card
UM10883
User manual
COMPANY PUBLIC
All information provided in this document is subject to legal disclaimers.
Rev. 1.6 — 14 May 2018
319816
© NXP B.V. 2018. All rights reserved.
96 of 120
�UM10883
NXP Semiconductors
PN7462 family Quick Start Guide - Development Kit
9.8 PN7462AU_ex_ phExCT7816 (CT functionality)
The “PN7462AU_ex_phExCt7816” example implements the CT functionality with CT
library support. Application use CT library APIs and perform same CT functionality as in
“PN7462AU_ex_phExMain” example with the only difference that for the transaction
static predefined packets are used. The example is built to work on a SCOSTA card.
PN7462AU_ex_phExCT7816 demonstrates the CT Protocol Lib + HAL API’s. After the
transactions, deactivation is performed.
Application does not implement CLIF and “Standby” functionality and it is not based on
the FreeRTOS.
9.8.1 Demo setup
In this example, the same setup is used as in “phExMain” example.
9.8.2 Features
“phExCT7816” example is covering next features:
Table 15.
Feature
“phExCT7816” Example features
supported
CLIF Interface
No
CT Interface
Yes
NXP NFC Reader Library
No
CT Pal Library
Yes
FreeRTOS
No
Non RTOS
Yes
Standby mode
No
HIF/MIF Interface
No
9.8.3 ISO7816 activation
The example performs an ISO7816 activation and ISO7816 ATR parsing. Also, it
determines the protocol supported by the card and applies the protocol supported.
9.8.4 APDU transactions
The following APDU’s are sent after the activation of the card. If the card supports the
following APDU’s (e.g. SCOSTA), proper responses will come from the card.
1. Create MF
2. Create EF
3. Select EF
4. Write binary
5. Read binary
6. Delete EF
UM10883
User manual
COMPANY PUBLIC
All information provided in this document is subject to legal disclaimers.
Rev. 1.6 — 14 May 2018
319816
© NXP B.V. 2018. All rights reserved.
97 of 120
�UM10883
NXP Semiconductors
PN7462 family Quick Start Guide - Development Kit
9.9 PN7462AU_ex_phExHif
This example demonstrates host interface loopback functionality for I2C, SPI, HSU and
master interface functionality for I2CM, SPIM. Beside that it demonstrates secondary
downloader functionality to EEPROM and FLASH memory over SPI Host interface. For
Host Interface Frames “FREE Format” is used.
Application is implementing CT functionality with SPI Host interface and it is not based on
the FreeRTOS.
Setup consist of two projects: HIF application executing on the PN7462AU and the LPC
application executing on the LPC1769 board (LPCXpresso board for LPC1769 with
CMSIS DAP probe [9]). LPC project is in the archive file \NXP
Semiconductors\PN7462AUPspPackageFull-vXX_XX_XX\PN7462AU
Software\LpcFw_phExHif\LpcFw_ex_phExHif.zip.
9.9.1 Demo setup
This section describes in detail the setup and execution environment required for the
“phExHif” application.
The following devices are required for setup:
1. PNEV7462B (PNEV7462C with HW modifications)
2. LPC1769 board
3. LPC-Link2 board
4. Power adapter
UM10883
User manual
COMPANY PUBLIC
All information provided in this document is subject to legal disclaimers.
Rev. 1.6 — 14 May 2018
319816
© NXP B.V. 2018. All rights reserved.
98 of 120
�UM10883
NXP Semiconductors
PN7462 family Quick Start Guide - Development Kit
Fig 92. HIF demo architecture
The GPIOs of LPC and PN7462AU are used to determine which functionality of this
example has to be executed (GPIO6,7,8). It is also used to select the host interface or
master interface to be used (GPIO4,5). For each different functionality, a different
MCUXpresso project is required for LPC1769 side while PN7462AU is running the
phExHif MCUXpresso project.
The phExHIF indicates its readiness to LPC1769 through GPIO1 of PN7462AU
connected to GPIO0.0 of LPC1769 (APP ready pin).
To run HIF example with PNEV7462C board, soldering an additional wire to access the
PN7462AU IRQ line is needed. The IRQ line marked on the following picture:
UM10883
User manual
COMPANY PUBLIC
All information provided in this document is subject to legal disclaimers.
Rev. 1.6 — 14 May 2018
319816
© NXP B.V. 2018. All rights reserved.
99 of 120
�UM10883
NXP Semiconductors
PN7462 family Quick Start Guide - Development Kit
(1)
IRQ line VIA marked yellow
(2)
An additional wire should be solder on this VIA to make the IRQ line accessible
Fig 93. PNEV7462C IRQ pin
9.9.2 Features
“phExHif” example is covering next features:
Table 16.
Feature
UM10883
User manual
COMPANY PUBLIC
“phExHif” Example features
supported
CLIF Interface
No
CT Interface
Yes
NXP NFC Reader Library
No
CT Pal Library
Yes
FreeRTOS
No
Non RTOS
Yes
Standby mode
No
HIF/MIF Interface
yes
All information provided in this document is subject to legal disclaimers.
Rev. 1.6 — 14 May 2018
319816
© NXP B.V. 2018. All rights reserved.
100 of 120
�UM10883
NXP Semiconductors
PN7462 family Quick Start Guide - Development Kit
9.9.3 HIF selection
Table 17. Host interface selection
GPIO5_PN7462AU ←
GPIO4_PN7462 ←
GPIO2.0_LPC
GPIO2.1_LPC
0
0
Invalid
0
1
I2C
1
0
SPI
1
1
HSU
Chosen HIF
9.9.4 Operation selection
The tabulated GPIO configuration selects the operation to be performed by examples
shown in 0.
Operation on the packet received on HIF
GPIO8_PN7462AU ←
GPIO7_PN7462AU ←
GPIO2.2_LPC
GPIO2.3_LPC
GPIO6_PN7462AU ←
GPIO2.4_LPC
Chosen HIF
0
0
0
Loopback on HIF
0
0
1
Forward HIF Rx
Packet to I2CM Tx
0
1
0
Forward HIF Rx
Packet to SPIM Tx
0
1
1
Forward HIF Rx
Packet to SPIM &
I2CM Tx Both
1
0
0
Program EEP with HIF
Rx Packet
1
0
1
Program FLASH with
HIF Rx Packet
1
1
0
Forward HIF Rx
Packet to CT
1
1
1
RFU
Application ready PIN is connected with GPIO0.0_LPC on the LPC board.
Important guidelines:
•
1 Logical HIGH as seen/set by the GPIO.
•
0 Logical HIGH as seen/set by the GPIO.
•
Start PN7462AU Application before launching LPC Application
•
Since both the projects are MCUXpresso IDE based, while updating FW image
via the LPC Link, ensure that the image is downloaded to the correct platform.
9.9.5 EEPROM configuration dependencies
Values from the following EEPROM structures are used in this example:
UM10883
User manual
COMPANY PUBLIC
All information provided in this document is subject to legal disclaimers.
Rev. 1.6 — 14 May 2018
319816
© NXP B.V. 2018. All rights reserved.
101 of 120
�UM10883
NXP Semiconductors
PN7462 family Quick Start Guide - Development Kit
• Boot: EEPROM
• Boot: FLASH
• Boot: CT
• Boot: GPIO
• HW: I2CM
• HW: SPIM
• HW: HIF
UM10883
User manual
COMPANY PUBLIC
All information provided in this document is subject to legal disclaimers.
Rev. 1.6 — 14 May 2018
319816
© NXP B.V. 2018. All rights reserved.
102 of 120
�UM10883
NXP Semiconductors
PN7462 family Quick Start Guide - Development Kit
9.9.6 MCUXpresso projects provided for LPC1769
• LPCExHif_HSU_LoopBack_App
• LPCExHif_HSU_to_I2CM_SPIM_App
• LPCExHif_I2C_Loopback_App
• LPCExHif_I2C_to_SPIM_App
• LPCExHif_SPI_CT_App
• LPCExHif_SPI_LoopBack_App
• LPCExHif_SPI_to_EEPROM_App
• LPCExHif_SPI_to_FLASH_App
• LPCExHif_SPI_to_I2CM_App
• Supporting libraries
− PN640_lpc17xx_lib, CMSISv2p00_LPC17xx
9.10 PN7462AU_ex_phExPos
POS use-case demo application shows how to use PN7462AU in combination with
second application hosted on the µController. PNEV7462B board is supported
(PNEV7462C is supported with HW modifications as described in 9.9.1). In this example
LPC1769 µC is used and connection is established through SPI host interface. POS usecase demonstrate the Pay pass transaction on the contact and contactless frontend.
Fig 94. POS use case demo architecture
The POS demo architecture is split into application layer (L2) and low level EMVCo
compliant layer L1 which is hosted on the PN7462AU. The application layer L2
commands are simulated in reference microcontroller board (LPC1769) and L1 layer
components are placed in PN7462AU.
UM10883
User manual
COMPANY PUBLIC
All information provided in this document is subject to legal disclaimers.
Rev. 1.6 — 14 May 2018
319816
© NXP B.V. 2018. All rights reserved.
103 of 120
�UM10883
NXP Semiconductors
PN7462 family Quick Start Guide - Development Kit
The application APDU commands (L2) are communicated to PN7462AU through SPI
host interface. PN7462AU GPIO pin is used to synchronize command/response between
LPC1769 and PN7462AU.
Interrupt pin is used to notify valid ISO 14443-4 card to LPC1769.
Note
Detailed description and how to use example is described in “POS Use Case Demo
Setup Manual”.
Fig 95. POS demo architecture
9.11 PN7462AU_ex_phExCcid
The PC USB reader application demonstrate how to use the PN7462AU customer demo
board as a CCID reader and shows how connected PN7462AU via USB interface to a
PC and provide the CCID protocol implementation on the top of the physical link.
The PC USB reader example is hosted on the PN7462AU and can be tested with any
PC/SC application running on the PC with Windows OS.
UM10883
User manual
COMPANY PUBLIC
All information provided in this document is subject to legal disclaimers.
Rev. 1.6 — 14 May 2018
319816
© NXP B.V. 2018. All rights reserved.
104 of 120
�UM10883
NXP Semiconductors
PN7462 family Quick Start Guide - Development Kit
Fig 96. PC USB reader example block diagram
The USB stack and CCID class is implemented in the PN7462AU. The default CCID
driver present in PC with Windows OS is used for operation.
Fig 97. Example architecture
Note:
Detailed description and how to use example is described in “PC Reader Demo Setup
Manual”.
9.12 PN7462AU_ex_phSystemServices
This example application demonstrates system services invocation. The PN7462AU
provides ROM services that are accessible via flash APIs, also described in
/PN7462AU/phROMIntf/phhalSysSer/inc/phhalSysSer.h and with more detailed
description in API documentation.
UM10883
User manual
COMPANY PUBLIC
All information provided in this document is subject to legal disclaimers.
Rev. 1.6 — 14 May 2018
319816
© NXP B.V. 2018. All rights reserved.
105 of 120
�UM10883
NXP Semiconductors
PN7462 family Quick Start Guide - Development Kit
This application requires user interface for performing the operations so it is needed to
use debug mode. Some of the featured system service commands could be irreversible
or reversible depending on the application mode configured by:
#define ENABLE_IR_REVERSIBLE_COMMANDS 0 //1
If the macro ENABLE_IR_REVERSIBLE_COMMANDS is defined to 0, example will not
run irreversible commands, if defined to 1 example will run irreversible commands but
user confirmation is needed.
Table 18.
Feature
PN7462AU_ex_phSystemServices features
description
SECROW Lock
The HW SecRow contains the SWD access bits, code writeprotection bits and RSTN pin behavior bits. For blocking any further
writes to SecRow, the phhalSysSer_OTP_SetSecrowLock() is used.
It prevents further usage of phhalSysSer_OTP_SecrowConfig()
function.
Code write protection
It is required to lock flash memory from write at HW level. It is locked
possibly at a stage when secure secondary upgrade is not planned
for the remaining lifecycle of the product. For such use cases,
phhalSysSer_OTP_SecrowConfig() is used to lock flash memory
from any further write. Any flash programming after locking the flash
results in hard fault. Once SECROW functionality is locked, this
feature cannot be used anymore.
Block SWD debugging
This command disables PN7462AU SWD debug interface. When the
PN7462AU IC is delivered from production to user, the default SWD
access level enables the user to view and debug user flash memory,
user EEPROM memory, user RAM memory, and peripheral registers.
The access level can be irreversibly changed to prevent view/debug
access to any memory region or peripheral registers, before
deploying the IC to the field. phhalSysSer_OTP_SecrowConfig() can
be used to lock the SWD against any further access. Once SECROW
functionality is locked, this feature cannot be used anymore.
Disable primary download Command is used to irreversibly disable the ROM primary download
feature. On subsequent boots, the ROM boot never enters ROM
primary download mode, even if DWL_REQ pin and USB_VBUS pin
is high. This feature is typically used after development and flashing
of secondary downloader in the flash memory, for subsequent
code/data upgrades.
UM10883
User manual
COMPANY PUBLIC
Update Product ID
USB Product ID - PID update
Update Vendor ID
USB vendor ID - VID update
Perform In Application
Programming
Application asks for FLASH page number. Page is 128bytes long, for
158kb of the flash memory, the page number is in range 0-1263. The
selected flash page is updated from user programmable values.
Set internal PVDD
PVDD is pad voltage reference and supply of the host interface
(HSU, USB, I2C, and SPI) and the GPIOs. This command sets PVDD
configuration to internal.
Get ROM version
Commands returns current ROM firmware version
All information provided in this document is subject to legal disclaimers.
Rev. 1.6 — 14 May 2018
319816
© NXP B.V. 2018. All rights reserved.
106 of 120
�UM10883
NXP Semiconductors
PN7462 family Quick Start Guide - Development Kit
Note:
For irreversible commands: Secrow lock, code write protection, block SWD debugging
and disable primary download the undo is not possible!
9.13 PN7462AU_ex_phExVCom
This example application features TypeA card detection, RF filed control and
communication with the PC host over USB CDC interface (VCOM).
9.13.1 Demo setup
Board is connected to the PC host via USB interface. USB micro socket X3 needs to be
connected to the PC’s USB port. The proper USB host interface configuration on the
board is depicted in 3.2.1.1 (not needed for PNEV7462C). Application outputs debug
traces to and receives commands from the terminal emulation application running on the
PC host. Serial port parameters are 9600/8/1/N/1.
9.13.2 Command sets
Commands are entered by the terminal emulation program. Each command is onecharacter long.
a) T command (character T), example application enters Type A detection mode and
the terminal output is as follows:
Poll command received
Entering TypeA Polling mode..
Type A Polling
Type A Polling
Card UID=0424566AF13B80
Card UID=0424566AF13B80
Card UID=0424566AF13B80
Type A Polling
Type A Polling
LED8-10 lit in circular pattern.
b) O command (character O), example application turns RF filed permanently ON, the
corresponding output on the terminal console is:
RF ON command received
LED9 (Green) and LED10 (Blue) lit.
c) F command (character F), example application turns RF filed permanently OFF,
output on the terminal console is:
RF OFF command received
LED7 (Red) and LED8 (Yellow) lit.
9.14 PN7462AU_ex_phExDoorAccess
The example application demonstrates card detection, card authentication and HSU
interface communication with the PC host. The application is running a NFC polling loop
and goes to standby mode after each polling loop in case no CL card is detected by the
RF field of the reader. The polling loop is implemented for Type A, B, F, ISO15693 and
ISO 1800-P3M3. The application prints out the detected type of the card and UID if
UM10883
User manual
COMPANY PUBLIC
All information provided in this document is subject to legal disclaimers.
Rev. 1.6 — 14 May 2018
319816
© NXP B.V. 2018. All rights reserved.
107 of 120
�UM10883
NXP Semiconductors
PN7462 family Quick Start Guide - Development Kit
available. In case the NFC device is detected, the application sends a NDEF message
containing the NXP webpage address.
Serial Interface
PN7462AU
NFC Reader
PC
Fig 98. Door access example
After each polling loop the application goes to standby mode and remains for 500ms. A
timer is used as a wakeup source from standby. This process continues until a card is
detected by the RF field of the reader. If a card is detected, the card type with its UID is
sent via HSU and will be printed on the PC console.
In case a MIFARE Classic card is detected, application tries to authenticate the card
using the default MIFARE key. If the authentication is successful a block of data is read
from the card. The type of the card, UID and data are sent via HSU and printed on the
PC console.
P2P functionality is integrated. When a NFC enabled phone is detected from the RF field
as an active or passive target the LLCP SNEP will be activated and NDEF message will
be sent to the mobile device.
If LPCD (Low Power Card Detection) is enabled, the reader checks during the wakeup
time the presence of a card and enters the card detected mode when a card is present &
repeats the cycle. If no card is present it goes back to standby mode. LPCD is enabled
by default.
Note:
Detailed description and how to use example is described in “Door Access User Manual”.
9.15 PN7462AU_ex_phExDoorAccessEC
This example is related to the 9.14 but in this version the application is using a MIFARE
DESFire EV1 card for the authentication, data exchange is done over contactless
interface and software key store or SAM (Secure Access Module) key store is used for
storing the authentication key. By default, the software key store is enabled. The user
can use the SAM key store by enabling corresponding. SAM is a key storage element
and it should be inserted in the CT main.
UM10883
User manual
COMPANY PUBLIC
All information provided in this document is subject to legal disclaimers.
Rev. 1.6 — 14 May 2018
319816
© NXP B.V. 2018. All rights reserved.
108 of 120
�UM10883
NXP Semiconductors
PN7462 family Quick Start Guide - Development Kit
PN7462AU
NFC Reader
Serial Interface
MIFARE
SAM AV2
PC
Fig 99. Door Access Example - Export Controlled Version
On power-up, NFC Reader starts polling for (PICC) cards (Type A, B or F, ISO15693,
ISO18000-3M3) and if no card is present, the reader goes to standby mode. Timer is
used as a wakeup source from standby - timer periodically every 500 ms. This process
continues until a card is detected by the RF field of the reader. If a card is detected, the
card type with its UID is sent via HSU & this is printed on the PC console
If a MIFARE DESFire EV1 card is detected, the reader tries to select a pre-written
custom application on the card. It tries to authenticate the card using the key stored in
SAM. If SAM is not present, then software keys can be used for authentication. If
authentication is successful a block of data will be read from the card.
Note:
Detailed description and how to use example is described in “Door Access User Manual”.
This example is available only with PSP package from NXP DocStore [8].
9.16 PN7462AU_ex_phExNFCCcid
The NFC CCID is versatile demo application that features:
•
•
•
•
•
Card detection for TypeA, TypeB, Felica, ISO15693, ISO18000p3m3
technologies
Support for proprietary commands for MIFARE Classic, MIFARE Ultralight and
MIFARE Ultralight C for read and write.
CCID USB device protocol implementation. Supports the Suspend Resume and
Wakeup Feature.
Communication of the CLIF information with the PC using a PCSC application.
P2P passive initiator mode. Supports LLCP Initiator Mode for sending the NDEF
message to the mobile.
Demo setup for this application is the same as described in 9.10
9.17 PN7462AU_ex_phExMfCrypto
The PN7462AU_ex_phExMfCrypto demo application includes both CL and CT library
components. Example is based on the Discovery Loop alongside Crypto layers and it is
intended to evaluate MIFARE DESFire card functionalities. Application performs
following operations:
1. Application and Data and Value File creation inside the card.
UM10883
User manual
COMPANY PUBLIC
All information provided in this document is subject to legal disclaimers.
Rev. 1.6 — 14 May 2018
319816
© NXP B.V. 2018. All rights reserved.
109 of 120
�UM10883
NXP Semiconductors
PN7462 family Quick Start Guide - Development Kit
2.
3.
4.
5.
6.
7.
AES authentication of the application.
Changing of the key.
Enciphered Read of Value File and Plain Read of Data File.
Enciphered Write of Value File and Plain write of Data File.
Supports Different Keys for Read and write.
CT part does not include any crypto example for CT but gives scope to include the
CT example later
Example application trace in case when the application file is already created:
Entering Polling mode..
Type A Card - ISO14443-4A - UID : Len=7
04 24 81 5A 47 21 80
Master Application of Desfire Card Selected,
Application A515A5 selected proceed for File Operations
APP Created By:
NxpNfcRdLib_v4.030.00.011627_2016
Value :
Len=4
0D 00 00 00
Operation successful
Please remove the card.
Note:
This example is available only with PSP package from NXP DocStore [8].
9.18 PN7462AU_ex_phExRfPCDA
This example demonstrates simple low-level API usage to perform detection, anticollision, activation, authentication and R/W operation on the Type A cards according to
ISO14443 standard.
Application is using low level RF interface HAL implementation in flash. There is
limitation to only one card at the time. Supported TypeA cards are Type1 TOPAZ,
MIFARE Ultralight, MIFARE Classic, MIFARE DESFire cards will pass through activation
and anti-collision and. In the case of MIFARE Classic card also authentication with
default key is demonstrated. In the case of MIFARE DESFire card L4 activation is
demonstrated.
Application trace in case of MIFARE DESFire card is as follows:
Polling Start
Found TypeA
DesFire R/W PASS : =106
DesFire R/W PASS : =212
DesFire R/W PASS : =424
UM10883
User manual
COMPANY PUBLIC
All information provided in this document is subject to legal disclaimers.
Rev. 1.6 — 14 May 2018
319816
© NXP B.V. 2018. All rights reserved.
110 of 120
�UM10883
NXP Semiconductors
PN7462 family Quick Start Guide - Development Kit
10. Abbreviations
UM10883
User manual
COMPANY PUBLIC
Table 19. Abbreviations
Acronym
Description
APDU
Application Protocol Data Unit
API
Application Programming Interface
CLIF
Contactless Interface
CRC
Cyclic Redundancy Code
CTIF
Contact Interface
EEPROM
Electrically Erasable Programmable Read Only Memory
FW
Firmware
GPIO
General-Purpose Input Output
HAL
Hardware Abstraction Layer
HSU
High Speed UART
HW
Hardware
LDO
Low Drop Out
MSD
Mass Storage Device
NFC
Near Field Communication
P2P
Peer to Peer
PCB
Printed Circuit Board
PAL
Protocol Abstraction Layer
PMU
Power Management Unit
PSP
Product Support Package
RF
Radio Frequency
ROM
Read Only Memory
RTOS
Real Time Operating System
SAM
Secure Access Module
SDA
Serial Data Signal
SPI
Serial Peripheral Interface
SPIM
SPI Master interface
SRAM
Static Random Access Memory
SW
Software
SWD
Serial Wire Debug
TXLDO
Transmitter Low Drop Out
USB
Universal Serial Bus
All information provided in this document is subject to legal disclaimers.
Rev. 1.6 — 14 May 2018
319816
© NXP B.V. 2018. All rights reserved.
111 of 120
�UM10883
NXP Semiconductors
PN7462 family Quick Start Guide - Development Kit
11. Annex A Rx Matrix XML input file examples
11.1 Type A example without AWG control
0x26
0x44, 0x03
11.2 Type B example with AWG control
0x05, 0x00, 0x00
0x50, 0x0F, 0x69, 0x14, 0x49, 0x1C, 0x2D, 0x94, 0x11, 0xF7, 0x71, 0x85
UM10883
User manual
COMPANY PUBLIC
All information provided in this document is subject to legal disclaimers.
Rev. 1.6 — 14 May 2018
319816
© NXP B.V. 2018. All rights reserved.
112 of 120
�UM10883
NXP Semiconductors
PN7462 family Quick Start Guide - Development Kit
12. References
UM10883
User manual
COMPANY PUBLIC
[1]
OM27462CDK NFC controller development kit
https://www.nxp.com/products/:OM27462CDK
[2]
Om27462CDKP NFC controller development kit
https://www.nxp.com/products/:OM27462CDKP
[3]
PN7462 family Datasheet https://www.nxp.com/docs/en/data-sheet/PN7462.pdf
[4]
MCUXpresso webpage http://mcuxpresso.nxp.com/
[5]
PN7462 family Software User’s Manual https://www.nxp.com/docs/en/userguide/UM10913.pdf
[6]
NFC-COCKPIT: NFC Cockpit configuration tool for NFC ICs
http://www.nxp.com/products/:NFC-COCKPIT
[7]
AN11706 PN7462 Antenna design guide
https://www.nxp.com/docs/en/application-note/AN11706.pdf
[8]
NXP DocStore https://www.docstore.nxp.com
[9]
LPCXpresso board for LPC1769 with CMSIS DAP probe
http://www.nxp.com/products/:OM13085
[10]
Dynamic Power Control https://www.nxp.com/docs/en/applicationnote/AN11742.pdf
[11]
LPC-Link2 https://www.nxp.com/products/OM13054
[12]
Technical Video Tutorials: https://www.nxp.com/products/identification-andsecurity/nfc/nfc-reader-ics/high-performance-multi-protocol-full-nfc-forumcompliant-frontend-optimized-for-pos-terminals:PN5180
[13]
Keysight 33500B: https://www.keysight.com
[14]
NI VISA driver: http://www.ni.com/download/ni-visa-17.0/6646/en/
All information provided in this document is subject to legal disclaimers.
Rev. 1.6 — 14 May 2018
319816
© NXP B.V. 2018. All rights reserved.
113 of 120
�UM10883
NXP Semiconductors
PN7462 family Quick Start Guide - Development Kit
13. Legal information
13.1 Definitions
Draft — The document is a draft version only. The content is still under
internal review and subject to formal approval, which may result in
modifications or additions. NXP Semiconductors does not give any
representations or warranties as to the accuracy or completeness of
information included herein and shall have no liability for the consequences
of use of such information.
13.2 Disclaimers
Limited warranty and liability — Information in this document is believed to
be accurate and reliable. However, NXP Semiconductors does not give any
representations or warranties, expressed or implied, as to the accuracy or
completeness of such information and shall have no liability for the
consequences of use of such information.
In no event shall NXP Semiconductors be liable for any indirect, incidental,
punitive, special or consequential damages (including - without limitation lost profits, lost savings, business interruption, costs related to the removal
or replacement of any products or rework charges) whether or not such
damages are based on tort (including negligence), warranty, breach of
contract or any other legal theory.
Notwithstanding any damages that customer might incur for any reason
whatsoever, NXP Semiconductors’ aggregate and cumulative liability
towards customer for the products described herein shall be limited in
accordance with the Terms and conditions of commercial sale of NXP
Semiconductors.
Right to make changes — NXP Semiconductors reserves the right to make
changes to information published in this document, including without
limitation specifications and product descriptions, at any time and without
notice. This document supersedes and replaces all information supplied prior
to the publication hereof.
Suitability for use — NXP Semiconductors products are not designed,
authorized or warranted to be suitable for use in life support, life-critical or
safety-critical systems or equipment, nor in applications where failure or
malfunction of an NXP Semiconductors product can reasonably be expected
to result in personal injury, death or severe property or environmental
damage. NXP Semiconductors accepts no liability for inclusion and/or use of
NXP Semiconductors products in such equipment or applications and
therefore such inclusion and/or use is at the customer’s own risk.
Export control — This document as well as the item(s) described herein
may be subject to export control regulations. Export might require a prior
authorization from competent authorities.
Evaluation products — This product is provided on an “as is” and “with all
faults” basis for evaluation purposes only. NXP Semiconductors, its affiliates
and their suppliers expressly disclaim all warranties, whether express,
implied or statutory, including but not limited to the implied warranties of noninfringement, merchantability and fitness for a particular purpose. The entire
risk as to the quality, or arising out of the use or performance, of this product
remains with customer.
In no event shall NXP Semiconductors, its affiliates or their suppliers be
liable to customer for any special, indirect, consequential, punitive or
incidental damages (including without limitation damages for loss of
business, business interruption, loss of use, loss of data or information, and
the like) arising out the use of or inability to use the product, whether or not
based on tort (including negligence), strict liability, breach of contract, breach
of warranty or any other theory, even if advised of the possibility of such
damages.
Notwithstanding any damages that customer might incur for any reason
whatsoever (including without limitation, all damages referenced above and
all direct or general damages), the entire liability of NXP Semiconductors, its
affiliates and their suppliers and customer’s exclusive remedy for all of the
foregoing shall be limited to actual damages incurred by customer based on
reasonable reliance up to the greater of the amount actually paid by
customer for the product or five dollars (US$5.00). The foregoing limitations,
exclusions and disclaimers shall apply to the maximum extent permitted by
applicable law, even if any remedy fails of its essential purpose.
13.3 Licenses
Purchase of NXP ICs with NFC technology
Purchase of an NXP Semiconductors IC that complies with one of the Near
Field Communication (NFC) standards ISO/IEC 18092 and ISO/IEC 21481
does not convey an implied license under any patent right infringed by
implementation of any of those standards. Purchase of NXP
Semiconductors IC does not include a license to any NXP patent (or other
IP right) covering combinations of those products with other products,
whether hardware or software.
Purchase of NXP ICs with ISO 14443 type B functionality
This NXP Semiconductors IC is ISO/IEC 14443 Type
B software enabled and is licensed under Innovatron’s
Contactless Card patents license for ISO/IEC 14443
B.
Applications — Applications that are described herein for any of these
products are for illustrative purposes only. NXP Semiconductors makes no
representation or warranty that such applications will be suitable for the
specified use without further testing or modification.
Customers are responsible for the design and operation of their applications
and products using NXP Semiconductors products, and NXP
Semiconductors accepts no liability for any assistance with applications or
customer product design. It is customer’s sole responsibility to determine
whether the NXP Semiconductors product is suitable and fit for the
customer’s applications and products planned, as well as for the planned
application and use of customer’s third party customer(s). Customers should
provide appropriate design and operating safeguards to minimize the risks
associated with their applications and products.
NXP Semiconductors does not accept any liability related to any default,
damage, costs or problem which is based on any weakness or default in the
customer’s applications or products, or the application or use by customer’s
third party customer(s). Customer is responsible for doing all necessary
testing for the customer’s applications and products using NXP
Semiconductors products in order to avoid a default of the applications and
the products or of the application or use by customer’s third party
customer(s). NXP does not accept any liability in this respect.
UM10883
User manual
COMPANY PUBLIC
The license includes the right to use the IC in systems
and/or end-user equipment.
RATP/Innovatron
Technology
13.4 Trademarks
Notice: All referenced brands, product names, service names and
trademarks are property of their respective owners.
MIFARE — is a trademark of NXP B.V.
MIFARE Ultralight — is a trademark of NXP B.V.
DESFire — is a trademark of NXP B.V.
I²C-bus logo — is a trademark of NXP B.V
ICODE and I•CODE — are trademarks of NXP B.V.
All information provided in this document is subject to legal disclaimers.
Rev. 1.6 — 14 May 2018
319816
© NXP B.V. 2018. All rights reserved.
114 of 120
�UM10883
NXP Semiconductors
PN7462 family Quick Start Guide - Development Kit
14. List of figures
Fig 1.
Fig 2.
Fig 3.
Fig 4.
Fig 5.
Fig 6.
Fig 7.
Fig 8.
Fig 9.
Fig 10.
Fig 11.
Fig 12.
Fig 13.
Fig 14.
Fig 15.
Fig 16.
Fig 17.
Fig 18.
Fig 19.
Fig 20.
Fig 21.
Fig 22.
Fig 23.
Fig 24.
Fig 25.
Fig 26.
Fig 27.
Fig 28.
Fig 29.
Fig 30.
Fig 31.
Fig 32.
Fig 33.
Fig 34.
Fig 35.
Fig 36.
OM27462CDK Development Kit ....................... 3
OM27462CDKP Development Kit ..................... 4
Properly enumerated USB CCID reader ........... 5
PNEV7462B board............................................ 6
PNEV7462B supply .......................................... 7
PNEV7462B board schematic (PN7462 part) ... 8
PNEV7462B contact slot interface .................... 9
PNEV7462B TDA8026 part schematics .......... 10
Default 65x65 antenna matching diagram symmetrical ..................................................... 12
Matching circuit principle ................................. 12
Antenna and matching .................................... 13
PNEV746B V2.1 ............................................. 14
PNEV7462B V2.2 ........................................... 15
Board Power settings ...................................... 16
VBUS supply jumper setting ........................... 16
Supply indicator .............................................. 17
Default supply connection of the PN7462AU
using all blocks................................................ 18
Host Interface selection – USB mode ............. 19
Host Interface selection - I2C mode ................ 20
Host Interface selection - SPI.......................... 20
Host Interface selection - HSU ........................ 21
JTAG/SWD debug probe connector................ 21
PNEV7462C board ......................................... 22
PNEV7462C supply ........................................ 23
PNEV7462C board schematic (PN7462AU
block) .............................................................. 24
PNEV7462C contact slot interface .................. 24
Default 65x65 antenna matching diagram –
symmetrical ..................................................... 26
Matching circuit principle ................................. 26
Antenna and matching .................................... 27
PNEV7462C board power source configuration
........................................................................ 29
PN7462AU VBUS configuration ...................... 29
Power supply status LEDs .............................. 30
Default power supply setting ........................... 31
LPC-Link2 debug probe connected to the
PNEV7462C.................................................... 32
NFC Cockpit: activation of a MIFARE DESFire
EV1 card + Get Application ID ........................ 34
PN7462 NFC cockpit register access ............. 35
UM10883
User manual
COMPANY PUBLIC
Fig 37.
Fig 38.
Fig 39.
Fig 40.
Fig 41.
Fig 42.
Fig 43.
Fig 44.
Fig 45.
Fig 46.
Fig 47.
Fig 48.
Fig 49.
Fig 50.
Fig 51.
Fig 52.
Fig 53.
Fig 54.
Fig 55.
Fig 56.
Fig 57.
Fig 58.
Fig 59.
Fig 60.
Fig 61.
Fig 62.
Fig 63.
Fig 64.
Fig 65.
Fig 66.
Fig 67.
Fig 68.
Fig 69.
Fig 70.
Fig 71.
Fig 72.
Fig 73.
Fig 74.
Fig 75.
PN7462 family IC direct EEPROM access ......36
PN7462 family IC analog and digital test signals
........................................................................37
PN7462 family IC DPC ....................................38
PN7462 family IC AWC ...................................39
Basic Rx Matrix Test set up.............................41
Enhanced Rx Matrix Test setup with AWG .....42
NI VISA installation .........................................44
AWG setup for type A @ 106 ..........................45
AWG setup for type B @ 106 ..........................47
Rx Matrix test run example with AWG.............48
Rx Matrix Result example with AWG ..............49
PN7462 family LPCD ......................................49
PN7462 family FW tab with EMVCo Loopback
function............................................................50
Static overview of PN7462 family firmware .....51
Architecture diagram .......................................52
Contactless architecture view..........................54
Contact architecture view ................................55
Project initialization order ................................55
FreeRTOS usage diagram ..............................56
Overview of PN7462AU development
environment ....................................................57
MCUXpresso installation .................................58
Windows security dialog ..................................59
MCUXpresso IDE ............................................59
Importing project to MCUXpresso IDE (1) .......60
Importing project to MCUXpresso IDE (2) .......61
Select project ..................................................62
Project Workspace with all examples ..............63
Building a project.............................................64
Build output - flash binary file ..........................64
Successful build ..............................................65
Connecting LPC Link2 to the PNEV7462B board
........................................................................66
Launch debug session ....................................67
Selecting debug probe ....................................67
Project debugging ...........................................68
Inserting breakpoints .......................................69
Debug view and debugger traces....................70
Peripheral view................................................71
PN7462AU EECTRL peripheral view ..............72
HW setup for the flashing via LPC-Link 2 ........73
All information provided in this document is subject to legal disclaimers.
Rev. 1.6 — 14 May 2018
319816
© NXP B.V. 2018. All rights reserved.
115 of 120
�UM10883
NXP Semiconductors
PN7462 family Quick Start Guide - Development Kit
Fig 76.
Fig 77.
Fig 78.
Fig 79.
Fig 80.
Fig 81.
Fig 82.
Fig 83.
Fig 84.
Fig 85.
Fig 86.
Fig 87.
Fig 88.
Fig 89.
Fig 90.
Fig 91.
Fig 92.
Fig 93.
Fig 94.
Fig 95.
Fig 96.
Fig 97.
Fig 98.
Fig 99.
Starting flash tool in MCUXpresso .................. 73
Build output - flash binary file .......................... 74
Program flash report ....................................... 74
PN7462AU as USB mass storage device ....... 75
PN7462AU IC detected as USB mass storage
device for flash/ EEPROM upgrade ................ 75
LEDs status..................................................... 77
HW setup for the main example ...................... 79
phExMain standby flow ................................... 81
phExMain non standby flow ............................ 82
PN7462AU phExMain sequence diagram for
standby scenario with RTOS........................... 87
PN7462AU phExMain sequence diagram for
non-standby scenario with RTOS ................... 88
HW Setup for the “phExEMVCo”example ....... 89
HW setup for the “phExRF”example ............... 91
phExRF Example Application Flow ................. 92
HW setup for the “phExCT”example ............... 93
phExCT Example Application Flow ................. 95
HIF demo architecture .................................... 99
PNEV7462C IRQ pin .................................... 100
POS use case demo architecture ................. 103
POS demo architecture ................................. 104
PC USB reader example block diagram ....... 105
Example architecture .................................... 105
Door access example ................................... 108
Door Access Example - Export Controlled
Version .......................................................... 109
UM10883
User manual
COMPANY PUBLIC
All information provided in this document is subject to legal disclaimers.
Rev. 1.6 — 14 May 2018
319816
© NXP B.V. 2018. All rights reserved.
116 of 120
�UM10883
NXP Semiconductors
PN7462 family Quick Start Guide - Development Kit
15. List of tables
Table 1.
Table 2.
Table 3.
Table 1.
Table 3.
Table 4.
Table 5.
Table 6.
Table 7.
Table 8.
Table 9.
Table 10.
Table 11.
Table 12.
Table 13.
Table 14.
Table 15.
Table 16.
Table 17.
Table 18.
Table 19.
Assembled matching components .................. 13
Supply options ................................................ 18
PN7462 HIF pins............................................. 19
Assembled matching components .................. 27
Test input ........................................................ 42
Send Data input .............................................. 43
Read Data input .............................................. 43
Development environment .............................. 57
Files found in USB mass storage .................... 76
Code and data protection level ....................... 76
Status of read write operating code ................ 76
“phExMain” Example features ......................... 79
“phExEMVCo” Example features .................... 89
“phExRf” Example features ............................. 91
“phExRf” Example features ............................. 94
“phExRf” Example features ............................. 96
“phExCT7816” Example features .................... 97
“phExHif” Example features .......................... 100
Host interface selection ................................. 101
PN7462AU_ex_phSystemServices features . 106
Abbreviations ................................................ 111
UM10883
User manual
COMPANY PUBLIC
All information provided in this document is subject to legal disclaimers.
Rev. 1.6 — 14 May 2018
319816
© NXP B.V. 2018. All rights reserved.
117 of 120
�UM10883
NXP Semiconductors
PN7462 family Quick Start Guide - Development Kit
16. Contents
1.
1.1
1.1.1
1.1.2
2.
2.1
2.2
2.2.1
2.2.2
2.2.3
2.2.4
2.2.5
2.2.6
2.2.6.1
2.2.6.2
2.3
2.3.1
2.3.2
2.3.2.1
3.
3.1
3.1.1
3.1.2
3.1.3
3.2
3.2.1.1
3.2.1.2
3.2.1.3
3.2.1.4
3.2.2
4.
4.1
4.2
4.2.1
4.2.2
Getting started ..................................................... 3
Introduction to PN7462 NFC Controller
Development Kits ............................................... 3
OM27462CDK .................................................... 3
OM27462CDKP ................................................. 4
Hardware overview of the PNEV7462B board ... 6
PNEV7462B concept ......................................... 6
PNEV7462B board ............................................. 6
Power circuitry.................................................... 7
PN7462AU block ................................................ 7
LPCXpresso block.............................................. 8
Smartcard interface ............................................ 9
TDA SAM extension interfaces .......................... 9
Antenna coil and related matching circuit......... 11
Default board antenna ...................................... 11
PCB for individual antenna matching ............... 14
PNEV7462B board available versions ............. 14
PNEV7462B V2.1............................................. 14
PNEV7462B V2.2............................................. 15
Design changes V2.1 to V2.2: .......................... 15
Configuration of the PNEV7462B board .......... 16
Board power settings ....................................... 16
PN7462AU supply options ............................... 16
Power supply status LED ................................. 17
Supply options for PVDD, VUP_TX and TVDD 17
Host interface configuration.............................. 19
USB Host Interface configuration ..................... 19
I2C Host Interface configuration ....................... 19
SPI Host Interface configuration....................... 20
HSUART Interface configuration ...................... 21
Debug interface ................................................ 21
Hardware overview of the PNEV7462C board . 22
PNEV7462C board concept ............................. 22
PNEV7462C board overview............................ 22
Power circuitry.................................................. 23
PN7462AU block .............................................. 23
4.2.3
Smartcard interface ..........................................24
4.2.4
Antenna coil and related matching circuit .........25
4.2.4.1
Default board antenna ......................................25
4.2.4.2
PCB for individual antenna matching ...............28
5.
Configuration of the PNEV7462C .....................29
5.1
PNEV7462C Board power settings ..................29
5.2
PN7462AU IC power supply options ................29
5.3
Power supply status LEDs................................29
5.4
Supply options for PVDD, PVDD_M, VUP_TX
and TVDD.........................................................30
5.4.1
Supply options for PVDD and PVDD_M ...........30
5.4.2
Supply options for VUP_TX ..............................30
5.4.3
Supply options for TVDD ..................................30
5.5
Host interfaces .................................................31
5.6
Debug interface ................................................32
6.
NFC Cockpit getting started .............................33
6.1
Board preparation .............................................33
6.2
NFC Cockpit installation ...................................33
6.3
Firmware, EEPROM settings and driver ...........33
6.4
NFC Cockpit getting started .............................33
6.5
PN7462 family register access .........................35
6.6
PN7462 family EEPROM access .....................35
6.7
PN7462 family IC internal test bus ...................36
6.8
PN7462 family Dynamic Power Control ...........37
6.9
PN7462 family Adaptive Wave Control ............38
6.9.1
Proposal for “static” Tx shaping adjustment .....39
6.9.2
Proposal for “dynamic” Tx shaping adjustment 40
6.10
PN7462 family Rx Matrix test ...........................40
6.10.1
Rx parameters ..................................................40
6.10.2
Rx Matrix test principle .....................................41
6.10.3
Rx Matrix XML input file....................................42
6.10.3.1 Input parameters ..............................................42
6.11
NFC Cockpit with AWG ....................................44
6.11.1
NI VISA installation ...........................................44
6.11.2
AWG setup and test for type A @ 106 .............44
6.11.3
AWG setup and test for type B @ 106 .............46
6.11.4
Rx Matrix test with AWG...................................48
Please be aware that important notices concerning this document and the product(s)
described herein, have been included in the section 'Legal information'.
© NXP B.V. 2018.
All rights reserved.
For more information, please visit: http://www.nxp.com
For sales office addresses, please send an email to: salesaddresses@nxp.com
Date of release: 14 May 2018
319816
Document identifier: UM10883
�UM10883
NXP Semiconductors
PN7462 family Quick Start Guide - Development Kit
6.12
6.13
6.14
7.
7.1
7.2
7.3
7.4
7.5
7.5.1
7.5.2
7.6
7.7
8.
8.1
8.2
8.3
8.4
8.5
8.6
8.7
8.7.1
8.7.2
8.7.3
8.8
8.9
8.10
9.
9.1
9.1.1
9.1.2
9.2
9.2.1
9.2.2
9.2.3
PN7462 family Low Power Card Detection ...... 49
Secondary FW - EMVCo Loopback application 50
PN7462 family Scripting ................................... 50
Software application stack ............................... 51
Hardware abstraction layer – HAL ................... 52
Protocol abstraction layer – PAL ...................... 52
Application layer – AL ...................................... 53
OSAL and utilities layer .................................... 53
Component view .............................................. 54
Contactless component view............................ 54
Contact component view .................................. 55
Building a project from bottom to top................ 55
RTOS and it´s usage ........................................ 56
Managing the PN7462 family SW projects with
MCUXpresso IDE ............................................... 57
Development environment ............................... 57
Installation of the MCUXpresso IDE ................. 58
Installing PN7462AU FW and SW examples
package ........................................................... 59
Updating PN7462AU EEPROM configuration .. 59
Importing provided SW example projects ......... 60
Building projects ............................................... 63
Running and debugging the example projects . 65
Break points ..................................................... 69
Debug traces .................................................... 70
Peripheral view................................................. 71
Updating PNEV7462B/C board firmware (flash
and EEPROM memory) ................................... 73
Updating flash/EEPROM via SWD interface .... 73
Updating flash and EEPROM via USB MSD
interface ........................................................... 75
PN7462AU software examples ......................... 77
General overview ............................................. 77
Application messages – debug printouts.......... 77
LEDs status specifications ............................... 77
PN7462AU_ex_phExMain – (CLIF + CTIF
functionality) ..................................................... 78
Demo setup ...................................................... 78
Features ........................................................... 79
FreeRTOS usage in this example .................... 79
9.2.4
9.2.5
9.2.6
9.2.7
9.2.8
9.2.9
9.2.10
9.2.11
9.2.12
9.2.13
9.2.14
9.2.15
9.2.16
9.2.17
9.2.18
9.3
9.3.1
9.3.2
9.3.3
9.3.4
9.3.5
9.3.6
9.4
9.4.1
9.4.2
9.4.3
9.5
9.6
9.6.1
9.6.2
9.6.3
9.6.4
9.6.5
9.7
9.7.1
9.7.2
9.7.3
Operation with standby and without standby ....80
MIFARE Classic ...............................................82
MIFARE Ultralight.............................................83
MIFARE DESFire .............................................83
Jewel reader .....................................................83
ISO15693 – ICODE SLIX .................................83
ISO18000-3.3 – ICODE ILT..............................84
Type B eZLINK/ SLE card ................................84
Type F (FeliCa tag) ..........................................84
ISO14443-4 card mode (till activation) .............84
Passive and active ISO18092 initiator (till
activation) .........................................................85
Passive ISO18092 target (till activation) ...........85
Contact Example ..............................................85
RTOS task management ..................................85
No-RTOS management ....................................88
PN7462AU_ex_phExEMVCo (CLIF + CTIF
functionality) .....................................................89
Demo setup ......................................................89
Features ...........................................................89
EMVCo polling loop ..........................................90
EMV transaction ...............................................90
RTOS task management ..................................90
No RTOS management ....................................90
PN7462AU_ex_phExRf (CL functionality) ........91
Demo setup ......................................................91
Features ...........................................................91
Application Flow ...............................................92
PN7462AU_ex_phExRFPoll example (CL
functionality) .....................................................93
PN7462AU_ex_phExCT (CT functionality) .......93
Demo setup ......................................................93
Features ...........................................................94
Application Flow ...............................................94
EMVCo activation .............................................95
SELECT master card .......................................95
PN7462AU_ex_phExCTEMVCo (CT
functionality) .....................................................96
Demo setup ......................................................96
Features ...........................................................96
EMVCo activation .............................................96
Please be aware that important notices concerning this document and the product(s)
described herein, have been included in the section 'Legal information'.
© NXP B.V. 2018.
All rights reserved.
For more information, please visit: http://www.nxp.com
For sales office addresses, please send an email to: salesaddresses@nxp.com
Date of release: 14 May 2018
319816
Document identifier: UM10883
�UM10883
NXP Semiconductors
PN7462 family Quick Start Guide - Development Kit
9.7.4
9.8
APDU transactions ........................................... 96
PN7462AU_ex_ phExCT7816 (CT functionality)
......................................................................... 97
9.8.1
Demo setup ...................................................... 97
9.8.2
Features ........................................................... 97
9.8.3
ISO7816 activation ........................................... 97
9.8.4
APDU transactions ........................................... 97
9.9
PN7462AU_ex_phExHif ................................... 98
9.9.1
Demo setup ...................................................... 98
9.9.2
Features ......................................................... 100
9.9.3
HIF selection .................................................. 101
9.9.4
Operation selection ........................................ 101
9.9.5
EEPROM configuration dependencies ........... 101
9.9.6
MCUXpresso projects provided for LPC1769. 103
9.10
PN7462AU_ex_phExPos ............................... 103
9.11
PN7462AU_ex_phExCcid .............................. 104
9.12
PN7462AU_ex_phSystemServices ................ 105
9.13
PN7462AU_ex_phExVCom ........................... 107
9.13.1
Demo setup .................................................... 107
9.13.2
Command sets ............................................... 107
9.14
PN7462AU_ex_phExDoorAccess .................. 107
9.15
PN7462AU_ex_phExDoorAccessEC ............. 108
9.16
PN7462AU_ex_phExNFCCcid ....................... 109
9.17
PN7462AU_ex_phExMfCrypto ....................... 109
9.18
PN7462AU_ex_phExRfPCDA ........................ 110
10.
Abbreviations .................................................. 111
11.
Annex A Rx Matrix XML input file examples . 112
11.1
Type A example without AWG control ............ 112
11.2
Type B example with AWG control................. 112
12.
References ....................................................... 113
13.
Legal information ............................................ 114
13.1
Definitions ...................................................... 114
13.2
Disclaimers..................................................... 114
13.3
Licenses ......................................................... 114
13.4
Trademarks .................................................... 114
14.
List of figures................................................... 115
15.
List of tables .................................................... 117
16.
Contents ........................................................... 118
Please be aware that important notices concerning this document and the product(s)
described herein, have been included in the section 'Legal information'.
© NXP B.V. 2018.
All rights reserved.
For more information, please visit: http://www.nxp.com
For sales office addresses, please send an email to: salesaddresses@nxp.com
Date of release: 14 May 2018
319816
Document identifier: UM10883
�