Crimpköpfe für WE Crimp-Systemzange
Crimp heads for WE Crimping Tool
AWG/Leistungsquerschnitt
AWG/Conductor
Cross Section
Crimp
Nest
Crimp
Cavity
66100113722DEC
28 – 26
G1
66100113722DEC
24 – 22
G2
66200113722DEC
24 – 22
F1
66200113722DEC
20
F2
66200213722DEC
24 – 22
F1
66200213722DEC
20
F2
66200413722DEC
30 – 26
F3
66200513722DEC
30 – 26
F3
66200313722DEC
24 – 22
F4
66200313722DEC
20
F5
66200613722DEC
30 – 26
F6
64900513722DEC
16
E2
64900613722DEC
24 – 20
E3
64900613722DEC
18
E2
64900713722DEC
28 – 22
E1
64900813722DEC
16
E2
64900913722DEC
24 – 20
E3
64900913722DEC
18
E2
64900013722DEC
28 – 22
E1
Mit Kabelanschlag
With Wire
Stop
600254254001
No
600300300001
Yes
600300300001LF
Yes
600420420001
Find the WE crimping tool
video manual by scanning
the QR code
Operation Manual
WE Crimping Tool
Bedienungsanleitung
WE Crimp Systemzange
y2u.be/jcEo5WSMmUw
Read these instructions
completely before
using this tool!
Yes
Warranty
Die Crimp-Systemzange unterliegt einer sorgfältigen Qualitätskontrolle. Es gelten die allgemeinen Garantiebestimmungen.
This crimping tool is subject to thorough
quality control before leaving the factory. The
enclosed general terms and conditions of
warranty apply.
Die Crimp-Systemzange muss vor Arbeitsbeginn in einem ordnungsgemäßen und sauberen
Zustand sein. Crimprückstände sind zu entfernen. Die Gelenke sind regelmäßig mit leichtem
Maschinenöl zu ölen und vor Verschmutzung
zu schützen. Es ist darauf zu achten, dass alle
Bolzen durch Sicherungsringe gesichert sind.
Der Festsitz der Schaftschraube zur Sicherung
der Stellscheibe ist zu prüfen. Die Instandhaltung der Zange sollte beim Hersteller erfolgen.
Service
*Haftungsausschluss
*Disclaimer
Gesenk-Standzeit 50.000 Zyklen nach
DIN 41641 Teil 1.
Dies lifetime 50.000 cycles according to
DIN 41641 part 1.
www.we-online.com
Scannen Sie den QR-Code, um
zur Video-Anleitung der Crimp
Systemzange zu gelangen
(Anleitung auf Englisch)
Vor Beginn aller
Arbeiten Bedienungsanleitung lesen!
Garantie
Wartung und Instandhaltung
02
Crimpkopf*
Art.-Nr.
Crimp Head Order
Code
Art.-Nr. / Order Code
600 001
Before using the crimp system tool, make sure
it is in a clean and proper operating state.
Always remove crimping residue. Protect the
joints from soiling and apply light machine oil
to them regularly. Check the bolts regularly to
ensure that the lock washers and headless
screw, securing the adjustment dial, are intact
and tight. All other maintenance should be performed by the manufacturer.
Zur Verarbeitung von Bandware ist für viele
Serien ein Crimpeinsatz für Crimpautomaten
erhältlich. Bei Interesse sprechen Sie unsere
Vertriebsmannschaft gerne an.
For processing of crimpcontacts on reel, applicators for crimpmachines are available for various
series. Please contact our sales staff for further
information.
06
www.we-online.com
DIENECK ARPRINZEN 999900007.0819.250.FLY
Einzelkontakt
Art-Nr.
Single Contact
Order Code
V1.0/2019
Allgemeines
Preface
Die Bedienungsanleitung muss ständig bei der
Zange verfügbar sein. Die Zange ist nach dem
neuesten Stand der Technik und den anerkannten
sicherheitstechnischen Regeln hergestellt.
Die Zange darf nur in technisch einwandfreiem
Zustand sowie sicherheits- und gefahrenbewusst
benutzt werden und ist nur für den in der Bedienungsanleitung beschriebenen Zweck zu verwenden.
The Operating Instructions must always be within reach of the hand crimping tool. This Crimp
System Tool may be used only for the intended application and in strict compliance with all
applicable safety rules, regulations and practices.
It must be properly maintained, undamaged and
in good working order. Unauthorized modification is prohibited and voids the manufacturer’s
warranty. Always wear safety glasses with side
shields and other appropriate personal protective
equipment.
!
EINE EIGENMÄCHTIGE VERÄNDERUNG
ODER EINE NICHT BESTIMMUNGSGEMÄSSE VERWENDUNG DER
HANDCRIMPZANGE SCHLIESST
EINE HAFTUNG DES HERSTELLERS
FÜR DARAUS RESULTIERENDE
SCHÄDEN AUS.
!
MISUSE MAY CAUSE PERSONAL
INJURY. KEEP OUT OF REACH
OF CHILDREN!
NEVER INSERT FINGERS BETWEEN
THE JAWS OF THE TOOL!
�Bedienungsanleitung – WE Crimp-Systemzange
Operation Manual – WE Crimping Tool
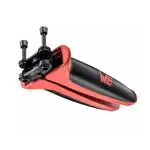
Verwendungszweck
Application
Mit der Crimp-Systemzange können unter Einsatz
verschiedener Crimpköpfe die unterschiedlichsten
Crimpkontakte verarbeitet werden (s. Tabelle auf
Seite 2).
The Crimp System Tool has been developed for
optimal crimping of a large variety of terminals
by using interchangeable crimping heads (see
table, Page 2).
Beschreibung
Description
Die Crimp-Systemzange besteht aus einem Handgriff und einem wechselbarem Crimpkopf. Für
manche Serien verfügt der Crimpkopf über einen
Kabelanschlag.
This crimp tool is comprised of handles and
an exchangeable crimp head. The crimp head
comes with a wire stop for some series.
Die Crimp-Systemzange verfügt über einen
Ratschenmechanismus. Erst nach Überwindung
der letzten Raststufe öffnet die Zange automatisch
(Prinzip der Zwangsvollendung). Um eine Beschädigung der Crimpmatrizen bzw. des Verbinders zu
vermeiden, kann bei Fehlcrimpung die Zange über
die Schnellentriegelung vorzeitig geöffnet werden.
Werkzeugloser Wechsel des Crimpkopfes
Tool-free exchange of the Crimp Head
Fully open the handles.
Release the locking pins by
pressing. Turn around the
tool and pull out the locking
pins until end position.
1 Crimp Nester
Crimp cavities
3
4
3 Crimp Nest
bezogene Infos (Art-Nr.
des Kontakts, AWG)
5
3 Den passenden Werkzeugkopf
anhand der Tabelle auf Seite 2
auswählen und einsetzen (A)
und Stifte eindrücken (B).
Beachten Sie die Drehrichtung:
Die Markierungen auf Crimpkopf und Handgriff müssen
auf der selben Seite sein.
Cavity related info
(contact order
code, AWG)
Handgriff
Handles
4 Art-Nr. des Crimpkopfes
5
Partnumber of
crimp head
Choose the suitable crimp
head according to the table on
page 2. Place the crimp head
(A) and lock the pins (B).
Attention: be sure that the marking area is on the same side on
the handles and on the head.
5 SchnellmontageVorrichtung
Fast Mounting System
6 Schnellentriegelung
Quick release (lock)
www.we-online.com
04
I
C
A
B
II
2 Korrekt abisoliertes Kabel
in den Kontakt bis zum
Kabelanschlag einführen (D).
2 Kabelanschlag
(bei manchen Serien)
Wire Stop
(for some series)
1
03
Insert the crimp contact (I) into the
feeder (II) of the appropriate crimp
cavity (according to the table on
page 2) (A). Be careful about the
contact orientation in the feeder:
the contact wings must do a
“V” like shown on the picture of
step 2). Close the feeder (B) and
(if present) push the wire stop (C).
2 Stifte durch Drücken entriegeln.
Werkzeug wenden und Stifte bis
zum Anschlag herausziehen.
2
6
1 Crimpkontakt (I) in das passende
Crimp Nest (II) (lt. Tabelle,Seite 2)
in den Kontakthalter einlegen (A).
Die offenen Crimpflügen müssen
hierbei nach außen zeigen (wie auf
Bild bei Schritt 2). Den Halter zuklappen (B) und (falls vorhanden)
mit der Positionierhilfe fixieren (C).
1 Handgriff vollständig öffnen.
The tool has a ratchet mechanism. After the
last ratchet step has been passed, it automatically opens (priciple of compulsory-completion).
To prevent damage to the crimping die or
connector, the built-in quick-release (lock)
enables the tool to be opened prematurely in
the event of failed crimping
Crimpkopf
Crimp head
Crimpvorgang
Crimping process
D
Insert the correctly stripped
cable into the contact until the
wire hit the wire stop (D).
A
B
3 Werkzeug betätigen (E), bis es
wieder automatisch öffnet (F).
Actuate the tool (E) until it
opens again automatically (F).
E
E
4 Gecrimpten Kontakt entnehmen.
Remove crimped contact.
Das Werkzeug ist nun einsatzbereit.
The tool is now ready to use.
05
F
�
很抱歉,暂时无法提供与“600001”相匹配的价格&库存,您可以联系我们找货
免费人工找货- 国内价格
- 1+816.17407
- 5+775.36224
- 10+759.85604