�Disclaimer
Warning
DO NOT USE THIS PRODUCT IN LIFE SUPPORT SYSTEMS.
LIFE SUPPORT POLICY
ZILOG’S PRODUCTS ARE NOT AUTHORIZED FOR USE AS CRITICAL COMPONENTS IN LIFE
SUPPORT DEVICES OR SYSTEMS WITHOUT THE EXPRESS PRIOR WRITTEN APPROVAL OF
THE PRESIDENT AND GENERAL COUNSEL OF ZILOG CORPORATION.
As used herein
Life support devices or systems are devices which (a) are intended for surgical implant into the body,
or (b) support or sustain life and whose failure to perform when properly used in accordance with
instructions for use provided in the labelling can be reasonably expected to result in a significant
injury to the user. A critical component is any component in a life support device or system whose
failure to perform can be reasonably expected to cause the failure of the life support device or system
or to affect its safety or effectiveness.
Document Disclaimer
©2019 Zilog, Inc. All rights reserved. Information in this publication concerning the devices,
applications, or technology described is intended to suggest possible uses and may be superseded.
ZILOG, INC. DOES NOT ASSUME LIABILITY FOR OR PROVIDE A REPRESENTATION OF
ACCURACY OF THE INFORMATION, DEVICES, OR TECHNOLOGY DESCRIBED IN THIS
DOCUMENT. ZILOG ALSO DOES NOT ASSUME LIABILITY FOR INTELLECTUAL PROPERTY
INFRINGEMENT RELATED IN ANY MANNER TO USE OF INFORMATION, DEVICES, OR
TECHNOLOGY DESCRIBED HEREIN OR OTHERWISE. The information contained within this
document has been verified according to the general principles of electrical and mechanical
engineering.
S3 and Z8 Encore! are trademarks or registered trademarks of Zilog, Inc. All other product or service
names are the property of their respective owners.
UM028704-0920
�Revision History
Each instance in the Revision History table below reflects a change to this document from the
previous version.
Date
Rev
Description
2018 Apr
01
2018 Apr
02
2018 Nov
03
Added Z8 Encore Family support
2020 Sept
04
Converted from chm to pdf file
UM028704-0920
Original Issue
Updated "Standalone Programming of Devices" section. Added a section named "How
to use the External Controller Interface"
�Overview
The Zilog Standalone Programmer (ZSP, Zilog PN: ZUSBZSP0100ZACG) is used to
program Flash memory on Zilog’s S3F8 and Z8 Encore! series of microcontrollers (MCU).
Programming is performed through the S3F8 standard 10-pin In-System Programming
(ISP) connector using the Serial Programming (SPGM) protocol (for S3F8 device) or the
On-Chip Debug protocol for Z8 Encore! devices). Programming can be done by a human
operator at the push of a button on the ZSP, or automatically by an external controller
using the 6-pin External Controller Interface (ECI) in combination with the ISP interface.
Prior to programming, the ZSP must be configured with information about the target
MCU and the application Hex file to be programmed into Flash memory on target
devices. This setup process is performed using the ZSP Configuration software on a PC
running a supported version of Windows. The ZSP can be configured to program
application Hex files generated with the Zilog Development Studio, or any other 3rd
party toolset capable of generating Intel Hex files for the target MCU.
After initialization, the ZSP can erase, program, and verify the contents of Flash memory
on target MCU devices independently of the development toolset (and PC) used to create
the application Hex file. All that is required is a power source capable of delivering power
through a standard Type-A to Mini-B USB cable.
This document describes the Zilog Standalone Programmer (ZSP) Kit, how to interface
the ZSP to target devices and how to use the ZSP in standalone mode.
Zilog Standalone Programmer
UM028704-0920
�Kit Contents
The ZIlog Standalone Programmer Kit PN: ZUSBZSP0100ZACG contains the following items:
Item
1
2
3
4
Description
Zilog Standalone Programmer (ZSP)
Type-A(male) to Mini-B(male) USB cable
10-wire ribbon cable
Zilog Standalone Programmer Kit hardcopy insert
(FL0191)
Quantity
1
1
1
1
Optional Hardware
The ZSP can be powered by a PC with USB port or wall power supply capable of supplying 5V at
200mA. Using a USB wall adapter allows the ZSP to program targets in standalone mode.
Zilog Standalone Programmer Kit
UM028704-0920
�Supported Target Environments
The Zilog Standalone Programmer supports the following targets:
•
•
•
•
Zilog S3 MCU
Zilog Z8 Encore! MCU
Programming socket, or PCB, with Zilog S3 and a 10-pin ISP II connector
Programming socket, or PCB, with Zilog Z8Encore and a 10-pin ISP II connector to 6pin DBG
adapter
UM028704-0920
�10 Pin ZSP/ISP II Connector - S3 MCU
The Zilog Standalone Programmer interfaces to any target PCB (or programmer) through the
supplied 10-wire ribbon cable that terminates in a 2x5 female connector. Pin 1 of the ribbon cable is
marked by a red wire. The target PCB must include a male 2x5 header (standard 0.025 inch square
posts on 0.1 inch centers; FCI part number 67997-210HLF). This same 2x5 header is used on all
Zilog S3 development boards as a connection point for the S3 Flash ISP II (and most other 3rd party
S3 in-circuit programmers). In the remainder of the document this PCB header for S3 MCU is referred
to as the ZSP/ISP II connector.
The figure below shows the connection between the ZSP/ISP II connector and the S3 Flash MCU.
When connecting the ribbon cable to the target board, ensure that Pin 1 of the cable is aligned with
Pin 1 of the connector on the board.
ZSP/ISP II Connector to S3 MCU Schematic
UM028704-0920
�ZSP/ISP II Interface
The ZSP/ISP II interface consists of the following signals:
TEST/VPP Test Mode signal; when driven High, this signal places the S3
Flash MCU into Test Mode to make on-chip Flash memory
available for programming by the ZSP/S3 Flash ISP II. For
proper ZSP operation, a 0.1 µF capacitor and 10KOhm resistor
should be placed in parallel between this pin and Ground, as
shown in the figure above.
RESET
Input; an active Low signal that resets the S3 Flash MCU.
SDAT
Serial data; bidirectional signal.
SCLK
Serial clock; input for the S3 Flash MCU
VDD, VSS Power
Zilog recommends keeping the traces connecting SCLK and SDAT to the ZSP/ISP II connector as
short as possible. Table below shows the recommended values for the passive components in the
above ZSP/ISP II circuit.
ISP II Signal
Passive
(Pin Number)
Component
TEST/VPP(2) CVPP = 0.1uF
RVPP=10K
VDD(4)
RESET(6)
CVDD = 0.1uF
CRESET = 0.1uF
RRESET=10K
SDAT(8)
.
SCLK(10)
GND (1,3,5,7,9)
.
Notes
If the S3 MCU has a shared Vpp/Reset pin, connect the
ZSP/ISP II Vpp/Test pin to the MCU Vpp/Test pin.
.
.
.
Connect all odd number pins of the ZSP/ISP II connector
to GND on the target board and S3 MCU.
Target Power
During programming, the ZSP applies power to the target and can supply up to 100mA of current. If
the target board requires more current, an external power source with output voltage matching the
UM028704-0920
�Settings > Device > Target Voltage setting can be connected to the target:
Ground
Ensure there is a good ground connection between the S3 Flash MCU and the ZSP/ISP II connector
to avoid injecting noise into SDAT
UM028704-0920
�10 Pin ZSP/ISP II Connector with 6 pin Adapter Z8Encore! MCU
The Zilog Standalone Programmer interfaces to any target PCB (or programmer) through the
supplied 10-wire ribbon cable that terminates in a 2x5 female connector. A 10-pin Male connector to
6-pin Female adapter (not supplied) is needed to connect the ribbon cable to an Encore Target
MCU. The target PCB must include a male 2x3 header (standard 0.025 inch square posts on 0.1 inch
centers). This same 2x3 header is used on all Zilog Z8 Encore! development boards as a connection
point for the USB Smartcable. In the remainder of the document this Z8 Encore PCB header is
referred to as the DBG connector.
The figure below shows the connection between the ZSP/ISP II connector and the 10-pin to 6-pin
adapter. When connecting the ribbon cable to the target board, ensure that Pin 1 of the cable is
aligned with Pin 1 of the connector on the board.
ZSP/ISP II Connector to DBG Connector Adapter Schematic
UM028704-0920
�Note:
When programming Z8 Encore MCU devices that do not have an Internal Precision Oscillator
(IPO) an external Crystal is needed for programming. Please see the MCU's Product
Specification for reference.
ZSP/ISP II Interface
The ZSP/ISP II interface consists of the following signals:
VDD, VSS
Power
RESET
Input; an active Low signal that resets the Z8Encore Flash MCU.
DBG
Serial data; bidirectional signal.
Target Power
During programming, the ZSP applies power to the target and can supply up to 100mA of
current. If the target board requires more current, an external power source with output
voltage matching the Settings > Device > Target Voltage setting can be connected to the
target:
UM028704-0920
�Ground
Ensure there is a good ground connection between the Z8 Encore! Flash MCU and the
ZSP/ISP II connector to avoid injecting noise into the DBG signal
UM028704-0920
�6-Pin ECI Connector
The Zilog Standalone Programmer interfaces to an external controller through the 6-pin External
Controller Interface (ECI). This interface allows the external controller to initiate device programming
(via the ZSP/ISP II interface). Feedback signals in the ECI indicate when the programming operation
completes and whether the operation was successful. The ZSP ECI header is a male 2x3 header
strip (standard 0.025” square posts, 0.1” pitch).
Table below describes the ECI connector pin-out:
1
Signal
Name
VCC
2
3
GND
nSTART
4
nPASS
Pin
UM028704-0920
Function
Power 5VDC. Do not use to power external device.
Power GND
Active
State
NA
ZSP
Direction
Output
NA
NA
Input
The external controller drives this pin low to initiate a
programming operation. The nSTART signal should be
Failling
set to VCC (logic 1) by the external controller for a
Edge
minimum of 100uS to allow the ZSP to prepare for the
falling edge of nSTART.
Asserted by the ZSP at the end of device programming if
the data read back from the target matches the image file
programmed into the target. The ZSP drives nPASS to
VCC when BUSY is asserted.
LOW
Output
�5
nFAIL
6
BUSY
Asserted by the ZSP at the end of device programming if
the data read back from the target does not match the
image file programmed into the target or an error is
detected during programming. The ZSP drives nFAIL to
VCC when BUSY is asserted.
The ZSP drives this pin to VCC while a programming
operation is in progress, While BUSY is asserted, the
ZSP
ignores the nSTART signal.
Figure below shows the ECI connector location.
UM028704-0920
LOW
Output
HIGH
Output
�ECI Signal Timing
The figure below is a timing diagram showing the relationship between ECI signals during
programming.
UM028704-0920
�Installing the ZSP Configuration Software and
Drivers
Download ZSP Configuration Software from Zilog Software Downloads page. Run the software
installation file and follow the on-screen instructions. Be sure to install the “Zilog Standalone
Programmer (ZSP) driver software” if prompted during the installation. If the ZSP USB drivers are not
installed, it will not be possible for the ZSP Configuration Software to download target information
and/or an image file into the ZSP and the ZSP will not be able to program any target devices.
Click here for more information about the operation of the Zilog Standalone Programmer
Configuration Software, or refer to the integrated help files by pressing F1 while the ZSP
Configuration Software is in focus.
Supported Operating Systems
UM028704-0920
�Connecting to the Target
Observe the following procedure to safely connect the ZSP to the target board.
1. Connect the 10-pin ribbon cable to the ZSP as shown in the figure below.
2. Connect the other end of the ribbon cable to the target/programmer board. Observe that Pin 1 of
the target board connector is connected to Pin 1 of the ribbon cable. Pin 1 of the ribbon cable is
marked by a red wire on the cable.
3. Connect the (male) Mini-B USB connector into the (female) USB receptacle on the ZSP
4. Connect the (male) Type A connector of the same USB cable into the (female) receptacle on the
power source. The ZSP yellow power LED will then will illuminate.
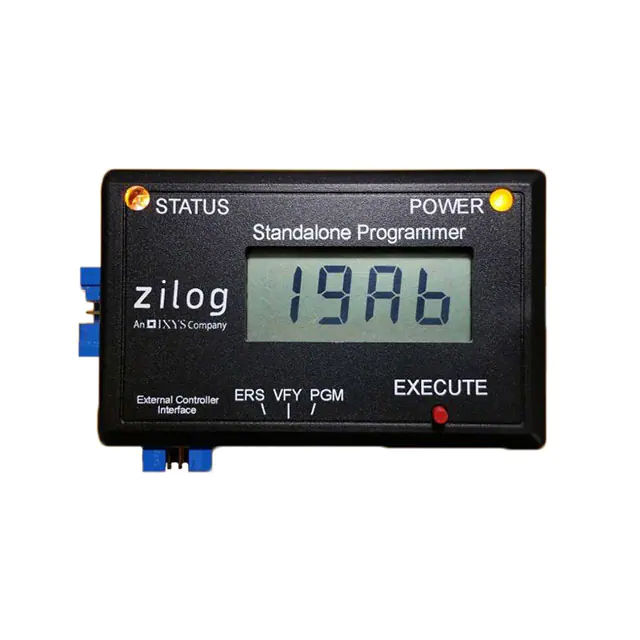
• If the ZSP contains a valid target configuration and image file, then the status LED will turn
yellow and the LCD will display the image file checksum.
• If the ZSP does not contain a valid target configuration and image file, then the status LED will
not turn yellow and the LCD panel will display four hyphens "----".
The figure below shows the ZSP connected to a Zilog Development board.
UM028704-0920
�Standalone Programming of Devices
After successfully downloading target information and an application image (Hex) file into the ZSP
dongle, the ZSP can be used in standalone mode. The following operations can be performed:
Verify(VFY)
Target memory is compared against the ZSP image file used for programming. If all data matches,
then the status LED turns green, the checksum of target memory is displayed on the LCD panel,
and the ZSP emits a sequence of three short beeps to indicate the operation succeeded . If the
data does not match, the status LED turns red, the LCD panel displays one of the ZSP Error
Codes (negative number) for approximately 2 seconds, and the ZSP emits 1 long
beep. Regardless of whether the target configuration includes serialization, target serial numbers
are ignored during device verification. For the S3 Family of devices, the Smart Option and
Protection bits1 are also verified before indicating whether the operation succeeded.
Program(PGM)
Target memory is erased (see ERS below) and the image file previously downloaded into the ZSP
is programmed into the target. If the target configuration includes serialization, then the ZSP also
programs the next sequential serial number into target Flash (and internally increments the target
serial number). For the S3 Family of devices, the ZSP programs the Smart Option and Protection
bits according to the previously downloaded configuration information. After programming the
target, serial number and smart options, the ZSP automatically performs a verify operation (see
VFY above). If the verify operation succeeds, the Protection bits are also programmed.
Erase (ERS)
For the S3 family of devices, erasing target memory also erases the Smart Option and Protection
bits. If the erase operation succeeds, then the status LED turns green, the checksum of target
memory is displayed on the LCD panel, and the ZSP emits a sequence of three short beeps. If the
operation fails, then the status LED turns red, the LCD panel displays one of the ZSP Error Codes
(negative number) for approximately 2 seconds, and the ZSP emits 1 long beep. It is not
necessary to manually erase the contents of target Flash prior to initiating a programming
operation (see PGM above).
To perform an operation in standalone mode, move the slider below the LCD panel into desired
position (ERS, VFY, or PGM) and press the EXE button. While the requested operation is in
progress, the Yellow power LED blinks.
UM028704-0920
�The recommended procedure for programming a target in standalone mode follows:
1.
2.
3.
4.
5.
6.
Connect the ZSP using the supplied USB cable to the host PC or wall adapter.
Connect the ZSP using the supplied 10-pin circuit cable to the target/programmer board.
Place the MCU on the Zero Insertion Force (ZIF) socket.
Slide the switch to the PGM position.
Press the EXE button.
After the operation completes, the status LED turns green if the operation succeeded and
the ZSP emits a sequence of three short beeps. If the operation failed, the status LED
turns red, the LCD panel displays one of the ZSP Error Codes (negative number) for
approximately 2 seconds, and the ZSP emits 1 long beep. For successful Program and
Verify operations, the checksum of the contents of target Flash memory are displayed on
the LCD.
7. Remove the MCU from the ZIF socket.
The figure below shows the ZSP connected to a programming board containing a Zero Insertion
Force socket.
UM028704-0920
�Checksum
The checksum is calculated by adding the contents of every memory location in the target’s Flash
address space (from 0 to end of Flash memory). Memory locations that were not programmed by the
ZSP contain the value 0xFF since Flash memory is erased (all bits set to 1) prior to
programming. The checksum is displayed in hexadecimal using the numerals 0-9 and the letters A
,b, C, d, E, and F as shown in the following examples:
For the S3 family of devices, the verify operation automatically performed after programming does not
compare the protection bits; but the protection bits are verified on subsequent verify operations. Note
that when S3 read protection is enabled, the ZSP will read back 0x00 for all bytes of target Flash and
consequently all verify operations will fail.
UM028704-0920
�How to use the External Controller Interface
The recommended procedure for programming a target using the ECI port is:
1. Connect the ZSP to a PC (or wall adapter) using the supplied USB cable.
2. Attach one end of the 10-pin ZSP/ISP II ribbon cable to the ZSP and the other end of the
cable to the target board/ socket to be programmed or to the external controller (ATE,
device/ gang programmer/ replicator) used for device programming. Refer to the 10 Pin
ZSP/ISP II Connector section for signal information.
3. Attach one end of the 6-pin ECI ribbon cable to the ZSP and the other end of the cable to
the External Controller. Refer to the 6-pin ECI Connector section for signal information.
4. Activate the External Controller to initiate device programming.
UM028704-0920
�LED Indicators
There are two LED on the top panel of the ZSP:
Status (upper left) Tri-colour LED used to indicate the following conditions based on the color of the
LED:
•
•
•
Green (Pass)The requested operation completed successful
Red (Fail)The requested operation could not be completed due to an error. When an error
occurs, the LCD panel typically displays a negative number indicating a possible cause for the
error. For more information refer to the ZSP Error Codes section. Error codes are displayed on
the LCD panel for approximately 2 seconds before reverting to what was displayed previously.
Yellow(File)In the Beta version of the ZSP firmware, the status LED turns yellow after the ZSP
is powered if the ZSP contains a valid ZSP target configuration and image file. When the ZSP
is powered for the first time, it will not contain any target information or a target image file.
Therefore the status LED will not turn yellow. In addition, the LCD panel will display four
hyphens "----" to indicate that the ZSP has not been configured. If the status LED is not yellow
after being powered, then any attempt to program or verify a target will fail (status LED turns
red). Once the ZSP Configuration Software is used to configure the ZSP with target
information and an image file, the status LED will turn yellow and the LCD panel will display
the checksum of the Hex file downloaded in the ZSP using the ZSP Configuration
software.indicating the ZSP is ready for standalone operation. The meaning of a yellow status
LED could change before the ZSP production release.
Power (upper right) Yellow LED that is illuminated once the ZSP is powered. The power LED blinks
while long running erase, program, or verify operations are in progress.
UM028704-0920
�ZSP Error Codes
When the ZSP detects an error, the status LED turns red and stays illuminated until the next
standalone operation is performed, or until the 10-wire ribbon cable is disconnected from the
target. In addition, an error code (a negative decimal number) is displayed on the LCD panel for
approximately two seconds. After two seconds, the LCD panel returns to the state it was in prior to
the error condition. Common error codes, their meaning, and ideas for resolving the problem are
listed in the Table below. If an error code is displayed that is not listed in the table, please contract
Zilog technical support.
Error
Error
Code Condition
-5 SPGM Bus
Error
-6
-8
-9
Target Not
Present
Invalid
Address
Verify
-10 Smart Option
UM028704-0920
Description and Troubleshooting
While programming or erasing target memory on an S3 device, an
unexpected bus error was detected. This condition could indicate ZSP power
failure or electrical problems on the ZSP/ISP II interface (including if the
ZSP/ISP connector is disconnected during programming/verify operations).
An attempt was made to program, erase, or verify an S3 target device, but
there is no S3 device connected to the ZSP/ISPII connector.
This condition might occur while downloading a target image if the file is too
large for the ZSP internal memory. This condition is unexpected when
downloading image files for S3 devices with less than 64KB of Flash.
This error can be displayed if a verify operation fails. It indicates that a byte of
memory read from target Flash does not match the expected value. If this
error occurs, try programming the target again (move slider to PGM position
and press the EXE button). If the error occurs again, try erasing the target
(move slider to the ERS position and Press EXE button) and then reprogram
the target. If the problem still persists, connect the ZSP to a PC running the
ZSP Configuration Software and click the Clean ZSP Configuration and Image
area start button (in the Communication view) and then click the Download
CFG toolbar icon. After the ZSP has been reset, try programming in
standalone mode again.
This error occurs if the Smart option data read from an S3 target does not
match the expected value(s). Refer to error -9 (Verify) for more information.
�-11 Protection Bits This error occurs if the value of the Protection bits read from an S3 target
does not match the expected value(s). Refer to error -9 (Verify) for more
information.
-12 Checksum
This error occurs if the checksum value computed over the target memory
range does not match the expected value Refer to error -9 (Verify) for more
information.
-13 Invalid State The ZSP was directed to perform an unexpected action given its current
operating mode. This could occur if the user attempt to program a target in
standalone mode before the ZSP has been configured with target information
and a valid target image file.
-14 OCD Failure OCD transaction failed (time-out waiting for response).
-15 Auto-baud
Auto-baud algorithm failed to determine an appropriate OCD baud rate.
Failure
-16 Z8 Encore
Z8 Encore Read protection enabled. Target must be mass-erased to disable.
Read Protect
-17 Z8 Encore
Z8 Encore Write protection enabled. Target must be mass-erased to disable.
Write Protect
-18 Z8 Encore
Z8 Encore Mass Erase Failure
Mass Erase
-19 Z8 Encore
Z8 Encore Program Failure (OCD baud rate


 工商网监
湘ICP备2023018690号
工商网监
湘ICP备2023018690号
