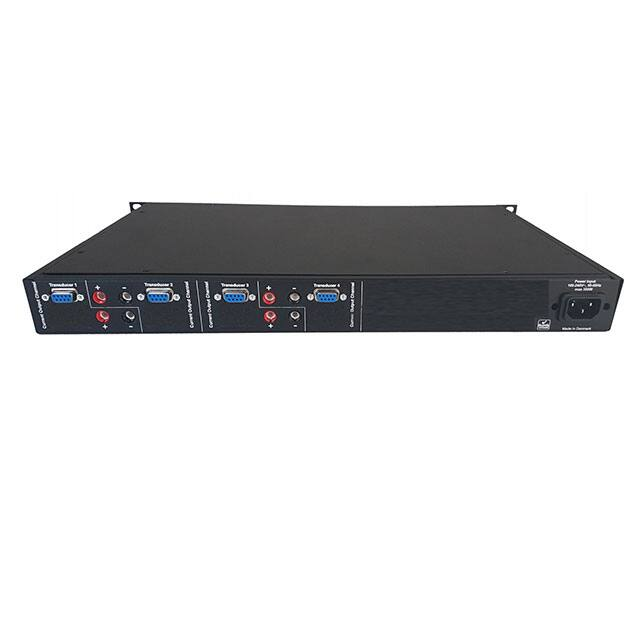
DSSIU-4-1U
Complete 4-channel system interface unit for ultra-stable, high precision fluxgate technology DS series current transducers.
Powers up to 4 x DS50 to DS2000 at the same time.
Features
•
•
•
•
Compact 19” rack mount 1U height
Current transducers’ output signals available via
4mm banana plugs (Only current output)
Front LEDs indication of normal operation for
each transducer and power LED for DSSIU-4-1U
Universal autorange (100-240V AC 50/60Hz) AC
input voltage or 120–370V DC input voltage.
page 1 - 2021-03-04
Precision – Innovation
www.danisense.com
�DSSIU-4-1U
Specifications
Parameter
Symbol
Unit
VAC
Vrm s
Min Typ.
Max
Comment
264
Autoranging
Mains input
AC input voltage
AC nominal
current
IAC
I rm s
Frequency
f
Hz
85
1.6A @ 115V
0.7A @ 230V
Full scale operation with 4
DS2000 and 3000A primary
47
63
Autoranging
±14.7
5
±15.75
x4 channels
Transducer output port
Supply voltage
Ucc
Ripple
15
mVrm s
Environment and Mechanical
Ambient operating temperature range
Ta
Storage temperature range
Relative humidity
Mass
Size (W x H x D)
ºC
ºC
5
-20
%
20
Kg
40
85
80
4.6
mm
483 x 44 x 271
Channel configuration
Each channel does have 3 connectors.
•
Transducer (DSUB9) for connection to the transducer
•
RED + (4mm Banana) is positive output from the measured current
•
BLACK - (4mm Banana) is negative output from the measured current
Current output configuration
The DSSIU-4-1U will send the measured current to the RED and BLACK 4mm banana jacks.
RED being connected to pin 6 on the transducer.
BLACK being connected to pin 1 on the transducer.
page 2 - 2021-03-04
Precision – Innovation
www.danisense.com
�DSSIU-4-1U
Environmental, safety and mechanical specifications
Parameter
Unit
Altitude
m
Min
Typ
Max
Comment
2000
Usage
Designed for indoor use
Polution Degree
2
Ambient operating temperature range
°C
5
40
Storage temperature range
°C
0
60
Relative humidity
%
20
80
Mass
kg
Connections
DSUB9 female for transducer connection
4mm banana (red and black) jacks for output of measured current from transducers
4mm banana (Yellow) jacks for connection of calibration current to transducer
DSUB15 female for status information
IEC inlet for mains connection
Standards
IEC61326-1 EMC
IEC61010-1:2010 3rd Edition
External devices
Only connect Danisense transducers to the DSSIU-4-1U
Cleaning
The unit should only be cleaned with a damp cloth. No detergent or chemicals should be used.
page 3 - 2021-03-04
Non-condensing
5.0
Precision – Innovation
www.danisense.com
�DSSIU-4-1U
Mechanical Dimensions
page 4 - 2021-03-04
Precision – Innovation
www.danisense.com
�DSSIU-4-1U
User Guide
Intended use:
The DSSIU-4-1U is designed to work with Danisense transducers with DSUB9 connection powered by +/-15V.
Instruction for use:
1.Do not power up the device before all cables are connected.
2.Only use cable provided by Danisense to ensure correct wiring and dimension of cable.
3.Ensure that it is easy to unplug the mains cord in case of system problems.
4.Place the primary conductor through the apperture of the transducer(s)
5.If the DSSIU-4-1U is intended for desk use, mount the rubber feet which are part of the package.
6.If the DSSIU-4-1U is intended for Rack mounting, use the screw kit for mounting and do not mount the rubber feet.
7.Connect a Danisense DSUB cable between DSSIU-4-1U and each sensor
8.Connect a low impedance amperemeter, measuring resistor or power analyzer on the secondary output (4mm red
and black connectors)
9.Ensure that no calibration connectors are attached when measuring primary current. Always avoid to create a calibration short circuit, between + and — calibration connection.
10.There is a risk of electrical shock if an uninsulated busbar with high voltages is touching the metal enclosure of
the transducer. Please ensure before powering up the system that no primary busbar can touch the metal enclosure.
11.When all connection are secured - connect mains power with the mains cable delivered. If other cables are used
ensure that the cable has sufficint rating for operation.
12.Apply primary current
Safety Instructions:
DO NOT TRY TO DISASSEMBLE THE UNIT.
If the green transducer diode is not operating when the system is powered up, disconnect power and contact Danisense for further instruction.
If the equipment is used in a manner not specified by the manufacturer, the protection provided by the equipment
may be impaired..
It is mandatory to support the unit when rack mounted, either on the sides or backside.
Indications:
When mains is applied the left light diode on the front under the power symbol will light green.
For each sensor channel connected a green light diode will light on the front
if the connection is correct and the sensor is operating within normal range.
page 5 - 2021-03-04
Precision – Innovation
www.danisense.com
�DSSIU-4-1U
Declaration of Conformity
Danisense A/S
Malervej 10
DK-2630 Taastrup
Denmark
Declares that under our sole responsibility that this DSSIU-4-1U is in conformity with the provisions of the following
EC Directives, including all amendments, and with national legislation implementing these directives:
Directive 2004/108/EC, Class A+B
And that the following harmonized standards have been applied
EN/IEC 61010-1 (Third Edition):2010, EN 61010-1:2010
Declares that under our sole responsibility that all products delivered by Danisense are manufactured in accordance
with RoHS directive 2015/863/EU.
Danisense follows the provision in EN 63000:2018
Place
Taastrup, Denmark
Signature
Henrik Elbæk
Serial Number# ________________________
DATE: ____________
page 6 - 2021-03-04
Precision – Innovation
www.danisense.com
�
很抱歉,暂时无法提供与“DSSIU-4-1U”相匹配的价格&库存,您可以联系我们找货
免费人工找货- 国内价格 香港价格
- 1+13720.460071+1716.67714
