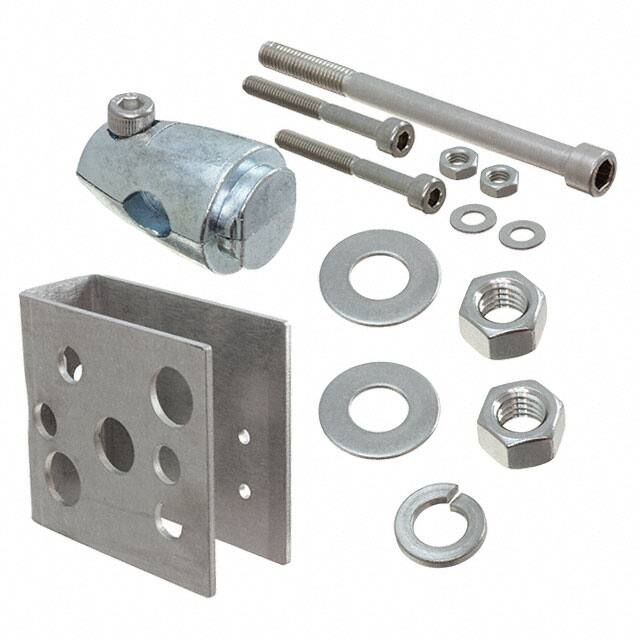
Mounting aid
OMH-RL2-S
< Mounting bracket
< Adjustable Bracket
< Protective functions
Protective Shroud Bracket with 360° Rotating Half-Clamp
Dimensions
37.8
27.6
70.2
85.7
56.3
49.3
16.2
ø7.9
43.8
211.6
96.8
28.5
28.5
47.0
62.0
22.1 20.0
ø5.3 (4 x)
Tool access
holes (4 x)
131
16.2
19.2
Release date: 2020-03-23 Date of issue: 2020-06-30 Filename: 904798_eng.pdf
Mounting holes for
half-clamp (3 x)
31.7
3.0
3/8"-16
Technical Data
Mechanical specifications
Material
Stainless steel shroud, nickel-plated zinc half-clamp, xinc-plated steel screws and nuts
Refer to "General Notes Relating to Pepperl+Fuchs Product Information".
Pepperl+Fuchs Group
USA: +1 330 486 0001
Germany: +49 621 776 1111
fa-info@de.pepperl-fuchs.com
www.pepperl-fuchs.com
fa-info@us.pepperl-fuchs.com
Singapore: +65 6779 9091
fa-info@sg.pepperl-fuchs.com
1
�Mounting aid
OMH-RL2-S
Mounting
Instructions
Model OMH-RL2-S is a protective shroud bracket for Series 28 and Series 29 photoelectric sensors.
This model includes the following components (as shown in Figure 1, starting at the upper left and going clockwise).
Half-clamp
Mounting bolt with two nuts, two flat washers, and one lock washer
Metal sensor shroud
Two screws, two nuts, and two washers to mount sensor to shroud
Figure 1
Sensor is attached to
this side of bracket
using screws & nuts
Figure 2
Release date: 2020-03-23 Date of issue: 2020-06-30 Filename: 904798_eng.pdf
(1.) To assemble, the sensor must be mounted inside the sensor shroud.
Align the sensitivity adjustment poteniometer(s) of the sensor to the holes in the top of the shroud, as shown in Figure 3.
Figure 3
(2.) Slide the two screws through the shroud and sensor with the two washers and two nuts on the outside of the shroud. Tighten
Refer to "General Notes Relating to Pepperl+Fuchs Product Information".
Pepperl+Fuchs Group
USA: +1 330 486 0001
Germany: +49 621 776 1111
www.pepperl-fuchs.com
fa-info@us.pepperl-fuchs.com
fa-info@de.pepperl-fuchs.com
Singapore: +65 6779 9091
fa-info@sg.pepperl-fuchs.com
2
�Mounting aid
OMH-RL2-S
the screws in place so the sensor is securely mounted inside the shroud, as shown in Figures 4 and 5.
Figure 4
Figure 5
Release date: 2020-03-23 Date of issue: 2020-06-30 Filename: 904798_eng.pdf
(3.) Loosen the half-clamp and observe the grooved slot inside. Place the head of the mounting bolt into this groove, as indicated
in Figure 6.
Figure 6
(4.) Without tightening the half-clamp over the bolt head, squeeze the half-clamp together so the smaller protrusion at the end fits
together, and place it into one of the three larger holes on the side of the shroud as shown in Figure 7 and 8.
Refer to "General Notes Relating to Pepperl+Fuchs Product Information".
Pepperl+Fuchs Group
USA: +1 330 486 0001
Germany: +49 621 776 1111
www.pepperl-fuchs.com
fa-info@us.pepperl-fuchs.com
fa-info@de.pepperl-fuchs.com
Singapore: +65 6779 9091
fa-info@sg.pepperl-fuchs.com
3
�Mounting aid
OMH-RL2-S
Figure 7
Figure 8
(5.) Position and align the mounting bracket as desired, then tighten the half-clamp set screw to secure the assembly as shown
in Figure 9.
Figure 9
The OMH-RL2-S and attached sensor are now ready for installation as shown in Figure 10.
Release date: 2020-03-23 Date of issue: 2020-06-30 Filename: 904798_eng.pdf
Figure 10
Refer to "General Notes Relating to Pepperl+Fuchs Product Information".
Pepperl+Fuchs Group
USA: +1 330 486 0001
Germany: +49 621 776 1111
www.pepperl-fuchs.com
fa-info@us.pepperl-fuchs.com
fa-info@de.pepperl-fuchs.com
Singapore: +65 6779 9091
fa-info@sg.pepperl-fuchs.com
4
�
很抱歉,暂时无法提供与“OMH-RL2-S”相匹配的价格&库存,您可以联系我们找货
免费人工找货