Stepper Motor Shield For Arduino(DRV8825) SKU:DRI0023
From Robot Wiki
Stepper Motor Shield For Arduino
Contents
1 Introduction
2 Specification
3 Pin Out& Diagram
4 Sample code
Introduction
Do you want to do some projects with stepper motors such as a drafting instrument, a 3D printer,
an auto curtain, etc...? As we all know, regular stepper motors are hard to drive, but with this
stepper motor shield, you can easily drive 2 stepper motors via just 6 digital I/O’s. This board is
compatible with the Arduino UNO R3. Directly supports Xbee and Xbee form factor Wi-Fi,
Bluetooth and RF modules. Easy connection of cables via screwless PC terminals. Each stepper
motor has a code switch for adjusting driving modes, to obtain different rotational speeds.
Interfaces of the board include extension 6 channel Analog I/O, 8 channel Digital I/O & I2C.
Stepper motor is a brushless DC electric motor that divides a full rotation into a number of equal
steps. The motor's position can then be commanded to move and hold at one of these steps
without any feedback sensor (an open-loop controller), as long as the motor is carefully sized to
the application in respect to torque and speed.
�Specification
Support 3.3V and 5V operating voltage
Suitable for two‐phase and four‐wire stepper motor
Board with two DRV8825 driver chip and a heat sink has been mounted.
Input Voltage:8.2‐45V DC (Just power the stepper motor driver), 1.6A output current per coil
Driving Pins: D4,D5,D6,D7,D8,D12
Squeeze connector, quite easy and convenient.
8 channel digital I/O pins & 6 channel Analog input pins
DRV8825 Microstepping bipolar stepper motor driver
Six different microstep resolutions (full‐step, 1/2‐step, 1/4‐step, 1/8‐step, 1/16‐step, 1/32‐step)
Compatible with Arduino UNO R3, Leonardo, Mega and other controllers, with full port
extensions. Support XBee, XBee Wi‐Fi, Bluetooth and RF modules, ensure that the needs of your
wireless communications.
There is a switch on the board Xbee wireless interfaces corner. PROG stop wireless module,
available USB programming. RUN time can use the wireless communication module.
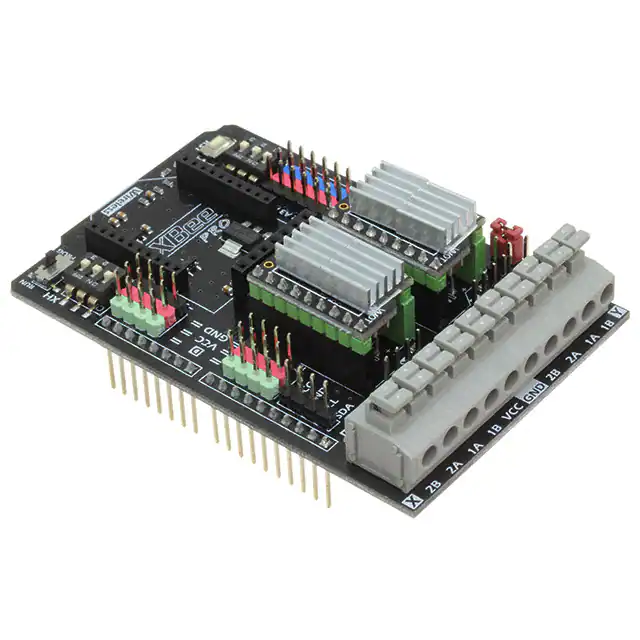
Pin Out& Diagram
Stepper Motor Shield For Arduino(DRV8825)
�
Wireless program switch:
o RUN: Turn the Switch here to use the Xbee module
o PROG: Turn the Switch here to upload the sketch via USB
Motor wiring diagram:
Motor wiring diagram
The new version expand two enable pins, you can enable/disable the motor driver to save the
power consumption, Motor X enable pin for the D8, Motor Y enable pin for the D12, low voltage
enable, the following truth table:
D8
D12
M1
M2
Low
Low
ENABLE
ENABLE
High
Low
DISENABLE
ENABLE
Low
High
ENABLE
DISENABLE
High
High
DISENABLE
DISENABLE
�
Dip switch settings for Microstep resolution:
MS1
MS2
MS3
Microstep Resolution
Low
Low
Low
Full step
High
Low
Low
Half step
Low
High
Low
1/4 step
High
High
Low
1/8 step
Low
Low
High
1/16 step
High
Low
High
1/32 step
Low
High
High
1/32 step
High
High
High
1/32 step
IO voltage select
o Change the the position of the jumper cap according to your Main board operating
voltage.
More details
Squeeze connector makes connection easily and quickly.
The other form of connector for XH2.54 or female headers
�Sample code
/*
This sample code is for testing the 2 stepper motors
The rotation velocity can be adjusted by the code switch
Microcontroller: Arduino UNO
*/
int M1dirpin = 7;
//Motor X direction pin
int M1steppin = 6; //Motor X step pin
int M1en=8;
//Motor X enable pin
int M2dirpin = 4;
//Motor Y direction pin
int M2steppin = 5; //Motor Y step pin
int M2en=12;
//Motor Y enable pin
void setup()
{
pinMode(M1dirpin,OUTPUT);
pinMode(M1steppin,OUTPUT);
pinMode(M1en,OUTPUT);
pinMode(M2dirpin,OUTPUT);
pinMode(M2steppin,OUTPUT);
pinMode(M2en,OUTPUT);
digitalWrite(M1en,LOW);// Low Level Enable
digitalWrite(M2en,LOW);// Low Level Enable
}
void loop()
{
int j;
delayMicroseconds(2);
digitalWrite(M1dirpin,LOW);
digitalWrite(M2dirpin,LOW);
for(j=0;j
很抱歉,暂时无法提供与“DRI0023”相匹配的价格&库存,您可以联系我们找货
免费人工找货- 国内价格 香港价格
- 1+290.819701+37.62529