Flora Wearable GPS
Created by Becky Stern
https://learn.adafruit.com/flora-wearable-gps
Last updated on 2021-11-15 05:53:16 PM EST
©Adafruit Industries
Page 1 of 11
�Table of Contents
Overview
3
Hook up GPS
4
Program FLORA
5
• Basic Echo Test
• Install Adafruit GPS Library
• Load Echo Demo
6
6
6
Getting location data
8
• Detailed GPS Test
8
Downloads
• Files
• Downloads:
• Schematic & Fabrication Print
©Adafruit Industries
10
10
10
11
Page 2 of 11
�Overview
This module is the best way to add a GPS to your wearable project. It's part of the
Adafruit Flora series of wearable electronics, designed specifically for use with the
Flora motherboard. Installed on the PCB is the latest of our Ultimate GPS modules, a
small, super-thin, low power GPS module with built in data-logging capability! This
module's easy to use, but extremely powerful:
• -165 dBm sensitivity, 10 Hz updates, 66 channels
• Designed for wearable use with the Flora system
• Only 20mA current draw
• RTC battery-compatible - sew a battery on to create a atomic-precision real time
clock
• Built-in datalogging
• >25Km altitude
• Internal patch antenna + u.FL connector for external active antenna
• Fix status LED
This guide will get you started with the Flora GPS.
©Adafruit Industries
Page 3 of 11
�Hook up GPS
Use alligator clips to connect Flora's 3.3V pad to the 3.3V pad on the GPS. Likewise
connect RX to TX and TX to RX, then finally GND to GND.
Unlike the GPS breakout and GPS shield we carry, the Flora GPS is for use with 3.3V
power and logic only!
©Adafruit Industries
Page 4 of 11
�The four connectors are all in a row just to the left of Flora's JST battery connector for
easy sewing. But test your project with alligator clips before sewing it in!
Program FLORA
Make sure the USB cable is connecting your computer and Flora.
©Adafruit Industries
Page 5 of 11
�Basic Echo Test
We'll start with the most basic test, where we listen to the raw GPS data, to make sure
it shows up! Copy and paste this code into a new sketch window and upload it to your
Flora
Install Adafruit GPS Library
Our helper library will make using the GPS easy since we have working code already.
The library is available on GitHub (https://adafru.it/nCR)
You can download the most recent version from the Arduino library manager.
First, open up the Arduino library manager
Search for the Adafruit GPS library and install it
We also have a great tutorial on Arduino library installation at:
http://learn.adafruit.com/adafruit-all-about-arduino-libraries-install-use
Load Echo Demo
We'll begin by loading up the HardwareSerial echo test example available in the
Adafruit_GPS library
©Adafruit Industries
Page 6 of 11
�Wire up the GPS module according to the hookup. Check your board and serial port
settings (https://adafru.it/aRS) and upload this sketch to your Flora using the Upload
button in the IDE. Open up the Serial Monitor.
You should see something like the following from the serial monitor. You may not have
as many numbers, but there should be sentences that start with $GPRMC and
$GPGGA, etc. If you see text like that it means your GPS and connection are working
fine.
©Adafruit Industries
Page 7 of 11
�Getting location data
Detailed GPS Test
Now that we know it basically works, we'll try to get 'fix data' from the GPS. For this,
you will have to have the GPS outside. It cannot be inside a building, even if its right
at the window. The silver antenna must be pointing up with a clear view of the sky!
Wire up the GPS module according to the hookup
©Adafruit Industries
Page 8 of 11
�Check your board and serial port settings (https://adafru.it/aRS) and upload this sketch
to your Flora using the Upload button in the IDE.
Place the GPS module (still connected to the Flora) outside. Once the GPS has
located the satellite data, the red LED on the GPS will stop blinking.
If you see the LED blinking once a second, it does not yet have a fix!
It can take many minutes to get a fix if it doesn't see any satellites immediately.
Once it has a fix, you can check the serial monitor for the GPS data, which includes
the current date and time in UTC. It will also give you your latitude, longitude and
approximate altitude with the Serial monitor
GPS modules will always send data EVEN IF THEY DO NOT HAVE A FIX! In order
to get 'valid' (not-blank) data you must have the GPS module directly outside,
with the square ceramic antenna pointing up with a clear sky view. In ideal
conditions, the module can get a fix in under 45 seconds. however depending on
your location, satellite configuration, solar flares, tall buildings nearby, RF noise,
etc it may take up to half an hour (or more) to get a fix! This does not mean your
GPS module is broken, the GPS module will always work as fast as it can to get a
fix.
©Adafruit Industries
Page 9 of 11
�Now we know where we are. According to the GPS, my location is 4043.5715 N (Latit
ude 40 degrees, 43.5815 minutes North) & 07400.2783 W. (Longitude 74 degrees,
0.2783 minutes West) To look at this location in Google maps, type +40° 43.5715', -74°
00.2783' into the google maps search box (https://adafru.it/aMl) . Unfortunately gmaps
requires you to use +/- instead of NSWE notation. N and E are positive, S and W are
negative.
People often get confused because the GPS is working but is "5 miles off" - this
is because they are not parsing the lat/long data correctly. Despite appearances,
the geolocation data is NOT in decimal degrees. It is in degrees and minutes in
the following format: Latitude: DDMM.MMMM (The first two characters are the
degrees.) Longitude: DDDMM.MMMM (The first three characters are the degrees.)
Downloads
Files
• EagleCAD PCB files on GitHub (https://adafru.it/rPD)
• Fritzing object in the Adafruit Fritzing Library (https://adafru.it/aP3)
Downloads:
• MTK3329/MTK3339 command set sheet (https://adafru.it/qif) for changing the fix
data rate, baud rate, sentence outputs, etc!
• Datasheet for the PA6H (MTK3339) GPS module itself - used in version 3 of this
module (https://adafru.it/ria)
©Adafruit Industries
Page 10 of 11
�• MT3339 GPS PC Tool (windows only) (https://adafru.it/uoD) and the PC Tool
manual (https://adafru.it/uoE)
• Mini GPS tool (windows only) (https://adafru.it/rid)
Schematic & Fabrication Print
©Adafruit Industries
Page 11 of 11
�
很抱歉,暂时无法提供与“1059”相匹配的价格&库存,您可以联系我们找货
免费人工找货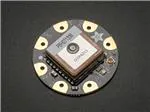


 工商网监
湘ICP备2023018690号
工商网监
湘ICP备2023018690号