Flora Accelerometer
Created by Becky Stern
https://learn.adafruit.com/flora-accelerometer
Last updated on 2021-11-15 05:56:01 PM EST
©Adafruit Industries
Page 1 of 11
�Table of Contents
Overview
3
Wiring with Conductive Thread
4
Programming
8
Downloads
• Files
• Schematic
• Fabrication Print
©Adafruit Industries
10
10
11
11
Page 2 of 11
�Overview
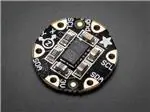
Add motion and direction sensing to your wearable Flora project with this high
precision 3-axis Accelerometer+Compass sensor. Inside are two sensors, one is a
classic 3-axis accelerometer, which can tell you which direction is down towards the
Earth (by measuring gravity) or how fast the board is accelerating in 3D space. The
other is a magnetometer that can sense where the strongest magnetic force is
coming from, generally used to detect magnetic north. By combining this data you can
then orient yourself.
We based this sensor on the latest version of this popular sensor, the LSM303DLHC.
The sensor has a digital (I2C) interface. Attaching it to the Flora is simple: line up the
sensor so its adjacent to the SDA/SCL pins and sew conductive thread from the 3V,
SDA, SCL and GND pins. They line up perfectly so you will not have any crossed lines.
You can only connect one of these sensors to your Flora, but you can connect other
I2C sensors/outputs by using the set of SCL/SDA pins on the opposite side.
To get started making a soft accelerometer circuit on fabric you will need:
• Flora main board (http://adafru.it/659)
• Flora accelerometer (http://adafru.it/1247)
• Conductive thread (http://adafru.it/640) (2 or 3 ply)
• Fabric inside an embroidery hoop
• USB A/MiniB cable (http://adafru.it/260)
• 3xAAA battery holder (http://adafru.it/727)
©Adafruit Industries
Page 3 of 11
�Wiring with Conductive Thread
Bring your needle through the back of
the fabric to the front next to the GND
pad on your Flora. Leave a the last few
inches as a tail on the back side of the
fabric.
Stitch a few times around the GND pad
and end on the back side of the fabric.
Tie the tail and the working thread into a
square knot, tight against the fabric.
©Adafruit Industries
Page 4 of 11
�Dab a little Fray Check or clear nail polish
on the knot while holding it tight. This will
prevent the knot from coming undone
and creating unwanted shorts in your
circuit. Trim the tail very close to the knot.
©Adafruit Industries
Page 5 of 11
�Stitch a path over to the gnd pad on the
Flora accelerometer. When you get there,
stitch a few times around the sensor's
gnd pad.
©Adafruit Industries
Page 6 of 11
�On the back side of the fabric, slip the
needle through the previous stitches and
then back through the resulting loop to
tie a knot tight to the fabric. Dab on your
sealant and trim closely.
©Adafruit Industries
Page 7 of 11
�Repeat this process to make the other three required connections to the
accelerometer - 3.3v, SCL, and SDA. This is the i2c bus on the Flora, and you can
chain more sensors (http://adafru.it/1246) (or LED matrix backpacks (https://adafru.it/
aQg)) to this first one by connecting to the as-of-now unconnected SDA and SCL pins.
i2c is great for this application because you can connect many devices to each other
without using up all the pins on the Flora.
Programming
Plug in a USB cable connecting your Flora to your computer.
Download the Adafruit_LSM303 (https://adafru.it/aXz) library from the Arduino Library
Manager.
Open up the Arduino Library Manager:
©Adafruit Industries
Page 8 of 11
�Search for the Adafruit LSM303 library and install it
For information how to use and install libraries, see our tutorial (https://adafru.it/aYG)!
Open the special Adafruit version of the Arduino IDE and naviate to File-->Examples->Adafruit_LSM303-->Test to open the accelerometer test sketch. For more information
on programming the Flora, check out the Getting Started with FLORA (https://adafru.it
/aSZ) guide.
Be sure you have the correct serial port and board type selected under the Tools
menu, then upload the sketch to your Flora.
Open the serial monitor and watch the accelerometer values pour in!
©Adafruit Industries
Page 9 of 11
�Modify this sample sketch to integrate this sensor into your project. Debugging over
USB is helpful to see the ranges of numbers your sensor provides, but once your
code is solid, you can disconnect from the computer and power your project with a
3xAAA battery holder.
Downloads
Files
• LSM303DLHC datasheet (https://adafru.it/rgd)
• Adafruit_LSM303 Arduino Driver Library (https://adafru.it/aXz)
• Fritzing object in the Adafruit Fritzing Library (https://adafru.it/aP3)
• EagleCAD PCB files on GitHub (https://adafru.it/rEe)
©Adafruit Industries
Page 10 of 11
�Schematic
Fabrication Print
©Adafruit Industries
Page 11 of 11
�
很抱歉,暂时无法提供与“1247”相匹配的价格&库存,您可以联系我们找货
免费人工找货