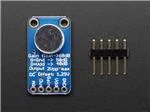
Adafruit AGC Electret Microphone
Amplifier - MAX9814
Created by lady ada
https://learn.adafruit.com/adafruit-agc-electret-microphone-amplifier-max9814
Last updated on 2021-11-15 06:09:42 PM EST
©Adafruit Industries
Page 1 of 10
�Table of Contents
Overview
3
Assembly
5
• Prepare the header strip:
• Add the breakout board:
• And Solder!
5
6
6
Wiring and Test
7
• Wiring
• Test!
• Do more!
8
8
9
Downloads
9
•
•
•
•
9
9
10
10
Datasheets & Files
Schematics
PCB Dimensional Diagram
3D models
©Adafruit Industries
Page 2 of 10
�Overview
This fancy microphone amplifier module is a step above the rest, with built in
automatic gain control. The AGC in the amplifier means that nearby 'loud' sounds will
be quieted so they don't overwhelm & 'clip' the amplifier, and even quiet, far-away
sounds will be amplified. This amplifier is great for when you want to record or detect
audio in a setting where levels change and you don't want to have to tweak the
amplifier gain all the time.
The chip at the heart of this amp is the MAX9814 (https://adafru.it/d9r), and has a few
options you can configure with the breakout. The default 'max gain' is 60dB, but can
be set to 40dB or 50dB by jumpering the Gain pin to VCC or ground. You can also
change the Attack/Release ratio, from the default 1:4000 to 1:2000 or 1:500. The
ouput from the amp is about 2Vpp max on a 1.25V DC bias, so it can be easily used
with any Analog/Digital converter that is up to 3.3V input. If you want to pipe it into a
Line Input, just use a 1uF blocking capacitor in series.
Each order comes with one assembled and tested board, with electret mic presoldered on, and a small piece of header.
©Adafruit Industries
Page 3 of 10
�Specifications:
• Supply Voltage: 2.7v-5.5v @ 3mA current
• Output: 2Vpp on 1.25V bias
• Frequency Response: 20Hz - 20 KHz
• Programmable Attack and Release Ratio
• Automatic gain, selectable max from 40dB, 50dB or 60dB
• Low Input-Referred Noise Density of 30nV/
• Low THD: 0.04% (typ)
©Adafruit Industries
Page 4 of 10
�Assembly
Assembly is really easy, you can use straight or 'right-angle' style headers to attach to
the PCB. We'll be using the plain straight headers included
The board comes with all surface-mount components pre-soldered. The included
header strip can be soldered on for convenient use on a breadboard or with 0.1"
connectors. You can also skip this step and solder on wires.
Prepare the header strip:
Cut the strip to length if necessary. It will
be easier to solder if you insert it into a
breadboard - long pins down.
©Adafruit Industries
Page 5 of 10
�Add the breakout board:
Place the breakout board over the pins
so that the short pins poke through the
breakout pads
And Solder!
Be sure to solder all 5 pins for reliable
electrical contact.
(For tips on soldering, be sure to check
out our Guide to Excellent
Soldering (https://adafru.it/aTk)).
©Adafruit Industries
Page 6 of 10
�Wiring and Test
The microphone amp is thankfully quite simple to get started. No microcontroller or
programming required. We suggest wiring it up directly with a battery pack and
headphones to start while you get a hang of how the AGC acts and responds.
You'll need a 3 AA/AAA battery pack (http://adafru.it/727)(or some external source of
3-5VDC) - we suggest batteries since they are very electrically-quiet compared to
USB or wall power adapters.
(For rechargeable NiMH cells, you can use a 4xAA/AAA pack for a total of 4.8v)
You'll also need a headphone jack, this breadboard-friendly one (http://adafru.it/1699)
works great, and a 1 to 100uF electrolytic capacitor. This is just to protect your
headphones from the DC bias voltage. Just about any capacitor will work.
Find the 'cheapest' headphones you have, or use earbuds, they wont load down the
microphone amp as much! This is not a good time to use your huge Sennheiser cans.
Don't connect to speakers or you will get really horrible feedback effects
©Adafruit Industries
Page 7 of 10
�Wiring
Connect the amplifier, battery pack and headphone jack as shown above.
For the Microphone amp:
• GND connects to the battery pack ground - black wire
• VDD connects to the battery pack positive - red wire
• Connect the Gain pin to VDD for now - green wire
• Connect the OUT pin to a 1uF-100uF capacitor (really any value will do). If the
capacitor is polarized, connect the OUT pin to the positive side - green wire
For the headphone jack
• Connect the Left and Right pins together (the microphone is mono out) to the
negative side of the capacitor - yellow wires.
• Connect the center ground pin to the battery ground - blue wire
Test!
Now try listening to sounds on the headphones, you should notice a strange 'effect'
where you can hear people from further away than your hearing is used to! Try setting
the Gain pin to the GND pin to get 10dB more gain. You can also remove the Gain
wire, to set the gain to 60dB but you may find the gain is way too high, and it sounds
'too noisy', so we suggest sticking to 40 or 50dB for most purposes.
©Adafruit Industries
Page 8 of 10
�You can also try adjusting the A/R (attack/response) ratio by connecting the A/R pin to
VDD or GND but we found that the default no-wire works pretty well for most
purposes.
Do more!
Now that you have the amplifier tested, you can use this microphone amp just like our
non-AGC board.
Check out http://learn.adafruit.com/adafruit-microphone-amplifier-breakout/
measuring-sound-levels (https://adafru.it/d9p) and http://learn.adafruit.com/adafruitmicrophone-amplifier-breakout/more-cool-projects (https://adafru.it/d9q) for other
projects that can be adapted to use this amplifier.
Downloads
Datasheets & Files
• Datasheet for the MAX9814 (https://adafru.it/d9o)
• Datasheet for the electret mic capsule (https://adafru.it/aW6)
• Fritzing object in Adafruit Fritzing library (https://adafru.it/aP3)
• EagleCAD PCB files in GitHub (https://adafru.it/rpb)
Schematics
©Adafruit Industries
Page 9 of 10
�PCB Dimensional Diagram
3D models
Thanks to Aron Rubin!
adafruit_mic_agc.pdf
https://adafru.it/frD
adafruit_mic_agc.skp
https://adafru.it/frE
©Adafruit Industries
Page 10 of 10
�
很抱歉,暂时无法提供与“1713”相匹配的价格&库存,您可以联系我们找货
免费人工找货- 国内价格 香港价格
- 1+75.603961+9.79972