Adafruit Pro Trinket LiPoly/LiIon Backpack
Created by lady ada
https://learn.adafruit.com/adafruit-pro-trinket-lipoly-slash-liion-backpack
Last updated on 2021-11-15 06:18:15 PM EST
©Adafruit Industries
Page 1 of 10
�Table of Contents
Overview
3
Pinouts
7
• Adjusting Current Rate
• LEDs
• Optional Switch
7
8
8
Downloads
9
• Files & Datasheets
• Schematic
9
9
©Adafruit Industries
Page 2 of 10
�Overview
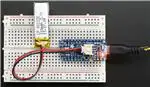
If you have a Pro Trinket you probably know it's the perfect little size for a portable
project. This LiPoly backpack makes it really easy to do! Instead of wiring 2 or 3
boards together to make a charging system, this little PCB sits on top of the Pro
Trinket and allows a LiPoly/LiIon battery to plug in. When the Pro Trinket USB port is
powered, the battery is recharged automatically. Unplug the USB port and the Pro
Trinket will switch over to the rechargeable battery.
It does not work with normal Trinkets. However, you can use it with our Adafruit
Sound FX board series (https://adafru.it/rd9)!
©Adafruit Industries
Page 3 of 10
�Ideally, this backpack is for use with the 3.3V Pro Trinket, so that the battery voltage
(3.7V-4.2V) will get regulated down to 3.3V on the Pro Trinket board. However, many
times, you can run a 5V Pro Trinket + accessories off of the ~4V from the LiPoly
battery with no problem. (Technically its overclocking but we've never seen that affect
the Pro Trinket itself, AVRs are happy to overclock without complaint).
Solder the backpack on with the extra long header so that it can still plug into a
breadboard, or clip the long header leads short afterwards for a slim package.
©Adafruit Industries
Page 4 of 10
�There are two LEDs - one red and one green. While charging, the red LED is lit. When
the battery is fully charged and ready for use, the green LED turns on. Seriously, it
could not get more easy.
Please use care when assembling to make sure the bottom of the PCB including
the solder jumper doesn't rest on the microUSB connector and possibly short to
ground. If you want to rest the backpack onto the micro USB connector, cover up
the jumper with kapton tape.
If you want to add an On/Off switch, we also made that really easy. The two 0.1" holes
with a box around them are the battery output line. Carefully cut the trace between
them with a hobby knife and replace with two wires from a switch like this slide
switch (https://adafru.it/drN), or this pushbutton one (http://adafru.it/1683), for example.
Charging is performed in three stages: first a preconditioning charge, then a constantcurrent fast charge and finally a constant-voltage trickle charge to keep the battery
topped-up. The charge current is 100mA by default, so it will work with any size
battery and USB port. If you want you can easily change it over to 500mA mode by
soldering closed the jumper on the bottom, for when you'll only be charging batteries
with 500mAh size or larger.
©Adafruit Industries
Page 5 of 10
�For use with Adafruit LiPoly/LiIon batteries only! Other batteries may have different
voltage, chemistry, polarity or pinout.
• Comes assembled and tested
• Uses the 5V input via Micro-B USB connector on the Pro Trinket
• For charging single Lithium Ion/Lithium Polymer 3.7/4.2v batteries (not for older
3.6/4.1v cells)
• 100mA charge current, adjustable to 500mA by soldering a jumper closed
Batteries (http://adafru.it/258) not included.
©Adafruit Industries
Page 6 of 10
�Pinouts
This little backpack is very "short & sweet" when it comes to pinouts:
• 5V - this is the pin that comes from the USB port power, with 5V DC to charge
the battery.
• G - this is the common ground pin, shared with the battery and charger
• BAT - this is the voltage out from the battery, which will range from 3.2V when
the battery is dead to 4.2V when it's charged.
Adjusting Current Rate
The default current rate is 100mA, which is safe for any battery 100mAh or greater
capacity. If you're going to be using larger batteries, you may want to bump up the
charge rate for faster charging. Easy! Just solder the jumper on the bottom of the
board as shown here:
©Adafruit Industries
Page 7 of 10
�LEDs
There's two LEDs on the backpack
• CHG red LED - This LED is lit when the battery is being charged.
• DON green LED - this LED is lit when the battery is done being charged (charge
complete)
When the backpack is installed on the Pro Trinket, but not charging, you may notice
these LEDs faintly glowing. That's a side effect of a slight current leakage through one
of the protection diodes on the Pro Trinket. It's not harmful at all and you can basically
ignore it.
Optional Switch
If you want to have an on/off switch for your project, it's a quick mod. The line from
the battery to the VBAT pin has a 0.1" breakout with a thin trace in between. Cut the
trace between the two outlined pins and solder a switch in place. The switch is
current-carrying so make sure it can handle the current draw you're expecting
©Adafruit Industries
Page 8 of 10
�Downloads
Files & Datasheets
• Datasheet for the MCP73831 charger chip (https://adafru.it/dvn)
• Fritzing object in Adafruit Fritzing Library (https://adafru.it/aP3)
• EagleCAD PCB files on GitHub (https://adafru.it/pwD)
Schematic
©Adafruit Industries
Page 9 of 10
�©Adafruit Industries
Page 10 of 10
�
很抱歉,暂时无法提供与“2124”相匹配的价格&库存,您可以联系我们找货
免费人工找货- 国内价格 香港价格
- 1+47.258131+6.12556