Adafruit 2.2" PiTFT HAT - 320x240
Display
Created by lady ada
https://learn.adafruit.com/adafruit-2-2-pitft-hat-320-240-primary-display-for-raspberry-pi
Last updated on 2022-06-22 12:36:29 PM EDT
©Adafruit Industries
Page 1 of 34
�Table of Contents
Overview
3
Easy Install
5
•
•
•
•
•
•
•
•
•
•
•
•
•
•
•
6
6
7
9
10
11
11
12
13
14
14
15
15
15
15
Install Raspberry Pi OS on an SD Card
Installer script
Easy Single Command Install Options
Interactive Installation
Configuring what shows where
PiTFT as Text Console (best for Raspberry Pi OS 'Lite')
PiTFT as HDMI Mirror (Best for Raspberry Pi OS with Desktop)
PiTFT as Raw Framebuffer Device
Creating Your Own Automated Command
Uninstalling The Driver
Unsupported Full Images
PiTFT 2.2" Images
PiTFT 2.4"/2.8"/3.2" Resistive Images
PiTFT 2.8" Capacitive
PiTFT 3.5" Images
Console Configuration
• Turn off Console Blanking
• Raspbian Jessie
• Raspbian Wheezy
16
18
18
19
Displaying Images
19
Playing Videos
21
• How To Play Videos
• Converting/Resizing Videos
21
23
Using FBCP
25
Backlight Control
26
Extras!
27
• Boot to X Windows on PiTFT
27
HELP! (FAQ)
27
Downloads
32
• Schematic
• Fabrication Print
©Adafruit Industries
32
33
Page 2 of 34
�Overview
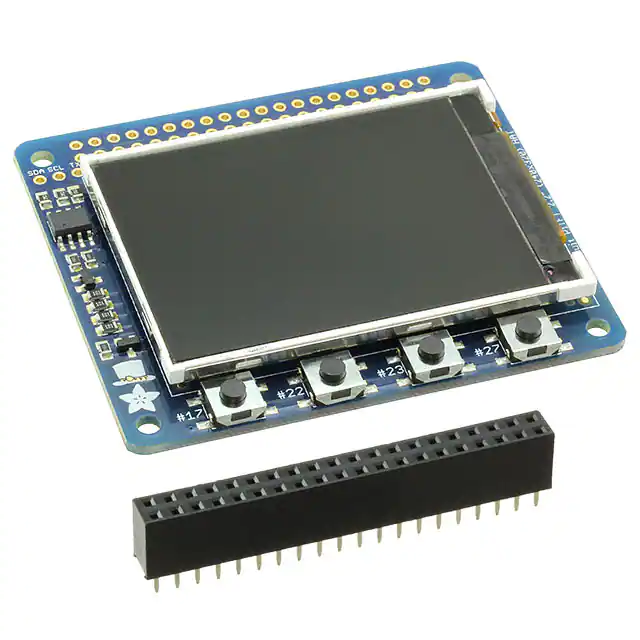
The cute PiTFT got even more adorable with this little primary display for Raspberry Pi
in HAT form! It features a 2.2" display with 320x240 16-bit color pixels. The HAT uses
the high speed SPI interface on the Pi and can use the mini display as a console, X
window port, displaying images or video etc. Best of all it plugs right in on top of your
Model A+ or B+ and fits into our case quite nicely.
It's designed to plug directly onto the Pi Model A+ or B+. While not specifically
designed for Pi Model A or B, you can use it with A/B if you solder in an extra-tall 2x13
header (not included) (https://adafru.it/eib) instead of the included 2x20 header
©Adafruit Industries
Page 3 of 34
�This design uses the hardware SPI pins (SCK, MOSI, MISO, CE0, CE1) as well as GPIO
#25. All other GPIO are unused. Since we had a tiny bit of space, there's 4 flat tactile
switches wired to four GPIOs, that you can use if you want to make a basic user
interface. For example, you can use one as a power on/off button.
All the other pins are available on a 25-pin long breakout line.
To make it super easy for use: we've created a custom kernel package based of off
Notro's awesome framebuffer work, so you can install it over your existing Raspbian
(or derivative) images in just a few commands.
©Adafruit Industries
Page 4 of 34
�Comes as a fully assembled display PCB and an additional 2x20 GPIO header. Some
light soldering is required to attach the 2x20 GPIO header to the HAT but it's fast and
easy for anyone with a soldering iron and solder
This tutorial series shows you how to install the software, play small videos, or display
images such as from your PiCam and more!
Easy Install
©Adafruit Industries
Page 5 of 34
�The PiTFT requires some device tree support and a couple other things to make it a
nice stand-alone display. If you just want to get going, check out the following for
easy-install instructions!
The same installer is used for all PiTFTs, you will pick and configure the setup
during installation!
Install Raspberry Pi OS on an SD Card
You'll need to start with Raspberry Pi OS or Raspberry Pi OS Lite.
The last known for-sure tested-and-working version is May 28, 2021 (https://
downloads.raspberrypi.org/raspios_lite_armhf/images/
raspios_lite_armhf-2021-05-28/ (https://adafru.it/VGE)) from https://
downloads.raspberrypi.org/raspios_lite_armhf/images/ (https://adafru.it/VHb)
Raspberry Pi OS does often 'break' stuff when new versions come out so to be safe, if
you are having problems try this version!
The latest Raspberry Pi Bullseye release is new and may have issues with the
PiTFT. In that case, you can try the previous buster release.
Installer script
This script will do all the work for you, and install both device tree overlay support as
well as configure rotation and any HDMI mirroring. PiTFT no longer needs any custom
kernels or modules, so you can continue to update/upgrade your Pi and it will work
with the most recent releases.
Here's the commands to run. Make sure your Pi has network access, it needs to
download the software!
The latest installer script was rewritten in Python, so it can be installed with just a few
commands. First, start by installing a few dependencies and downloading the repo:
cd ~
sudo apt-get update
sudo apt-get install -y git python3-pip
sudo pip3 install --upgrade adafruit-python-shell click
©Adafruit Industries
Page 6 of 34
�git clone https://github.com/adafruit/Raspberry-Pi-Installer-Scripts.git
cd Raspberry-Pi-Installer-Scripts
Easy Single Command Install Options
The latest script allows you to specify all of your options within the command so you
can sit back and watch the installation. We'll cover interactive installation below if you
want to answer each prompt for a customized installation.
“Console Mode” Install Commands
If you just want a Linux text console to appear on the display, use one of the following
commands:
For the PiTFT 2.4", 2.8", or 3.2" Resistive touchscreens, use the following command:
sudo python3 adafruit-pitft.py --display=28r --rotation=90 --install-type=console
For the PiTFT 2.8" Capacitive touchscreen, use the following command:
sudo python3 adafruit-pitft.py --display=28c --rotation=90 --install-type=console
For the PiTFT 2.2" Display, use the following command:
sudo python3 adafruit-pitft.py --display=22 --rotation=90 --install-type=console
©Adafruit Industries
Page 7 of 34
�For the PiTFT 3.5" Resistive touchscreen, use the following command:
sudo python3 adafruit-pitft.py --display=35r --rotation=90 --install-type=console
For the Mini PiTFT 1.3", BrainCraft HAT, 1.3" Color TFT Bonnet, or 1.5" Display, use the
following command:
sudo python3 adafruit-pitft.py --display=st7789_240x240 --rotation=0 --installtype=console
For the Mini PiTFT 1.14" Display, use the following command:
sudo python3 adafruit-pitft.py --display=st7789_240x135 --rotation=270 --installtype=console
FBCP Install Commands
If you want to mirror the HDMI output to the display, known as “FrameBuffer Copy” or
FBCP for short, use one of the following commands:
For the PiTFT 2.4", 2.8", or 3.2" Resistive touchscreens, use the following command:
sudo python3 adafruit-pitft.py --display=28r --rotation=90 --install-type=fbcp
For the PiTFT 2.8" Capacitive touchscreen, use the following command:
sudo python3 adafruit-pitft.py --display=28c --rotation=90 --install-type=fbcp
For the PiTFT 2.2" Display, use the following command:
sudo python3 adafruit-pitft.py --display=22 --rotation=90 --install-type=fbcp
For the PiTFT 3.5" Resistive touchscreen, use the following command:
sudo python3 adafruit-pitft.py --display=35r --rotation=90 --install-type=fbcp
For the Mini PiTFT 1.3", BrainCraft HAT, 1.3" Color TFT Bonnet, or 1.5" Display, use the
following command:
©Adafruit Industries
Page 8 of 34
�sudo python3 adafruit-pitft.py --display=st7789_240x240 --rotation=0 --installtype=fbcp
For the Mini PiTFT 1.14" Display, use the following command:
sudo python3 adafruit-pitft.py --display=st7789_240x135 --rotation=270 --installtype=fbcp
Rebooting
When it asks you to reboot, then choose yes because the setting won't take full effect
until you do so.
Interactive Installation
For an interactive install, you can just run the script without any options:
sudo python3 adafruit-pitft.py
Once you run it you will be presented with menus for configuration.
Display Selection
Start by selecting the board that best corresponds with your PiTFT. There's lots of
options and we will likely be adding more in the future.
©Adafruit Industries
Page 9 of 34
�Rotation
Next you will be asked for the rotation you want, don't worry if you're not 100% sure
which you want, you can always change this later by re-running the script
It will take a few minutes to install the software and download all the things...
Configuring what shows where
You have a few different ways to set up the PiTFT, we ask 2 questions to figure out
what you want
©Adafruit Industries
Page 10 of 34
�PiTFT as Text Console (best for Raspberry Pi OS 'Lite')
This is the simplest to set-up type of use. Its great if you have a simple text based or
pygame/SDL based interface. If you want the PiTFT to act as a text console you can
expect:
• HDMI will be 'deactivated' - nothing appears on the HDMI output but a black
screen
• The login prompt appears on the Pi
• The Pi is all text, not a GUI (no PIXEL desktop)
• Keyboard and mouse are used only by the PiTFT interface
• Framebuffer-capable software (such as fbi for displaying images, mplayer for
videos, or pygame software, etc) appear on the PiTFT
• OpenGL accelerated software will not appear on the PiTFT (it is unaccelerated
framebuffer only)
• But, non-OpenGL-accelerated graphics software is a bit faster than using HDMI
mirroring (not tons faster but you're not running fbcp which will always make it
faster)
If you want that, say Yes to the question Would you like the console to appear
on the PiTFT display
Then simply reboot. Once rebooted you will not see anything on HDMI, but the
console will appear on the PiTFT. That's it!
PiTFT as HDMI Mirror (Best for Raspberry Pi OS with
Desktop)
This option is the easiest to understand: whatever appears on the HDMI display will
be 'mirrored' to the PiTFT. Note that HDMI is much higher resolution so it's not like it
turns the PiTFT into a 1080p display. This is great for when you want to run OpenGLoptimized software, PIXEL desktop software, or really anything. The down-side is its a
©Adafruit Industries
Page 11 of 34
�little slower than drawing directly to the framebuffer. You may not notice it but it's
worth us mentioning!
• HDMI will be 'activated' but at a lower resolution - you can change this later but
it looks best at 320x240 (PiTFT 2.2", 2.4", 2.8" and 3.2") or 480x320 (PiTFT 3.5")
• The login prompt or GUI appears on both HDMI and PiTFT at the same time
• Keyboard and mouse are shared, since the display is mirrored
• All graphics appear on both HDMI and PiTFT, thanks to fbcp
If you want that, say Yes to the question Would you like the HDMI display to
mirror to the PiTFT display?
PiTFT as Raw Framebuffer Device
For advanced users who are comfortable using framebuffer devices, it is possible to
have the PiTFT and HDMI graphics be both active and display different data.
• HDMI will be active and act like a normal Pi
• The login prompt or GUI (PIXEL) appears on the HDMI
• PiTFT appears black, nothing appears on it
• Keyboard and mouse are used by the HDMI interface but can, in theory, be
captured and used to change graphics on PiTFT through programming
• Framebuffer-capable software (such as fbi for displaying images, mplayer for
videos, or pygame software, etc) can appear on the PiTFT if you set it up to
display to /dev/fb1
• OpenGL accelerated software will never appear on the PiTFT (it is
unaccelerated framebuffer only)
If you want that, say No to both of the configuration questions!
You can always change your mind after setting up one of the configurations,
depending on your needs! Just re-run the script
©Adafruit Industries
Page 12 of 34
�Creating Your Own Automated Command
Under the Easy Single Command Install Options section, there are a bunch of
different installation flags that you can choose between. If you want to create your
own command, you can find the latest options by typing:
sudo python3 adafruit-pitft.py --help
The main options to pay attention to are the --display , --rotation , and -install-type arguments.
For the display, you can either choose the number you type for the options or the
display type, which has the options listed under help. For instance, to us the 2.8"
Resisitive display you could use
--display=1 or --display=28r
For the rotation, you can either choose the number you type for the options or the
angle, which has the options also listed under help. To use 90 degrees, you could use
--rotation=1 or --rotation=90
For install type, You can either choose fbcp, console or uninstall. To use FBCP, you
would simply supply
--install-type=fbcp
©Adafruit Industries
Page 13 of 34
�Automated Reboot Option
To go with a fully automated installation, you can provide a --reboot flag. To always
reboot, use:
--reboot=yes
This is useful if you want to use the display right after running the script. To never
reboot immediately, use
--reboot=no
This is useful if you want it as part of a larger script that installs many things.
Custom User Directory
By default, it is installed under the current user directory, but you can provide the -u
or --user flag along with the folder that you want to install to.
Uninstalling The Driver
To uninstall, you would either run the script interactively and choose Uninstall or you
can provide the uninstall flag:
--install-type=uninstall
Unsupported Full Images
Historically, we provided full 'images' of Raspbian, which is now called Raspberry Pi
OS. This worked OK until Raspbian started doing releases every few months. These
are no longer supported, and won't even boot on Pi 3B+, so we recommend the script
above.
There's the larger 'classic Jessie' image that will boot into X by default, and requires a
8G image, it has a lot more software installed. There's also the smaller 'Jessie Lite'
that will boot into the command line, and can be burned onto a 2G card! Click below
to download and install into a new SD card. Unzip and follow the classic SD card
burning tutorials (https://adafru.it/aMW)
©Adafruit Industries
Page 14 of 34
�PiTFT 2.2" Images
• Raspbian Jessie 2016/10/23-based image (https://adafru.it/sbg)
• Raspbian Jessie Lite 2016/10/23-based image (https://adafru.it/sbh)
• Raspbian Jessie 2016/03/25-based image (https://adafru.it/mAe)
• Raspbian Jessie Lite 2016/03/25-based image (https://adafru.it/mAf)
• Raspbian Jessie 2015/09/24-based image (https://adafru.it/iDC)
• Raspbian Wheezy 2015/09/09-based image (https://adafru.it/idt)
PiTFT 2.4"/2.8"/3.2" Resistive Images
• Raspbian Jessie 2016/9/23-based image (https://adafru.it/s7f)
• Raspbian Jessie Lite 2016/9/23-based image (https://adafru.it/s7A)
• Raspbian Jessie 2016/03/25-based image (https://adafru.it/mA9)
• Raspbian Jessie Lite 2016/03/25-based image (https://adafru.it/mAa)
• Raspbian Jessie 2015/09/24-based image (https://adafru.it/iDA)
• Raspbian Wheezy 2015/09/09-based image (https://adafru.it/idJ)
• Raspbian 2014/06/20-based image (https://adafru.it/dSM)
• Raspbian 2014/09/09-based image (https://adafru.it/e12)
PiTFT 2.8" Capacitive
• Raspbian Jessie 2016-09-23-based image (https://adafru.it/saM)
• Raspbian Jessie Lite 2016-09-23-based image (https://adafru.it/saN)
• Raspbian Jessie 2016-03-25-based image (https://adafru.it/mAc)
• Raspbian Jessie Lite 2016-03-25-based image (https://adafru.it/mAd)
• Raspbian Jessie 2015/09/24-based image (https://adafru.it/iDy)
• Raspbian Wheezy 2015/09/24-based image (https://adafru.it/idz)
• Raspbian 2014/09/18-based image (https://adafru.it/e11)
• Raspbian 2014/06/20-based image (https://adafru.it/dSO)
• Raspbian image from 2015/03/03 (https://adafru.it/eUI)
PiTFT 3.5" Images
• Raspbian Jessie 2016/9/23-based image (https://adafru.it/siF)
• Raspbian Jessie Lite 2016/9/23-based image (https://adafru.it/sja)
• Raspbian Jessie 2016/03/25-based image (https://adafru.it/mAb)
• Raspbian Jessie 2016/03/25-based image (https://adafru.it/mAG)
• Raspbian Jessie 2015/09/24-based image (https://adafru.it/iDD)
• Raspbian Wheezy 2015/09/24-based image (https://adafru.it/idy)
©Adafruit Industries
Page 15 of 34
�• Raspbian 2014/09/09-based image (https://adafru.it/e10)
• Raspbian 2015/03/12 image (https://adafru.it/eUE)
Console Configuration
If you've used our installer script, this step is not required, it's already done! This
is just for advanced users who are curious on how to configure and customize
the console
One fun thing you can do with the display is have it as your main console instead of
the HDMI/TV output. Even though it is small, with a good font you can get 20 x 40 of
text. For more details, check out https://github.com/notro/fbtft/wiki/Boot-console (http
s://adafru.it/cXQ)
First up, we'll update the boot configuration file to use the TFT framebuffer /dev/fb1
instead of the HDMI/TV framebuffer /dev/fb0
sudo nano /boot/cmdline.txt
you can also edit it by putting the SD card into a computer and opening the same file.
At the end of the line, find the text that says rootwait and right after that, enter in:
fbcon=map:10 fbcon=font:VGA8x8 then save the file.
On the next boot, it will bring up the console.
Note that the kernel has to load up the display driver module before it can display
anything on it so you won't get the rainbow screen, a NooBs prompt, or a big chunk of
the kernel details since the module is loaded fairly late in the boot process.
©Adafruit Industries
Page 16 of 34
�I think the VGA8x8 font is a bit chunky, you probably want 12x6 which is what is
shown in the photo above. To change the font, run sudo dpkg-reconfigure consolesetup and go thru to select Terminus 6x12
©Adafruit Industries
Page 17 of 34
�Turn off Console Blanking
You may notice the console goes black after 30 minutes, this is a sort of 'power
saving' or 'screensaver' feature.
Raspbian Jessie
Add the following line to /etc/rc.local
sudo sh -c "TERM=linux setterm -blank 0 >/dev/tty0"
on the line before the final exit 0
©Adafruit Industries
Page 18 of 34
�Raspbian Wheezy
You can disable this by editing /etc/kbd/config and looking for
BLANK_TIME=30
and setting the blank time to 0 (which turns it off)
BLANK_TIME=0
Displaying Images
You can display every day images such as GIFs, JPGs, BMPs, etc on the screen. To do
this we'll install fbi which is the frame buffer image viewer (not to be confused with
the FBI agency!)
sudo apt-get install fbi will install it
©Adafruit Industries
Page 19 of 34
�Grab our lovely wallpapers with
wget http://adafruit-download.s3.amazonaws.com/
adapiluv320x240.jpg
wget http://adafruit-download.s3.amazonaws.com/
adapiluv480x320.png (https://adafru.it/cXU)
For 320x240 PiTFTs (2.2", 2.4", 2.8" or 3.2") view it with
sudo fbi -T 2 -d /dev/fb1 -noverbose -a adapiluv320x240.jpg
or for 3.5" PiTFTs:
sudo fbi -T 2 -d /dev/fb1 -noverbose -a adapiluv480x320 (htt
ps://adafru.it/cXU).png
That's it!
©Adafruit Industries
Page 20 of 34
�Playing Videos
How To Play Videos
You can play many types of videos on the screen, using mplayer you don't even need
to run X and you can script the movies to play using Python. We'll show you how to
just play one video for now.
To demo, we'll use an mp4 of Big Buck Bunny for 320 pixel wide screens. Below we
©Adafruit Industries
Page 21 of 34
�show you how to create/resize videos, but to make it easy, just download our version
with:
wget http://adafruit-download.s3.amazonaws.com/
bigbuckbunny320p.mp4 (https://adafru.it/cXR)
The video is 30MB which is a lot if you haven't expanded your SD card yet.
Before you do this, run sudo raspi-config to expand the SD card so you don't run
out of space!
If you don't have mplayer yet, run
sudo apt-get update
sudo apt-get install mplayer
to install it. It may take a few minutes to complete
OK now you just have to run:
sudo SDL_VIDEODRIVER=fbcon SDL_FBDEV=/dev/fb1 mplayer -vo sdl framedrop bigbuckbunny320p.mp4
If your video is not sized for 320 wide, you may need to add a -zoom after framedrop so that it will resize - note that this is quite taxing for the Pi, so it may
result in a choppy or mis-synced video!
©Adafruit Industries
Page 22 of 34
�Converting/Resizing Videos
It's possible to play full length videos on the TFT plate, but since the screen is small
and the Pi cant use hardware accelleration to play the videos its best to scale them
down to 320x240 pixels. This will be easier for the Pi to play and also save you tons
of storage space. For this demo, we'll be using the famous Big Buck Bunny (https://
adafru.it/cXS) video, which is creative commons and also very funny!
You can download it from the link above, we'll be using the 720p AVI version.
©Adafruit Industries
Page 23 of 34
�To do the conversion itself, we suggest HandBrake (https://adafru.it/cXT) which works
great and is open source so it runs on all operating systems! Download and install
from the link. Then run the installed application and open up the AVI file from before.
The app will pre-fill a bunch of information about it.
Under Destination click Browse... to select a new MP4 file to save. Then under Picture
change the Width to 320 (the height will be auto-calculated)
Click START to begin the conversion, it will take a minute or two.
©Adafruit Industries
Page 24 of 34
�That's it! You now have a smaller file. Don't forget to play it on your computer to make
sure it plays right before copying it to your Pi
Using FBCP
The Ideal: Adafruit’s PiTFT displays are razor sharp. Whereas small composite screens
on the Raspberry Pi usually require some video scaling (resulting in blurriness), PiTFT
uses the GPIO header, digitally controlled pixel-by-pixel for a rock steady image.
Though not a lot of pixels, it works great for retro gaming (and the display neatly
stacks above the board, no side protuberances for video cables).
The Downside: this GPIO link entirely bypasses the Pi’s video hardware, including the
graphics accelerator. Many games and emulators depend on the GPU for
performance gains. So the PiTFT has traditionally been limited to just a subset of
specially-compiled emulators that can work and run well enough without the GPU.
©Adafruit Industries
Page 25 of 34
�The Solution: our latest PiTFT drivers, along with a tool called fbcp (framebuffer copy),
careful system configuration, and (optionally) the more potent Raspberry Pi 2 board
open the doors to many more gaming options. Existing emulator packages (such as
RetroPie, with dozens of high-performance emulators and ports) — previously offlimits to the PiTFT — can run quite effectively now!
Click here to go to our FBCP tutorial!
https://adafru.it/fbe
Backlight Control
Unlike the resistive 2.8" PiTFT, this little PiTFT does not have a resistive touch
controller chip that we can take advantage of as an extra backlight control pin.
Instead, you can set use GPIO #18 as an on/off or PWM control.
Note that if you are playing audio out the headphone jack, you can't use the PWM
capabilities of GPIO #18 at the same time, the PWM function is reassigned to do
audio. However, you can use it as a simple on/off pin
There's python code available for controlling the PWM on #18 but you can also just
use the kernel module and shell commands.
With these basic shell commands, you can set the GPIO #18 pin to PWM mode, set the
output to 100 (out of 1023, so dim!), set the output to 1000 (out of 1023, nearly all the
way on) and 0 (off)
sudo
gpio
gpio
gpio
gpio
apt-get install wiringpi
-g mode 18 pwm
-g pwm 18 100
-g pwm 18 1000
-g pwm 18 0
Try other numbers, from 0 (off) to 1023 (all the way on)!
©Adafruit Industries
Page 26 of 34
�Extras!
Boot to X Windows on PiTFT
Use the Pi installer script, select N on having the console appear on the Pi, and say Y
to mirroring HDMI. Then enable PIXEL using sudo raspi-config (boot to desktop)
HELP! (FAQ)
My PiTFT used to work, now it doesn't!
If you messed with /boot/config.txt or /etc/rc.local you may have
removed or disabled some of the elements required for the PiTFT to work. Try rerunning the Easy Installer script!
I have a Pi 4 or Pi 400 and my HDMI output looks very
weird
The Raspberry Pi 4 and the Raspberry Pi 400 have dual HDMI outputs. However,
only one of those is a primary port. The is likely caused by connecting to HDMI1.
Please try connecting the display to the other HDMI port and rebooting.
For the Pi 4, HDMI 0 is closer to the USB-C port. For the Pi 400, it's the port closer
to the MicroSD Card slot.
I'm booting my Pi with the PiTFT and the HDMI output
'locks up' during boot!
It looks like the Pi is 'halting' or 'locking' up during boot but what is really
happening is the console is switching from the HDMI output to the PiTFT console
output.
Check your PiTFT connections, particularly make sure you seated the PiTFT on the
Pi properly, nothing is in the way, and the TFT flex connector is seated properly.
©Adafruit Industries
Page 27 of 34
�My PiTFT works for a bit and then I get a black screen
with a short line of white pixels in one corner
Sounds like you tried to configure your Pi to 'boot straight to X', that is, start up the
graphics interface on boot. This doesn't work by default because the Pi operating
system is not expecting a PiTFT so it boots to the HDMI output. See below for how
to set up your Pi to boot to X on the PiTFT
To 'fix' this, you can either connect an HDMI monitor, then in a terminal window run
sudo raspi-config and configure the Pi to boot to the command line not X! If you do
not have an HDMI monitor, you can also try a console cable
I'm tring to run startx and I get FATAL: Module g2d_23 not
found.
don't forget you have to remove the turbo file!
sudo mv /usr/share/X11/xorg.conf.d/99-fbturbo.conf ~
How come OMX-Player and Minecraft and other programs
don't appear on the PiTFT display?
Some programs are graphics-optimized, particularly the video playback tools and
some other programs like Minecraft. They write 'directly' to the HDMI output, and
©Adafruit Industries
Page 28 of 34
�cannot write to the PiTFT so there is no way to directly make them work. However,
you can have the output go to HDMI and then mirror the HDMI onto the PiTFT with
fbcp. Using the Easy Installer, select Mirror HDMI
Why doesn't the tactile button on GPIO #21 work?
On some older PiTFTs we had one of the buttons labeled #21 - that's the original
RasPi name for that pin. If you're using a V2 (chance is, you are!) that is now called
#27.
All the PiTFT's we ship now have the button labeled #21 and #27
I want better performance and faster updates!
You can change the SPI frequency (overclock the display) by editing /boot/
config.txt and changing the dtoverlay options line to:
dtoverlay=pitft28r,rotate=90,speed=62000000,fps=25
Or whatever you like for speed, rotation, and frames-per-second. BUT, here's the
thing, the Pi only supports a fixed number of SPI frequencies. So tweaking the
number a little won't do anything. The kernel will round the number to the closest
value. You will always get frequencies that are 250MHz divided by an even
number. Here's the only SPI frequencies this kernel supports
• 15,625,000 (a.k.a 16000000 = 16 MHz)
• 17,857,142 (a.k.a. 18000000 = 18 MHz)
• 20,833,333 (a.k.a 21000000 = 21 MHz)
• 25,000,000 (= 25 MHz)
• 31,250,000 (a.k.a 32000000 = 32MHz)
• 41,666,666 (a.k.a 42000000 = 42MHz)
• 62,500,000 (a.k.a 62000000 = 62MHz)
So if you put in 48000000 for the speed, you won't actually get 48MHz, you'll
actually only get about 42MHz because it gets rounded down. We tested this
display nicely with 32MHz and we suggest that. But you can put in 42MHz or even
try 62MHz and it will update faster
You can tweak fps (frames per second) from 20 to 60 and frequency up to 62MHz
for tradeoffs in performance and speed. Reboot after each edit to make sure the
settings are loaded properly. There's a trade off that if you ask for higher FPS
you're going to load the kernel more because it's trying to keep the display
updated.
©Adafruit Industries
Page 29 of 34
�How can I take screenshots of the little screen?
We took the screenshots for this tutorial with (https://adafru.it/diV)fbgra (https://
adafru.it/diV)b (https://adafru.it/diV)
wget http://fbgrab.monells.se/fbgrab-1.2.tar.gz (https://adafru.it/diW)
tar -zxvf fbgrab*gz
cd fbgrab/
make
./fbgrab screenshot.png
How do I automatically boot to X windows on the PiTFT?
Make sure your Pi boots to the graphical PIXEL desktop on the HDMI output
monitor, then using the Easy Installer, select Mirror HDMI
My screen isn't working/works erratically/looks funny
Check to make syre that the flat flex cable is fully seated in the connetor and the
'ears' are pushed in to secure it. See the picture for what it should look like:
©Adafruit Industries
Page 30 of 34
�On my first run of startx I get a window saying "GDBus
Error.org.Freedesktop Policy Kit1 Error: Failed Cannot
determine user of subject"
This happens on the Raspberry Pi the first time you run startx, no matter what
display. You can just re-start X and it wont appear again.
Can I get a right-click from the touch-screen?
Yes! Please see this post:
https://forums.adafruit.com/viewtopic.php?
f=47&t=77528&p=393280#p393322 (https://adafru.it/fH3)
I'm having difficulties with the STMPE resistive touch
screen controller
Here's a hack for the device tree overlay that can force different SPI modes,
sometimes that helps! (https://adafru.it/fEw)
©Adafruit Industries
Page 31 of 34
�My PiTFT's rotation/calibration isn't working in X11
X11 (the graphical system) has changed how it gets touchscreen input, so if you
rotate the display and the calibration isn't being picked up:
Check /usr/share/X11/xorg.conf.d for a file called 10-evdev.conf
If you don't see that file
1. You need to sudo apt-get install xserver-xorg-input-evdev , and
then...
2. If you do have a 40-libinput.conf in that same directory, you must remove it
even if/once evdev is installed, since it will override the 10-evdev.conf
otherwise.
Thanks to cerebrate in the forums for the hint! (https://adafru.it/fEw)
Downloads
• The latest kernel fork that adds all the TFT, touchscreen, and other addons is
here on github (https://adafru.it/aPa)
• ILI9340 (datasheet) (https://adafru.it/ehr) controller with built in pixeladdressable video RAM buffer
• Display datasheet (https://adafru.it/ehs)
• EagleCAD PCB files on GitHub (https://adafru.it/rFP)
• Fritzing object in the Adafruit Fritzing Library (https://adafru.it/aP3)
Schematic
click to enlarge
©Adafruit Industries
Page 32 of 34
�Fabrication Print
©Adafruit Industries
Page 33 of 34
�©Adafruit Industries
Page 34 of 34
�