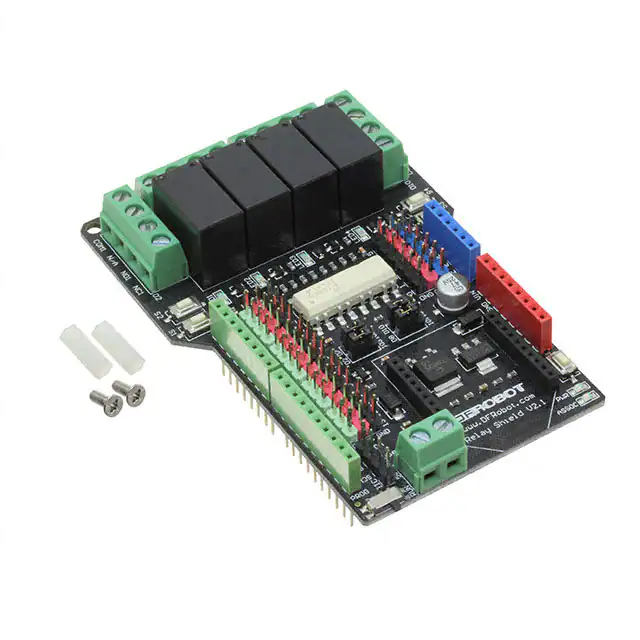
Relay Shield for Arduino V2.1 (SKU:DFR0144)
From Robot Wiki
Contents
1 Introduction
2 Specification
3 PinOut
4 Tutorial
o 4.1 Connection Diagram
4.1.1 Plugging in an appliance
o 4.2 Sample Code
Introduction
The DFRobot Relay shield V2.1 is capable of controlling 4 relays. The max switching power is
DC 90W or AC 360VA. It is possible to control the Relay shield through Arduino/DFRduino
using digital IOs with external 7 to 12V supply. With the built in xbee socket, it can be
wirelessly controlled via Xbee/bluetooth/WPM. This makes it an ideal solution for automation
and robotics.
�Specification
Compatible with Arduino Rev3
4 buttons to test module
LED status indicator of relay
Support Xbee IO directly control
Xbee socket for wireless communication
Selectable digital IO pin for control(Default digital 2,7,8,10)
6 channels Analog IO & 13 channels Digital IO
Up to 4 Relay with photo‐coupled circuit
Relay information:
o Contact Rating 3A AC 120V / DC 24V
o Max Switching Voltage AC 240V / DC 60V
o Max Switching Current 5A
o Max Switching Power AC 360VA / DC 90W
o Electrical Life (Min) 100,000 Operations
o Mechanical Life (Min) 10,000,000 Operations
o Safety Standard(relay) UL cUL TUV CQC
o Coil Working Voltage 9VDC
o Working temperature ‐30 to +85
o Working temperature 40% ‐ 85%
Size:95x65mm
PinOut
Instruction of Digital Pin State
Pin
Pin State:HIGH
Pin State:LOW
Digital 2
NC1 is disconnected with COM1
NC1 is connected with COM1
NO1 is connected with COM1
NO1 is disconnected with COM1
Digital 7
NC2 is disconnected with COM2
NC2 is connected with COM2
NO2 is connected with COM2
NO2 is disconnected with COM2
Digital 8
NC3 is disconnected with COM3
NC3 is connected with COM3
NO3 is connected with COM3
NO3 is disconnected with COM3
�Digital 10 NC4 is disconnected with COM4
NC4 is connected with COM4
NO4 is disconnected with COM4
NO4 is connected with COM4
Note: NC: Normally Closed; NO: Normally Open.
More detalis:
PROG SWITCH:
o PROG: When programming or download the code if you plug the Xbee/bluetooth on the
module
o RGN: Run the module after finishing downloading the code
S1,S2,S3,S4: 4 Buttons to test the module that you needn't program,S1‐ S4 correspond to relay1‐
relay4
Servo Power Supply: Just can supply power to the digital IO pins.
4 Digital IO selection headers for the Relays:
o D2,D7,D8,D10: Default,connect to Arduino digital 2,7,8,10 to drive the relays
o IO0,IO1,IO2,IO3:Connect to XBee's IO pins
o You can connect the middle pin header after you unplug the jumper, to Arduino digital
IO with jumper cables depend on your needed pin mapping to drive relays. For
example, when you use the board with an Arduino Ethernet board. They will conflict
the digital 10, so you should remove the jumper on D10, and connect the middle pin
to other digital IO.
XBee interface: The XBee module supports Xbee radios, Bluetooth Bee, and the Wireless
programming module. This gives the project a versatile wireless communications capability.
�Tutorial
Connection Diagram
In this sample connection diagram it shows how LED can be controlled via relays, while this is a
bit of overkill for controlling LEDs its only meant to be an example. These relays can be used to
control lamps, or some other mid-voltage range appliances.
Figure1:Controlling LEDs with one relay
Plugging in an appliance
We will use "NO" for our example, using "NC" will simply reverse the logic, as explained
above.
We recommend using a swappable cable to do this with, as using a relay requires you to perform
some minor surgery on the appliance's cable. To plug in an appliance such as a lamp: Cut and
strip a portion of the positive wire so that you end up with two ends of the wire as shown in
Figure 2.
�The relay should have the positive wire of the device being used connected to "COM" and to
"NO" as shown in figure 2, and any digital signal pin on the arduino end (For example pin 13).
Sending a digital high or a "1" will trigger the relay. Sending a digital low or "0" will disable the
relay.
Figure2:Lamp Demo
Please be vary carful not to play with live circuits! 120V or 220V should not be
taken lightly. Make sure the appliance to be tinckered with is unplugged from
mains. DO NOT CONNECT IT TO THE WALL WHILE MESSING WITH THE
CABLE!
Sample Code
byte relayPin[4] = {2,7,8,10};
//D2 -> RELAY1
//D7 -> RELAY2
//D8 -> RELAY3
�//D10 -> RELAY4
void setup(){
for(int i = 0; i < 4; i++)
pinMode(relayPin[i],OUTPUT);
}
// an sample to switch the 4 relays
void loop(){
int i;
for(i = 0; i < 4; i++)
digitalWrite(relayPin[i],HIGH);
delay(1000);
for(i = 0; i < 4; i++)
digitalWrite(relayPin[i],LOW);
delay(1000);
}
A more elaborate sample code
/*
# This Sample code is for testing the Relay shield V2.1 for Arduino.
# Editor : Phoebe
# Date
: 2013.2.28
# Ver
: 0.1
# Product: Relay shield for Arduino
# SKU
: DRI0144
# Hardwares:
1. Arduino UNO
2. Relay Shield For Arduino V2.1
3
*/
Power Supply:7~ 12V
�byte relayPin[4] = {
2,7,8,10};
//D2 -> RELAY1
//D7 -> RELAY2
//D8 -> RELAY3
//D10 -> RELAY
char input=0;
int val;
void setup() {
for(int i = 0; i < 4; i++)
pinMode(relayPin[i],OUTPUT);
Serial.begin(57600);
delay(100);
Serial.println("Press 1-4 to control the state of the relay");
Serial.println("waiting for input:");
for(int j = 0; j < 4; j++)
digitalWrite(relayPin[j],LOW);
}
void loop() {
if (Serial.available())
{
char input= Serial.read();
if(input != -1)
{
switch(input)
{
case '1':
Serial.println("Relay1");
val=digitalRead(relayPin[0]);
val=!val;
digitalWrite(relayPin[0],val);
break;
�case '2':
Serial.println("Relay2");
val=digitalRead(relayPin[1]);
val=!val;
digitalWrite(relayPin[1],val);
break;
case '3':
Serial.println("Relay3");
val=digitalRead(relayPin[2]);
val=!val;
digitalWrite(relayPin[2],val);
break;
case '4':
Serial.println("Relay4");
val=digitalRead(relayPin[3]);
val=!val;
digitalWrite(relayPin[3],val);
break;
default:
if(input != '\r' && input != '\n')
Serial.println("invalid entry");
break;
}
}
//
else unablerelay();
}
}
Powered By DFRobot © 2008-2017
�
