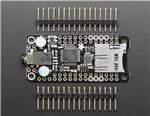
Adafruit Music Maker FeatherWing
Created by lady ada
https://learn.adafruit.com/adafruit-music-maker-featherwing
Last updated on 2022-09-02 01:04:31 PM EDT
©Adafruit Industries
Page 1 of 23
�Table of Contents
Overview
3
Pinouts
7
•
•
•
•
•
•
•
•
SPI Pins
Control Pins
Power Pins
MIDI Data Pin
Line Level Audio Breakouts (Headphone out version)
Speaker outputs (Amplifier version)
Amplifier Gain
Reset Jumper & Pad
Installing Software
11
Play Music
12
• Load some MP3 files
• Simple Audio Player Sketch
• Upload & Test!
MIDI Synth
15
• Solder Closed MIDI Jumper
Library Reference
•
•
•
•
16
Adafruit_VS1053_FilePlayer
Public Methods:
Public Member Variables:
Adafruit_VS1053
Downloads
20
• Library:
• Datasheets & Files
• Schematics
Troubleshooting
©Adafruit Industries
22
Page 2 of 23
�Overview
Bend all audio files to your will with the Adafruit Music Maker FeatherWing! It's a funsize version of our Music Maker shield for Arduino (https://adafru.it/tbM)! This
powerful shield features the VS1053, an encoding/decoding (codec) chip that can
decode a wide variety of audio formats such as MP3, AAC, Ogg Vorbis, WMA, MIDI,
FLAC, WAV (PCM and ADPCM). You can do all sorts of stuff with the audio as well
such as adjusting bass, treble, and volume digitally.
©Adafruit Industries
Page 3 of 23
�All this functionality is implemented in a light-weight SPI interface so that any Feather
Board can play audio from an SD card. There's also a special MIDI mode that you can
boot the chip into that will read 'classic' 31250Kbaud MIDI data from the UART TX pin
and act like a synth/drum machine - there are dozens of built-in drum and sample
effects!
What a great musical add-on to your Feather! That's why we spun up this super
FeatherWing, perfect for use with any of our Feather Boards! Music (MP3) playback
testing working with all Feathers. MIDI playback works with all Feathers but you may
need to remove the 'Wing during programming and also for USB-Serial Feathers like
the ESP8266 and nRF52 you'll end up re-using the main Serial console for MIDI which
can be confusing.
We even made two versions. One version has headphone jack output, so you can
listen directly or connect to an audio amp. The other version has a built in stereo
amplifier that can driver 4-8 ohm speakers, up to 3W per channel!
©Adafruit Industries
Page 4 of 23
�Here are some specs:
• Features the VS1053B codec chip - decodes Ogg Vorbis, MP3/MP2/MP1, MP4,
AAC, WMA, FLAC, WAV/PCM, MIDI.
• Stereo audio out with proper audio filter caps and ground reference so it can be
safely connected directly to headphones, a stereo system or other powered
speakers
• MicroSD card socket, for any FAT16/FAT32 formatted SD card from 64MB or
greater
• Built in MIDI synth/drum machine with dozens of instruments
• Headphone 3.5mm stereo line level or stereo audio out to any 4ohm speakers
(3W max) or 8 ohm speakers (1W max), class D output
©Adafruit Industries
Page 5 of 23
�Each order comes with one tested FeatherWing, and two sticks of 0.1" male headers
to plug it into your Feather and terminal blocks if you have the Amplifier version.
Some light soldering is required to attach the through-hole headers to the PCB for
plugging into your Feather Board. Headphones, speakers, SD card and Feather Board
not included!
©Adafruit Industries
Page 6 of 23
�Pinouts
There's a lot of stuff going on in this wing! Lets look at the board and all the pinouts.
Note that overall pin usage and software is the same between both headphone and
amp versions.
Nearly all pins on the FeatherWing have 'duplicate' pins side-by-side so even when its
soldered in, you can connect to digital pins with wires.
SPI Pins
The Music Maker wing has a bunch of pins required for use.
There are three 'totally fixed' pins, the hardware SPI pins:
• SPI SCK - connected to SCK - used by both the SD card and VS1053
• SPI MISO - connected to MISO - used by both the SD card and VS1053
• SPI MOSI - connected to MOSI - used by both the SD card and VS1053
©Adafruit Industries
Page 7 of 23
�These are needed whenever you are transmitting data from SD card to the decoder
chip. If you are using the wing in the special MIDI mode, they're not used.
Control Pins
There are a couple other pins that are required for talking to the SD and VS1053 to
play MP3s and such. From left to right, above, they are:
• XDCS - this is the VS1053 data select pin
• DREQ - this is the VS1053 data request interrupt pin
• MP3CS - this is the VS1053 chip select pin
• SD CS - this is the SD Card chip select pin
These are needed whenever you are transmitting data from SD card to the decoder
chip. If you are using the wing in the special MIDI mode, they're not used.
Power Pins
©Adafruit Industries
Page 8 of 23
�For both headphone & amp version: to power the SD card and MP3 chip, we need
power from the 3V (2nd pin) and GND (4th pair of pins).
For the amplifier version of the Music Maker, we also use the USB or VBAT pins
(whichever has more voltage) to power the amplifier.
MIDI Data Pin
This is the UART data pin that is connected to the MIDI RX on the VS1053. If you short
the jumper on the back to put it in MIDI mode, you can send data from the TX pin.
This pin is always connected.
©Adafruit Industries
Page 9 of 23
�Line Level Audio Breakouts (Headphone
out version)
If you don't want to use a 3.5mm jack, you can always connect directly to the Ground,
Right and Left pins next to the headphone jack. They are line level, AC coupled
outputs - so its safe to connect them to an amplifier or other device input.
Speaker outputs (Amplifier version)
This is the bridge-tied-load output from the VS1053 through the amplifier chip.
Connect to 4 to 8 ohm speakers. If you don't need both outputs, just keep one
disconnected. Don't connect the outputs together! Nor can you connect the outputs
to another amplifier - they are for direct connection to a speaker only!
Once you've soldered the terminal blocks in you can connect any speaker you like,
such as our 4Ω 3W (http://adafru.it/1314) or 8Ω 1W (http://adafru.it/1313). Hey you can
even use a surface transducer (http://adafru.it/1785)! Don't forget to make sure you
have a good strong 5V power supply - especially if you're using the 3W 4 ohm
speakers! Our 2.4A power plug is recommended (http://adafru.it/1995).
©Adafruit Industries
Page 10 of 23
�Amplifier Gain
The default gain is 2 Volts/Volts (6 dB). You can change the decoding gain/volume
through the software library. On the off chance if you absolutey have to change the
gain, you can short the jumpers on the bottom of the Wing. This is really really not
recommended because you can easily blow out your speakers or damage the amp!
Reset Jumper & Pad
The VS1053 chip reset is tied to the Feather reset by default. This means if you press
the reset button on your Feather it will reset both chips. This works great for nearly all
uses.
However, for some projects, you may find you want to reset the VS1053 manually.
The Reset jumper is there if you want to manually reset the VS1053 separately from
the main reset for the Feather. Cut the jumper and then wire the rst pad to a digital i/o
pin.
For 99% of users, just leave the jumper as is!
Installing Software
To get started with the Music Maker, you'll need to control the built-in VS1053 chip by
installing the Adafruit_VS1053 library (https://adafru.it/clE)
Open up the Arduino library manager:
©Adafruit Industries
Page 11 of 23
�Search for Adafruit_VS1053 library and install it
Play Music
Load some MP3 files
Copy 2 MP3 files to a micro SD card and name them track001.mp3 and track002.mp3
(this is just for the test, you can re-name them later). Then push the uSD card into the
slot on the shield
The SD library for Arduino can only handle 8.3 names, that means you can name
your file track001.mp3 (8 letters dot 3 letters) but not MyFavoriteMusic.mp3
©Adafruit Industries
Page 12 of 23
�Make sure you have a good quality SD card, some cheap SD cards won't work,
causing confusion! Especially 'non-brand' knockoffs.
Simple Audio Player Sketch
Connect the Feather to your computer with a USB cable and plug your headphones
into the headphone jack. Since it may be loud at first, don't put them full on your ears
yet.
Select File->Examples->Adafruit_VS1053->feather_player to load the example code.
For all the current Feathers, the correct pins are layed out for you in the beginning.
When you upload the correct pins will automagically be used!
Interrupt based playback currently does not work on ESP32 platforms.
// Feather M0 or 32u4
#if defined(__AVR__) || defined(ARDUINO_SAMD_FEATHER_M0)
#define VS1053_CS
6
// VS1053 chip select pin (output)
#define VS1053_DCS
10
// VS1053 Data/command select pin (output)
#define CARDCS
5
// Card chip select pin
// DREQ should be an Int pin *if possible* (not possible on 32u4)
#define VS1053_DREQ
9
// VS1053 Data request, ideally an Interrupt pin
// Feather ESP8266
#elif defined(ESP8266)
#define VS1053_CS
#define VS1053_DCS
#define CARDCS
#define VS1053_DREQ
16
15
2
0
//
//
//
//
VS1053 chip select pin (output)
VS1053 Data/command select pin (output)
Card chip select pin
VS1053 Data request, ideally an Interrupt pin
// Feather ESP32
#elif defined(ESP32)
©Adafruit Industries
Page 13 of 23
�#define
#define
#define
#define
VS1053_CS
VS1053_DCS
CARDCS
VS1053_DREQ
32
33
14
15
//
//
//
//
VS1053 chip select pin (output)
VS1053 Data/command select pin (output)
Card chip select pin
VS1053 Data request, ideally an Interrupt pin
// Feather Teensy3
#elif defined(TEENSYDUINO)
#define VS1053_CS
3
#define VS1053_DCS
10
#define CARDCS
8
#define VS1053_DREQ
4
//
//
//
//
VS1053 chip select pin (output)
VS1053 Data/command select pin (output)
Card chip select pin
VS1053 Data request, ideally an Interrupt pin
// WICED feather
#elif defined(ARDUINO_STM32_FEATHER)
#define VS1053_CS
PC7
//
#define VS1053_DCS
PB4
//
#define CARDCS
PC5
//
#define VS1053_DREQ
PA15
//
#elif defined(ARDUINO_FEATHER52)
#define VS1053_CS
30
#define VS1053_DCS
11
#define CARDCS
27
#define VS1053_DREQ
31
#endif
//
//
//
//
VS1053 chip select pin (output)
VS1053 Data/command select pin (output)
Card chip select pin
VS1053 Data request, ideally an Interrupt pin
VS1053 chip select pin (output)
VS1053 Data/command select pin (output)
Card chip select pin
VS1053 Data request, ideally an Interrupt pin
Upload & Test!
Upload the sketch to your Feather, make sure the SD card with the correct mp3 files is
inserted. Open up the serial console once upload is complete
You should see the following:
And audio playing from the headphone jack.
If you get
Adafruit VS1053 Simple Test
Couldn't find VS1053, do you have the right pins defined?
©Adafruit Industries
Page 14 of 23
�Check that you've soldered all the pins of the FeatherWing and if you have soldered
closed the MIDI jumper on the bottom, clear that jumper with some solder wick! (You
cannot use MIDI mode and SPI control mode at once)
If you don't see TRACK001.MP3 in the file listing, make sure you copied over the files!
Also, if you're using Bluefruit 32u4/M0 or LoRa or RFM69 Feather, make sure to
disable the radio with a pinMode(8, INPUT_PULLUP); in setup()
Note that for all but the 32u4-based Feathers, playing occurs in 'the background' with
an interrupt that handles reading data from the SD card and piping it to the MP3 chip!
MIDI Synth
With a simple solder jumper connection, the board will boot up in MIDI mode that will
read 'classic' 31250Kbaud MIDI data on the UART pin and act like a synth/drum
machine - there are dozens of built-in drum and sample effects.
On the Feathers that have a separate UART for USB communicating (e.g. 32u4, M0,
WICED, Teensy and any others with native USB) you'll want to use Serial1 as the serial
port. On the ones that use the UART (e.g. nRF52, ESP8266, etc) use Serial and note
that this will make the serial console not work right because the baud rate is now
31250 KBaud!
You may also need to remove the FeatherWing while programming boards that have
Serial not Serial1 as the serial port because the VS1053 can interfere with the UART
during upload. If you have a 32u4, M0, Teensy, etc with native USB you will not need
to remove it.
Solder Closed MIDI Jumper
By default, MIDI mode is not 'activated' - but its very easy to turn on. Start by
soldering the jumper on the bottom of the Feather.
Once that is done, you can no longer play an MP3, you will only be able to send MIDI
commands via the hardware UART (TX) pin. That pin is automatically connected.
©Adafruit Industries
Page 15 of 23
�Now load up the MIDI demo File->Examples->Adafruit_VS1053->player_miditest
Upload to the Arduino + Shield and listen on the headphone jack for the Ocarina
scale being played. You can check the datasheet for a list of all the instruments
(there's a lot!)
Library Reference
The full library reference documentation can be access via the link below:
Adafruit VS1053 Arduino Library
https://adafru.it/10IF
The information here is a brief overview of the main functions of interest.
©Adafruit Industries
Page 16 of 23
�Adafruit_VS1053_FilePlayer
The Adafruit_VS1053_FilePlayer class is derived from the Adafruit_VS1053
class and provides high level functions for playing files stored on the VS1053
breakout SD Card reader. Use this class for easy access and playback of files stored
on an SD card.
There are two general methods of playback:
• Non-interrupt / blocking playback via playFullFile()
• Interrupt based / non-blocking playback via startPlayingFile()
Interrupt based playback currently does not work on ESP32 platforms.
Public Methods:
Adafruit_VS1053_FilePlayer (int8_t mosi, int8_t miso, int8_t clk, int8_t rst,
int8_t cs, int8_t dcs, int8_t dreq, int8_t cardCS) - Software SPI constructor.
Uses Software SPI, so you must specify all SPI pins.
Adafruit_VS1053_FilePlayer (int8_t rst, int8_t cs, int8_t dcs, int8_t dreq,
int8_t cardCS) - Hardware SPI constructor. Uses Hardware SPI and
assumes the default SPI pins. This is what you'll likely use if you're using
the shield.
boolean begin(void) - Initialize communication and reset the chip. Returns
true if a VS1053 is found
boolean useInterrupt(uint8_t type) - Specifies the interrupt to use for
interrupt-driven playback. Valid arguments are:
• VS1053_FILEPLAYER_TIMER0_INT
• VS1053_FILEPLAYER_PIN_INT
boolean startPlayingFile(char *trackname) - Begin playing the specified file
from the SD card using interrupt-driven playback. This allows your program
to perform other tasks as the file is playing.
©Adafruit Industries
Page 17 of 23
�boolean playFullFile(char *trackname) - Play the complete file. This function
will not return until the playback is complete.
Public Member Variables:
File currentTrack - File currently being played
boolean playingMusic - True if playback in progress
Adafruit_VS1053
The Adafruit_VS1053 class implements an interface to the basic VS1053
functionality. For more detail on the operation of the VS1053 chip, please refer to the
documentation on the Downloads page (see the link to the left). Its a little more
powerful but it's also harder to use. We suggest sticking to the FilePlayer class
(previous section) which abstracts a lot of this out for you.
public Methods:
Adafruit_VS1053(uint8_t mosi, uint8_t miso, uint8_t clk, uint8_t rst, uint8_t
cs, uint8_t dcs, uint8_t dreq) - Software SPI constructor - must specify all
pins.
Adafruit_VS1053(uint8_t rst, uint8_t cs, uint8_t dcs, uint8_t dreq) Hardware SPI constructor - assumes hardware SPI pins.
uint8_t begin(void) - Initialize SPI communication and (hard) reset the chip.
void reset(void) - Performs a hard reset of the chip.
void softReset(void) - Attempts a soft reset of the chip.
uint16_t sciRead(uint8_t addr) - Reads from the specified register on the
chip.
void sciWrite(uint8_t addr, uint16_t data) - Writes to the specified register
©Adafruit Industries
Page 18 of 23
�on the chip.
void sineTest(uint8_t n, uint16_t ms) - Generate a sine-wave test signal.
void spiwrite(uint8_t d) - Low-level SPI write operation.
uint8_t spiread(void) - Low-level SPI read operation.
uint16_t decodeTime(void) - Reads the DECODETIME register from the
chip.
void setVolume(uint8_t left, uint8_t right) - Set the output volume for the
chip.
void dumpRegs(void) - Prints the contents of the MODE, STATUS, CLOCKF
and VOLUME registers.
void playData(uint8_t *buffer, uint8_t buffsiz) - Decode and play the
contents of the supplied buffer.
boolean readyForData(void) - Test if ready for more data.
void applyPatch(const uint16_t *patch, uint16_t patchsize) - Apply a code
patch (See datasheet for details).
uint16_t loadPlugin(char *fn) - Load the specified plug-in.
void GPIO_digitalWrite(uint8_t i, uint8_t val) - Write to a GPIO pin.
void GPIO_digitalWrite(uint8_t i) - Write to all 8 GPIO pins at once.
uint16_t GPIO_digitalRead(void) - Read all 8 GPIO pins at once.
boolean GPIO_digitalRead(uint8_t i) - Read a single GPIO pin.
void GPIO_pinMode(uint8_t i, uint8_t dir) - Set the Pin Mode (INPUT/
OUTPUT) for a GPIO pin.
boolean prepareRecordOgg(char *plugin) - Initialize chip for OGG
recording.
void startRecordOgg(boolean mic) - Start recording (mic = true for
©Adafruit Industries
Page 19 of 23
�microphone input).
void stopRecordOgg(void) - Stop the recording.
uint16_t recordedWordsWaiting(void) - Returns the number of words
recorded.
uint16_t recordedReadWord(void) - Reads the next word from the buffer of
recorded words.
uint16_t recordedReadWord(void) - Reads the next word from the buffer of
recorded words.
Downloads
Library:
• Adafruit VS1053 Library (https://adafru.it/clE)
Datasheets & Files
• VS1053B (Codec chip) datasheet (https://adafru.it/clI)
• Fritzing objects in Adafruit Fritzing library (https://adafru.it/aP3)
• EagleCAD PCB files in GitHub (https://adafru.it/tbN)
©Adafruit Industries
Page 20 of 23
�Schematics
©Adafruit Industries
Page 21 of 23
�Troubleshooting
In rev B of the Featherwing, we connect the MIDI pin directly to the UART TX on the
Feather without a pullup. For unknown reasons (the VS1053 is supposed to ignore the
MIDI input when not in MIDI mode), having this pin floating sometimes causes a
problem with decoding.
If you're having glitchy hangs, you can fix this intermediately by either:
1) Connecting a 10K - 100K pullup resistor between the Feather TX pin and 3.3V,
highlighted here:
OR
Set the Feather TX pin to be a pullup input or output level high.
On a Feather 32u4, Feather M0, or Feather Teensy, add either to setup:
pinMode(1, INPUT_PULLUP);
or
©Adafruit Industries
Page 22 of 23
�pinMode(1, OUTPUT);
digitalWrite(1, HIGH);
On ESP8266 this is done by default so you can ignore this step (since the UART is
always on). If using another kind of Feather, substitute 1 for whatever pin number is on
UART TX.
©Adafruit Industries
Page 23 of 23
�