Overview | Adafruit Terminal Block Breakout FeatherWing | Adafruit Learning System
Page 1 of 13
Overview
by lady ada
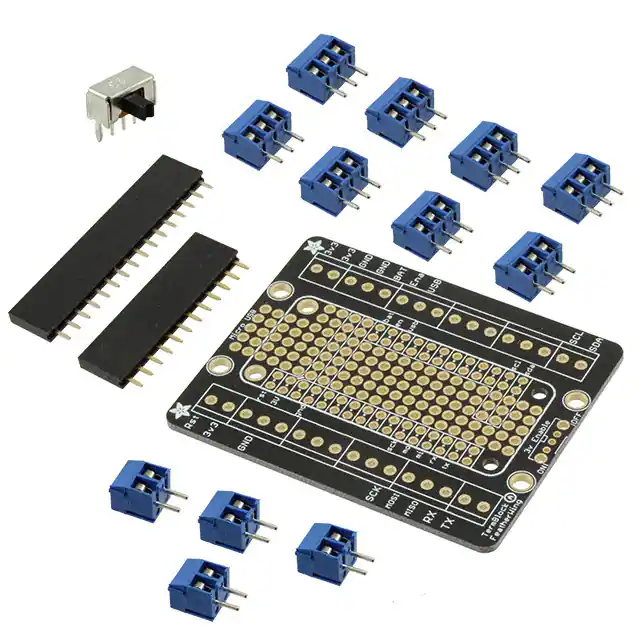
The Terminal Block Breakout FeatherWing kit is like the Golden Eagle of prototyping FeatherWings (eg. majestic, powerful, good-looking). To start, you get a nice
prototyping area underneath your Feather, with extra pads for ground, 3.3V and SDA/SCL. Not one to stop there, we expanded the PCB out to 2" x 2.5" with 3.5mm pitch
terminal blocks down each side. There's also four mounting holes so you can attach the breakout to your enclosure or project.
The terminal blocks allow you to connect to any of the external Feather pins, great for wiring temporary or permanent installations. We also give you a few extra terminal
block pins for ground and 3.3V connections since those are so useful.
�Page 2 of 13
Finally, there's a spot for soldering in a slide switch. This connect the EN pin to ground when in the 'off' position, cutting off the 3.3V regulator. Note that the FONA
Feather uses both VBat and 3.3V as power supplies so you wont be able to fully turn off the FONA Feather with this switch.
Comes as a kit with a nice PCB, socket headers, terminal blocks, and a slide switch. Soldering is required to assemble the Terminal Block Breakout FeatherWing, but it's
not too tough if you've got a soldering iron and some basic hand tools.
�Page 3 of 13
Pinouts
by lady ada
The Terminal Block Featherwing doesn't have any active components. Instead, it just breaks out all the existing connections from a Feather. Note that Feathers use different
chipsets so not all pins are labeled on purpose!
The only pins you can depend on are:
• 3.3V power
• 3.3V enable
• VBat power
�Page 4 of 13
•
•
•
•
•
•
USB power
GND
Reset
I2C: SDA & SCL
SPI: MOSI, MISO, SCK
UART: RX & TX
Check your Feather documentation and product page for details on what other pins are available and what they are connected to
Assembly
by lady ada
Start by grabbing the blue terminal blocks. Terminal blocks
only come in 2 and 3 pin sizes, but can be slid together to form
�Page 5 of 13
longer strips. Start by connecting a 2 and 3 pin piece together.
There's nubs on either side so line those up and you'll be able to
slide them together
•
Keep sliding more 3-pin blocks on until you get a 2-pin block
with four 3-pin blocks in the middle and then another 2-pin
block at the end
Make two of these long strips
•
•
•
Place the two strips on either side of the breakout PCB with the
terminal block holes facing out
�Page 6 of 13
•
Flip over the board and solder in all of the terminal block pins
with plenty of solder
Be sure to solder all pins for reliable electrical contact.
•
(For tips on soldering, be sure to check out our Guide to
Excellent Soldering).
•
•
•
Check the first row once its done, to make sure each pin is
shiny and completely soldered
�Page 7 of 13
•
Do the other row of terminal blocks
•
•
•
•
�Page 8 of 13
•
Next up place the 12-pin and 16-pin headers in the center part
of the breakout in the outer-most set of holes
•
If you have a Feather, plugging it into the headers will keep
them nicely aligned so you dont need to tape them in place
•
Flip over and solder in one row of the header
�Page 9 of 13
•
•
•
•
•
Solder in the other row of header
�Page 10 of 13
•
•
•
•
If you'd like to install the slide on/off switch, snap it into place
at the end of the PCB and tape it down so it doesn't fall out
when soldering
•
Solder in the two large mechanical points and the three signal
pins in the center
That's it! You're done
�Page 11 of 13
•
•
•
•
•
�Page 12 of 13
Downloads
by lady ada
Datasheets
OS102011MA1QS1 slide switch
Schematic
�Page 13 of 13
Fabrication print
Dimensions in inches
https://learn.adafruit.com/adafruit-terminal-block-prototyping-breakout-featherwing?view...
3/14/2016
�
很抱歉,暂时无法提供与“2926”相匹配的价格&库存,您可以联系我们找货
免费人工找货