Adafruit Arcade Bonnet for Raspberry Pi
Created by Phillip Burgess
https://learn.adafruit.com/adafruit-arcade-bonnet-for-raspberry-pi
Last updated on 2021-11-15 06:52:51 PM EST
©Adafruit Industries
Page 1 of 14
�Table of Contents
Introduction
3
• Joysticks:
• Speakers
• Arcade Buttons
5
5
5
Connections
6
•
•
•
•
•
6
7
8
9
10
Buttons
Joystick / D-Pad
Analog-style Joystick
Speaker
Other Connections
Software
11
• Buttons and Joysticks
• Audio Amplifier
• Advanced Usage - Other Inputs
11
12
13
Downloads
13
• Files
• Schematic & Fabrication Print
©Adafruit Industries
13
14
Page 2 of 14
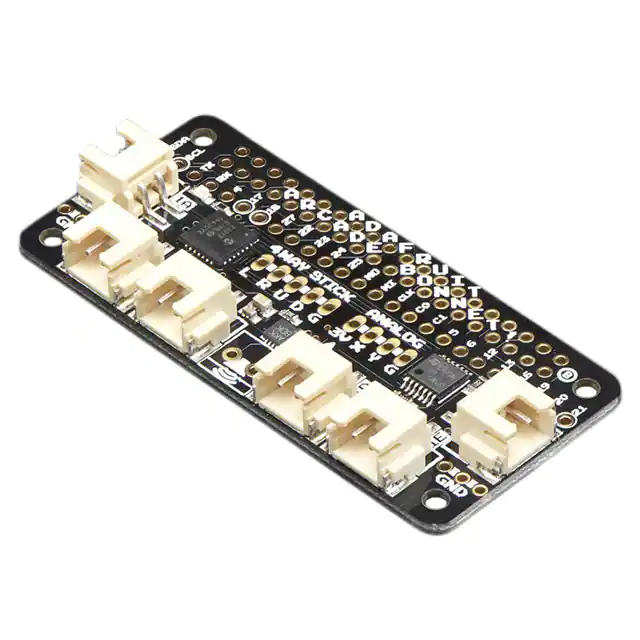
�Introduction
Playing retro games is easy on a Raspberry Pi - and the pocket computer is pretty
good at it too! All you need is a little help to connect buttons and a joystick up and
you can custom design your own arcade console, desktop or stand-up machine, even
just a simple controller box. It makes for a fun weekend project that will last all year.
©Adafruit Industries
Page 3 of 14
�This Adafruit Arcade Bonnet is designed to make small emulator projects a little
easier to build. Here's what you can look forward to!
• It is the same size as a Pi Zero, so for really compact builds, this is super small.
You can use it with a Pi 2, 3, B+ or any 2x20 connector Pi.
• It has JST sockets so you can plug in six arcade buttons easily using our quick
connects (https://adafru.it/dMr)
• Header breakouts for use with both clicky-type switched joysticks and...
• Header breakout and converter for using analog-type joysticks or thumbsticks
with potentiometers inside
• A 3W speaker output that can drive 4-8 ohm speakers for when using with a TV
output, HDMI display or PiTFT
• Switches are all managed with an I2C-GPIO converter with interrupt out. The
converter is very fast and frees up all the pins so you can use this Bonnet with a
PiTFT or any other accessory/device that uses a lot of pins!
If you don't need an amplified speaker output, analog-joystick input or minimal pin
usage, check out our plain-jane Retrogame tutorial which just plugs all the buttons
and joysticks right into the Pi directly (https://adafru.it/uyC).
This item as sold as a mini-kit, with a Bonnet and headers that need to be soldered in
to attach it to a Raspberry Pi! It only takes a few minutes but soldering iron and solder
are required.
©Adafruit Industries
Page 4 of 14
�It also doesn't come with any of the extras, so you can choose which buttons/
joysticks/speaker you want! Here is a list of the items you can use:
Joysticks:
• Small Arcade Joystick (http://adafru.it/480)
• Mini Analog Joystick (http://adafru.it/3102)
• Assembled 2 Axis Joystick (http://adafru.it/245)
• Analog Thumbstick (http://adafru.it/2765)
• 2 Axis Joystick (http://adafru.it/512)
• PSP Analog Joystick (http://adafru.it/444)
• PSP3000 Analog Joystick (http://adafru.it/3103)
to connect them, you may want some 20 x 12" Female jumper wires (http://adafru.it/
1949)
Speakers
• 4 ohm 3 Watt speaker (http://adafru.it/1314)
• 8 ohm 1 Watt speaker (http://adafru.it/1313)
• Mono enclosed speaker (http://adafru.it/3351)
• Mini Metal speaker (http://adafru.it/1890) (may need to turn the volume down in
Emulation station)
• Thin Plastic speaker (may need to turn the volume down in Emulation station) (h
ttp://adafru.it/1891)
Arcade Buttons
The JST connectors on the Bonnet mate perfectly with these quick-connects, which
we really like. (http://adafru.it/1152)
Any of our Arcade buttons will work. (https://adafru.it/uyD)You can use any switch you
like, really - doesn't even need to be a button!
The translucent 30mm ones work nicely with the quick-connects and are
recommended! (http://adafru.it/11523025202520)
©Adafruit Industries
Page 5 of 14
�Connections
Buttons
Around the edges of the Arcade Bonnet are plugs for up to 6 buttons, labeled 1A
through 1F. These work directly with our arcade button quick-connect wires (http://
adafru.it/1152).
Arcade Button Quick-Connect Wire Pairs 0.11" (10 pack)
Quick connector wire sets will make
wiring up our arcade-style or metal
buttons quicky-quick. Each wire comes as
a 'pair' with two 0.11" quick-connects precrimped onto...
https://www.adafruit.com/product/1152
Arcade Button - 30mm Translucent Clear
A button is a button, and a switch is a
switch, but these translucent arcade
buttons are in a class of their own.
They're the same size as common arcade
controls (often referred to...
https://www.adafruit.com/product/471
©Adafruit Industries
Page 6 of 14
�These cables plug right in, and then you can quick connect to many switches or
arcade buttons. For the 1F connection, plug this cable in before plugging the Bonnet
into your Pi 3 or Pi 2 since the USB ports will make it tougher once its installed.
Joystick / D-Pad
Any four or eight-way “clicky” joystick can be connected to the 4WAY STICK header.
“G” is the joystick’s common ground pin, while L, R, U and D are the four cardinal
directions. (Yes, diagonal works as well, in games that require it.) We recommend
soldering some of the male header that comes with the bonnet and then using
Female-Female wires to plug directly into the joystick
Or you can solder the wires directly from the joystick
Small Arcade Joystick
This snappy 8-way joystick beckons you
to play with it! It is rugged, and not too
large, reminiscent of a Pac Man arcade
cabinet. Unlike the potentiometer-based
2-axis and mini...
https://www.adafruit.com/product/480
©Adafruit Industries
Page 7 of 14
�Premium Female/Female Jumper Wires 20 x 12" (300mm)
These Female/Female Jumper Wires are
handy for making wire harnesses or
jumpering between headers on PCB's.
These premium jumper wires are 12"
(300mm) long and come in a 'strip' of 20...
https://www.adafruit.com/product/1949
Analog-style Joystick
Some lower-profile joysticks are available only in analog versions. These can be
connected to the ANALOG header. 3V and G are 3.3 Volts and ground from the Pi,
respectively, while X and Y are the stick’s analog outputs for the two axes.
The analog joystick input is processed and handled as a 4-way stick. Most vintage
games operate with a 4-way stick; there is no option here for a “true” analog input.
Note that we convert the analog voltage into digital switches without an analog-todigital converter so we can detect when the joystick is moved around but we do not
measure how 'hard' it is being pushed in a direction!
©Adafruit Industries
Page 8 of 14
�Analog 2-axis Thumb Joystick with Select
Button + Breakout Board
This mini-kit makes it easy to mount a
PSP/Xbox-like thumb joystick to your
project. The thumbstick is an analog
joystick - more accurate and sensitive
than just 'directional'...
https://www.adafruit.com/product/512
Mini 2-Axis Analog Thumbstick
Sometimes a simple analog control device
can be the perfect tactile solution for your
project, but they can be surprisingly hard
to come by. Luckily we've got a low-cost,
quality...
https://www.adafruit.com/product/2765
Mini Analog Joystick - 10K Potentiometers
Sometimes a simple analog control device
can be the perfect tactile solution for your
project, but they can be surprisingly hard
to come by. Luckily we've found a lowcost,...
https://www.adafruit.com/product/3102
Speaker
The Arcade Bonnet’s mono class D amplifier can handle a single 4 or 8 Ohm speaker,
up to 3 Watts. The amplifier’s “I2S” interface provides extremely clear sound…better
than you’ll get from the Raspberry Pi’s headphone jack.
Most early arcade games had monaural sound. For anything with stereo, the two
channels will be mixed to a single channel for the amplifier.
©Adafruit Industries
Page 9 of 14
�Speaker - 3" Diameter - 4 Ohm 3 Watt
Listen up! This 3" diameter speaker cone
is the perfect addition to any audio
project where you need an 4 ohm
impedance and 3W or less of power. We
particularly like this cone as...
https://www.adafruit.com/product/1314
Mono Enclosed Speaker - 3W 4 Ohm
Listen up! This 2.8" x 1.2"
speaker is a great addition to any audio
project where you need 4 ohm
impedance and 3W or less of power. We
particularly like...
https://www.adafruit.com/product/3351
Other Connections
If you have a need to interface other hardware, most of the Pi’s GPIO pins are broken
out to this header. There are also some spare ground points near the corners.
Be mindful of the pins marked with a circle — SDA, SCL, 17, 18, 19 and 21. These are
used by the chips on the Arcade Bonnet. Some — like SDA and SCL, used for I2C
communication — can usually be shared by multiple devices. The others should be
avoided unless you very specifically know what you’re after.
©Adafruit Industries
Page 10 of 14
�Software
Software installation for the Arcade Bonnet requires an internet connection. That’s a
frequent topic already covered in other Pi getting-started guides, so we’ll assume
here that your Pi is already booted and networked, running Raspbian or a gamingready OS like RetroPie.
You may find this easiest if ssh is enabled on the Pi, and then log in with a terminal
app. This lets you copy-and-paste the commands that follow, as they’re very exact
about spelling.
Support for the buttons and the audio amplifier are installed separately. If you don’t
need the bonnet’s speaker support, you can just skip that step and use the regular
headphone jack or HDMI audio in that case.
Buttons and Joysticks
Enter the following two lines to install support for the six button connectors and the
4WAY and ANALOG joystick connectors:
curl https://raw.githubusercontent.com/adafruit/Raspberry-Pi-Installer-Scripts/
master/arcade-bonnet.sh >arcade-bonnet.sh
sudo bash arcade-bonnet.sh
When run, this script will offer a couple of options:
• Disable overscan? If you answer “Y” this removes the black border around the
screen (common on HDMI monitors). Takes effect on next boot.
• Install gpio-halt utility? Linux-based systems like the Raspberry Pi don’t like it
when you just switch off power…there’s a specific shutdown process, else the
SD card may get corrupted. The gpio-halt tool lets you add one more button
between ground and any unused GPIO pin (not one of the six button sockets) to
©Adafruit Industries
Page 11 of 14
�initiate an orderly shutdown. Gaming OSes like RetroPie already include a
shutdown command among their menu options, so you may not need this.
When the script finishes you’ll be asked whether to reboot. Answer “N” if you plan on
installing audio support, and follow the next section (“Audio Amplifier,” below).
If you need to change the key assignments: edit the file /boot/arcadeBonnet.py say
with sudo nano /boot/arcadeBonnet.py
Near the top of the code you’ll see this table:
'#' lines are human comments and do nothing for the code. The first six actual
elements in the table correspond to the six button inputs (labeled “1A” through “1F” on
the Bonnet). Then two “0” values (these do nothing, but need to be there, don’t
delete them) and another 8 elements corresponding to the 4-way and analog joystick
/d-pad inputs.
Audio Amplifier
If you’d rather use the heaphone jack or HDMI audio output, this step can be skipped.
Otherwise, to enable Arcade Bonnet speaker output, it’s one line:
curl -sS https://raw.githubusercontent.com/adafruit/Raspberry-Pi-Installer-Scripts/
master/i2samp.sh | bash
©Adafruit Industries
Page 12 of 14
�There are no install options; it simply does its one thing. Confirm installation when
prompted and reboot when done. Then re-run the script again after rebooting to test
the speaker output. After the speaker test reboot once more to activate the speaker
volume control
Audio will then be channeled through the Arcade Bonnet amp.
If you’re curious about what the script is doing behind the scenes, this guide lays out
in detail each step performed (https://adafru.it/uvD).
Advanced Usage - Other Inputs
Additional button inputs are possible using the GPIO pin header and our retrogame
utility.
This guide shows how to install and configure retrogame. (https://adafru.it/sct)
This requires configuring retrogame to only read the extra GPIO inputs! The six
main buttons and joystick are already handled by the previously-installed Arcade
Bonnet software; retrogame is a separate thing and they’ll interfere if accessing the
same pins.
Try to use the 6 button inputs on the Bonnet. Much easier. retrogame is guru-level
stuff.
Downloads
Files
• EagleCAD PCB Files on GitHub (https://adafru.it/uyF)
• Arcade Bonnet GPIO & I2S Amplifier install scripts (https://adafru.it/uza)
©Adafruit Industries
Page 13 of 14
�Schematic & Fabrication Print
©Adafruit Industries
Page 14 of 14
�


 工商网监
湘ICP备2023018690号
工商网监
湘ICP备2023018690号