Adafruit FONA 800 Shield
Created by lady ada
https://learn.adafruit.com/adafruit-fona-800-shield
Last updated on 2021-11-15 06:28:45 PM EST
©Adafruit Industries
Page 1 of 44
�Table of Contents
Overview
5
Pinouts
9
•
•
•
•
•
•
•
Connectors
Charging Circuitry
SIM Connector
LEDs
Shield I/O Breakouts
Audio Breakouts
Other Breakout Pins
10
11
11
12
13
14
15
Obtaining a SIM
15
• T-Mobile & TING
• Some suggestions from FONA users!
16
17
Assembly
18
•
•
•
•
18
18
22
22
Stack Alert!
Attaching Header
Attaching Antenna & Battery
SIM Card
Arduino Test
•
•
•
•
Download Adafruit_FONA
FONA 3G Baud Adjustment
Load Demo
Using the Test Sketch
Hardware Test
24
24
25
25
27
28
• Battery voltage
• Check SIM CCID
28
28
Network Test
29
• Check RSSI (network signal strength)
• Checking Network Registration
Audio Settings & Test
• Set and Get audio volume
• Setting Headset or External audio
• Playing Toolkit Tones
PWM Buzzer
• PWM/Buzzer
Phone Calls
• Make Phone Calls
SMS
• Send and Read SMS
29
29
30
30
30
31
32
32
32
32
33
33
FM Radio (FONA800)
35
• FM Radio (FONA 800 only)
36
©Adafruit Industries
Page 2 of 44
�Handy Commands
• RI on SMS receipt
• Factory Reset
• Bluetooth commands
36
36
36
37
F.A.Q.s
37
Downloads
42
•
•
•
•
Datasheets & App notes
Files
Schematic
Fabrication Print
©Adafruit Industries
42
43
43
43
Page 3 of 44
�©Adafruit Industries
Page 4 of 44
�Overview
Ring, Ring! Who's that callin'? It's your Arduino! Introducing Adafruit FONA 800 Shield,
an adorable all-in-one cellular phone shield that lets you add voice, text, SMS and
data to your project in an easy to use pluggable shield.
This shield fits on top of any classic Arduino or compatible, and packs a surprising
amount of technology into it's little frame. At the heart is a GSM cellular module (we
©Adafruit Industries
Page 5 of 44
�use the latest SIM800) the size of a postage stamp. This module can do just about
everything
• Quad-band 850/900/1800/1900MHz - connect onto any global GSM network
with any 2G SIM (in the USA, T-Mobile is suggested)
• Make and receive voice calls using a headset OR an external 8Ω speaker +
electret microphone
• Send and receive SMS messages
• Send and receive GPRS data (TCP/IP, HTTP, etc.)
• Scan and receive FM radio broadcasts (yeah, we don't exactly know why this
was included but it works really well)
• PWM/Buzzer vibrational motor control
• AT command interface with "auto baud" detection
Sounds delicious, right? So we plated this fine module onto a shield with all the extras
you need to make your next project shine
• Onboard LiPoly battery charging circuitry so you can take your project on the
go. Use any 500mAh+ LiPoly or LiIon battery (https://adafru.it/dhK) and recharge
via the Arduino when necessary. Two LEDs let you know when its charging and
done. You can then flip the switch and use the battery to run your circuit!
• Standard 4-pole TRRS headphone jack. Use any 'Android' or 'iPhone'-compatible
headset with mic (https://adafru.it/fbS)
• Breakouts for external 8Ω speaker (https://adafru.it/fbT) and electret mic (https://
adafru.it/fbU) if you don't want to use a headphone
• Level shifting circuitry to make it Arduino-safe
©Adafruit Industries
Page 6 of 44
�• Vibrational motor (buzzer) (https://adafru.it/fbV) driver so you can have noiseless
notifications
• uFL connection for external antenna (https://adafru.it/fbL)
• Indicator LEDs for power and network connectivity
• Any standard 2G SIM slides into a secure connector (https://adafru.it/fbW)
On its own, this shield can't do anything. It requires a microcontroller like an Arduino
to drive it! You will also need some required accessories to make FONA work. These
are not included!
• SIM Card! A 2G Mini SIM card is required to do anything on the cellular network.
US AT&T no longer sells 2G SIMs and will shut off their 2G network, so for
American customers we recommend any T-Mobile or reseller (TING, SIMPLE
mobile, etc) that uses the T-Mobile network. (https://adafru.it/fbW)
• Lipoly Battery - 500mAh or larger! This 500mAh (https://adafru.it/drL)battery, or
this 1200mAh (http://adafru.it/258) will work great.
• External Antenna - This slim uFL antenna works great! (https://adafru.it/fbL)
©Adafruit Industries
Page 7 of 44
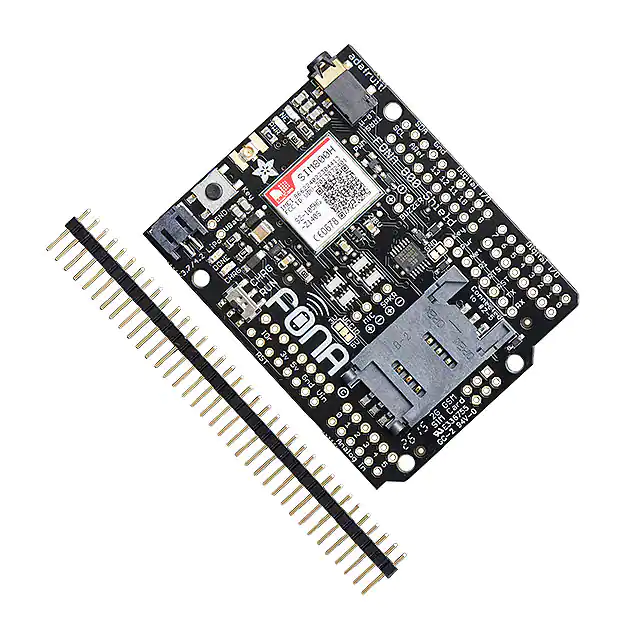
�Each order comes with one tested and assembled FONA shield and a stick of 0.1"
male header. Required Arduino, SIM card, battery, antenna and other accessories are
not included! Some light soldering is required to put the headers onto the shield. You
can also grab some stacking headers if you would like to stack a shield on top (https:
//adafru.it/dsu)
©Adafruit Industries
Page 8 of 44
�There's also some recommended accessories. They are not required but chances are
you'll want them!
• TRRS 4-Pole Headset - Any 'iPhone' or 'Android' compatible (but not iPhone
original) should work. We tried about 10 different ones, and basically the more
expensive once are more comfortable and louder but our official iPhone headset
mic did not work. (https://adafru.it/fbS)
• External Mic & Speaker - If you want to talk directly to your FONA, an electret
mic (https://adafru.it/dDa) and mini 8 ohm speaker (https://adafru.it/dDb) will do
quite nicely.
• Vibrating motor - the FONA can drive this directly, just solder a mini vibrating
motor disc in! (https://adafru.it/dDc)
Pinouts
There's a lot going on in this shield, we basically stuffed an entire phone in here! So
lets go piece by piece on what you get in a shield
©Adafruit Industries
Page 9 of 44
�Connectors
There's three external connectors along the left side, from the top, a headphone jack,
a uFL connector and a 2 pin JST-PH
• Headset jack - this is a 'standard' TRRS 3.5mm phone headset jack with stereo
earphone and mono microphone. Any 'iPhone' or 'Android' compatible (but not
iPhone original) should work. We tried about 10 different ones, and basically the
more expensive once are more comfortable and louder but our official iPhone
headset mic did not work for unknown reasons. Sleeve is Mic+, first ring is
ground, then the second ring and tip are for stereo audio. The module does not
have stereo out so we just tied both together.
• uFL RF connector - This is the Antenna connector, an antenna is required to use
the FONA shield! You can either use a uFL GSM antenna like this (https://
adafru.it/fbL), or use a uFL to SMA adapter (https://adafru.it/fbM) and then an
SMA antenna (https://adafru.it/fbN)
• JST 2-pin - this is the battery input connector. It works with any of our Lipoly
batteries but since the charge rate is 500mA (and the cellular module can spike
high current draw!) we suggest our 500mAh (https://adafru.it/drL) or 1200mAh (
http://adafru.it/258)batteries. You can also connect a JST cable here if you have
other plans.
©Adafruit Industries
Page 10 of 44
�Charging Circuitry
A lipoly battery is required to run the FONA shield, as there's up to 2A mini-spikes
during cellular connectivity. To make it easy to keep the battery charged, there's
charging circuitry onboard. The battery is kept topped-up by the 5V Arduino pin. We
charge at a 200mA rate. You can check the status by looking at the CHRG and DONE
LEDs. Charging occurs whenever the switch is set to CHRG
You can also run the Arduino + Shield off the battery. It will run at a lower-than-5V
level, around 3.7V or so. It's a under the common 5V voltage so if you are reading
analog voltages and expecting 5V note that those numbers will be off, but for digital
usages, it tends to be just fine. To run the Arduino+Shield off of LiPoly, set the switch
to RUN
SIM Connector
A 2G Mini SIM card is required to use the module. Nearly any cell phone shop can sell
you a SIM card. It must be a 2G GSM card. AT&T in the US does not sell these
anymore! They are shutting down their GSM network, and only T-mobile sells and
supports a GSM network. If you are in another country, chances are you can just ask
for a GSM 2G card. For USA customers, we have a known-working TING SIM card
which has a great billing system and works very well! (https://adafru.it/fbO)
MicroSIMs won't fit - so make sure its a "Mini" SIM. Mini SIMs are 1" x 0.6" / 25mm x
©Adafruit Industries
Page 11 of 44
�15mm. These are by far the most common size.
Most cards come with a voice and/or data plan. If you want to make phone calls and
SMS's you'll need a voice plan. If you want to transmit data like fetching a webpage,
you'll need a data plan.
LEDs
• PWR - Blue! Lit when the Cell module is booted and running
• NET - Red! You can use this for checking the current state without sending an AT
command:
64ms on, 800ms off - the module is running but hasn't made connection to the
cellular network yet
64ms on, 3 seconds off - the module has made contact with the cellular network
and can send/receive voice and SMS
64ms on, 300ms off - the GPRS data connection you requested is active
By watching the blinks you can get a visual feedback on whats going on.
• Charging - Orange! This is next to the JST jack. Indicates the onboard lipo
charger is charging
• Done - Green! This is next to the JST jack. Indicates that the battery charging is
done and the battery is full
©Adafruit Industries
Page 12 of 44
�Shield I/O Breakouts
The most important pins are broken near the top left of the board. This is how the
Arduino will communicate with the FONA shield!
These pins are all 3-5V input safe and if they are an output, the logic level is whatever
VCCIO is set to (see the VCCIO jumper near the FONA logo, by default we use 5V
logic, for 3.3V logic-only Arduinos, cut the trace and solder the middle pad over to 3V
Starting from the right
• RX & TX - The module uses UART to send and receive commands and data.
These pins are auto-baud so whatever baud rate you send "AT" after reset or
boot is the baud rate is used. RX is into the module connected by default to Dig
ital #2, TX is out of the module, connected to Digital #3.
• Reset (RST)- this is module hard reset pin. By default it has a high pull-up
(module not in reset). If you absolutely got the module in a bad space, toggle
this pin low for 100ms to perform a hard reset. We tie this to Digital #4, and the
library does a hard-reset so you always have a fresh setup.
• RTS (Ready To Send) - This is the module's flow control pin, you can use this to
control how fast data is sent out from the module to the Arduino, good when
you want to read only a few bytes at a time.
• RI - this is the Ring Indicator. It is basically the 'interrupt' out pin from the
module. It is by default high and will pulse low for 120ms when a call is received.
©Adafruit Industries
Page 13 of 44
�It can also be configured to pulse when an SMS is received. This is not
connected to any pin by default, so solder a wire if you want to use it!
• Net - this is the Network status pin. It pulses to signal the current status of the
module. This is also tied to the Net LED so for more detail see the LEDs section
• Pwr - this is the Power Status pin. It is low when the module is off and high when
the module has power. If you're using the Key button or pin, you can monitor this
pad to see when the module's booted up. This is tied to the Pwr LED too.
• Key - This is the power on/off control for the module. Its also tied to the button in
the top left. When this pin is tied to ground for 2 seconds, it turns the module on
or off. It's not a level signal so it isn't like "low is off, high is on" - instead you
must pulse it for 2 seconds to turn off/on. The module comes by default on (tied
to GND) so the module will come up immediately. If by chance you want to
control this pin, cut the GND-jumper right below this pad and use with any
microcontroller output pin
Audio Breakouts
• SPK+ and - : This is for connecting an external 8 ohm speaker, max 1W. You can
configure the module to route calls and FM radio to the headset or the external
audio. The two pins are differential so they don't have output DC blocking
capacitors. You cannot connect this to a stereo, powered speakers or other nondifferential amplifier without adding a 100uF+ blocking cap in series to the + pin
and then not using the - pin. Instead, your amp should use GND for the reference
©Adafruit Industries
Page 14 of 44
�• MIC + and -: this is for connecting an external electret microphone, it will bias
the mic with 2V. Most electrets will work just fine. No extra circuitry is required
for the mic such as a biaser or amplifier, just wire it up directly!
Other Breakout Pins
We scattered a few other breakouts around the board.
• Buzzer and PWM - These are tied to the PWM output of the module! The PWM
capability is quite nice, it can set any frequency and duty cycle. The PWM pin is
directly output from the module and is 0-2.8Vpp. The Buzzer output has a NPN
drive transistor so it can run a small vibration motor. Bz+ is the VBat voltage, Bzis toggled on and off to ground.
• VBat & GND (near JST) - this is the ~3.7V Battery voltage from the JST
connector.
• 2.8V test point - We have a test point for the 2.8V internal regulator, its off to the
right of the module
Obtaining a SIM
In order to use the phone parts of FONA you will need a SIM card. Luckily, there's a
phone store in every town in America! You can get a pre-paid or post-paid SIM but we
kinda like the pre-paid kind.
©Adafruit Industries
Page 15 of 44
�A 2G Mini SIM card is required to use the module. Nearly any cell phone shop can sell
you a SIM card. It must be a 2G GSM card. AT&T in the US does not sell these
anymore! They are shutting down their GSM network, and only T-mobile sells and
supports a GSM network. If you are in another country, chances are you can just ask
for a GSM 2G card.
MicroSIMs won't fit - so make sure its a "Mini" SIM. Sometimes these are just called
plain "SIM" cards since the huge-size SIMs are rarely used. Mini SIMs are 1" x 0.6" /
25mm x 15mm. these are by far the most common size.
The only thing to watch for is you need to have a 2G GSM-compatible SIM
In the US, AT&T no longer sells 2G SIMs! We suggest T-Mobile or T-Mobile
"distributors"
If you have an older AT&T SIM it may work. AT&T announced in 2012 that they would
shut down their 2G network January 1, 2017. The vast majority of M2M (machine-tomachine) cellular devices use GSM, so the 5 year lead time was to give people plenty
of time to migrate from AT&T.
You can read an interesting whitepaper from Aeris about this below:
AT&T 2G GSM Network Sunset
Whitepaper
https://adafru.it/dEh
T-Mobile & TING
T-Mobile does not have any announcement that they will sunset GSM. We can't speak
for them but we expect at least 5 years warning as well, probably they will never fully
sunset since there's millions of machines with GSM connectivity.
©Adafruit Industries
Page 16 of 44
�Adafruit now sells the TING SIM card, a 2G GSM SIM that works great with all FONAs,
and has a great billing system as well, where you only pay what you use!
If you don't want to use TING, there are dozens of T-Mobile resellers such as Walmart,
SIMPLEMOBILE, etc! Just ask the seller if its AT&T or T-Mobile network. If they get
cagey just say your apartment has no AT&T coverage.
You do not need to bring in or show your FONA to the Cell Phone store. Just tell
them you need a Mini SIM for a GSM phone and it's at home.
Some suggestions from FONA users!
• I've had good luck using the FONA with a SIM from Walmart. Their 'Walmart
Family Mobile' is a T-mobile reseller and you can pick up the SIM starter in store
pretty easily (https://adafru.it/dEi). The service isn't the cheapest, it's $25 for the
SIM and $30/month for unlimited talk+text or $40/month for unlimited
talk+text+data but there's no contract as its all prepaid -tdicola
• Just want to let the Adafruit team know that it is possible to get pre-paided
minutes on T-Mobile and its a pretty good deal. I was paying $100 for 1000
minutes (10c a minute 20 a sms) over the course of the year. (https://adafru.it/
dEj) For me it in my usage came out to about $8 a month. Have found this is
something that you have to ask for at the store. No evidence in advertising or
website -Paul B.
• Telna has a good deal you may want to point people to for FONA. I used them
for a previous GSM project and they worked great. $20 per year, includes 1000
©Adafruit Industries
Page 17 of 44
�free txt messages and a bunch of other nice features. (https://adafru.it/dEk)I had
a lot more issues with T-Mobile (Their cards go inactive if not used in a month
and you have to call to reactivate) -Tyler C.
• I pay 2 EUR (a bit less than $3 USD) for 2 hours, unlimited SMS and 50Mb of
Data at http://mobile.free.fr/ (https://adafru.it/dEr) -KTOWN
• There are specialty "machine 2 machine" SIM sellers that have plans that are
tuned for the short bursts of usage used by these kinds of modules. Check out t
hese guys (https://adafru.it/vQA) for example, you can choose data, voice/sms
or a combination for a pretty low price!
• Hi, just a update to let you know I have just begun to use the Fona, SIM from
ROGERS, which is 2G, 3G, ang 4G. I pulled my sim out of my phone, and it works
well. So if you have Canadians that want to use that product, let them know it
works on the west coast ! You can go to Rogers website and see the coverage
map and services. - Steve C
We haven't tried all of these SIMs so you may need to try it out. For other countries,
GSM is very common so you should be able to buy a SIM from any cell phone store.
Assembly
Stack Alert!
If you want to stack a shield on top of the FONA Shield, you'll want to pick up some
stacking headers and use those instead of the plain header shown here!
Wanna stack? This tutorial shows how to
use the plain header to connect to an
Arduino. If you want to use stacking
headers (https://adafru.it/dsu), don't
follow these steps!
Attaching Header
©Adafruit Industries
Page 18 of 44
�Begin by breaking the 36-pin male
header into four pieces: one 10-pin, two
8-pin and one 6-pin. Stick the header into
the Arduino sockets with the long pins
down.
Place the shield on top so that all the
little pins stick out through the matching
holes in the shield. It should match up
perfectly!
©Adafruit Industries
Page 19 of 44
�Solder in all the header
©Adafruit Industries
Page 20 of 44
�Check your work once done! Now you
can move onto the next steps
©Adafruit Industries
Page 21 of 44
�Attaching Antenna & Battery
A battery and antenna is required!
Check polarity for the battery!
Snap the uFL connector on, it will click when placed properly
SIM Card
You must insert a SIM card to do anything but the most basic tests. FM radio does
work without a SIM but of course you cannot send or receive texts, calls, etc!
The SIM card holder it on the right side of
the shield. It holds a very-standard "Mini
SIM"
Micro SIMs will not work! Make sure you
get a "Mini SIM"
©Adafruit Industries
Page 22 of 44
�Open by sliding the cover towards the
bottom of the shield
Insert the SIM with the gold pads facing
up and the notch on the outer corner
Close the hinge down and slide the cover
to lock it in place
©Adafruit Industries
Page 23 of 44
�The SIM should be secure and flat in the
holder
Arduino Test
The FONA library is under heavy development! This page may change over time!
Download Adafruit_FONA
Open up the Arduino library manager
Search for the Adafruit FONA library and install it
We also have a great tutorial on Arduino library installation at:
http://learn.adafruit.com/adafruit-all-about-arduino-libraries-install-use (https://
adafru.it/aYM)
©Adafruit Industries
Page 24 of 44
�FONA 3G Baud Adjustment
If you have a FONA 3G, the first time you use it you may need to run the FONA3G_se
tBaud example to set the baud rate manually to 4800bps rather than 115200
Load Demo
Open up File->Examples->Adafruit_FONA->FONAtest and upload to your Arduino
wired up to the module.
For the FONA 3G, change the constructor used in FONATest to Adafruit_FONA_3G:
// Use this for FONA 800 and 808s
//Adafruit_FONA fona = Adafruit_FONA(FONA_RST);
// Use this one for FONA 3G
Adafruit_FONA_3G fona = Adafruit_FONA_3G(FONA_RST);
For Mega, Leonardo, or Micro, change the definition of FONA_TX to the pin you used!
Make sure you have a charged 3.7/4.2V LiPoly or LiIon battery plugged into the JST
and an antenna attached
©Adafruit Industries
Page 25 of 44
�Once uploaded to your Arduino, open up the serial console at 115200 baud speed to
begin the tester sketch
©Adafruit Industries
Page 26 of 44
�Make sure you also have Both NL & CR for the serial command sender option. This
means when you send data to the Arduino via the console, it will put a newline/return
at the end.
Using the Test Sketch
The test sketch has a menu interface so you can test out just about everything the
FONA can do. The menu may change slightly as we add more functionality and
update code!
Continue onto the next few sections to see what functionality you can test with the
sketch
©Adafruit Industries
Page 27 of 44
�Hardware Test
Battery voltage
Lets begin by reading the battery voltage. That's the lipoly battery. This is handy if you
need to track when the battery is low! type b into the command window and hit Send
You'll see a print-out of the battery voltage in mV, so in this case its 3.726V
Check SIM CCID
You can verify that the SIM is inserted and correct by reading the CCID, which is the
unique identifier printed on it with C
©Adafruit Industries
Page 28 of 44
�Network Test
Check RSSI (network signal strength)
You can ask the FONA for the signal strength with the command i. The reply is a
number, but you can convert it to dBm. Try to have the signal strength higher than 5 in
order to make calls, SMSs, etc. In this case, I've got a 10
Checking Network Registration
If the FONA has good signal it will immediately try to locate a cell tower and register
to it.
You can check the status of the network with n
Once it's Home Registered, give it like 5-10 more seconds before trying to access/
send SMS's or phone calls.
©Adafruit Industries
Page 29 of 44
�Audio Settings & Test
Set and Get audio volume
You can set the audio volume with v and retrieve it with V - its in % so ranges from 0
to 100
Setting Headset or External audio
There are two audio paths on the FONA. One is the headset, thru the 3.5mm audio
jack. The other is "external" - using the two speaker and mic pins for wiring up
©Adafruit Industries
Page 30 of 44
�external speaker and mic. FM audio, phone calls, tones, etc can be routed to one or
the other.
To set the audio to headset, use the command H
To set the audio to external, use the command e
Note the FONA 808 only has Headset audio, so setting External audio wont do
anything. The Feather FONA does not have headphone brought out, so use
external only!
Playing Toolkit Tones
You can test the audio path with the toolkit tones. These are tones that mimic what
some phone services sound like. For a full list of tones, you can check the AT+STTON
E command in the AT command datasheet. We'll use tone #20 which is the American
dial tone.
You can switch to headset mode, play a tone, then try it on the external audio mode.
This is a very easy way to try out both speakers for debugging
©Adafruit Industries
Page 31 of 44
�PWM Buzzer
PWM Buzzer is available on the FONA800 and 808 Breakouts and Shields
PWM/Buzzer
There is a single PWM output pin that you can use to control a Piezo or a vibrating
motor. The datasheet is a little unclear on how to use it in 'PWM' mode where you
have full frequency and duty cycle control. In the mode we're using it, you can set the
frequency from 1-2000 Hz and it will have 50% duty cycle. The PWM pin is the
straight-from-the-module output, 2.8Vpp. The Buzzer pins have a PNP driver, so you
can use it with a motor buzzer and power from the lipoly battery.
Phone Calls
Make Phone Calls
OK now we're onto the good stuff. You can make a phone call with FONA pretty
easily. Make sure you have the right audio interface selected (external or headset!)
before you go forward
Make a call with c - the call happens in the 'background'. When you're done then you
can hang up with h
©Adafruit Industries
Page 32 of 44
�SMS
Send and Read SMS
Another easy thing you can do is send and receive SMS messages. Lets start by
sending an SMS. We'll use twitter's 40404 short code, which will auto respond,
making it easy to verify both sending and receiving
You can send multi-line SMS's using the library API but for this example, its easier to
parse the data if its a single line!
You can then ask the SIM how many SMS's it has with N and read all of them with R
Note that SMS's are referred to by slots but the number does not include empty slots.
We'll show this in detail in a bit
©Adafruit Industries
Page 33 of 44
�You can read individual SMS's with r
©Adafruit Industries
Page 34 of 44
�And delete SMS's by slot # with d
Note that before I deleted SMS #2, so if I read them again, that SMS # will be an
empty slot. SMS number #3 doesn't "move slots"!
FM Radio (FONA800)
FM radio tuning/listening is only for FONA 800, the FONA 808 and FONA 3G
does not contain a tuner
©Adafruit Industries
Page 35 of 44
�FM Radio (FONA 800 only)
The FONA has an FM receive in it. It uses the headset as the 'antenna' but it works
pretty well considering! The FM radio goes thru whatever audio path you have set up
You can open and tune to an FM frequency in units of 100KHz. So if you want to tune
to 88.1MHz, type in 881. For 102.3, type in 1023.
Use the f command to open and tune, and F to close it
Handy Commands
Here's a quick list of useful commands that may not be directly supported by the
library but are handy for many projects!
RI on SMS receipt
AT+CFGRI=1
The RI pin will pulse low for ~100ms when an SMS is received
Factory Reset
ATZ
will reset the FONA GSM module to its factory default
©Adafruit Industries
Page 36 of 44
�Bluetooth commands
Here's a thread if you're interested in the BT support in the SIM800H (https://adafru.it
/rva) (there's no antenna for BT in the SIM800 breakout but it is in the FONA feather)
F.A.Q.s
Is a Lipo Battery required? Can I run the FONA off of a
power supply or just the microUSB port?
The microUSB (on the shield, in CHARGE mode and powered via USB or DC
power) is only used to charge the battery. Without a battery installed it will flicker
on and off so it cannot be used to power a FONA minus battery.
A 1200mAh+ sized Lithium ion/polymer battery is required, nothing else will be
able to easily power the FONA and provide the correct voltage range even during
2 Amp spikes.
I really want to run my FONA without a Lipoly battery!
You can't.
We keep getting people who ask "Hey I know its a requirement but I want to build
a buck/boost/linear 3.8V regulator and it wil be OK because I said so" and then
they realize it doesn't work well
The FONA design depends on a Lipoly battery. The battery is not optional. The
battery is essential to function. If you do not want a Lipoly battery you will have to
use a different cellular module design. All of our FONAs require, depend and will
not work without a Lipoly battery
You can keep the battery topped up with an external 5V power supply for long
term usage but the battery is still required even if plugged into USB
Ahh! My FONA was working fine then I sent it some
command and its not working right anymore?
You can always factory reset the FONA by sending it the
ATZ
©Adafruit Industries
Page 37 of 44
�command. Say with fona.println("ATZ") or using a USB console cable to send
commands. If you set an odd fixed baud rate (e.g. you cannot even get an OK when
you send AT), a USB serial console cable will be helpful it quickly changing baud
rates in your terminal software to get back to a working AT/OK setup!
I'm using FONA as a voice caller and the other person
can't hear me!
Note that you do have to use a compatible headset. Not all CTIA headsets will
work, the ones we have in the shop are known to work (https://adafru.it/fbK) and so
do many other Android but iPhone headsets do not.
You can also use 'external' audio on the FONA (electret mic and speaker soldered
to FONA) but you cannot mix and match. Either you use headset or you use
external audio. You cant use external mic and headset speaker.
You also have to tell the FONA which audio you are using, it does not autodetect.
You can use our library and fona.setAudio() (https://adafru.it/j0e)
My FONA doesn't work with Arduino Due/ADK/101/
Galileo/STM32....
Right now we only know that the FONA library and shields work with Arduino UNO.
Any other platforms may require porting work
Can I charge the battery and use FONA at the same time?
Yes! You can use the Lipoly as sort of a 'backup battery' - keep charging it via
MicroUSB (on the shield, in CHARGE mode and powered via USB or DC power)
during use. If the MicroUSB loses power, the FONA will keep going.
My FONA won't turn on/respond! Or it acts flakey and
auto-shuts off sometimes!
We've noticed a lot of problems that are 'weird' that are a results of using batteries
with the wrong polarity.
All batteries from adafruit have the right wire colors/polarity for the FONA
Batteries not from Adafruit are not guaranteed to have the right pinout! Using the
wrong pinout may damage the FONA and/or make it act 'odd'!
©Adafruit Industries
Page 38 of 44
�FONA 800/808 requires a 2G SIM, does it work with a
dual 2G-3G SIM?
That will work fine, as long as the SIM can register to the 2G network at all, it is
acceptable to use
Are you sure I can't use ATT for 2G service? I'm in a TMobile cold spot
The AT&T GSM network is going to be live until January 2017. If you're reading this
and it's 2017, you're outta luck. If not, you can try to get an AT&T SIM activated to
the 2G GSM network but its not going to do that by default. You'll have to call up or
talk to an AT&T rep and it may not go so well because they really don't want people
to use their GSM network.
You can also call up T-Mobile and say you can't get connected consistently - they
may send you a free signal booster (https://adafru.it/dHk)
Check out this handy map to see T-Mobile's coverage map in the USA (https://
adafru.it/sdk)
How long can FONA last on my battery?
We haven't done extensive testing with FONA but from preliminary reports, the
FONA draws about 20-25mA while running, up to 200mA+ while actually making a
call/sending/receiving data, and has very small spikes of up to 2A. The spikes are
short and are absorbed by the onboard capacitors.
A 1200mAh battery can run the FONA on 'standby' for a day or two.
How do I set the Real Time Clock on the FONA SIM?
Please see this forum post (https://adafru.it/aP1)!
©Adafruit Industries
Page 39 of 44
�I'm using a FONA 808 and the GPS commands aren't
working
The FONA 808 has two versions, due to a revision of the module itself. Version 1
has two barcodes on the front and is part #S2-10606-Z1F01. Version 2 has a QR
code on the front and is part #S2-10606-Z1F02. V2 has a newer/better chipset
(MT3337 instead of MT3336) but the commandset has changed. Which is annoying
but adaptable!
If you are using V1, use this GPS command document for how to interact with the
GPS subsystem (https://adafru.it/fhm)
If you are using V2, use this GNSS command document instead. (https://adafru.it/
tdw)
How do I switch between SMS storage on SIM and in
internal FLASH?
You can switch between the storage locations by changing
the FONA_PREF_SMS_STORAGE definition in the Adafruit_FONA.h library file. The
definition "SM" selects the SIM, and the definition "ME" selects FLASH.
// Set the preferred SMS storage.
//
Use "SM" for storage on the SIM.
//
Use "ME" for internal storage on the FONA chip
#define FONA_PREF_SMS_STORAGE "\"SM\""
//#define FONA_PREF_SMS_STORAGE "\"ME\""
Then recompile and upload
I'm trying to reset the FONA with my microcontroller/
computer and pulling the RESET pin low via a GPIO isnt
working?
There's a superfluous level shifting diode that we put on the FONA and FONA 808
breakouts - it turns out it isn't necessary and for microcontrollers with weaker
outputs it can keep the FONA from resetting.
You can 'bridge' this diode with a piece of wire, its perfectly safe and may give you
a little more headroom. There's already level shifting inside the modules so there's
no risk to this mod.
Simply solder a small wire between the two pads, or remove the diode and replace
with a 0 ohm resistor or wire.
©Adafruit Industries
Page 40 of 44
�See more here: http://forums.adafruit.com/viewtopic.php?
f=54&t=77778#p410867 (https://adafru.it/sdl)
©Adafruit Industries
Page 41 of 44
�Downloads
Datasheets & App notes
• SIM800 Command Manual (https://adafru.it/vTb) - All the basic commands that
the module supports (please note some are not supported by the 800L, such as
text to speech or bluetooth)
• SIM800 Hardware Design (https://adafru.it/kDW) - The 'H differs from the 'L in
supporting bluetooth and fax. Otherwise its the same, this is basically the
'datasheet'
• SIM800 Sleep App Note (https://adafru.it/vTc)
• SIM800 Embedded AT App Note (https://adafru.it/vTd)
• SIM800 Compiling Environments (https://adafru.it/vTe)
• SIM800 Bluetooth App Note (https://adafru.it/vTf)
• SIM800 FM App Note (https://adafru.it/vTA)
• SIM800 FS App Note (https://adafru.it/vTB)
• SIM800 GNSS Location App Note (https://adafru.it/vTC)
• SIM800 GSM Location App Note (https://adafru.it/vTD)
• SIM800 IP App Note (https://adafru.it/vTE)
• SIM800 MMS App Note (https://adafru.it/vTF)
• SIM800 Multiplexer App Note (https://adafru.it/vUa)
• SIM800 NTP App Note (https://adafru.it/vUb)
• SIM800 PCM App Note (https://adafru.it/vUc)
• SIM800 Software Upgrade App Note (https://adafru.it/vUd)
• SIM800 SSL App Note (https://adafru.it/vUe)
• SIM800 STK App Note (https://adafru.it/vUf)
• SIM800 TCPIP App Note (https://adafru.it/vUA)
• SIM800HL Schematic and PCB Reference Design (https://adafru.it/vUB)
• SIM800H GCF I13GC9551_RSE-E Report (https://adafru.it/vUC)
• SIM800H CE Certificate (https://adafru.it/vUD)
• SIM800H CTTL + GCF Test Report (https://adafru.it/vUE)
• I14Z46950-GPM01 Test Report (https://adafru.it/kEi)
• SIM800H PTCRB Test Report (https://adafru.it/vUF)
• SIM800H RoHS Test Report (https://adafru.it/vVa)
• SIM800H REACH Test Report (https://adafru.it/vVb)
• SIM800H GCF I13GC9551 Test Report (https://adafru.it/vVc)
• SIM800H FCC PCB Grant Final (https://adafru.it/vVd)
• SIM800H FCC DSS Grant Final (https://adafru.it/vVe)
• SIM800H CE EMC Test Report (https://adafru.it/vVf)
• SIM800H CE RF-BT Test Report (https://adafru.it/vVA)
• SIM800H CE RF-GSM Test Report (https://adafru.it/vVB)
©Adafruit Industries
Page 42 of 44
�• SIM800H SAFETY Test Report (https://adafru.it/vVC)
• SIM800H EPL Certificate (https://adafru.it/vVD)
• FCC TCB BT (https://adafru.it/kEu)
• R&TTE Statement of Opinion (https://adafru.it/kEv)
• FCC Part 15B Test Report (https://adafru.it/kEw)
• FCC Part 15C Test Report (https://adafru.it/kEx)
• FCC RF Test Report (https://adafru.it/kEy)
• FCC TCB (https://adafru.it/kEz)
Files
• Fritzing object in the Adafruit Fritzing Library (https://adafru.it/aP3)
• EagleCAD PCB files on GitHub (https://adafru.it/rEk)
Schematic
(Click to embiggen)
Fabrication Print
Dimensions in inches
©Adafruit Industries
Page 43 of 44
�©Adafruit Industries
Page 44 of 44
�