Adafruit 10-DOF IMU Breakout
Created by Kevin Townsend
https://learn.adafruit.com/adafruit-10-dof-imu-breakout-lsm303-l3gd20-bmp180
Last updated on 2021-11-15 06:07:10 PM EST
©Adafruit Industries
Page 1 of 12
�Table of Contents
Introduction
3
• Related Links
3
Connecting It Up
4
• Basic Setup (5V Logic, Arduino Uno, etc.)
• Advanced Setup
• 3V3 Setup
5
5
6
Software
6
•
•
•
•
•
•
•
Installing LSM303DLHC, L3GD20, and BMP180 Drivers
6
Downloading Libraries
7
Adafruit_10DOF Library Helper Functions
8
bool accelGetOrientation ( sensors_event_t *event, sensors_vec_t *orientation )
8
bool magGetOrientation ( sensors_axis_t axis, sensors_event_t *event, sensors_vec_t *mag_orientation )
9
bool magTiltCompensation ( sensors_axis_t axis, sensors_event_t *mag_event, sensors_event_t *accel_event )
Example Sketch
109
Design Files
11
• Datasheets
• Dimensions (Inches)
• Schematic
11
11
12
F.A.Q.
©Adafruit Industries
12
Page 2 of 12
�Introduction
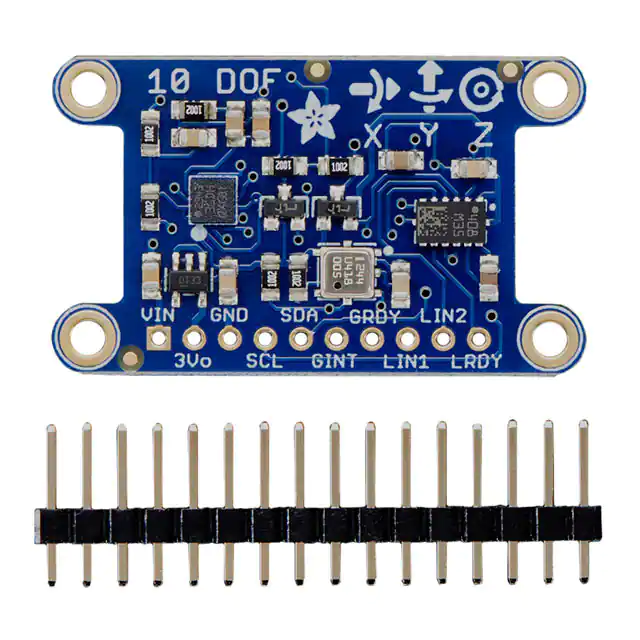
Please note that there is a small cosmetic error on the first revision of these
boards (shown above). The straight X arrow for the accelerometer should be
pointing in the opposite direction, towards the right. This will be fixed in the next
run of these boards.
Adafruit's 10DOF (10 Degrees of Freedom) breakout board allows you to capture ten
(err, eleven!) distinct types of motion or orientation related data.
After testing a lot of combinations of sensors, we settled on the following devices that
we think offer the best results and the least amount of hassle:
• LSM303DLHC - a 3-axis accelerometer (up to +/-16g) and a 3-axis magnetometer
(up to +/-8.1 gauss) on a single die
• L3GD20 - a 3-axis gyroscope (up to +/-2000 dps)
• BMP180 - A barometric pressure sensor (300..1100 hPa) that can be used to
calculate altitude, with an additional on-board temperature sensor
Related Links
The Adafruit 10DOF board and library reuses the existing Adafruit drivers for the LSM
303DLHC (accelerometer and magnetometer), the L3GD20 (gyroscope) and the BMP
180 (pressure/altitude sensor).
©Adafruit Industries
Page 3 of 12
�For information about these particular drivers, consult the following learning guides:
• LSM303DLHC Learning Guide (https://adafru.it/cXW)
• L3GD20 Learning Guide (https://adafru.it/cXX)
• BMP180 Learning Guide (https://adafru.it/cXY)
This breakout is basically just a smooshed together version of all three so anything
you can do with those libraries/guides will follow here.
Connecting It Up
All of the sensors on the Adafruit 10DOF breakout communicate via a two-pin I2C bus,
making it relatively easy to setup with a minimum number of cables:
To interface with the sensor, you will need to solder in wire or header into the
breakout row at the bottom. You cannot 'press fit' or 'twist' wires in, they will not
make good contact! Soldering is required
©Adafruit Industries
Page 4 of 12
�Basic Setup (5V Logic, Arduino Uno, etc.)
We'll be using an Arduino UNO here, but the code will work on a Mega or Leonardo
just fine. Most other Arduino compatibles should have no problems either but we only
support official Arduinos for code.
• Connect the SCL pin on the breakout to the SCL pin on your Arduino. On an
UNO & '328 based Arduino, this is also known as A5, on a Mega it is also known
as digital 21 and on a Leonardo/Micro, digital 3
• Connect the SDA pin on the breakout to the SDA pin on your Arduino. On an
UNO & '328 based Arduino, this is also known as A4, on a Mega it is also known
as digital 20 and on a Leonardo/Micro, digital 2
• Connect the VIN pin on the breakout to 3.3V or 5V on your Uno (5V is preferred
but if you have a 3V logic Arduino 3V is best)
• Connect the GND pin on the breakout to the GND pin on your Uno
That's it! With those four wires, you should be able to talk to any of the I2C chips on
the board and run any of the example sketches.
Advanced Setup
While most people probably won't need to use the pins below, we've also broken out
a few extra pins for advanced users or for special use cases. If you need to use any of
these pins, simply hook them up to a GPIO pin of your choice on the Uno:
• GINT - The interrupt pin on the L3GD20 gyroscope
• GRDY - The 'ready' pin on the L3GD20 gyroscope
• LIN1 - Interrupt pin 1 on the LSM303DLHC
©Adafruit Industries
Page 5 of 12
�• LIN2 - Interrupt pin 2 on the LSM303DLHC
• LRDY- The ready pin on the LSM303DLHC
These pins are all outputs from the 10-DOF breakout and are all 3.3V logic, you can
use them with 5V or 3V as 3.3V registers 'high' on 5V systems.
3V3 Setup
If you are using an MCU or board with 3V3 logic (instead of the 5V logic used by the
Arduino Uno), you can still power the 10-DOF with the VIN pin or you can use the 3Vo
pin, which will bypass the on-board 3V3 regulator and level shifting:
• Connect Vin or 3Vo on the breakout to the 3.3V supply on your target MCU
• Connect GND on the breakout to GND on the target MCU
Like other breakouts on Adafruit, the 10 DOF Breakout is fully level shifted, and
you can safely use it on 3V3 or 5V systems.
Software
Installing LSM303DLHC, L3GD20, and
BMP180 Drivers
You will need to install all of the following libraries to make use of the Adafruit 10DOF
breakout:
• Adafruit Unified Sensor Library on Github (https://adafru.it/aZm)
• LSM303DLHC Library on Github (https://adafru.it/aYU)
• L3GD20 Library on Github (https://adafru.it/cZ4)
• BMP180 Library on Github (https://adafru.it/aZq)
• Adafruit 10DOF Library on Github (https://adafru.it/cXZ)
For information on the Adafruit Sensor Library and the Unified Sensor Drivers used for
all of these sensors, feel free to have a look at our related learning guide: Using the
Adafruit Unified Sensor Driver (https://adafru.it/cZ5)
©Adafruit Industries
Page 6 of 12
�Downloading Libraries
To use these libraries, you should download them from the Arduino Library Manager.
Open up the Arduino Library Manager:
Search for the Adafruit Unified Sensor library and install it
Search for the Adafruit L3GD20 library and install it
Search for the Adafruit BMP085 Unified library and install it
Search for the Adafruit 10DOF library and install it
©Adafruit Industries
Page 7 of 12
�If you're new to installing libraries, check out our super-awesome detailed tutorial on
how to install Arduino libraries (https://adafru.it/aYM)
Adafruit_10DOF Library Helper Functions
The Adafruit_10DOF.cpp file (from Adafruit_10DOF (https://adafru.it/cXZ)) includes the
following helper functions that are useful when working with typicaly 10DOF projects
bool accelGetOrientation ( sensors_event_t *event,
sensors_vec_t *orientation )
This function reads the LSM303DLHC accelerometer data (supplied via the 'event'
variable), and converts it into equivalent pitch (x) and roll (y) values, populating the
supplied 'orientation' variables .pitch and .roll fields accordingly.
Arguments
• event: The sensors_event_t variable containing the data from the accelerometer
• orientation: The sensors_vec_t object that will have its .pitch and .roll fields
populated
Returns
• true if the operation was successful,
• false if there was an error
Example
See the 'pitchrollheading' example in the Adafruit_10DOF library for an example
of how to use this helper function
sensors_event_t accel_event;
sensors_vec_t
orientation;
/* Calculate pitch and roll from the raw accelerometer data */
accel.getEvent(&accel_event);
if (dof.accelGetOrientation(&accel_event, &orientation))
{
/* 'orientation' should have valid .roll and .pitch fields */
Serial.print(F("Roll: "));
Serial.print(orientation.roll);
Serial.print(F("; "));
Serial.print(F("Pitch: "));
Serial.print(orientation.pitch);
©Adafruit Industries
Page 8 of 12
�Serial.print(F("; "));
}
bool magGetOrientation ( sensors_axis_t axis,
sensors_event_t *event, sensors_vec_t *mag_orientation
)
This function populates the .heading field in mag_orientation with the correct angular
data (0-359°). Heading increases when rotating clockwise around the specified axis.
Arguments
• axis: The given axis (SENSOR_AXIS_X, SENSOR_AXIS_Y, or SENSOR_AXIS_Z)
• event: The raw magnetometer sensor data to use when calculating out heading
• orientation: The sensors_vec_t object where we will assign an
'orientation.heading' value
Returns
• true if the operation was successful,
• false if there was an error
Example
See the 'pitchrollheading' example in the Adafruit_10DOF library for an example
of how to use this helper function
sensors_event_t mag_event;
sensors_vec_t
orientation;
/* Calculate the heading using the magnetometer */
mag.getEvent(&mag_event);
if (dof.magGetOrientation(SENSOR_AXIS_Z, &mag_event, &orientation))
{
/* 'orientation' should have valid .heading data now */
Serial.print(F("Heading: "));
Serial.print(orientation.heading);
Serial.print(F("; "));
}
bool magTiltCompensation ( sensors_axis_t axis,
sensors_event_t *mag_event, sensors_event_t
*accel_event )
This function uses the accelerometer data provided in accel_event to compensate the
magnetic sensor measurements in mag_event to compensate for situations where the
©Adafruit Industries
Page 9 of 12
�sensor is tilted (the pitch and roll angles are not equal to 0°).
Arguments
• axis: The given axis (SENSOR_AXIS_X, SENSOR_AXIS_Y, or SENSOR_AXIS_Z)
that is parallel to the gravity of the Earth
• mag_event: The raw magnetometer data to adjust for tilt
• accel_event: The accelerometer event data to use to determine the tilt when
compensating the mag_event values
Returns
• true if the operation was successful,
• false if there was an error
Example
sensors_event_t accel_event;
sensors_event_t mag_event;
...
// Get a sensor event from the accelerometer and magnetometer
accel.getEvent(&accel_event);
mag.getEvent(&mag_event);
if (dof.magTiltCompensation(SENSOR_AXIS_Z, &mag_event, &accel_event))
{
// Do something with the compensated data in mag_event!
}
else
{
// Oops ... something went wrong (probably bad data)
}
Example Sketch
If you run the pitchrollheading sketch in the examples folder, you can see a practical
example using these helper functions above, which should result in output similar to
the image below:
©Adafruit Industries
Page 10 of 12
�Design Files
Datasheets
• LSM303 Datasheet (https://adafru.it/d8s)
• L3GD20 Datasheet (https://adafru.it/d8t)
• BMP180 Datasheet (https://adafru.it/d8u)
• EagleCAD PCB files on GitHub (https://adafru.it/rpd)
• Fritzing object in Adafruit Fritzing library (https://adafru.it/c7M)
Dimensions (Inches)
©Adafruit Industries
Page 11 of 12
�Schematic
F.A.Q.
©Adafruit Industries
Page 12 of 12
�