MintySynth Rev. 2.0 Assembly Manual
Tools and materials required:
Soldering iron
1/32” solder (leaded solder is easiest to use for beginners)
End cutters or diagonal cutters
Small needle-nose pliers are helpful but not necessary
Paper-hole punch or ¼” drill bit
1/8” drill bit and drill
Small Phillips-head screwdriver
Mint tin (blank tins are available from Adafruit if you prefer)
Glue stick, other water-soluble adhesive, or double-sided tape
Thin cardboard or electrical tape for insulating the bottom of the tin
Please open the kit carefully, because there are small parts inside. Check the parts list to make sure that you have all the
parts ready before beginning assembly. Note that some small parts such as resistors may get stuck inside the bag.
�We’ll begin by marking the location on the tin for the
audio jack hole. Print out the final page of this
document, which is the layout diagram. Cut out the
small rectangle, then apply a small amount of watersoluble glue (e.g. from a craft glue-stick) or doublesided tape on the right end of the tin. Position the
tin in the large rectangle, and stick the small
rectangle to the end of the tin as shown, with the
two arrows aligned. Make sure the top and bottom
edges of the small rectangle are aligned with the top
and bottom edges of the tin.
The easiest way to make the ¼” hole for the audio
jack is with a paper-hole punch, which typically costs
less than $2. However, the punch may need to be
modified to remove the paper guide, as shown, so
that it can reach close enough to the bottom of the
tin. The guide can often be removed by pulling it out
with a pair of pliers. If there’s a small tray on the
bottom of the punch for collecting “dots”, you may
have to remove that too (you can usually just pull
them off).
Punching the hole.
2
�Here’s the completed hole. If you prefer to use a
drill, a brad-point drill bit is recommended to help
minimize deforming the thin metal. Also, it is
necessary to put a small block of hardwood under
the metal to support it while drilling. Some people
recommend filling the tin with water, then freezing
it, so the ice will support the metal as you drill.
Another option is to start the hole with a small drill
bit (~1/8”) and enlarge it with needle files or a
Dremel tool.
Remove the paper, and if necessary wash off any
remaining adhesive.
Next, cut out the rectangle on the lower half of the
page and glue it onto the colored side of a sheet of
thin cardboard (cereal-box cardboard, etc.). Then cut
it out on the outline. The cardboard will serve to
insulate the bottom of the PCB from the tin.
Insert the cardboard/drilling guide into the tin as
shown. Place the PCB on a block of hardwood and
drill the two mounting holes through the tin with a
1/8” (or 3 mm) drill bit. Begin drilling slowly to keep
the drill bit centered on the marks. It’s okay if the tin
gets deformed slightly around the holes.
3
�Now, remove the cardboard (you may need to use a
toothpick, etc. to hook it by one of the holes and pull
it out), turn it over, and put it back in the tin with the
plain brown side up. This way the cardboard will be
less visible when the device is complete.
An alternative is to use electrical tape to insulate the
bottom of the tin, but thin cardboard works well and
gives a cleaner look.
Now we’re ready to begin soldering. If you’re new to
through-hole soldering, there are great tutorials
available at Adafruit and Sparkfun. The most
important thing is to not spend more than a few
seconds making a soldering joint, because you may
overheat the part.
A “helping hand” tool is useful but not essential for
holding the PCB while soldering. If you don’t have
one you can just rest the PCB on a table. In order to
hold some of the components in place while
soldering, you may need to place a small object
under each component to support it, or you may be
able to use tape to temporarily hold it in place.
We’ll begin with resistors R1 and R2 (10 kΩ). Form
the resistors into a staple shape and insert them.
Resistors are not polarized, so it doesn’t matter
which way they go. Try to to seat them all the way
into the PCB.
4
�Spreading the leads out on the back of the PCB will
hold the resistors in place while you solder them.
Solder the leads and clip them off with your end
cutters or diagonal cutters. Note: there will be
minimal clearance (~1.5 mm) under the PCB when it
is in the tin, so the leads of all the parts need to be
clipped close (1 mm or less) to the PCB. This may
mean clipping off the top bit of the mound of solder
as well, which is fine. We’ll insulate the inside of
the tin as well, but we want to make sure that none
of the leads have a chance of coming into contact
with the metal tin.
Here you can see the leads clipped close.
Next you can solder the rest of the resistors in place.
R3 and R4 are 150 Ω, and R5 is 1.5 kΩ.
5
�Next we’ll add the small yellow ceramic capacitors,
C1, C2, and C3. These are all the same, so you don’t
need to worry about the value. There’s also no
polarity, so they can go either way. Try to make sure
that they are fully seated in the PCB, and sitting
vertically. You can bend out the leads on the back to
hold them in place, as you did with the resistors.
Now we’ll add the photocell in the same manner,
seating it as far as it will go. Again, it doesn’t matter
which way it goes in. It should hold itself in place
while you solder it.
Next is the socket for the ATmega328. The small
notch on one end of the socket should point to the
left, as an indicator of which way the microcontroller
will go later. You can bend the four corner pins
outward to hold it in place while you solder. It helps
to solder to corner pins first and then checking to
make sure the socket is fully seated before
committing to soldering the rest.
6
�Now add the ceramic oscillator, Y1. Again, there’s no
polarity, so it can go either way. It helps to have
some method of holding it vertical while you solder.
Here I’ve used one of the clips on the helping hand
to support it while I solder.
Now for the six buttons. The reset button is the
short one. Note that the reset button is oriented
differently from the other five, with the pins pointing
to the front and back of the PCB rather than side to
side. This should be clear from the spacing of the
holes.
The buttons snap into place; make sure all four pins
are started in their holes and then push the button
straight down, using a fingernail on each side of the
housing. Solder all the buttons, checking frequently
to see that they’re all still fully seated, and clip all
the leads.
Now let’s add the electrolytic capacitor, C4. This one
is polarized, so be sure that the gray band on the
side of the capacitor points to the edge of the PCB,
as shown.
7
�Now we’re ready for the five thumbwheels. To
prepare them, bend the single unused pin upward as
shown in the photo. It should still be angled outward
just slightly (maybe 5-10 degrees). This pin will
engage in the underside of the acrylic cover plate,
holding each wheel securely.
Now insert the first wheel into the PCB as shown.
Then gently fold the wheel upward until it is vertical,
keeping the pins fully seated in the holes in the PCB
as you do this. When you let go the wheel will spring
back slightly away from vertical, which is fine.
8
�Then repeat for the other four wheels. Don’t solder
them yet. We’re going to temporarily install the
acrylic cover plate to hold them in perfect alignment
while we solder them.
Peel the protective paper off the acrylic and use four
of the screws to attach the four hex standoffs to the
underside of the acrylic as shown.
Now position the cover plate over the buttons and
wheels. Gently guide each thumbwheel so the small
pin that you bent upward engages into the tiny hole
in the acrylic. You will gradually be able to lower the
cover plate down until the standoffs are almost
touching the PCB. Don’t force the cover plate down
if it won’t go—it probably means that one of the pins
isn’t engaged correctly.
9
�The small plate to which each thumbwheel is
mounted should extend into the slot in the cover
plate, held firmly against the back of the slot by the
pin.
Now you can insert all four remaining screws into
the bottom of the PCB, pulling the cover plate down
and securing the thumbwheels. Check to make sure
that the wheels are all aligned. If necessary you can
twist them slightly.
Then you can solder the pins on all the
thumbwheels.
Next remove the bottom screws and the cover plate
again. You can leave the hex standoffs attached to
the cover plate.
Here’s what the bottom of the PCB looks like at this
point.
Now add the three headers, with the short ends of
the pins in the PCB. These can be a little tricky to
hold vertically while you solder, so again use the
helping hand where necessary. Solder one or two
pins first and check to make sure the header is
vertical.
Then we can add the two LEDs. LED1 is red, and
LED2 is yellow. LEDs are polarized, and they won’t
work if they’re installed backwards. The longer lead
on each LED is the positive lead. This goes in the hole
marked with the “+” sign. The housing on the LEDs
also has a small flat on one side, which should point
toward the thumbwheels (down, in this photo).
10
�Now we’ll add the audio jack as shown. These pins
are bigger than on any previous components, so it
will take more solder to make a good joint. Use
plenty so the jack will be firmly attached to the PCB.
Then install the power switch (it doesn’t matter
which way). This is another one that can be a little
tricky to keep fully seated and vertical while you
solder, so take your time and use some means of
holding it in place correctly. Be generous with solder
here too.
Finally, snap the four battery clips in place as shown
and solder them. They will hold themselves in place
while you solder, but do make sure that they’re fully
seated. Again, these will take plenty of solder.
Now we’re done soldering! Clip any remaining leads
short, and check the underside of the PCB carefully
for any long leads or any bits of solder or clipped
leads that need to be brushed away so they don’t
cause short circuits.
11
�If you’ll be using the preinstalled software, put the
jumper in place in position 3 as shown. You also have
the option of using digital pin 6 or 9 for the audio
output if you’re using other software. Note: don’t
forget the jumper, or you won’t get any sound. It’s
easy to forget.
Now we can put the ATmega328 in its socket. You
will have to gently bend both rows of pins inward
slightly by laying the ATMega on its side on a table
and gently folding it over until the row of pins is
vertical (then repeat with the other row).
The small notch on the ATmega points to the left, as
shown here. The notch should line up with the notch
in the socket. Press the IC evenly in place after
making sure all the pins are lined up with their
respective positions in the socket.
If you’d like you can now put AAA batteries in the
device (always noting proper polarity) and turn it
on. You should see the LEDs flashing.
Now reinstall the cover plate, but only use the two
screws at the end of the PCB with the audio jack to
hold it in place as shown. The two screws at the
other end will be installed through the bottom of the
tin.
12
�Insert the remaining two screws up through the
holes in the tin and cardboard, and place the two
washers on them. These washers are important for
holding the device off the bottom of the tin, so
please don’t forget them.
Then tip the whole assembly into the tin and insert
the audio jack through the hole in the side.
Finally, engage the two screws in the tin into the
bottoms of the hex standoffs (they may take a little
wiggling), and tighten them. Then screw the small
knurled nut onto the outside of the audio jack. Using
fingers for this is probably best so you don’t scratch
the side of the tin.
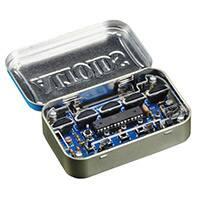
Congratulations, you’ve done it! You’re ready to try
out MintySynth with the preloaded software or
upload your own sketches.
Here’s the Quick Start Guide
And the Software Manual
13
�MintySynth tin hole location guide
1/4” (6 mm) hole
Hinge side of tin here
Place tin here with the lid open, lining up
outside edges of the tin with the sides of
the rectangle.
Cut out this rectangle and glue
to right-hand end of tin with the
arrow pointing down, lining up
the ends of the arrows.
Hinge side of tin here
Then cut this rectangle out and place inside tin
to mark the locations for the two mounting holes.
1/8” (3 mm) holes
�