SparkFun Auto pHAT Hookup Guide
Introduction
Introducing, the Auto pHAT! The *perfect GIF(t) to get that HAT moving...
Source: Youtube Doris from Disney's Meet the Robinsons
Terrible pun aside, this product isn't capable of creating DOR-15 (aka Doris), but it will get you started on your
robotics adventure.
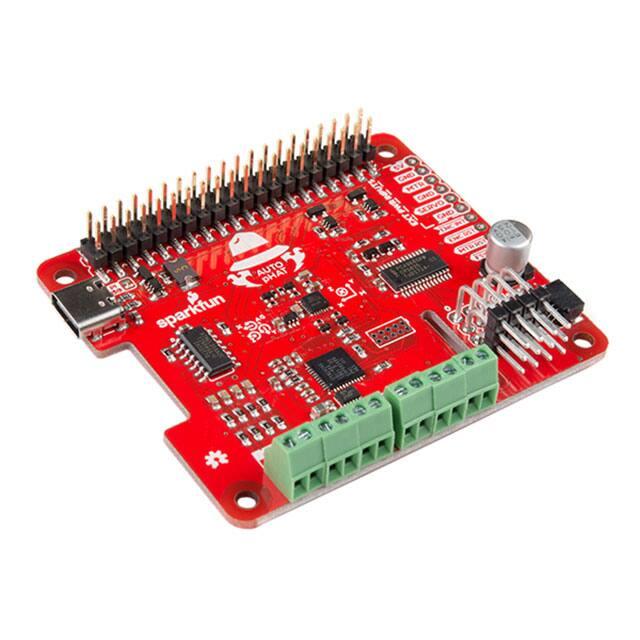
SparkFun Auto pHAT for Raspberry Pi
ROB-16328
�This device combines a few of our existing products onto a single pHAT. On the Auto pHAT you will find the
following components:
4 Channel Servo Controller
A 9-DoF IMU
USB-C Power Input
Qwiic Motor Driver
Rotary Encoder Input
A Qwiic connector
There are dozens of applicable projects for this product, you can even use it to get started with your rover and
robotics applications. Its limits are up to you.
Required Materials
The required materials will depend on your project. However, at minimum, users will need:
A single board computer (SBC)
Must have a 40-pin Raspberry Pi compatible header
An SD card
Power supply (or power source)
Additional accessories:
Servos
Motors
Encoders
Chassis and Wheels
Header (optional)
Tools:
Small Flathead Screw Driver
Single Board Computers
Each of the SBCs that we offer have a unique facet that separates it from the others. There is a 40-pin Raspberry
Pi compatible header on each of the SBCs.
Raspberry Pi 3 B+
NVIDIA Jetson Nano Developer Kit (V3)
DEV-14643
DEV-16271
�Raspberry Pi 4 Model B (4 GB)
Raspberry Pi 4 Model B (2 GB)
DEV-15447
DEV-15446
Raspberry Pi 3 A+
Raspberry Pi Zero W (with Headers)
DEV-15139
DEV-15470
Note: When using the Raspberry Pi 4 with heat sink case, a compatible header that provides enough
clearance and interfaces with the Auto pHAT is required.
SD Cards
These SD cards in our catalog are tested and known to work with all the models of the Raspberry Pi and the
Jetson Nano (excluding the NOOBS card).
microSD Card - 16GB (Class 10)
microSD Card with Adapter - 64GB (Class 10)
COM-15051
COM-14833
�microSD Card with Adapter - 32GB (Class 10)
SparkFun Noobs Card for Raspberry Pi (16GB)
COM-14832
COM-15052
Note: For first time Raspberry Pi users, we recommend using the NOOBS version as it has the required OS
pre-installed.
Power Supplies
Use the appropriate power supply for the SCB you choose. The battery pack and USB-C cable are specifically for
the Auto pHAT to supplement the current draw of the motor driver and servo controller.
Wall Adapter Power Supply - 5.1V DC 2.5A
(USB Micro-B)
Raspberry Pi Wall Adapter Power Supply 5.1VDC, 3.0A, 15.3W (USB-C)
TOL-13831
TOL-15448
Power Supply - 5V, 4A
TOL-15352
�Low Current Lithium Ion Battery Pack - 2.5Ah
(USB)
USB 3.1 Cable A to C - 3 Foot
CAB-14743
TOL-15204
Servos
The Auto pHAT has 4 available servo channels. This is perfect if for users looking to add a pan-tilt bracket for their
camera, a claw, or any other servo or PWM related mechanism (like a robotic arm).
Pan/Tilt Bracket Kit (Single Attachment)
Standard Gripper Kit A - Channel Mount
ROB-14391
ROB-13174
Standard Gripper Kit B - Straight Mount
ROB-13175
Chassis, Motor, and Wheels
The motor driver on the Auto pHAT has 2 H-Bridge drive channels for DC motors.
�Hobby Motor - Gear
Micro Gearmotor - 90 RPM (6-12V)
ROB-11696
ROB-12285
Hobby Motor and Encoder Kit
Planetary Gearmotor - 140RPM
ROB-13260
ROB-15277
Note: Users looking to add brushless DC motors, which are usually driven by an ESC, shouldn't be using the
H-Bridge. ESCs are controlled through a PWM signal and required a specific power source. The servo/PWM
controller may work, but users should also consider the arming process.
Besides a motor, users will also need a chassis or some kind of structure to assemble all the components on. You
can't really call it a vehicle, if all you have is a motor.
Robotics Shield Kit for Arduino - Parallax
GoPiGo Beginner Starter Kit
ROB-11494
ROB-14801
�Circular Robotics Chassis Kit (Three-Layer)
Rover 5 Robot Platform
ROB-14339
ROB-10336
Actobotics Kit - ActoBitty 2
STS-Pi - Build a Roving Robot!
ROB-13047
DEV-15735
Wheels... these are pretty self explanatory. If you don't have them, then you can't get rolling (or tracks for "tracktion").
Wheel - 65mm (Rubber Tire, Pair)
ROB-13259
Mecanum Wheels - 65mm, LEGO Compatible (4
Pack)
ROB-15536
Header
This is an optional item. For users looking to stack HATs, a header might be required for additional clearance
between boards or components.
Note: Unfortunately, at this time, we do not have a compatible header. However, we are working on it. Users
shouldn't use the Raspberry Pi GPIO Tall Header, as the (male) pins on the header aren't quite long enough
�to reach into the (female) socket on the Auto pHAT.
Screw Driver
To tighten and loosen the screw terminals, users will need a small flathead screw driver. The head will need to be
~1.5mm; anything around 2mm will most likely be too large.
Tool Kit - Screwdriver and Bit Set
Magnetic Screwdriver Set (20 Piece)
TOL-10865
TOL-15003
iFixit Essential Electronics Toolkit
Electric Hobby Screwdriver Set
TOL-15256
TOL-15548
ADDITIONAL ACCESSORIES
Click the button above to toggle a list of additional accessories that are available from our catalog.
Suggested Reading
Note: First time Raspberry Pi users should also head over to the Raspberry Pi Foundation website and check
out their quickstart guides:
Blog Post: Getting started with your Raspberry Pi
Raspberry Pi Foundation Getting Stared Guides:
Getting started with Raspberry Pi Tutorial
Setting up your Raspberry Pi Tutorial
MagPi Books and Guides:
Article: Get started with your new Raspberry Pi
The Offical Raspberry Pi Beginner’s Book (December 2017)
Get Started with Raspberry Pi (November 2019)
�The Offical Raspberry Pi Beginner’s Guide: How to use your new computer
1st Edition (December 2018)
2nd Edition (June 2019)
3rd Edition (November 2019)
We have also listed a few additional resources for users to familiarize themselves with the Raspberry Pi:
Using your Raspberry Pi Tutorial
Documentation:
Setup Documentation
Installation Documentation
Raspbian Documentation
SD card Documentation
Note: First time Nvidia Jetson Nano users should also head over to the Nvidia website and check out their
guides and tutorials:
Support Resources
Jetson Nano Getting Started Guide
Jetson Download Center
Nvidia Jetson Tutorials
Jetpack Software Documentation
Jetson FAQ
Wiki: Nvidia Jetson
Wiki: Jetson Nano
User Manuals:
Jetson Nano Developer Kit: User Manual
Below are some of our related tutorials that may be of interest to beginners:
Logic Levels
I2C
Learn the difference between 3.3V and 5V devices and
logic levels.
An introduction to I2C, one of the main embedded
communications protocols in use today.
�Serial Terminal Basics
SD Cards and Writing Images
This tutorial will show you how to communicate with
your serial devices using a variety of terminal emulator
applications.
How to upload images to an SD card for Raspberry Pi,
PCDuino, or your favorite SBC.
Raspberry Pi SPI and I2C Tutorial
Headless Raspberry Pi Setup
Learn how to use serial I2C and SPI buses on your
Raspberry Pi using the wiringPi I/O library for C/C++
and spidev/smbus for Python.
Configure a Raspberry Pi without a keyboard, mouse,
or monitor.
Python Programming Tutorial: Getting Started
with the Raspberry Pi
How to Use Remote Desktop on the Raspberry
Pi with VNC
This guide will show you how to write programs on your
Raspberry Pi using Python to control hardware.
Use RealVNC to connect to your Raspberry Pi to
control the graphical desktop remotely across the
network.
Hardware Overview
Below, is an overview of the major hardware components on the Auto pHAT.
Dimensions
The overall dimensions of the Auto pHAT are 57mm x 65mm. For more details, users can check out the layout in
the Eagle files. The board also features two cut-outs for the camera and display ribbon connections.
�Dimensions of the Auto pHAT. (Click to enlarge)
GPIO Connections
As the Auto pHAT is also intended to integrate with other HATs, it is important to know all of the pin being utilized
to avoid conflicts. Below is a layout of all the GPIO pins being utilized by the hardware on the Auto pHAT. (*Click
the following links, for more information on the GPIO mapping of the Raspberry Pi or Jetson Nano.)
GPIO header connection on the top of the Auto pHAT.
�GPIO header connection on the bottom of the Auto pHAT.
(Click to enlarge)
Raspberry Pi GPIO Map
Standard GPIO layout on the Raspberry Pi.
Power Connections
Power to the Auto pHAT is supplied through the GPIO pins; both 5V and 3.3V are utilized.
Pin #
GPIO
1
3.3V
17
3.3V
2
5V
4
5V
6
GND
9
GND
Pin #
GPIO
14
GND
�20
GND
30
GND
34
GND
39
GND
Qwiic (I2C)
IMU (I2C)
Pin #
GPIO
Function
3
GPIO 02 (SDA)
Qwiic (SDA)
5
GPIO 03 (SCL)
Qwiic (SCL)
26
GPIO 7
Interrupt
Pin #
GPIO
Function
3
GPIO 02 (SDA)
Qwiic (SDA)
5
GPIO 03 (SCL)
Qwiic (SCL)
7
GPIO 4
Interrupt
Pin #
GPIO
Function
3
GPIO 02 (SDA)
Qwiic (SDA)
5
GPIO 03 (SCL)
Qwiic (SCL)
Encoder (I2C)
Motor Driver (I2C)
Servo Controller (I2C)
Pin #
GPIO
Function
3
GPIO 02 (SDA)
Qwiic (SDA)
5
GPIO 03 (SCL)
Qwiic (SCL)
Qwiic Connector
�Pin #
GPIO
Function
3
GPIO 02 (SDA)
Qwiic (SDA)
5
GPIO 03 (SCL)
Qwiic (SCL)
Servo Controller
The servo controller utilizes the same PCA9685 IC used on the Pi Servo pHAT; however, only the first 4 PWM
channels are broken out. The PCA9685 provides I2C control over the 16-channels of 12-bit pulse width modulation
(PWM); although only the first 4-channels are available on the Auto pHAT. The default I2C address for the servo
controller on the Auto pHAT is 0x40.
The PCA9685 16-channel PWM controller IC and output headers.
Characteristic
Description
Operating Voltage (VDD)
2.3 V to 5.5 V (Hardwired: 5V)
Operating Temperature
-40°C to 85°C
PWM Outputs
16 Totem pole outputs (Default: Open-Drain)
Sink 25 mA or Source 10 mA (at 5V)
Shared PWM frequency
Supports hot insertion
PWM Frequency
24Hz to 1526 Hz (Default (1Eh): 200Hz)
PWM Resolution
12-bit (4096 steps of control)
Duty Cycle
0% to 100% (adjustable)
Oscillator
Internal: 25 MHz (Hardwired)
External: 50 MHz (max.) input (unavailable)
�I2C Address
8 available hardware configurable addresses
Configuration Jumpers: 0x40 to 0x47
Default: 0x40
4 programmable addresses to allow simultaneous groups control of multiple devices:
1- General All Call address.
3- Sub Call addresses.
Note: For more details on the PCA9685 and its utilization as a servo controller, check out the following
hookup guides on the Pi Servo pHATs:
Pi Servo Hat Hookup Guide
SEPTEMBER 14, 2017
This hookup guide will show you how to connect and use the Pi Servo Hat in a
project.
Pi Servo pHAT (v2) Hookup Guide
JULY 11, 2019
�This hookup guide will get you started with connecting and using the Pi Servo
pHAT on a Raspberry Pi.
Motor Driver
The motor driver consists of the same PSoC4245 and DRV8835 as the Serial Controlled Motor Driver and Qwiic
Motor Driver. The DRV8835 H-Bridge provides two drive outputs, each capable of 1.2A at steady state. The
default I2C address for the motor driver on the Auto pHAT is 0x5D.
The PSoc4245 microcontroller, DRV8835 H-Bridge, and screw terminal outputs.
Characteristic
Description
Operating Voltage (VDD)
3 V to 11 V (Hardwired: 5V)
Drive Channels
2 Channels
Drive Strength
1.5A per channel (max.)
1.2A (steady state)
Drive Control
127 levels of control
Direction inversion on a per motor basis
Global Drive enable
I2C Address
10 available hardware configurable addresses
Configuration Jumpers: 0x58 to 0x61
Default: 0x5D
Thermal Management
�An important consideration for the motor driver is the thermal load due to the current draw of the motors. In order
to dissipate the heat, users can use our Theragrip Thermal Tape to attach Small Heat Sinks across the thermally
conductive area on the bottom of the board. As the thermal plane doesn't promote natural convection well, users
can add a fan to help dissipate the energy, as well.
Thermally conductive area on the bottom of the Auto pHAT.
Temperature to total driver load curve.
(Click to enlarge)
Note: For more details on the Serial Controller Motor Driver or Qwiic Motor Driver and its utilization, check
out the following hookup guides on the Pi Servo pHATs:
Serial Controlled Motor Driver Hookup Guide
�NOVEMBER 17, 2016
Hookup guide for the Serial Controlled Motor Driver
Hookup Guide for the Qwiic Motor Driver
SEPTEMBER 19, 2019
Drive things "qwiic"-ly with the SparkFun Qwiic Motor Driver!
Encoder Reader
At the heart of the encoder reader is an ATtiny84, which is utilized on our pseudo I2C devices. The encoder reader
is based off of the Qwiic Twist, but is capable of reading two, separate quadrature encoders. The default I2C
address for the servo controller on the Auto pHAT is 0x73.
The ATtiny84 dual encoder reader and screw terminal inputs.
9-DoF IMU
�The 9-DoF (degree of freedom) IMU is the same ICM20948 IC used on the 9DoF IMU Breakout. It provides 10
unique measurements: 3 axes of acceleration, rotational rate, and magnetic strength data, as well as, internal
temperature. Users should note the location of the IMU and the orientation of the axes (labeled on the board),
when taking measurements. The default I2C address for the IMU on the Auto pHAT is 0x69.
The ICM20948 9-DoF IMU.
Characteristic
Description
Operating Voltage (VDD)
1.71 V to 3.6 V (Hardwired: 1.8V)
Operating Temperature
-40°C to 85°C
Gyroscope
Full Scale Ranges:
±250 dps
±500 dps
±1000 dps
±2000 dps
Sensitivity:
±(1/131) dps
±(1/65.5) dps
±(1/32.8) dps
±(1/16.4) dps
Output Data Rate: 562.5, 1125, 9000 Hz
�Accelerometer
Full Scale Ranges:
±2 G
±4 G
±8 G
±16 G
Sensitivity:
±(1/16384) G
±(1/8192) G<
±(1/4096) G<
±(1/2048) G<
Output Data Rate: 562.5, 1125, 4500 Hz
Magnetometer
Full Scale Range: ±4900 µT
Sensitivity: .15 µT
Output Data Rate: 100 Hz
I2C Address
2 hardware configurable addresses:
0x69: Jumper closed (Default)
0x68: Jumper open
Note: For more details on the ICM-20948 and its utilization as an IMU, check out the following hookup guide:
SparkFun 9DoF IMU (ICM-20948) Breakout Hookup
Guide
JUNE 27, 2019
How to use the SparkFun 9DoF ICM-20948 breakout board for your motion
sensing projects. This breakout is ideal for wearable sensors and IoT
applications.
Qwiic Connector
�A connector is provided for attaching other Qwiic devices.
Qwiic connector.
Note: While most of our Qwiic devices should be compatible with a single board computer (SBC), not all
have a supported Python package. Users who are unfamiliar with our Qwiic connect system, can check out
the video below:
SparkFun's Qwiic Connect System
Hardware Assembly
Assembly for the Auto pHAT is fairly straight forward. It plugs directly into the GPIO pins of a Raspberry Pi. Most
importantly, users need pay attention to the orientation of the pHAT and double check that the pin are lined up
properly. below are a few examples for users to follow.
�Auto pHAT on Raspberry Pi 3 Model A+.
Auto pHAT on Raspberry Pi 3 Model B.
(Click images to enlarge)
Attaching Accessories
Users will want to attach additional accessories to the Auto pHAT.
Servos
Servos are attached to the 3x4 right angle header. The channels and pins are indicated on the top and right of the
header, when reading the silk screen. Below is an example with servos connected to channels 0 and 3. Users
should pay close attention to the orientation of the servo connector, in order to match up the pin connections
properly.
Servos attached to channels 0 and 3.
�Verify that the connector is in the proper orientation.
(*Hint: The signal wire is the uppermost header.)
(Click images to enlarge)
Note: Users who are unfamiliar with servos and their operation should check out our hobby servo and basic
servo control tutorials. Additionally, here is a quick reference for common servo wiring colors.
Hobby Servo Tutorial
MAY 26, 2016
Servos are motors that allow you to accurately control the rotation of the output
shaft, opening up all kinds of possibilities for robotics and other projects.
�Basic Servo Control for Beginners
FEBRUARY 25, 2020
An introductory tutorial demonstrating several ways to use and interact with
servo motors!
Annotated image of servo wiring harness. (Click to enlarge)
Motors
DC motors should be connected to the inner screw terminals indicated by MTRA and MTRB on the silk screen.
Below, is an example of a pair of motors connected to the Auto pHAT. The orientation of the wires (between 1 or
2 ) shouldn't matter as the drive direction can be configured in software.
DC hobby motors (with wheels attached) connected to the Auto pHAT.
�An external power source provided by the USB-C connetor.
(Click images to enlarge)
Note: Users unfamiliar with DC motors should check out our motors tutorial.
Motors and Selecting the Right One
DECEMBER 12, 2013
Learn all about different kinds of motors and how they operate.
Quadrature Encoders
Connecting quadrature encoders to the Auto pHAT is relatively simple with the screw terminals. Users should use
the silk screen on the board ( + , A , B , and - ) to match the connections for the encoder. The datasheet for the
encoders should be used if the connections aren't apparent or labeled on the product.
Note: This section is in progress while we await the arrival of the encoder embedded motors.
Note: Users who are unfamiliar with quadrature encoders and their operation should check out our
Adventures in Science blog post on encoders.
Adventures in Science: How to Use Rotary Enco
�Adventures in Science: How to Use Rotary Enco…
Enco…
Clearance Issues
Another consideration is the clearance of the pHAT from other components. Users can cover the header and
screw terminal through hole pins with an insulator to avoid shorting the pins. Additionally, if the clearance between
the pHAT and other components (including things like a the heat sink case for the Raspberry Pi 4) becomes an
issue, a header should be used to increase the spacing.
Note: The details for this section are in progress while we await the arrival of the compatible header.
Desktop
To configure the Raspberry Pi for use with the Auto pHAT, the PIXEL desktop is recommended. It will be the most
convenient for users, but users can still use other methods like SSH to remotely access the Raspberry Pi. To
utilize the desktop, users will need to add peripherals like a monitor and keyboard.
Pi 3 Model B setup to access the PIXEL desktop. (Click to enlarge)
Software Configuration
Enable the I2C Bus
Configuring an OS for the Auto pHAT is relatively simple; the I2C interface will need to be enabled.
�Nvidia Jetson
The I2C bus on the Nvidia Jetson is enabled by default; no configuration is necessary.
Raspberry Pi
On the Raspberry Pi, this is easily accomplished within the Raspberry Pi PIXEL desktop. Using the graphical
Raspberry Pi Configuration application from the Preferences menu will be the most user friendly option. Users can
also make changes through the console based raspi-config application.
Raspberry Pi Configuration application. (Click to enlarge)
From the Interfaces tab, enable the I2C interface. (Click to enlarge)
Once done, click the OK button. Reboot the Raspberry Pi when prompted.
Install the Python Packages
Note: This tutorial assumes you are using the latest version of Python 3. If this is your first time using Python
or I2C hardware on a Raspberry Pi, please checkout our tutorial on Python Programming with the Raspberry
Pi and the Raspberry Pi SPI and I2C Tutorial.
�We've written a Python packages to easily get setup and utilize the Auto pHAT. There are two methods for
installing the Python packages:
1. Install the all inclusive SparkFun Qwiic Python package.
2. Independently install the various Python packages:
pi-servo-hat
sparkfun-qwiic-pca9685
sparkfun-qwiic-scmd
sparkfun-qwiic-dual-encoder-reader
sparkfun-qwiic-icm20948
The all inclusive SparkFun Qwiic Python package, is recommended as is also installs the required I2C driver as
well.
Note: Don't forget to double check that the hardware I2C connection is enabled on your Raspberry Pi or other
single board computer.
SparkFun Qwiic Package
This repository is hosted on PyPi as the sparkfun-qwiic package . On systems that support PyPi installation via
pip3 (use pip for Python 2) is simple, using the following commands:
For all users (note: the user must have sudo privileges):
sudo pip3 install sparkfun-qwiic
For the current user:
pip3 install sparkfun-qwiic
Upgrading the Python Package
In the future, changes to the Python package might be made. Updating the installed packages has to be done
individually for each package (i.e. sub-modules and dependencies won't update automatically and must be
updated manually). For example, with the sparkfun-qwiic-scmd Python package use the following command (use
pip for Python 2):
For all users (note: the user must have sudo privileges):
sudo pip3 install --upgrade sparkfun-qwiic-scmd
For the current user:
pip3 install --upgrade sparkfun-qwiic-scmd
Python Package Examples
Servo Controller
Documentation and examples for utilizing the servo controller is hosted on ReadtheDocs.
�Note: The tutorials below, include other examples for the utilization of the sparkfun-pi-servo-hat Python
package.
Pi Servo pHAT (v2) Hookup Guide
JULY 11, 2019
This hookup guide will get you started with connecting and using the Pi Servo
pHAT on a Raspberry Pi.
Basic Servo Control for Beginners
FEBRUARY 25, 2020
An introductory tutorial demonstrating several ways to use and interact with
servo motors!
�Setting Up the Pi Zero Wireless Pan-Tilt Camera
SEPTEMBER 14, 2017
This tutorial will show you how to assemble, program, and access the Raspberry
Pi Zero as a headless wireless pan-tilt camera.
Demo Example
This example is pulled from the examples in the ReadtheDocs documentation. It should be used with a 90 degree
(range of rotation) servo on channel 0 of the Auto pHAT. It will swing the servo arm between 0° and 90°, in a loop.
�#!/usr/bin/env python
#----------------------------------------------------------------------# Pi Servo Hat - Example 1
#----------------------------------------------------------------------#
# Written by SparkFun Electronics, June 2019
# Author: Wes Furuya
#
# Compatibility:
#
* Original: https://www.sparkfun.com/products/14328
#
* v2: https://www.sparkfun.com/products/15316
#
# Do you like this library? Help support SparkFun. Buy a board!
# For more information on Pi Servo Hat, check out the product page
# linked above.
#
# This program is distributed in the hope that it will be useful, but
# WITHOUT ANY WARRANTY without even the implied warranty of
# MERCHANTABILITY or FITNESS FOR A PARTICULAR PURPOSE. See the GNU
# General Public License for more details.
#
# You should have received a copy of the GNU General Public License
# along with this program. If not, see .
#
#=======================================================================
# Copyright (c) 2019 SparkFun Electronics
#
# Permission is hereby granted, free of charge, to any person obtaining
# a copy of this software and associated documentation files (the
# "Software"), to deal in the Software without restriction, including
# without limitation the rights to use, copy, modify, merge, publish,
# distribute, sublicense, and/or sell copies of the Software, and to
# permit persons to whom the Software is furnished to do so, subject to
# the following conditions:
#
# The above copyright notice and this permission notice shall be
# included in all copies or substantial portions of the Software.
#
# THE SOFTWARE IS PROVIDED "AS IS", WITHOUT WARRANTY OF ANY KIND,
# EXPRESS OR IMPLIED, INCLUDING BUT NOT LIMITED TO THE WARRANTIES OF
# MERCHANTABILITY, FITNESS FOR A PARTICULAR PURPOSE AND NONINFRINGEMENT.
# IN NO EVENT SHALL THE AUTHORS OR COPYRIGHT HOLDERS BE LIABLE FOR ANY
# CLAIM, DAMAGES OR OTHER LIABILITY, WHETHER IN AN ACTION OF CONTRACT,
# TORT OR OTHERWISE, ARISING FROM, OUT OF OR IN CONNECTION WITH THE
# SOFTWARE OR THE USE OR OTHER DEALINGS IN THE SOFTWARE.
#=======================================================================
"""
This example should be used with a 90 degree (range of rotation) servo
on channel 0 of the Pi Servo Hat.
The extended code (commented out), at the end of the example could be
used to test the full range of the servo motion. However, users should
�be wary as they can damage their servo by giving it a position outside
the standard range of motion.
"""
import pi_servo_hat
import time
# Initialize Constructor
test = pi_servo_hat.PiServoHat()
# Restart Servo Hat (in case Hat is frozen/locked)
test.restart()
# Test Run
#########################################
# Moves servo position to 0 degrees (1ms), Channel 0
test.move_servo_position(0, 0)
# Pause 1 sec
time.sleep(1)
# Moves servo position to 90 degrees (2ms), Channel 0
test.move_servo_position(0, 90)
# Pause 1 sec
time.sleep(1)
# Sweep
#########################################
while True:
for i in range(0, 90):
print(i)
test.move_servo_position(0, i)
time.sleep(.001)
for i in range(90, 0, -1):
print(i)
test.move_servo_position(0, i)
time.sleep(.001)
#########################################
# Code below may damage servo, use with caution
# Test sweep for full range of servo (outside 0 to 90 degrees).
# while True:
#
for i in range(-23, 100):
#
print(i)
#
test.move_servo_position(0, i)
#
time.sleep(.001)
#
for i in range(100, -23, -1):
#
print(i)
#
test.move_servo_position(0, i)
#
time.sleep(.001)
Motor Driver
�Documentation and examples for utilizing the motor driver is hosted on ReadtheDocs.
Demo Example
This example is pulled from the examples in the ReadtheDocs documentation. It should be used with a DC motor
on MTRA of the Auto pHAT. It will increase and decrease the speed between the 20 and 254 levels, in a loop.
�#!/usr/bin/env python
#----------------------------------------------------------------------------# A simple test to speed up and slow down 1 motor.
#-----------------------------------------------------------------------#
# Written by Mark Lindemer
# SparkFun Electronics, April 2020
#
# This python library supports the SparkFun Electroncis qwiic
# qwiic sensor/board ecosystem on a Raspberry Pi (and compatable) single
# board computers.
#
# More information on qwiic is at https://www.sparkfun.com/qwiic
#
# Do you like this library? Help support SparkFun. Buy a board!
#
#==================================================================================
# Copyright (c) 2019 SparkFun Electronics
#
# Permission is hereby granted, free of charge, to any person obtaining a copy
# of this software and associated documentation files (the "Software"), to deal
# in the Software without restriction, including without limitation the rights
# to use, copy, modify, merge, publish, distribute, sublicense, and/or sell
# copies of the Software, and to permit persons to whom the Software is
# furnished to do so, subject to the following conditions:
#
# The above copyright notice and this permission notice shall be included in all
# copies or substantial portions of the Software.
#
# THE SOFTWARE IS PROVIDED "AS IS", WITHOUT WARRANTY OF ANY KIND, EXPRESS OR
# IMPLIED, INCLUDING BUT NOT LIMITED TO THE WARRANTIES OF MERCHANTABILITY,
# FITNESS FOR A PARTICULAR PURPOSE AND NONINFRINGEMENT. IN NO EVENT SHALL THE
# AUTHORS OR COPYRIGHT HOLDERS BE LIABLE FOR ANY CLAIM, DAMAGES OR OTHER
# LIABILITY, WHETHER IN AN ACTION OF CONTRACT, TORT OR OTHERWISE, ARISING FROM,
# OUT OF OR IN CONNECTION WITH THE SOFTWARE OR THE USE OR OTHER DEALINGS IN THE
# SOFTWARE.
#==================================================================================
# Example 1
#
from __future__ import print_function
import time
import sys
import math
import qwiic_scmd
myMotor = qwiic_scmd.QwiicScmd()
def runExample():
print("Motor Test.")
R_MTR = 0
L_MTR = 1
FWD = 0
�BWD = 1
if myMotor.connected == False:
print("Motor Driver not connected. Check connections.", \
file=sys.stderr)
return
myMotor.begin()
print("Motor initialized.")
time.sleep(.250)
# Zero Motor Speeds
myMotor.set_drive(0,0,0)
myMotor.set_drive(1,0,0)
myMotor.enable()
print("Motor enabled")
time.sleep(.250)
while True:
speed = 20
for speed in range(20,255):
print(speed)
myMotor.set_drive(R_MTR,FWD,speed)
time.sleep(.05)
for speed in range(254,20, -1):
print(speed)
myMotor.set_drive(R_MTR,FWD,speed)
time.sleep(.05)
if __name__ == '__main__':
try:
runExample()
except (KeyboardInterrupt, SystemExit) as exErr:
print("Ending example.")
myMotor.disable()
sys.exit(0)
Encoder Reader
Documentation and examples for utilizing the encoder reader is hosted on ReadtheDocs.
Demo Example
This example is pulled from the examples in the ReadtheDocs documentation. It should be used with quadrature
encoders attached to both ENC1 and ENC2 on the Auto pHAT. It will read and print out the encoder position; the
ticker counter range rolls up to 32767 ticks.
�#!/usr/bin/env python
#----------------------------------------------------------------------------# ex1_qwiic_dual_encoder_reader.py
#
# Simple Example demonstrating how to read encoder counts for the Qwiic Dual Encoder Reader (as
part of the SparkFun Auto pHAT)
#-----------------------------------------------------------------------#
# Written by SparkFun Electronics, May 2019
#
# This python library supports the SparkFun Electroncis qwiic
# qwiic sensor/board ecosystem on a Raspberry Pi (and compatable) single
# board computers.
#
# More information on qwiic is at https://www.sparkfun.com/qwiic
#
# Do you like this library? Help support SparkFun. Buy a board!
#
#==================================================================================
# Copyright (c) 2019 SparkFun Electronics
#
# Permission is hereby granted, free of charge, to any person obtaining a copy
# of this software and associated documentation files (the "Software"), to deal
# in the Software without restriction, including without limitation the rights
# to use, copy, modify, merge, publish, distribute, sublicense, and/or sell
# copies of the Software, and to permit persons to whom the Software is
# furnished to do so, subject to the following conditions:
#
# The above copyright notice and this permission notice shall be included in all
# copies or substantial portions of the Software.
#
# THE SOFTWARE IS PROVIDED "AS IS", WITHOUT WARRANTY OF ANY KIND, EXPRESS OR
# IMPLIED, INCLUDING BUT NOT LIMITED TO THE WARRANTIES OF MERCHANTABILITY,
# FITNESS FOR A PARTICULAR PURPOSE AND NONINFRINGEMENT. IN NO EVENT SHALL THE
# AUTHORS OR COPYRIGHT HOLDERS BE LIABLE FOR ANY CLAIM, DAMAGES OR OTHER
# LIABILITY, WHETHER IN AN ACTION OF CONTRACT, TORT OR OTHERWISE, ARISING FROM,
# OUT OF OR IN CONNECTION WITH THE SOFTWARE OR THE USE OR OTHER DEALINGS IN THE
# SOFTWARE.
#==================================================================================
# Example 1
#
from __future__ import print_function
import qwiic_dual_encoder_reader
import time
import sys
def runExample():
print("\nSparkFun Qwiic Dual Encoder Reader
Example 1\n")
myEncoders = qwiic_dual_encoder_reader.QwiicDualEncoderReader()
if myEncoders.connected == False:
�print("The Qwiic Dual Encoder Reader device isn't connected to the system. Please check
your connection", \
file=sys.stderr)
return
myEncoders.begin()
while True:
print("Count1: %d, Count2: %s" % (myEncoders.count1, \
myEncoders.count2, \
))
time.sleep(.3)
if __name__ == '__main__':
try:
runExample()
except (KeyboardInterrupt, SystemExit) as exErr:
print("\nEnding Example 1")
sys.exit(0)
9-DoF IMU
Documentation and an example for utilizing the IMU is hosted on ReadtheDocs.
Demo Example
This example is pulled from the examples in the ReadtheDocs documentation. It display the raw data in the
following order: a_x , a_y , a_z , g_x , g_y , g_z , m_x , m_y , and m_z .
�#!/usr/bin/env python
#----------------------------------------------------------------------------# ex1_qwiic_ICM20948.py
#
# Simple Example for the Qwiic ICM20948 Device
#-----------------------------------------------------------------------#
# Written by SparkFun Electronics, March 2020
#
# This python library supports the SparkFun Electroncis qwiic
# qwiic sensor/board ecosystem on a Raspberry Pi (and compatable) single
# board computers.
#
# More information on qwiic is at https://www.sparkfun.com/qwiic
#
# Do you like this library? Help support SparkFun. Buy a board!
#
#==================================================================================
# Copyright (c) 2019 SparkFun Electronics
#
# Permission is hereby granted, free of charge, to any person obtaining a copy
# of this software and associated documentation files (the "Software"), to deal
# in the Software without restriction, including without limitation the rights
# to use, copy, modify, merge, publish, distribute, sublicense, and/or sell
# copies of the Software, and to permit persons to whom the Software is
# furnished to do so, subject to the following conditions:
#
# The above copyright notice and this permission notice shall be included in all
# copies or substantial portions of the Software.
#
# THE SOFTWARE IS PROVIDED "AS IS", WITHOUT WARRANTY OF ANY KIND, EXPRESS OR
# IMPLIED, INCLUDING BUT NOT LIMITED TO THE WARRANTIES OF MERCHANTABILITY,
# FITNESS FOR A PARTICULAR PURPOSE AND NONINFRINGEMENT. IN NO EVENT SHALL THE
# AUTHORS OR COPYRIGHT HOLDERS BE LIABLE FOR ANY CLAIM, DAMAGES OR OTHER
# LIABILITY, WHETHER IN AN ACTION OF CONTRACT, TORT OR OTHERWISE, ARISING FROM,
# OUT OF OR IN CONNECTION WITH THE SOFTWARE OR THE USE OR OTHER DEALINGS IN THE
# SOFTWARE.
#==================================================================================
# Example 1
#
from __future__ import print_function
import qwiic_icm20948
import time
import sys
def runExample():
print("\nSparkFun 9DoF ICM-20948 Sensor
IMU = qwiic_icm20948.QwiicIcm20948()
Example 1\n")
if IMU.connected == False:
print("The Qwiic ICM20948 device isn't connected to the system. Please check your connec
�tion", \
file=sys.stderr)
return
IMU.begin()
while True:
if IMU.dataReady():
IMU.getAgmt() # read all axis and temp from sensor, note this also updates all insta
nce variables
print(\
'{: 06d}'.format(IMU.axRaw)\
, '\t', '{: 06d}'.format(IMU.ayRaw)\
, '\t', '{: 06d}'.format(IMU.azRaw)\
, '\t', '{: 06d}'.format(IMU.gxRaw)\
, '\t', '{: 06d}'.format(IMU.gyRaw)\
, '\t', '{: 06d}'.format(IMU.gzRaw)\
, '\t', '{: 06d}'.format(IMU.mxRaw)\
, '\t', '{: 06d}'.format(IMU.myRaw)\
, '\t', '{: 06d}'.format(IMU.mzRaw)\
)
time.sleep(0.03)
else:
print("Waiting for data")
time.sleep(0.5)
if __name__ == '__main__':
try:
runExample()
except (KeyboardInterrupt, SystemExit) as exErr:
print("\nEnding Example 1")
sys.exit(0)
Challenge: Now that you are familiar with the basics, flew that robotics muscle. Try to implement a traction
control or an anti-lock braking system (ABS) to show off your prowess.
Troubleshooting
Raspberry Pi
For comprehensive information or troubleshooting issues, on the Raspberry Pi, users should check out the
Raspberry Pi Foundation website and their forum.
As a general guideline, users should use the following resources when looking for technical information or
assistance that is specifically related to the Raspberry Pi itself:
1. Raspberry Pi FAQ
FAQ Troubleshooting Section
2. Raspberry Pi Beginner's Subforum
3. Raspberry Pi Documentation and Help Guides
Troubleshooting Guide
�4. Raspberry Pi Forum
STICKY - Booting Issues
See other STICKY topics in the Troubleshooting section of the forum
Nvidia Jetson Nano
For comprehensive information or troubleshooting issues, on the Nvidia Jetson, users should check out the Nvidia
website and their forum.
As a general guideline, users should use the following resources when looking for technical information or
assistance that is specifically related to the Jetson Nano itself:
1.
2.
3.
4.
5.
6.
7.
Jetson Support Resources
Jetson Nano Getting Started Guide
Developer Kit User Manual
Jetson Nano Wiki
Nvidia FAQ
Jetson Forum
Jetpack Documentation
For users looking for technical assistance, click on the link. There you will find, basic troubleshooting
tips and instructions to get started with posting a topic in our forum. Our technical support team will
do their best to assist you.
Resources and Going Further
Product Information
Schematic
Eagle Files
GitHub Product Repository
Servo Controller:
PCA9685 Datasheet
Pi Servo Hat Python Package
PCA9685 Python Package
Motor Driver:
Serial Controlled Motor Driver Datasheet
Qwiic SCMD Python Package
Encoder Reader:
ATtiny84 Datasheet
Firmware
Dual Encoder Reader Python Package
9-DoF IMU:
ICM20948 Datasheet
Qwiic 9DoF IMU (ICM20948) Python Package
Nvidia Jetson Resources:
Jetson Download Center
Nvidia Forum: Jetson Nano
Jetson Forum: List of All Resources
Wiki: Nvidia Jetson:
�Jetson Nano Wiki
Jetson Support Resources
Jetson Nano Getting Started Guide
Nvidia Jetson Tutorials
Nvidia FAQ
Community Projects
User Manuals:
Developer Kit User Manual
Jetpack Software Documentation
Raspberry Pi Resources:
Raspberry Pi Foundation Downloads
Raspberry Pi Foundation Forum
Raspberry Pi Help Guides & Documentation:
Help Guides:
Setting up your Raspberry Pi
Using your Raspberry Pi
Add-ons Guide
Troubleshooting Guide
Videos
Documentation:
Setup/Quickstart
Installation
Configuration
Remote Access
Linux
�