Page 1 of 8
Crypto Shield Hookup Guide
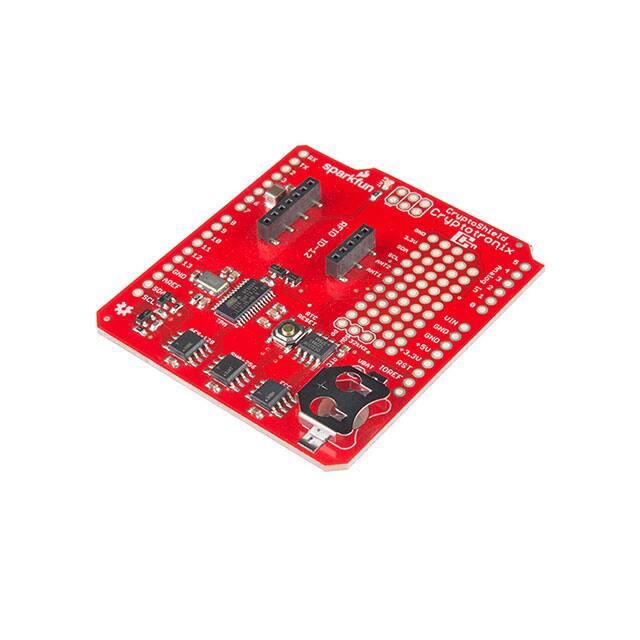
What is a CryptoShield?
The CryptoShield is a collaboration with Hacker In Residence alumni Josh
Datko. The CryptoShield is a dedicated security shield. This shield adds
specialized ICs that perform various cryptographic operations which will
allow you to add a hardware security layer to your project. It also is a nice
device for those performing embedded security research.
The CryptoShield is design to work with not only the Arduino ecosystem but
with embedded Linux boards that support the Arduino shield form-factor. As
we cover each of the components below, we’ll discuss how to use the
shield on each type of device.
In this tutorial, we’ll tour the features on the CryptoShield and show you the
software resources available for you to start using the device.
Required Materials
Aside from the CryptoShield, you’ll also need the following items:
• Arduino Headers
• Coin Cell Battery
• A dev board that supports the Arduino R3 form-factor like the
RedBoard or pcDuino3.
Optinal Materials
• RFID Starter Kit if you want to use the RFID socket on the
CryptoShield.
Suggested Reading
Before getting into this tutorial, make sure you’re familiar with the concepts
below:
�Page 2 of 8
•
•
•
•
•
Integrated Circuits
I2C
Serial Communication
Using GitHub
How to Solder
Using the CryptoShield
There are two ways to use this shield:
1. With Linux on a board like the following. Not all of these have been
tested, this is just a list of boards that claim to support Linux and
support the physical Arduino form factor:
◦
◦
◦
◦
◦
◦
◦
◦
pcDuino3
Intel Edison Arduino Breakout Kit
Atmel SAMA5D3 Xplained
Atmel SAMA5D4 Xplained
Rubix A10
UDOO Board
86duino
BeagleBone Black with the Shield Cape
2. Any board that directly supports the Arduino IDE and the Arduino
form-factor.
IO Voltage Levels
The CryptoShield is 3.3V and 5V friendly. The CryptoShield contains
onboard logic level conversion circuitry. If the main board is properly
supplying IOREF, as per the Arduino board specification, then the
CryptoShield should work without any external voltage conversion.
Maxim Integrated DS3231M Real Time
Clock
The Real-Time Clock is used to keep accurate time, which is often useful in
security protocols. The clock on the CryptoShield is the DS3231M. It’s
attached to the I2C bus with an address of 0x68.
PP Button
On the CryptoShield, we added a small SMD button that attached to the
RST pin of the RTC and is connected to the pad labeled RTC Reset next to
the RTC. PP stands for Physical Presence, as in, pressing the button
confirms physical presence. The neat thing about this button is that the
�Page 3 of 8
RTC will perform hardware debouncing on it. Bouncing electrical noise that
results from the springy mechanical contact of a button or switch. It’s best
shown in a picture. Below is a picture of a switch that exhibits this bouncing
effect.
The DS3231M monitors the RST pin, which is connected to the pushbutton,
and when it detects a low-going edge, will hold the line low for 250ms. It
then waits for a rising edge and once that it detected, it holds the line low
for another 250ms. These are the characteristics you want when you are
designing a reset button for your microcontroller. However, you can use the
pushbutton for anything you want and enjoy the stable behavior. Notice in
the following picture how the DS3231M keeps the line low when you push
the PP button:
This figure is a screenshot from the Salea Pro 16 (see here for the Pro 8).
Channel 0, the button, appears twice in this figure. On the top is the digital
representation from the logic analyzer and the bottom is the sampled
analog representation.
Keeping Time
While the hardware-debounce button is fun, you probably will use the RTC
for its primary purpose: keeping time. Be aware, you must set the clock. It
comes with a default time that won’t be accurate unless you have a time
machine. You also need a coin cell battery if you want the RTC to keep its
time when you remove power from the board.
Keeping time under Linux
There Kernel module that supports this chip is the ds1307 module. You’ll
need to manually insert and probe this module as there is no automatic
detection of RTC. To do that, you need to perform something like this:
echo ds1307 0x68 | sudo tee /sys/class/i2cadapter/i2c2/new_device
You’ll need to change the i2c2 bit for the i2c bus on your board. Once
that’s complete, you should now see your RTC show up when you perform
ls /dev/rtc* . The hwclock utility can be used to set the time on the
device, assuming your system clock is correct. While this tutorial was
written from the perspective of the CryptoCape for the BeagleBone, the
directions on setting the time are applicable for any Linux platform.
Keeping time with Arduino
The device appears to be mostly compatible with DS1307 drivers, so you
can use something like RTClib to communicate with the chip over I2C.
Atmel AT97SC3204T Trusted Platform
�Page 4 of 8
Module
Overview
The Atmel Trusted Platform Module (TPM) is the AT97SC3204T, and only
a summary datasheet is available with an NDA. However, the full datasheet
is not required because there is existing software support. The TPM
conforms to the Trusted Computer Group (TCG) Software Stack (TSS)
Specification version 1.2, which is supported by the TrouSerS Linux
software.
A very generic description of the TPM is that it performs RSA encryption,
decryption, and signing in the hardware. It can perform much more than
that, and there are entire books on how to use the TPM.
NOTE
This chip is one of the more interesting on the Shield, it’s also one of the
hardest to use. It’s easiest to use with a Linux based board but could be
used on an AVR. On the AVR, you will have to write a lot of non-trivial
software to implement your own driver.
Compliance Vectors
This TPM ships with the compliance vectors loaded. Compliance vectors
are well-known keys that are used to test the cryptogrpahic operation of the
TPM. You need to clear these vectors and generate your own Endorsement
Key. See this blog post for further details.
Using the TPM under Linux
The kernel driver for this TPM did not show up until Kernel version 3.13.
Most likely, you will have to reconfigure your kernel to insert this module.
This is easier with some board vendors than with others. Configuring your
kernel for this module is outside-the-scope of this document.
Once you have the module built and loaded, you can view this page for
more instructions on the TPM. Some of the TPM application software in
Debian Wheezy is a bit old so you can get a more up-to-date package at
debian.cryptotronix.com.
Out of the Arduino shield compatible boards I’ve tested (this is Josh
speaking), none currently have native support for the TPM. I’m trying to
work with them to add support. I tested the TPM by fly-wiring the shield to a
BeagleBone Black, which does have the kernel driver built in.
Using the TPM with an AVR
�Page 5 of 8
Using the TPM with an AVR is even harder than Linux, but it is possible. It’s
harder because you will have to implement a large number of TPM
commands. However, the TPM will respond to commands over I2C just like
any other I2C device, so you can write your own code to do this. If you go
this route, you will want the review the following resources:
• Trusted Computing Group TPM Specs
• Atmel TPM Kit. This kit is for the AT97SC3205T, but it’s mostly
backwards compatible. There’s code on the dev kit that provides an
implementation for a TPM driver using a SAMS4. You might start
there to port your driver.
ATAES132 EEPROM
The Atmel AES132 is an AES encrypted EEPROM that can store up to
32Kb of data. Specifically, it uses AES with a 128 bit key in CCM mode.
Using the ATAES132 under Linux
There is currently no Linux driver that uses the crypto features of this
device. However, it may work with the generic EEPROM drivers as, without
the crypto features turned on, it acts as a general purpose EEPROM.
Using the ATAES132 with an AVR
Atmel provides a library for AVR based systems. It won’t build in the
Arduino IDE but it should work with Atmel Studio.
The device acts like a normal EEPROM without the crypto features turned
on, so you could use it with an I2C EEPROM Library in the Arduino IDE.
ATSHA204
�Page 6 of 8
The Atmel ATSHA204 is an authentication chip that performs SHA-256 and
HMAC-256. It can store up to 16 secret keys that can be used for sharedsecret authentication between two devices with an ATSHA204 or between
a ATSHA204 and a remote server. It also can produce random numbers
with its on-chip random number generator. The ATSHA204 on the
CryptoCape is the I2C version of our Breakout Board version. It’s also on
the Electric Imp.
This chip, like the other crypto chips, is one-time-programmable. This
means that once you run certain commands on the chip, it can not be
reversed. This is a security feature.
NOTE
On version 2 of the CryptoShield this device is the older ATSHA204 and not
the ATSHA204A.
Software
You have three options for software with this Chip.
1. Use Atmel’s AVR library with Atmel Studio.
2. Use the Cryptotronix Arduino library (a Work In Progress)
3. Use the Cryptotronix Linux user-space driver
Atmel’s AVR Library
Atmel’s ATSHA204 AVR Library page has links to their software.
Cryptotronix Linux driver
The linux driver, called hashlet , can be download here or cloned from
GitHub. See the GitHub page for examples.
If you don’t want to build this from source but want to use an ARM based
Linux board, you can add the Cryptotronix debian repository
debian.cryptotronix.com and then perform
sudo apt-get upgrade && sudo apt-get install hashlet .
The Linux driver is the easiest option to use currently.
Cryptotronix Arduino library
A third option is to use the Cryptotronix Arduino Library. For the
ATSHA204, the software support is very limited. The goal of the library is to
be a wrapper around the Atmel library to make using the ATSHA204 a bit
easier to use. If you want to help, pull requests are welcome!
Atmel ATECC108
�Page 7 of 8
The ATECC108 performs the Elliptic Curve Digital Signature Algorithm
(ECDSA) on the chip. This is an authentication chip, like the ATSHA204.
The goal of an authentication device is to assert the integrity and identity of
a communicating party. The ATECC108 uses asymmetric cryptography,
which means there is a public and private key. In short, this allows you to
distribute public keys and keep individual private keys secret. This is unlike
the ATSHA204 where each device needs a copy of the same secret key.
Software
You have three options for software with this Chip.
1. Use Atmel’s AVR library with Atmel Studio.
2. Use the Cryptotronix Arduino library (a Work In Progress)
3. Use the Cryptotronix Linux user-space driver
Atmel AVR Library
While the datasheet is under a NDA, Atmel provides an AVR based library
to interface with this chip.
Arduino library
The Arduino library will use the EC108 to sign messages, but you must
personalize the chip using the Linux driver first. The code is in development
and pull requests are welcome.
Using the ATECC108 under Linux
There is a Cryptotronix Linux driver, with examples, available on GitHub.
This blog post walks through using the software and describes the current
status.
Like the ATSHA204, this chip must go through a personalization process
that is irreversible. The above software driver picks reasonable default
settings which should be sufficient for the majority of use-cases.
The Linux driver is the easiest option to use currently.
RFID Socket
The RFID socket on the shield works best with SparkFun’s RFID ID-12LA.
Simply attach the reader and when a tag is read, the reader will write out to
the Arduino hardware serial lines. It will also flash the “stat” light on the
CryptoShield. Using the ID-12LA, the RFID tag, button, and capsule can all
be read.
An example Arduino sketch that will read the tag and echo it back over the
Serial port can be found here.
�Page 8 of 8
Resources and Going Further
If you are using the TPM on a Linux board, then Chapter 4 of BeagleBone
for Secret Agents should mostly apply. It shows how to add a keypad and
combine it with the TPM to protect GPG keys.
Josh is usually lurking on the #cryptotronix channel on Freenode, so you
can catch him there. While you are joining IRC channels, hang out in the
SparkFun IRC channel as well!
Further reading:
• Cryptography: A Very Short Introduction. For $11, this is the best
introduction to Cryptography that I’ve read. If you are looking to learn
more about the topic, start here.
• Cryptography Engineering. If you already have the background, then
I’d check this book out next. It is more detailed, but the authors
explain the concepts well. It also contains suggested exercises if you
like doing homework.
https://learn.sparkfun.com/tutorials/crypto-shield-hookup-guide?_ga=1.209870549.19394... 10/13/2015
�


 工商网监
湘ICP备2023018690号
工商网监
湘ICP备2023018690号