LMH1218EVM Evaluation Board
User's Guide
Literature Number: SNLU173A
January 2015 – Revised March 2015
�User's Guide
SNLU173A – January 2015 – Revised March 2015
1
Overview
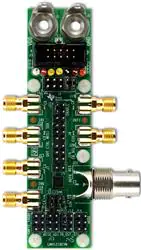
The LMH1218EVM evaluation module provides a complete high bandwidth platform to evaluate the
SDI/UHD and 10 GbE signal conditioning features of the Texas Instruments LMH1218 UHD Cable Driver
with Integrated Reclocker. The LMH1218EVM can be used for standard compliance testing, performance
evaluation, and initial system prototyping. The SMA and BNC edge launch connectors used for the
LMH1218EVM will interface to multiple system connector types via commercially available breakout
cables, adaptors, and boards (not included). This flexible connectivity enables integrated system level
testing between TI’s 12G SDI Cable Driver with Reclocker and 3rd party ASIC/FPGA host boards. A
graphical user interface can be used to manage LMH1218 device registers.
Figure 1. LMH1218EVM
2
SNLU173A – January 2015 – Revised March 2015
Submit Documentation Feedback
Copyright © 2015, Texas Instruments Incorporated
�Features
www.ti.com
2
Features
•
•
•
•
•
•
•
•
3
Applications
•
•
•
•
•
4
Locks to standard SDI (2.97 Gbps, 1.485 Gbps, or divide-by-1.001 sub-rates), DVB-ASI (270 Mbps),
ST-2081 (5.94 Gbps proposed), ST-2082 (11.88 Gbps proposed), and 10 GbE data rates
Integrated 2:1 100 Ω mux on input and 1:2 fan-out (one 75 Ω and one 100 Ω) output drivers with deemphasis supporting dual media (coax and fiber)
Programmable by SPI or SMBus interface
100 Ω differential and 75 Ω single-ended output drivers with de-emphasis
Single supply operation: VDD = 2.5 V ± 5%
High speed signal flow–thru pin-out package: 24-pin QFN (4 mm x 4 mm, 0.5 mm pitch)
GUI platform to support fast bring-up during product development
-40°C to +85°C Operation
UHDTV/4K/8K/HDTV/SDTV Video
Digital Video Routers and Switches
Digital Video Processing and Editing
DVB-ASI
Distribution Amplifiers
Ordering Information
Table 1. LMH1218EVM Ordering Information
EVM ID
DEVICE ID
DEVICE PACKAGE
LMH1218EVM
LMH1218RTW
RTW0024A
SNLU173A – January 2015 – Revised March 2015
Submit Documentation Feedback
Copyright © 2015, Texas Instruments Incorporated
3
�Setup
5
www.ti.com
Setup
This section describes the jumpers and connectors on the EVM as well as how to connect, set up, and
use the LMH1218EVM. When operating the LMH1218EVM, signal inputs and outputs can be connected
as shown in Figure 2.
Figure 2. LMH1218EVM Input and Output Pins
Table 2. Input and Output Channel Connectors
4
JUNCTION NUMBERS
FUNCTION
J15, J16
IN0+, IN0- (SMA)
J17, J18
IN1+, IN1- (SMA)
J19, J20
OUT1+, OUT1- (SMA)
J21
OUT0+ (BNC Single-Ended)
SNLU173A – January 2015 – Revised March 2015
Submit Documentation Feedback
Copyright © 2015, Texas Instruments Incorporated
�Setup
www.ti.com
5.1
Modes of Operation
The LMH1218EVM can be used in one of two modes:
1. SPI Mode – Provides full access to the LMH1218 status and control settings via MISO, MOSI, SCK,
and SS_N pins.
2. SMBus Mode – Provides full access to the LMH1218 status and control settings via SDA, SCL, and
GND pins. ADDR0 and ADDR1 pins are used for SMBus address strap.
Using either of these two modes, users have full access to all register controls for greater control of
LMH1218 parameters. For convenient use with the USB2ANY controller, LMH1218EVM provides a direct
connection via the J3 pin header for the ribbon cable interface. The USB2ANY interface is shown in
Figure 3.
Figure 3. USB2ANY Interface for LMH1218EVM SPI and SMBus Control
The external control pins on the LMH1218EVM are used to configure device settings. A 4-level input
scheme has been implemented across the control pin interface to increase the amount of control available
to the device with fewer physical pins.
The channel settings and controls are configurable for the LMH1218 4-logic levels (0, R, F, 1). The four
logic levels correspond to the following voltages in Table 3.
Table 3. Description of 4-Level Voltage Inputs
LEVEL
SETTING
INTERNAL PIN VOLTAGE
(2.5 V MODE)
0
Tie 1 kΩ to GND
0.08 V
R
Tie 20 kΩ to GND
1/3 x VDD
F
Float (Leave Pin Open)
2/3 x VDD
1
Tie 1 kΩ to VDD
VDD – 0.04 V
Typical 4-Level Input Thresholds:
• Internal Threshold between 0 and R = 0.2 * VDD
• Internal Threshold between R and F = 0.5 * VDD
• Internal Threshold between F and 1 = 0.8 * VDD
In order to set these 4-level voltage inputs, each input is controlled by a group of 6 jumper pins set in
accordance with Figure 4.
SNLU173A – January 2015 – Revised March 2015
Submit Documentation Feedback
Copyright © 2015, Texas Instruments Incorporated
5
�Setup
www.ti.com
Figure 4. Jumper Orientation for User Configuration
Therefore, the following jumper positions allow access to each of the four logic levels:
Table 4. Jumper Positions
LEVEL
JUMPER TIES
0
Pin 3-5
R
Pin 4-6
F
Pin 3-4 (or no connect)
1
Pin 1-3
The following jumpers are used to set the input condition for 4-level inputs:
J8, J9, J10 J11, J12, J13, J14
In SPI and SMBus modes, the jumpers on the LMH1218EVM control different functions. See Table 5 and
Table 6 for jumper descriptions and differences.
Table 5. Description of Connections in SPI Mode (J14 MODE_SEL = Level 1)
6
COMPONENT
NAME
J1
VDD
2.5 V power supply
DESCRIPTION
J2
GND
GND power supply
J3
SPI Access
Optional SMBus or SPI access pins. See datasheet and EVM
schematic for additional operation information.
J4
SPI Access
3.3 V to 2.5 V level shift. Install shunt jumpers on Pins 1-2, 3-4,
and 5-6 for proper operation. Do not install shunt jumpers on
Pins 7-8 and 9-10.
J5
LOS_INT_N
Default mode: LOS status indicator
Programmable interrupt caused by change in LOS, violation of
internal eye monitor threshold, or change in lock. External 4.7
kΩ pull-up resistor is required.
J6
LOCK
Signal Lock status. Connect jumper across J6 for Signal Lock
status indicator on LED D2. LED turns green when the
LMH1218 reclocker is locked.
J7
RES1
Reserved pin. Leave as no connect for normal operation.
J8
SMPTE_10GbE
J9
MOSI
SPI Master Output / Slave Input (Leave as Float and use J3 for
access if using USB2ANY)
J10
SCK
SPI Serial Clock Input (Leave as Float and use J3 for access if
using USB2ANY)
J11
ENABLE
Level 1: Power down until signal is detected
Level 0: Power down including signal detects. Reset registers
upon power-up
J12
SS_N
SPI Slave Select. This pin has an internal pull-up. (Leave as
Float and use J3 for access if using USB2ANY)
Level F: Leave open for normal operation
SNLU173A – January 2015 – Revised March 2015
Submit Documentation Feedback
Copyright © 2015, Texas Instruments Incorporated
�Setup
www.ti.com
Table 5. Description of Connections in SPI Mode (J14 MODE_SEL = Level 1) (continued)
COMPONENT
NAME
J13
MISO
J14
MODE_SEL
DESCRIPTION
SPI Master Input / Slave Output (Leave as Float and use J3 for
access if using USB2ANY)
Level 1: SPI Mode
Table 6. Description of Connections in SMBus Mode (J14 MODE_SEL = Level 0) (1)
(1)
COMPONENT
NAME
DESCRIPTION
J3
SMBus Access
Optional SMBus or SPI access pins. See datasheet and EVM
schematic for additional operation information.
J4
SMBus Access
External 2 kΩ pull-up resistor to 3.3 V supply. Install shunt
jumpers on Pins 7-8 and 9-10 for proper operation. Do not install
shunt jumpers on Pins 1-2, 3-4, and 5-6.
J5
LOS_INT_N
Default mode: LOS status indicator
Programmable interrupt caused by change in LOS, violation of
internal eye monitor threshold, or change in lock. External 4.7
kΩ pull-up resistor is required.
J9
SDA
SMBus Data Input / Output Open Drain. (Leave as Float and J3
for SMBus access if using USB2ANY)
J10
SCL
SMBus Clock Input / Output Open Drain. (Leave as Float and J3
for SMBus access if using USB2ANY)
J12
AD0
4-Level strap pins to determine up to 16 unique SMBus address
with J13 to create AD[1:0].
J13
AD1
4-Level strap pins to determine up to 16 unique SMBus address
with J12 to create AD[1:0].
J14
MODE_SEL
Level 0: SMBus Mode
Jumpers not listed in Table 6 are identical to the functions mentioned in Table 5.
SNLU173A – January 2015 – Revised March 2015
Submit Documentation Feedback
Copyright © 2015, Texas Instruments Incorporated
7
�Quick Start Guide
www.ti.com
6
Quick Start Guide
6.1
SPI and SMBus Control Mode
1. Connect J1: VDD = 2.5 V and J2: GND.
2. Set the jumpers for SPI or SMBus mode as shown below:
• Tie J5 jumper pins 1-2 and J6 jumper pins 1-2 to use LEDs D1 and D2 as status indicators of LOS
and LOCK, respectively.
• Tie J11 jumper pins 1-3 to enable normal operation by powering up the device when a signal is
detected on the selected input channel.
• For SPI Mode:
– Tie J14 jumper pins 1-3.
– Note: Tie J4 jumper pins 1-2, 3-4, and 5-6 for SPI 3.3 V to 2.5 V level shift.
• For SMBus Mode:
– Tie J14 jumper pins 3-5.
– Note: If SMBus controller does not have pull-ups provided internally for SDA and SCL, tie J4
jumper pins 7-8 and 9-10 to enable on-board 2 kΩ external pull-up resistors to 3.3 V.
– Note: Tie J12 (ADDR0) jumper pins 3-5 and J13 (ADDR1) jumper pins 3-5 for slave address =
0x1A (8-bits). For all other SMBus slave addresses, refer to the LMH1218 datasheet.
• The jumper configuration for SPI and SMBus mode can be seen in Figure 5 and Figure 6,
respectively.
Jumper pin connections.
Leave all other exposed
jumper pins floating.
Figure 5. Jumper Pin Configuration for SPI Mode
8
SNLU173A – January 2015 – Revised March 2015
Submit Documentation Feedback
Copyright © 2015, Texas Instruments Incorporated
�Quick Start Guide
www.ti.com
Jumper pin connections.
Leave all other exposed
jumper pins floating.
Figure 6. Jumper Pin Configuration for SMBus Mode
•
The user is expected to use a USB2ANY ribbon cable to establish SPI or SMBus interface
connection via the J3 jumper header. There are multiple ways to access and monitor SPI or
SMBus pins on the LMH1218EVM. The following table describes the connection description to
access the relevant SPI mode pins:
Figure 7. Labeled Diagram of SPI and SMBus Mode Connections
SNLU173A – January 2015 – Revised March 2015
Submit Documentation Feedback
Copyright © 2015, Texas Instruments Incorporated
9
�Quick Start Guide
www.ti.com
Table 7. SPI Mode Connections for J3, J4, and TP
FUNCTION
J3 PIN
J4 PIN
TP PIN
(TEST POINT)
SS_N
2
2
1
MISO
3
N/A
2
MOSI
4, 10
4, 7
3
SCK
8, 9
6
5
5
8, 10
N/A
6
N/A
4
3P3V (3.3 V power)
(2)
GND
(1)
(2)
(1)
TP access pins are not populated on-board during EVM manufacturing.
3P3V is provided by the USB2ANY module.
Table 8. SMBus Mode Connections for J3, J4, and TP (1)
(1)
(2)
J4 PIN
TP PIN
(TEST POINT)
2
2
1
3
N/A
2
SDA
4, 10
4, 7
3
SCL
8, 9
6
5
3P3V (3.3 V power) (2)
5
8, 10
N/A
GND
6
N/A
4
FUNCTION
J3 PIN
AD0
AD1
TP access pins are not populated on-board during EVM manufacturing.
3P3V is provided by the USB2ANY module.
3. Connect 50 Ω SMA or 75 Ω cables to the board depending on connector type:
• Connect an input signal to J17 and J18 for IN1 and J15 and J16 for IN0.
• The output signals on J19 and J20 are 100 Ω differential and can be connected to a scope or other
100 Ω receiver. The output signal on J21 is 75 Ω single-ended and can be connected via BNC
connector to a video analyzer or other 75 Ω instrument.
For further information about operation modes and LMH1218 functions and capabilities when using the
LMH1218EVM, please refer to the LMH1218 datasheet.
10
SNLU173A – January 2015 – Revised March 2015
Submit Documentation Feedback
Copyright © 2015, Texas Instruments Incorporated
�Example Waveforms
www.ti.com
7
Example Waveforms
7.1
Alignment Jitter and Rise / Fall Time Performance
Figure 8 to Figure 12 show the output jitter performance of OUT0 under the following conditions:
• Input Signal Pattern: PRBS-15
• VID: 800 mVp-p
• Measured Alignment Jitter (AJ) with scope filter applied
• Measured Rise / Fall Time (Tr / Tf) at 20 / 80
• VDD = 2.5 V, T = 25°C
Figure 8. OUT0 (75 Ω) Alignment Jitter (AJ) and Rise / Fall Time at 11.88 Gbps
AJ = 15.497 ps, Tr / Tf = 38.417 / 38.645 ps
SNLU173A – January 2015 – Revised March 2015
Submit Documentation Feedback
Copyright © 2015, Texas Instruments Incorporated
11
�Example Waveforms
www.ti.com
Figure 9. OUT0 (75 Ω) Alignment Jitter (AJ) and Rise / Fall Time at 5.94 Gbps
AJ = 12.678 ps, Tr / Tf = 40.511 / 41.615 ps
Figure 10. OUT0 (75 Ω) Alignment Jitter (AJ) and Rise / Fall Time at 2.97 Gbps
AJ = 16.628 ps, Tr / Tf = 39.268 / 39.252 ps
12
SNLU173A – January 2015 – Revised March 2015
Submit Documentation Feedback
Copyright © 2015, Texas Instruments Incorporated
�Example Waveforms
www.ti.com
Figure 11. OUT0 (75 Ω) Alignment Jitter (AJ) and Rise / Fall Time at 1.485 Gbps
AJ = 28.208 ps, Tr / Tf = 39.314 / 40.795 ps
Figure 12. OUT0 (75 Ω) Alignment Jitter (AJ) and Rise / Fall Time at 270 Mbps
AJ = 13.508 ps, Tr / Tf = 950.47 / 852.15 ps
SNLU173A – January 2015 – Revised March 2015
Submit Documentation Feedback
Copyright © 2015, Texas Instruments Incorporated
13
�Example Waveforms
7.2
www.ti.com
Output Jitter Performance for Retimed Data
Figure 13 shows the output jitter performance of OUT1 under the following conditions:
• Input Signal Pattern: PRBS-15
• VID: 800 mVp-p
• Operating Frequency: 11.88 Gbps
• LMH1218 in Retimed mode with 15" FR4 Trace at Input, EQ = 0x80
• VDD = 2.5 V, T = 25°C
Figure 13. OUT1 (50 Ω) Output Jitter Measurement with 15" FR4 Input Trace
TJ (E-12) = 9.3 ps
14
SNLU173A – January 2015 – Revised March 2015
Submit Documentation Feedback
Copyright © 2015, Texas Instruments Incorporated
�Schematic
www.ti.com
8
Schematic
VDD
VDD
1
C13 C14
���) ���)
R35
0
J21 BNC7T-J-P-GN-ST-EM1D
1
2
3
4
5
���)
C7 ���)
GND
11
12
142-0771-82150 ohm single ended trace
J17
i C5
1
8
9
2
3
4
5
���)
2
3
4
5
ENABLE
142-0771-82150 ohm single ended trace OUT_CTRL_MOSI_SDA
EQ_SCL_SCK
J18
i C6
IN_OUT_SEL_SSN_AD0
1
VOD_MISO_AD1
���)
LOCK
MODE_SEL
SMPTE_10GbE
142-0771-821
RES1
6
4
3
2
15
16
1
14
5
17
18
GND
C15 (DNP)
�����)
VDD
VDD
IN0+
IN0-
75 ohm single ended trace
75 ohm single
i ended trace
20
i
OUT0+
19
OUT0-
IN1+
IN1-
OUT1+
OUT1-
ENABLE
OUT_CTRL_MOSI_SDA
EQ_SCL_SCK
IN_OUT_SEL_SPI_SS_N_ADR0
VOD_MISO_ADR1
LOCK
MODE_SEL
SMPTE_10GbE
LOS_INT
RESERVED
RESERVED
RESERVED
DAP
VSS
VSS
R34
23
22
C8 ���)
50 ohm single ended trace
J19
C9
i
1
75.0
���)
5
4
3
2
2
3
4
5
���)
13
LOS_INT
25
10
24
GND
50 ohm single ended trace 142-0771-821
J20
C10
i
1
GND
���)
5
4
3
2
7
21
5
4
U1
142-0771-82150 ohm single ended trace
J16
i C4
1
3
2
J15
50 ohm single ended trace
i C3
142-0771-821
LMH1218RTWT
GND
3P3V
GND
R32 2.00k
R33 2.00k
GND
J1
VDD
108-0740-001
J3
C1
��)
C2
�)
TP2
(DNP)
J2
GND
TP6
1
VOD_MISO_AD1 3
3P3V
5
7
9
2
4
6
8
10
SSN R26 3.16k
MOSI R27 3.16k
GND
TP4 (DNP)
SCL R28 3.16k
TP7
(DNP)
R29 9.76k
TP1 (DNP)
R30 9.76k
TP3 (DNP)
R31 9.76k
TP5
Shunt Jumper Settings:
For SMBUS MODE:
J4 - Install pin 7-8 and 9-10 for 2kohm pull to 3.3V
J8-J14 No shunt jumper for FLOAT (open)
(DNP)
J4
2 IN_OUT_SEL_SSN_AD0
4 OUT_CTRL_MOSI_SDA
6 EQ_SCL_SCK
8
10
1
3
5
OUT_CTRL_MOSI_SDA 7
9
EQ_SCL_SCK
For SPI MODE:
J4 - Install pin 1-2 and 3-4 and 5-6 for SPI 3.3V to 2.5V level shift
J8-J14 No shunt jumper for FLOAT (open)
(DNP)
108-0740-001
5103308-1
PEC05DAAN
GND
J6
5-146278-2
2 RES1
1
5-146278-2
GND
VDD
R3 1.00k 1
3
SMPTE_10GbE
5
R4 1.00k
5-146278-2
D1
Green
1
J8
2
1 LOCK
2 GND
4
6
R17 20.0k
D2
Green
2
J7
2
2
1 LOS_INT
1
J5
R1
220
R2
220
VDD
GND
J9
VDD
R5 1.00k 1
OUT_CTRL_MOSI_SDA
3
5
R6 1.00k
J10
VDD
EQ_SCL_SCK
R7 1.00k 1
3
5
R8 1.00k
VDD
ENABLE
R9 1.00k 1
3
5
R10 1.00k
J11
GND
2 GND
4
6
R18 20.0k
GND
2 GND
4
6
R19 20.0k
GND
2 GND
4
6
R20 20.0k
J12
VDD
R11 1.00k 1
IN_OUT_SEL_SSN_AD0
3
5
R12 1.00k
VDD
VOD_MISO_AD1
R13 1.00k 1
3
5
R14 1.00k
VDD
MODE_SEL
R15 1.00k 1
3
5
R16 1.00k
2 GND
4
6
R21 20.0k
J13
GND
2 GND
4
6
R22 20.0k
J14
GND
2 GND
4
6
R23 20.0k
GND
GND
Figure 14. LMH1218EVM Schematic
15
SNLU173A – January 2015 – Revised March 2015
Submit Documentation Feedback
Copyright © 2015, Texas Instruments Incorporated
�EVM Layout
9
www.ti.com
EVM Layout
Figure 15 and Figure 16 show the LMH1218EVM layout. The evaluation board controls signal integrity
control settings via jumper pins.
The LMH1218EVM allows access to all input channels (IN0 and IN1) and output channels (OUT0 and
OUT1). It is very compact and low power. The QFN package offers an exposed thermal pad to enhance
electrical and thermal performance. This must be soldered to the copper landing on the PWB.
Figure 15. LMH1218EVM Top Layer
16
Figure 16. LMH1218EVM Bottom Layer
SNLU173A – January 2015 – Revised March 2015
Submit Documentation Feedback
Copyright © 2015, Texas Instruments Incorporated
�Bill of Materials
www.ti.com
10
Bill of Materials
Table 9. LMH1218EVM Bill of Materials
NO.
QTY.
DESIGNATOR
VALUE
FOOTPRINT
DESCRIPTION
1
1
C1
10uF
0805_HV
CAP CER 10UF 16V 20%
X5R 0805
2
1
C2
1uF
0805_HV
CAP CER 1UF 16V 10% X5R
0805
3
8
C3,C4,C5,C6,C7,C8,C9,C10
4.7uF
0402
CAP CER 4.7UF 6.3V 20%
X5R 0402
4
2
C13,C14
0.1uF
0402
CAP CER 0.1UF 6.3V 10%
X5R 0402
5
0
C15
0.022uF
0402
CAP CER 0.022UF 16V 10%
X5R 0402
6
2
D1,D2
Green
LED_SML-LX0603GW
LED 565NM GRN DIFF 0603
SMD
7
0
FID1,FID2,FID3,FID4,FID5
Fiducial10-30
COMMENTS
DNL
DNL
8
5
H1,H2,H3,H4,H5
NY PMS 440 0025 PH
NY PMS 440 0025 PH
MACHINE SCREW PAN
PHILLIPS 4-40
9
5
H7,H8,H9,H10,H11
1902C
Keystone_1902C
HEX STANDOFF 4-40
NYLON 1/2"
10
2
J1,J2
108-0740-001
Johnson_108-0740-001
CONN JACK BANANA
UNINS PANEL MOU
11
1
J3
5103308-1
CONN_5103308-1
CONN HEADER LOPRO
STR 10POS GOLD
12
1
J4
PEC05DAAN
CONN_PEC05DAAN
CONN HEADER .100 DUAL
STR 10POS
13
3
J5,J6,J7
5-146278-2
TE_5-146278-2
CONN HEADER BRKWY
2POS SLG .100
14
7
J8,J9,J10,J11,J12,J13,J14
5-146254-3
TE_5-146254-3
CONN HEADER BRKWAY
6POS DL .100
15
6
J15,J16,J17,J18,J19,J20
142-0771-821
Emerson_142-0771-821
CONN SMA JACK 50 OHM
EDGE MNT
16
1
J21
BNC7T-J-P-GN-ST-EM1D
SAMTEC_BNC7T-J-P-GNST-EM1D
BNC7T EDGE MOUNT DIE
CAST STRAIGHT JACK
17
2
R1,R2
220
0402
RES 220 OHM 1/16W 5%
0402 SMD
18
14
R3,R4,R5,R6,R7,R8,R9,R10,
R11,R12,R13,R14,R15,R16
1.00k
0402
RES 1.00K OHM 1/16W 1%
0402 SMD
19
7
R17,R18,R19,R20,R21,R22,
R23
20.0k
0402
RES 20.0K OHM 1/16W 1%
0402 SMD
20
1
R34
75.0
0402
RES 75.0 OHM 1/16W 1%
0402 SMD
21
3
R26,R27,R28
3.16k
0402
RES 3.16K OHM 1/16W 1%
0402 SMD
22
3
R29,R30,R31
9.76k
0402
RES 9.76K OHM 1/16W 1%
0402 SMD
23
2
R32,R33
2.00k
0402
RES 2.00K OHM 1/16W 1%
0402 SMD
24
1
R35
0
0603
RES 0.0 OHM 1/10W JUMP
0603 SMD
25
9
SH-J1,SH-J2,SH-J3,SHJ4,SH-J5,SH-J6,SH-J7,SHJ8,SH-J9
1x2
SNT-100-BK-G
SHUNT JUMPER .1" BLACK
GOLD
26
0
TP1
White
Keystone5002
TEST POINT PC MINI .040"D
WHITE
DNL
27
0
TP2
Orange
Keystone5003
TEST POINT PC MINI .040"D
ORANGE
DNL
28
0
TP3,TP7
Red
Keystone5000
TEST POINT PC MINI .040"D
RED
DNL
29
0
TP4
Black
Keystone5001
TEST POINT PC MINI .040"D
BLACK
DNL
30
0
TP5,TP6
Yellow
Keystone5004
TEST POINT PC MINI .040"D
YELLOW
DNL
31
1
U1
LMH1218RTWT
RTW0024A
Ultra HD Low-Power SDI
Reclocker and Cable Driver,
RTW0024A
32
SV601076 REVA BOARD
PCB
305-PD-14-0659
SNLU173A – January 2015 – Revised March 2015
Submit Documentation Feedback
Copyright © 2015, Texas Instruments Incorporated
17
�Revision History
www.ti.com
Revision History
Changes from Original (January 2015) to A Revision .................................................................................................... Page
•
Changed to full document release.
.....................................................................................................
2
NOTE: Page numbers for previous revisions may differ from page numbers in the current version.
18
Revision History
SNLU173A – January 2015 – Revised March 2015
Submit Documentation Feedback
Copyright © 2015, Texas Instruments Incorporated
�IMPORTANT NOTICE
Texas Instruments Incorporated and its subsidiaries (TI) reserve the right to make corrections, enhancements, improvements and other
changes to its semiconductor products and services per JESD46, latest issue, and to discontinue any product or service per JESD48, latest
issue. Buyers should obtain the latest relevant information before placing orders and should verify that such information is current and
complete. All semiconductor products (also referred to herein as “components”) are sold subject to TI’s terms and conditions of sale
supplied at the time of order acknowledgment.
TI warrants performance of its components to the specifications applicable at the time of sale, in accordance with the warranty in TI’s terms
and conditions of sale of semiconductor products. Testing and other quality control techniques are used to the extent TI deems necessary
to support this warranty. Except where mandated by applicable law, testing of all parameters of each component is not necessarily
performed.
TI assumes no liability for applications assistance or the design of Buyers’ products. Buyers are responsible for their products and
applications using TI components. To minimize the risks associated with Buyers’ products and applications, Buyers should provide
adequate design and operating safeguards.
TI does not warrant or represent that any license, either express or implied, is granted under any patent right, copyright, mask work right, or
other intellectual property right relating to any combination, machine, or process in which TI components or services are used. Information
published by TI regarding third-party products or services does not constitute a license to use such products or services or a warranty or
endorsement thereof. Use of such information may require a license from a third party under the patents or other intellectual property of the
third party, or a license from TI under the patents or other intellectual property of TI.
Reproduction of significant portions of TI information in TI data books or data sheets is permissible only if reproduction is without alteration
and is accompanied by all associated warranties, conditions, limitations, and notices. TI is not responsible or liable for such altered
documentation. Information of third parties may be subject to additional restrictions.
Resale of TI components or services with statements different from or beyond the parameters stated by TI for that component or service
voids all express and any implied warranties for the associated TI component or service and is an unfair and deceptive business practice.
TI is not responsible or liable for any such statements.
Buyer acknowledges and agrees that it is solely responsible for compliance with all legal, regulatory and safety-related requirements
concerning its products, and any use of TI components in its applications, notwithstanding any applications-related information or support
that may be provided by TI. Buyer represents and agrees that it has all the necessary expertise to create and implement safeguards which
anticipate dangerous consequences of failures, monitor failures and their consequences, lessen the likelihood of failures that might cause
harm and take appropriate remedial actions. Buyer will fully indemnify TI and its representatives against any damages arising out of the use
of any TI components in safety-critical applications.
In some cases, TI components may be promoted specifically to facilitate safety-related applications. With such components, TI’s goal is to
help enable customers to design and create their own end-product solutions that meet applicable functional safety standards and
requirements. Nonetheless, such components are subject to these terms.
No TI components are authorized for use in FDA Class III (or similar life-critical medical equipment) unless authorized officers of the parties
have executed a special agreement specifically governing such use.
Only those TI components which TI has specifically designated as military grade or “enhanced plastic” are designed and intended for use in
military/aerospace applications or environments. Buyer acknowledges and agrees that any military or aerospace use of TI components
which have not been so designated is solely at the Buyer's risk, and that Buyer is solely responsible for compliance with all legal and
regulatory requirements in connection with such use.
TI has specifically designated certain components as meeting ISO/TS16949 requirements, mainly for automotive use. In any case of use of
non-designated products, TI will not be responsible for any failure to meet ISO/TS16949.
Products
Applications
Audio
www.ti.com/audio
Automotive and Transportation
www.ti.com/automotive
Amplifiers
amplifier.ti.com
Communications and Telecom
www.ti.com/communications
Data Converters
dataconverter.ti.com
Computers and Peripherals
www.ti.com/computers
DLP® Products
www.dlp.com
Consumer Electronics
www.ti.com/consumer-apps
DSP
dsp.ti.com
Energy and Lighting
www.ti.com/energy
Clocks and Timers
www.ti.com/clocks
Industrial
www.ti.com/industrial
Interface
interface.ti.com
Medical
www.ti.com/medical
Logic
logic.ti.com
Security
www.ti.com/security
Power Mgmt
power.ti.com
Space, Avionics and Defense
www.ti.com/space-avionics-defense
Microcontrollers
microcontroller.ti.com
Video and Imaging
www.ti.com/video
RFID
www.ti-rfid.com
OMAP Applications Processors
www.ti.com/omap
TI E2E Community
e2e.ti.com
Wireless Connectivity
www.ti.com/wirelessconnectivity
Mailing Address: Texas Instruments, Post Office Box 655303, Dallas, Texas 75265
Copyright © 2015, Texas Instruments Incorporated
�