User's Guide
SLUUAY8E – March 2014 – Revised April 2018
TPS23861EVM-612: Auto-Mode Evaluation Module for
TPS23861
This user’s guide describes the evaluation modules (EVM) for the TPS23861 (TPS23861EVM-612). The
EVM contains evaluation and reference circuitry for the TPS23861. The TPS23861 is a Power-overEthernet (PoE) device for power sourcing equipment (PSE).
Contents
1
Description .................................................................................................................... 3
2
Quick Start .................................................................................................................... 3
3
General Use Features ....................................................................................................... 8
4
TPS23861EVM-612 PI Commander GUI Setup ....................................................................... 10
5
EVM Schematic, Layout Guidelines and PCB Assembly, Layer Plots .............................................. 26
6
Bill of Materials ............................................................................................................. 34
Appendix A
Revision A Schematic ............................................................................................ 37
List of Figures
1
Basic Test Setup ............................................................................................................. 5
2
Basic Setup Using USB-TO-GPIO
3
4
5
6
7
8
9
10
11
12
13
14
15
16
17
18
19
20
21
22
23
24
25
26
27
........................................................................................ 6
Advanced Setup Using LaunchPad ....................................................................................... 7
PI Commander Device Menu Window .................................................................................. 10
PI Commander Device Selection Window .............................................................................. 10
Devices Found in Scan .................................................................................................... 11
Detected Devices Selection............................................................................................... 11
Device Selector Approval ................................................................................................. 11
Telemetry Page............................................................................................................. 12
PD Detection ................................................................................................................ 13
Telemetry Data Collection and Graphs.................................................................................. 14
Telemetry Data Collection and Graphs, Device 2 ..................................................................... 15
High-Level Status, 2 Devices ............................................................................................. 15
I2C Register Page.......................................................................................................... 16
Device Configuration Page ............................................................................................... 17
Configuration Wizard ...................................................................................................... 17
Hit 'S' to Start ............................................................................................................... 18
Program Started ............................................................................................................ 19
Terminal Response with Connected Ports .............................................................................. 19
TPS23861 POE Documentation ......................................................................................... 20
Overall System Software Structure ...................................................................................... 21
Power on Decision Flow Chart ........................................................................................... 23
System Power Monitor Flow Chart....................................................................................... 24
TPS23861EVM-612 (Motherboard) Schematic: Control .............................................................. 26
TPS23861EVM-612 (Motherboard) Schematic: Power Ports ........................................................ 27
TPS23861EVM-613 (Daughterboard) Schematic ...................................................................... 28
TPS23861EVM-612 (Motherboard) Top Side Assembly .............................................................. 29
SLUUAY8E – March 2014 – Revised April 2018
Submit Documentation Feedback
TPS23861EVM-612: Auto-Mode Evaluation Module for TPS23861
Copyright © 2014–2018, Texas Instruments Incorporated
1
�www.ti.com
28
TPS23861EVM-612 (Motherboard) Top Side Routing ................................................................ 30
29
TPS23861EVM-612 (Motherboard) Layer 2 Routing .................................................................. 30
30
TPS23861EVM-612 (Motherboard) Layer 3 Routing .................................................................. 31
31
TPS23861EVM-612 (Motherboard) Bottom Side Routing ............................................................ 31
32
TPS23861EVM-613 (Daughterboard) Top Side Assembly ........................................................... 32
33
TPS23861EVM-613 (Daughterboard) Top Side Routing
34
35
36
.............................................................
TPS23861EVM-613 (Daughterboard) Bottom Side Routing .........................................................
TPS23861EVM-613 (Daughterboard) Bottom Side Assembly .......................................................
TPS23861EVM-612 (Motherboard) Schematic: Control ..............................................................
32
33
33
37
List of Tables
..............................................................
1
TPS23861EVM-612 Voltage Rail Current Requirements
2
EVM Input/Output Connectors ............................................................................................. 8
3
EVM LEDs .................................................................................................................... 8
4
EVM Test Points ............................................................................................................. 9
5
EVM Jumpers ................................................................................................................ 9
6
Terminology ................................................................................................................. 22
7
State Definitions ............................................................................................................ 22
8
Function Definitions ........................................................................................................ 22
9
User Configurable Parameters ........................................................................................... 23
10
TPS23861EVM-612 Bill of Materials
11
TPS23861EVM-613 Bill of Materials..................................................................................... 35
....................................................................................
4
34
Trademarks
LaunchPad, Code Composer Studio are trademarks of Texas Instruments.
2
TPS23861EVM-612: Auto-Mode Evaluation Module for TPS23861
SLUUAY8E – March 2014 – Revised April 2018
Submit Documentation Feedback
Copyright © 2014–2018, Texas Instruments Incorporated
�Description
www.ti.com
1
Description
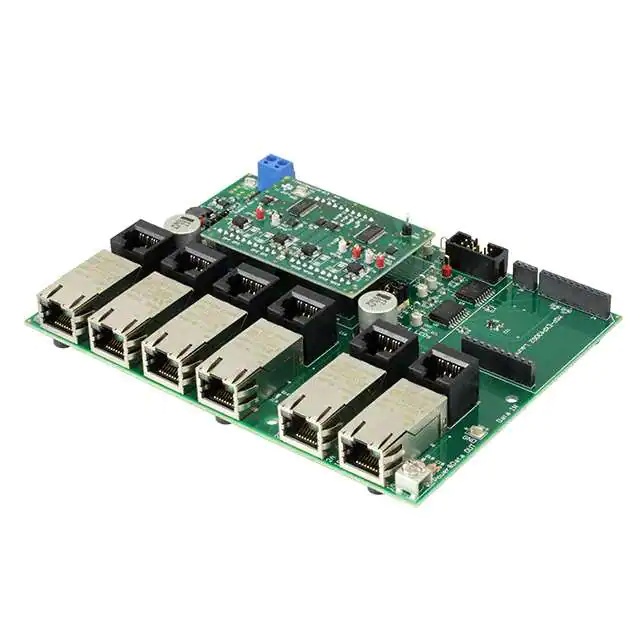
The TPS23861EVM-612 features the quad port, TPS23861, IEEE 802.3at PoE PSE controller. The EVM
consists of a motherboard (TPS23861EVM-612) and daughter board (TPS23861EVM-613) containing two
TPS23861 devices. The TPS23861EVM-612 provides a multi-port base platform interface for
TPS23861EVM-613, MSP-EXP430G2 (LaunchPad™), and USB-TO-GPIO (USB Interface Adapter).
1.1
Features
•
•
•
•
•
•
•
•
•
1.2
TPS23861 PSE devices default to auto-mode operation so no operator interface over I2C is required.
Four IEEE802.3at, Type 2 (30 W) ports with 1000BASE-T (gigabit Ethernet data pass through)
Two non-standard, high power ports with 1000BASE-T (gigabit Ethernet data pass through)
Fully certified using UNH-IOL Clause #33 PSE Conformance Test Suite
Single DC power supply input
On board 3.3-V regulator
On board I2C interface to both TPS23861PW devices from either USB-TO-GPIO or MSP-EXP430G2.
Port ON status LEDs
User test points
Applications
•
•
•
•
Ethernet switches and routers
Surveillance VDRs
High power PoE
PoE pass-through systems
2
Quick Start
2.1
Input Power
2.1.1
Input Power (Labeled VPWR)
DC input voltage is provided through J1 (screw jack). A dc power supply or laptop adapter with sufficient
current capacity can power the EVM.
CAUTION
Reverse voltage protection is not provided; ensure that the correct polarity is
applied to J1.
This dc input is labeled VPWR in the schematics and is used for port VBUS as well as for the TPS23861
devices. The VPWR connections to the PoE ports are not fused. Each two pair port is capable of
furnishing at least 30 W and each four pair port can furnish 60 W. The power supply requirements are
summarized in Table 1.
The minimum PSE port voltage is 44 VDC for type 1 and 50 V for type 2. The nominal dc voltage at
VPWR is 48 VDC for a type 1 and 54 VDC for a type 2. During evaluation, choose the appropriate dc
power supply for the type 1 or type 2 environment.
2.1.2
Local 3.3 V (Labeled 3.3V)
Local 3.3 V for local devices (labeled as 3.3V) is provided by the on-board LM5019 buck converter. The
LM5019 provides a basic power-on sequence and provides a well-controlled and consistent startup in
order to prevent erratic operation. This is described in detail in SLVA723. In addition to 48 V, the
TPS23861 requires 3.3 V for the digital circuitry and this is routed up to TPS23861EVM-613 over the
connector interface. The current consumption is 25-mA typical and 30-mA maximum.
SLUUAY8E – March 2014 – Revised April 2018
Submit Documentation Feedback
TPS23861EVM-612: Auto-Mode Evaluation Module for TPS23861
Copyright © 2014–2018, Texas Instruments Incorporated
3
�Quick Start
2.1.3
www.ti.com
External 3.3 V (Labeled 3.3V_USB)
The TPS23861EVM-612 provides galvanic isolation between PoE power side and host side using digital
isolators (ISO7241CD). The host side power is provided either from J2 (from USB-TO-GPIO) or J5 (from
LaunchPad). The current consumption is 3-mA typical and 5-mA maximum.
CAUTION
Do not use USB-TO-GPIO and LaunchPad simultaneously.
Table 1. TPS23861EVM-612 Voltage Rail Current Requirements
2.2
Voltage Rail
Typical (mA)
3.3V_USB
2.5
Maximum (mA)
3
3.3V
25
30
VPWR (Miscellaneous)
35
57
VPWR (8x Type 1
Output Ports)
2992
3142
VPWR (8x Type 2
Output Ports)
5160
5418
VPWR Total (8x Type 1
Ports)
3027
3202
VPWR Total (8x Type 2
Ports)
5195
5478
PoE Port Interfaces
The TPS23861 devices are pre-configured to operate in auto mode and, as such, no external
communication interface is required to enable or configure the TPS23861EVM-612. A standard PD can be
plugged into ports 1–4 and be expected to operate automatically.
2.2.1
Standard 30 W, IEEE802.3at Type 2 ports
Four standard ports are provided at J19, J20, J8, and J7 for two pair ports 1, 2, 3, and 4 respectively. The
power furnished is according to alternative A with MDI-X polarity.
2.2.2
Nonstandard 60-W Ports
Two non-standard ports are provided at J21 and J9 for four pair ports 1 and 2, respectively. The power
furnished is according to alternative A with MDI-X polarity and alternative B on a single port connector. A
standard PD may not power on at this interface, but a PD which can process power on all of the Ethernet
conductors (refer to TI application report, SLVA625) can power on and consume up to 60 W.
2.3
I2C Interfaces
Two I2C interfaces to the TPS23861 are provided on the EVM.
2.3.1
USB-TO-GPIO
J2 provides an interface with the USB-TO-GPIO adapter when using a PC and GUI.
2.3.2
MSP-EXP430G2
J3, J4, and J5 provide an interface with the MSP-EXP430G2 or LaunchPad when using a PC to develop
custom power management code.
4
TPS23861EVM-612: Auto-Mode Evaluation Module for TPS23861
SLUUAY8E – March 2014 – Revised April 2018
Submit Documentation Feedback
Copyright © 2014–2018, Texas Instruments Incorporated
�Quick Start
www.ti.com
2.4
Basic Test Setup (Out-of-the-box Auto-Mode Operation)
Figure 1 shows the basic test setup for the TPS23861EVM. All that is required is a dc power supply
(44–57 VDC, 5 A), Ethernet patch cable, and any PD load.
TPS23754EVM-420
J7
J8
J20
J19
J9
J21
Ethernet
Cable
TPS23861EVM-612
J2
J1
(-)
(+)
D1
TPS23861EVM-613
Positive
Negative
Power Supply
Figure 1. Basic Test Setup
SLUUAY8E – March 2014 – Revised April 2018
Submit Documentation Feedback
TPS23861EVM-612: Auto-Mode Evaluation Module for TPS23861
Copyright © 2014–2018, Texas Instruments Incorporated
5
�Quick Start
2.5
www.ti.com
2
Basic Test Setup Using USB-TO-GPIO for I C Interface (Auto-Mode Operation with I2C
Monitoring)
An I2C interface is provided through J2 to the TPS23861PW devices on the TPS23861EVM-613. The
USB-TO-GPIO adapter (not included) can be used with any TI GUI which uses USB-TO-GPIO to read and
write over an I2C bus. Figure 2 illustrates the basic setup using USB-TO-GPIO.
TPS23754EVM-420
J7
J8
J20
J19
J9
J21
Ethernet
Cable
J2
(-)
J1
(+)
TPS23861EVM-613
D1
TPS23861EVM-612
Ribbon
Cable
x
Positive
x
Negative
x
USB-to-GPIO
Power
Supply
x
x
PC
USB CABLE
Figure 2. Basic Setup Using USB-TO-GPIO
6
TPS23861EVM-612: Auto-Mode Evaluation Module for TPS23861
SLUUAY8E – March 2014 – Revised April 2018
Submit Documentation Feedback
Copyright © 2014–2018, Texas Instruments Incorporated
�Quick Start
www.ti.com
2.6
Advanced Test Setup Using MSP-EX430G2 (LaunchPad)
The LaunchPad (not included) running a custom software program can communicate with the
TPS23861PW devices on the TPS23861EVM-613. Figure 3 shows the advanced setup using LaunchPad.
TPS23754EVM-420
J7
J8
J20
J19
J9
J21
Ethernet
Cable
TPS23861EVM-613
D1
TPS23861EVM-612
J2
(-)
J1
(+)
MSP-EXP430G2
USB CABLE
Positive
x
x
Negative
x
x
x
Power
Supply
PC
Figure 3. Advanced Setup Using LaunchPad
SLUUAY8E – March 2014 – Revised April 2018
Submit Documentation Feedback
TPS23861EVM-612: Auto-Mode Evaluation Module for TPS23861
Copyright © 2014–2018, Texas Instruments Incorporated
7
�General Use Features
www.ti.com
3
General Use Features
3.1
EVM Input/Output Connectors and Switches
Table 2 lists the EVM input and output connectors.
Table 2. EVM Input/Output Connectors
3.2
Connector/Switch
Label
Description
J1
J1
DC power supply screw jack. (44–57 VDC, 5 A). Use a 48 VDC (nominal) for
type 1 and 54 VDC (nominal) for type 2 PSE operation.
J2
J2
Ribbon cable connection to USB-TO-GPIO adapter
J3
J3
LaunchPad Control (mates with LaunchPad J1)
J4
J4
LaunchPad I2C (mates with LaunchPad J2)
J5
J5
LaunchPad Power (mates with LaunchPad J6)
J6
J6
TPS23861EVM-613 Control (mates with TPS23861EVM-613 J3)
J17
J17
TPS23861EVM-613 Port 5-8 (mates with TPS23861EVM-613 J2)
J18
J18
TPS23861EVM-613 Port 1-4 (mates with TPS23861EVM-613 J1)
J22
J22
Two-pair port 1 data only
J19
2 Pair Port 1
Two-pair port 1 power and data
J23
J23
Two-pair port 2 data only
J20
2 Pair Port 2
Two-pair port 2 power and data
J11
J11
Two-pair port 3 data only
J8
2 Pair Port 3
Two-pair port 3 power and data
J10
J10
Two-pair port 4 data only
J7
2 Pair Port 4
Two-pair port 4 power and data
J24
J24
Four-pair port 1 data only
J21
4 Pair Port 1
Four -pair port 1 power and data
J12
J12
Four -pair port 2 data only
J9
4 Pair Port 2
Four -pair port 2 power and data
J29
J29
Chassis ground tie point
EVM LEDs
Table 3 lists the EVM LEDs and their descriptions.
Table 3. EVM LEDs
8
LED Color
Label
Description
D1
GREEN
48V
48-V ON indicator
D16
BLUE
D16
Two-pair port 1 power is ON. For J19 supplier #1 (see the bill of materials (BOM)), J19 internal port LED
is active. For supplier #2, D16 is active.
D17
BLUE
D17
Two-pair port 2 power is ON. For J20 supplier #1 (see the BOM), J20 internal port LED is active. For
supplier #2, D17 is active.
D13
BLUE
D13
Two-pair port 3 power is ON. For J8 supplier #1 (see the BOM), J8 internal port LED is active. For
supplier #2, D13 is active.
D12
BLUE
D12
Two-pair port 4 power is ON. For J7 supplier #1 (see the BOM), J7 internal port LED is active. For
supplier #2, D12 is active.
D18
BLUE
D18
Four-pair port 1A power is ON. For J21 supplier #1 (see the BOM), J21 internal port LED is active. For
supplier #2, D18 is active.
D14
BLUE
D14
Four-pair port 2A power is ON. For J9 supplier #1 (see the BOM), J9 internal port LED is active. For
supplier #2, D14 is active.
TPS23861EVM-612: Auto-Mode Evaluation Module for TPS23861
SLUUAY8E – March 2014 – Revised April 2018
Submit Documentation Feedback
Copyright © 2014–2018, Texas Instruments Incorporated
�General Use Features
www.ti.com
3.3
EVM Test Points
Table 4 lists and describes the EVM test points.
Table 4. EVM Test Points
TP
Color
Label
Description
Motherboard: TPS23861EVM-612
TP1
RED
VPWR
Used for VPWR
TP2
RED
3.3V
Used for TPS23861 VDD
TP3
SMT
GND
VPWR ground
TP4
WHT
SDA
I2C Data from LaunchPad and USB-TO-GPIO
TP5
WHT
SCL
I2C Clock from LaunchPad and USB-TO-GPIO
TP6
WHT
PSE_SDAO
I2C data out from TPS23861
TP7
WHT
PSE_SCL
I2C clock to TPS23861
TP8
WHT
PSE_SDAI
I2C data in to TPS23861
TP9
BLK
GND1
Ground from LaunchPad and USB-TO-GPIO
TP11
SMT
TP11
Chassis ground test point
TP14
SMT
GND
VPWR ground test point
TP15
SMT
GND
VPWR ground test point
TP16
SMT
GND
VPWR ground test point
Daughterboard: TPS23861EVM-613
3.4
TP4
RED
2P4D
Two-pair port 4 DRAIN
TP12
WHT
2P4G
Two-pair port 4 GATE
TP5
WHT
4P1AG
Four-pair port 1A GATE
TP6
RED
4P1AD
Four-pair port 1A DRAIN
TP9
WHT
4P1BG
Four-pair port 1B GATE
TP10
RED
4P1BD
Four-pair port 1B DRAIN
TP1
BLK
GND
VPWR ground
TP8
SMT
GND
VPWR ground
EVM Test Jumpers
The EVM is equipped with shunts on the jumper positions identified in Table 5, in the Default Pin Position
column. Shunts can be moved and removed, as required, during use.
Table 5. EVM Jumpers (1)
Jumper
Default Pin
Position
Label
Description
J27
1-2
P1
Two-pair port 1 LED bias
J28
1-2
P2
Two-pair port 2 LED bias
J16
1-2
P3
Two-pair port 3 LED bias
J15
1-2
P4
Two-pair port 4 LED bias
J26
1-2
P5
Four-pair port 1A LED bias
J25
1-2
P6
Four-pair port 1B LED bias
J14
1-2
P7
Four-pair port 2A LED bias
J13
1-2
P8
Four-pair port 2B LED bias
(1)
Remove the jumpers listed in this table when doing SIFOS or UNH DC MPS testing.
SLUUAY8E – March 2014 – Revised April 2018
Submit Documentation Feedback
TPS23861EVM-612: Auto-Mode Evaluation Module for TPS23861
Copyright © 2014–2018, Texas Instruments Incorporated
9
�TPS23861EVM-612 PI Commander GUI Setup
4
TPS23861EVM-612 PI Commander GUI Setup
4.1
TPS23861EVM-612 GUI Installation
www.ti.com
The Texas Instruments PI Commander graphical user interface (GUI) can be used with TPS23861EVM612 to provide real time feedback on port telemetry. PI Commander (PI Commander - TPS23861setup.exe) can be downloaded from the TPS23861 product page in the Software section.
Follow the onscreen instructions to complete the installation. PI Commander uses the USB-TO-GPIO as
an interface between the PC USB port and TPS23861EVM-612 J2 connector (I2C interface). Before
starting PI Commander, make sure the USB-TO-GPIO is properly connected to TPS23861EVM-612 as
shown in Figure 2.
4.2
TPS23861EVM-612 GUI Operation
Start Texas Instruments PI Commander - TPS23861 by clicking START → All Programs → Texas
Instruments → PI-Commander-n.n.n-n, then PI-Commander-PoE. A command window opens as the
program starts and scans for devices (note that the Scanning for devices …. message displays in the
window footer until the scan is complete). Once the scan is complete, click on the UNKNOWN 30 device
(Figure 4).
Figure 4. PI Commander Device Menu Window
TPS23861 shows up in the Device Selector window. Click the OK button.
Figure 5. PI Commander Device Selection Window
10
TPS23861EVM-612: Auto-Mode Evaluation Module for TPS23861
SLUUAY8E – March 2014 – Revised April 2018
Submit Documentation Feedback
Copyright © 2014–2018, Texas Instruments Incorporated
�TPS23861EVM-612 PI Commander GUI Setup
www.ti.com
As the program GUI starts, the window in Figure 6 appears showing the devices found in the scan. Device
#1 (two-pair ports 1-4) is at address 20 and device #2 (four-pair ports 1 and 2) is at address 28. Click the
OK button.
Figure 6. Devices Found in Scan
Choose device #1 (UNKNOWN 20) or device #2 (UNKNOWN 28).
Figure 7. Detected Devices Selection
Once the following window pops up, click the OK button.
Figure 8. Device Selector Approval
SLUUAY8E – March 2014 – Revised April 2018
Submit Documentation Feedback
TPS23861EVM-612: Auto-Mode Evaluation Module for TPS23861
Copyright © 2014–2018, Texas Instruments Incorporated
11
�TPS23861EVM-612 PI Commander GUI Setup
www.ti.com
PI Commander launches and starts the Telemetry Page as shown in Figure 9 for device #1. Note that
more than one device window can be opened at the same time by choosing another device from the
device menu.
Figure 9. Telemetry Page
12
TPS23861EVM-612: Auto-Mode Evaluation Module for TPS23861
SLUUAY8E – March 2014 – Revised April 2018
Submit Documentation Feedback
Copyright © 2014–2018, Texas Instruments Incorporated
�TPS23861EVM-612 PI Commander GUI Setup
www.ti.com
At any time, insert the ethernet cable connected to the PD load device into the two-pair port jacks. For the
case in Figure 10, type two PDs are installed into ports 1, 2, 3, and 4 respectively and are successfully
detected, classified, and powered up.
Figure 10. PD Detection
SLUUAY8E – March 2014 – Revised April 2018
Submit Documentation Feedback
TPS23861EVM-612: Auto-Mode Evaluation Module for TPS23861
Copyright © 2014–2018, Texas Instruments Incorporated
13
�TPS23861EVM-612 PI Commander GUI Setup
www.ti.com
Clicking the Run button (blue arrow in the header bar) starts telemetry data collection and graphs
(Figure 11).
Figure 11. Telemetry Data Collection and Graphs
14
TPS23861EVM-612: Auto-Mode Evaluation Module for TPS23861
SLUUAY8E – March 2014 – Revised April 2018
Submit Documentation Feedback
Copyright © 2014–2018, Texas Instruments Incorporated
�TPS23861EVM-612 PI Commander GUI Setup
www.ti.com
Following a similar procedure, device #2 can be viewed. For the case in Figure 12, two forced-four pair
PDs are installed into ports 1 and 2 respectively and are successfully detected, classified, and powered
up.
Figure 12. Telemetry Data Collection and Graphs, Device 2
The Dashboard window is also available showing a high level status (two devices shown).
Figure 13. High-Level Status, 2 Devices
SLUUAY8E – March 2014 – Revised April 2018
Submit Documentation Feedback
TPS23861EVM-612: Auto-Mode Evaluation Module for TPS23861
Copyright © 2014–2018, Texas Instruments Incorporated
15
�TPS23861EVM-612 PI Commander GUI Setup
www.ti.com
The I2C Register Page (Figure 14) provides a detailed view of Status, Device, and Telemetry information.
Figure 14. I2C Register Page
16
TPS23861EVM-612: Auto-Mode Evaluation Module for TPS23861
SLUUAY8E – March 2014 – Revised April 2018
Submit Documentation Feedback
Copyright © 2014–2018, Texas Instruments Incorporated
�TPS23861EVM-612 PI Commander GUI Setup
www.ti.com
The Device Configuration Page provides users with an additional level of access.
Figure 15. Device Configuration Page
The Configuration Wizard provides a quick way to set up ports in semi-auto or manual modes without
much knowledge of the device register-specific details.
Figure 16. Configuration Wizard
SLUUAY8E – March 2014 – Revised April 2018
Submit Documentation Feedback
TPS23861EVM-612: Auto-Mode Evaluation Module for TPS23861
Copyright © 2014–2018, Texas Instruments Incorporated
17
�TPS23861EVM-612 PI Commander GUI Setup
4.3
www.ti.com
MSP-EXP430G2 Details
The TPS23861EVM-612 accepts the MSP-EXP430G2 evaluation module when the application requires
management of the TPS23861 devices with an external controller. Before inserting the MSP-EXP430G2
into the TPS23861EVM-612, make the following jumper changes and ensure that the target MSP430
(MSP430G2553) device is installed:
1. Remove the shunt on J5 in the P1.6 slot
2. Remove the shunts on J3 in the RXD and TXD slot. Re-install these in the vertical position as
described in the MSP-EXP430G2 LaunchPad user guide (SLAU318C, page 10).
3. Install MSP-EXP430G2 onto TPS23861EVM-612 and ensure that the USB-TO-GPIO ribbon cable is
NOT installed into J2
4. Connect the PC to the LaunchPad as shown in Figure 3.
5. The source code was developed for the MSP430 LaunchPad Development Kit (MSP-EXP430G2
http://www.ti.com/tool/msp-exp430g2) using the Code Composer Studio™ (CCS) version 5.3
(http://www.ti.com/tool/ccstudio-msp430) development environment. The target MSP430 can be
programmed within this environment.
6. Once CCS is installed, then use the basic set of instructions listed in Section 4.3.1 to import, build, and
run the project. CCS version 5.3.0 is used in the following examples. Note that a terminal program
such as HyperTerminal or Teraterm is required to view the output from the EVM when it is running.
4.3.1
Basic CCS and Terminal Setup
1. Launch the CCS program on the PC: Start → Texas Instruments → Code Composer Studio 5.3.0 →
Code Composer Studio 5.3.0.
2. OK the workspace location and CCS starts
3. Import the project: File → Import Existing CCS Eclipse Project
4. Navigate to the project location, then click the Finish button
5. Set the active project: Project, Build Configurations, Set Active, Auto, Manual, or Semi-Auto
6. Build the project by clicking the hammer symbol
7. Launch debug session from CCS to activate the current project: Run, Debug (or F11).
8. Run the active project: Run, Resume (or play button, F8)
9. Determine the PC COM port connected to the LaunchPad by going into the Device Manager Ports
(COM and LPT) section. Launch the terminal program.
10. Once the terminal program is properly connected to the LaunchPad running the POE firmware, then
text similar to the following image appears
Figure 17. Hit 'S' to Start
18
TPS23861EVM-612: Auto-Mode Evaluation Module for TPS23861
SLUUAY8E – March 2014 – Revised April 2018
Submit Documentation Feedback
Copyright © 2014–2018, Texas Instruments Incorporated
�TPS23861EVM-612 PI Commander GUI Setup
www.ti.com
11. Pressing the “S” key on the keyboard starts the program
Figure 18. Program Started
12. The TPS23861EVM-612 is now waiting for a PD load to be installed. As ports are installed, the
firmware automatically detects, classifies, and powers up the port as shown in the following image.
Port status is updated on the screen approximately every 8 seconds
Figure 19. Terminal Response with Connected Ports
13. In similar fashion, the builds for Semi-auto and auto mode operation can be configured and launched.
The terminal welcome screen indicates which build is running on the LaunchPad.
SLUUAY8E – March 2014 – Revised April 2018
Submit Documentation Feedback
TPS23861EVM-612: Auto-Mode Evaluation Module for TPS23861
Copyright © 2014–2018, Texas Instruments Incorporated
19
�TPS23861EVM-612 PI Commander GUI Setup
4.3.2
www.ti.com
Documentation
Figure 20 illustrates the documentation contained within the \POETPS23861\Document\doxy\html\index.html file.
Figure 20. TPS23861 POE Documentation
4.4
4.4.1
MSP430 Reference Code
Overview
There are two versions of MSP430 reference code published on TI web. One is for basic applications and
the other is focused on multi-port power management applications. The reference code for multi-port
power management applications will be discussed in detail since it has more flexibility and complexity.
The system software supports the following features:
• Fully compliant to IEEE802.3at Power over Ethernet specification
• Device detection and classification
• DC disconnect
• Multi-port power management
The reference code can support PSE systems with up to 48 ports. It keeps track of all system level
parameters as well as port level parameters for each TPS23861 device within the system.
The main actions are interrupts triggered. As long as MSP430 receives an interrupt signal from TPS23861
devices, it checks the interrupt status and proceeds with related actions.
The system software also keeps track of system and devices error conditions that occur, as well as any
events that affect the port states. The MSP430 communicates with PC through UART, reporting port’s
parameters and status.
20
TPS23861EVM-612: Auto-Mode Evaluation Module for TPS23861
SLUUAY8E – March 2014 – Revised April 2018
Submit Documentation Feedback
Copyright © 2014–2018, Texas Instruments Incorporated
�TPS23861EVM-612 PI Commander GUI Setup
www.ti.com
Figure 21. Overall System Software Structure
4.4.2
Multi-Port Power Management Module
Multi-Port Power Management methods are used to manage the distribution and prioritization of PDs.
Power Management itself is not defined by the IEEE specification. Instead, it is a policy that takes
advantage of the POE specification as it defines such terms as port and system power.
The goals of Multi-Port Power Management in a POE enabled system are two-fold:
• Power as many PDs as possible
• Limit power cycling of PDs
In many systems, the maximum system power available limits the total number of ports that may be
powered. For example, each PD can draw a maximum of 30W, and a 48-port system can draw more than
1440W total system power. If the maximum system power available is less than 1440W then Power
Management becomes necessary so that the available system power may be used in the most efficient
manner while meeting the goals.
In this reference code, Multi-Port Power Management Module is implemented in Semi-Auto Mode
reference code (main_semi-auto.c).
SLUUAY8E – March 2014 – Revised April 2018
Submit Documentation Feedback
TPS23861EVM-612: Auto-Mode Evaluation Module for TPS23861
Copyright © 2014–2018, Texas Instruments Incorporated
21
�TPS23861EVM-612 PI Commander GUI Setup
4.4.2.1
www.ti.com
Definitions and Formulas
Table 6 defines terms used in the Power Management algorithm.
Table 6. Terminology
TERM
DEFINITION
sysPower
The current total power consumed by PDs
The estimated power the current port(finished detection and
classification) is going to consume
portPowerEstimate
4.4.2.2
lowestPrioPort
The lowest priority port among all turned on ports
powerOffPort
Port will be powered off
powerOnPort
Port will be turned on
State Definitions
The Power Management algorithm operates as a state machine, whereby the algorithm is a certain state
at any given point in time. Table 7 shows the state definitions for the algorithm.
Table 7. State Definitions
STATE
DEFINITION
PM_CHECK
Calculate existing ON ports’ total power, get current port estimate
power, compare total power + port estimate power and Power budget
PM_POWERUP
Power up current port
PM_OVERLIMIT
Power demand has exceeded the power budget. Calculate whether
the remaining power is enough to turn on current port after turning off
all lower priority ports
PM_POWERDOWN
4.4.2.3
Power down the lowest priority port. Entered from PM_OVERLIMIT
Function Definitions
The power management function is called after a valid classification is performed. It includes the functions
below to implement the algorithm.
Table 8. Function Definitions
FUNCTION
22
DEFINITION
uint32_t PM_calSysPower(void)
Calculate current total power consumed by PDs
uint8_t PM_getActLowestPrioPort(void)
Find lowest priority port among all turned on ports
uint32_t PM_getPowerofPortsHigherPriority(uint8_t
PM_sysPortNumber)
Calculate total power of ports that have the same or higher priority
uint32_t PM_getRequestPower(uint8_t
PM_sysPortNumber)
Get estimate power of current port(finished detection and classification) is
going to consume based on classification results
void PM_powerManagement(uint8_t
PM_sysPortNumber)
Power management function called in main function
void PM_monitorSysPower(void)
Note: running in background, software interrupt
triggered
Real-time check if current total power consumed by PDs exceeds power
budget (to prevent load step change on any ports).
TPS23861EVM-612: Auto-Mode Evaluation Module for TPS23861
SLUUAY8E – March 2014 – Revised April 2018
Submit Documentation Feedback
Copyright © 2014–2018, Texas Instruments Incorporated
�TPS23861EVM-612 PI Commander GUI Setup
www.ti.com
4.4.2.4
User Configurable Parameters
The PPM module gives user some flexibility to configure. Table 9shows the user configurable parameters.
Table 9. User Configurable Parameters
TERM
4.4.2.5
DEFINITION
LOCATION
#define PM_EN
Enable PPM feature. Enable=1, disable=0.
power_manage.h
#define PM_POWER_BUDGET
Total system power budget. Unit: mW
power_manage.h
#define NUM_OF_TPS23861
Total number of TPS23861 in the system
system_init.h
#define PM_POWER_MONITOR_TIMER
The timer that host monitor the actual system power
system_init.h
#define
The timer that host restart detection/ classification of the
PM_DETECT_CLASS_RESTART_TIMER ports which are turned off
system_init.h
uint8_t i2cAddList[NUM_OF_TPS23861]
I2C address of TPS23861s
system_init.c
TPS238x_On_Off_t
autoMode[NUM_OF_TPS23861]
AUTO bit setting of each TPS23861
system_init.c
uint8_t
PM_setPriority[NUM_OF_TPS23861 x
PM_NUM_OF_PORT]
The port priority setting of each port
system_init.c
Design Flow
The Power Management algorithm is shown in Figure 22, in the form of a flow chart.
Mode =
PM_CHECK
Is remaining power
enough?
Yes
Mode =
PM_POWERUP
No
Mode =
PM_OVERLIMIT
Is remaining power
enough after turning
off lowest priority
ports?
Yes
Mode =
PM_POWERDOWN
No
Figure 22. Power on Decision Flow Chart
SLUUAY8E – March 2014 – Revised April 2018
Submit Documentation Feedback
TPS23861EVM-612: Auto-Mode Evaluation Module for TPS23861
Copyright © 2014–2018, Texas Instruments Incorporated
23
�TPS23861EVM-612 PI Commander GUI Setup
www.ti.com
Real-time system power monitor to protect the system when step change happening on any ports
(1s timer triggered):
Calculate total
actual system
power
Is total system
power over power
budget?
Yes
Power down
lowest priority
port
No
Figure 23. System Power Monitor Flow Chart
24
TPS23861EVM-612: Auto-Mode Evaluation Module for TPS23861
SLUUAY8E – March 2014 – Revised April 2018
Submit Documentation Feedback
Copyright © 2014–2018, Texas Instruments Incorporated
�TPS23861EVM-612 PI Commander GUI Setup
www.ti.com
4.4.2.6
Pseudo-Code
The Power Management algorithm can also be represented by the following pseudo-code.
//This part is inserted after each port's successful classification
if (Mode == Check)
{
Get RequesPortPower;
Calculate SystemPower;
if (systemPower + RequesPortPower > PowerBudget)
{
Mode = OverLimit;
}
else
{
Mode = PowerUP;
}
}
if (Mode == OverLimit)
{
//If the remaining power is enough to turn on current port after powering down all ports that
have lower priority,
//then turn off the lowest priority port; otherwise, wait for the next cycle
if (powerofHigherPriorityPorts + RequesPortPower