User's Guide
SLDU007C – March 2012 – Revised November 2015
PGA450Q1EVM User’s Guide
This user’s guide describes the characteristics, operation, and use of the PGA450Q1EVM. An EVM
description, GUI description, interface requirements, and complete schematic are included.
1
2
3
4
5
6
7
8
9
10
11
12
Contents
Read This First ............................................................................................................... 2
EVM Overview ............................................................................................................... 2
Power-Supply Requirements and Connections .......................................................................... 4
3.1
Power Supply........................................................................................................ 4
3.2
Controlling and Powering the PGA450Q1EVM via the USB Interface Board............................... 4
3.3
Connecting the Transducer ........................................................................................ 4
Jumper Settings .............................................................................................................. 5
4.1
Jumpers .............................................................................................................. 5
4.2
Default Jumper Settings ........................................................................................... 5
4.3
0-Ω Resistors ........................................................................................................ 5
Socket for Programming OTP .............................................................................................. 6
Transformer and Transducer ............................................................................................... 6
PGA450-Q1 Communication Interfaces .................................................................................. 7
7.1
SPI .................................................................................................................... 7
7.2
LIN .................................................................................................................... 7
7.3
UART ................................................................................................................. 8
Controlling the PGA450-Q1 Memory Spaces With the GUI............................................................ 9
8.1
Using the Register Grids to Manipulate the Register Spaces ................................................ 9
8.2
ESFR Registers ................................................................................................... 10
8.3
EEPROM Registers ............................................................................................... 10
8.4
RAM ................................................................................................................. 10
8.5
OTP ................................................................................................................. 10
8.6
DEVRAM ........................................................................................................... 13
8.7
FIFO/ECHO ........................................................................................................ 14
LIN Master................................................................................................................... 16
Keil uVision Settings for Programming Firmware to the PGA450-Q1 DEVRAM or OTP Memory .............. 17
10.1 Objective............................................................................................................ 17
10.2 Setup ................................................................................................................ 17
Use Case .................................................................................................................... 19
11.1 Evaluation Through SPI Communication ....................................................................... 19
11.2 Monitoring the Signal Path ....................................................................................... 20
PGA450Q1EVM Schematics and Layout Drawings ................................................................... 22
List of Figures
1
PGA450Q1EVM Setup ...................................................................................................... 4
2
Transformer and Connector for the Transducer ......................................................................... 6
3
Equivalent Circuit of Transformer-Transducer Sensor Pair ............................................................ 7
4
LIN Master Transceiver ..................................................................................................... 7
5
RS232 Transceiver .......................................................................................................... 8
6
Loading a .HEX File Into the GUI ........................................................................................ 11
7
OTP Memory Successful Programming Verification................................................................... 12
SLDU007C – March 2012 – Revised November 2015
Submit Documentation Feedback
Copyright © 2012–2015, Texas Instruments Incorporated
PGA450Q1EVM User’s Guide
1
�Read This First
www.ti.com
8
OTP Memory can be programmed while programming the Development RAM ................................... 13
9
Echo Data Stored in FIFO RAM Plotted in Excel ...................................................................... 14
10
LIN Master on GUI ......................................................................................................... 16
11
DEVRAM Target Options
12
13
14
15
16
17
18
19
20
21
22
23
24
.................................................................................................
OTP Target Options .......................................................................................................
DEVRAM STARTUP.A51 Example ......................................................................................
OTP STARTUP.A51 Example ............................................................................................
Evaluation Tab Setting ....................................................................................................
Echo Analog Waveform Output (Channel1), Drive voltage (Channel 2) ............................................
DAC Output of Filtered Signal (Channel 2) and Drive Voltage (Channel 1) ........................................
Schematic, LIN .............................................................................................................
Schematic, Power ..........................................................................................................
Schematic, RS232 .........................................................................................................
Schematic, USB Controller ...............................................................................................
Schematic, PGA450-Q1 (TPIC8500-Q1) ................................................................................
PCB Layout, Bottom .......................................................................................................
PCB Layout, Top ...........................................................................................................
17
18
18
18
19
20
21
22
22
23
23
24
25
25
List of Tables
1
Jumpers ....................................................................................................................... 5
2
Default Jumper Settings .................................................................................................... 5
3
Default 0-Ω Resistor Setting................................................................................................ 5
4
Transducer and Transformer Manufacturer Part Numbers ............................................................. 6
Trademarks
1
Read This First
The PGA450-Q1 is an interface device for ultrasonic transducers used in automotive parking assistance
and blind spot detection applications. The device functions as the driver and receiver for a wide range of
transducers with frequency ranges from 40 kHz to 70 kHz. The PGA450-Q1 device incorporates an
analog front end (AFE) and a 8051W microprocessor core. The AFE includes voltage regulators, an
amplifier, an ADC, an oscillator, and a temperature sensor. The PGA450-Q1 device also implements a
LIN 2.1 physical layer for communication. For more details, see the device data sheet.
2
EVM Overview
The features of this EVM are as follows:
• Single power-supply input for basic operation
• Example push-pull transformer and 58-kHz transducer
• LIN master transceiver
• RS-232 transceiver for UART testing and debug
• PC control with a graphical user interface and USB communications board
For a given PGA450Q1EVM installation, the following items apply:
• The PGA450Q1EVM can have either a through-hole or surface-mount transformer installed on it.
When a through-hole transformer is installed, ensure that the case corners are not touching the
surface mount pads.
• The PGA450Q1EVM can be used to drive either a single-ended or push-pull transformer. The selection
of the drive method is achieved through jumper selection.
• The USB communication board 5-V power supply must be enabled for LIN communication to work.
The 5-V power supply provides power to the LIN master transceiver installed on the board.
• In order to communicate with the PGA450-Q1 device using SPI, the 8051W inside the device must be
2
PGA450Q1EVM User’s Guide
SLDU007C – March 2012 – Revised November 2015
Submit Documentation Feedback
Copyright © 2012–2015, Texas Instruments Incorporated
�EVM Overview
www.ti.com
put in the reset state.
SLDU007C – March 2012 – Revised November 2015
Submit Documentation Feedback
Copyright © 2012–2015, Texas Instruments Incorporated
PGA450Q1EVM User’s Guide
3
�Power-Supply Requirements and Connections
3
Power-Supply Requirements and Connections
3.1
Power Supply
www.ti.com
Only one main power supply is needed. Apply 7 VDC to 18 VDC to the PGA450Q1EVM that supplies
power to the entire board, except for the USB communications board and LIN which are powered by the
USB communication PCB. Connect a power supply to the banana jacks, P1 “VPWR_IN” and P3 “GND” or
use the screw terminal P2.
3.2
Controlling and Powering the PGA450Q1EVM via the USB Interface Board
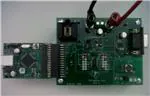
The PGA450Q1EVM is shipped with a USB interface board that provides a link from the PC-controlled
GUI (described later) to the EVM. Connect the USB interface board to the PGA450-Q1 device by
connecting the 30-pin female header on the interface board to P6, the male 30-pin header on the
PGA450Q1EVM. The TI logo on the interface board should face up when it is plugged in. Figure 1 shows
the interface board connected to the PGA450Q1EVM.
Figure 1. PGA450Q1EVM Setup
3.3
Connecting the Transducer
A transducer is included with the EVM. Solder the transducer connector to the through-holes at P6.
Alternatively, use the screw terminal to connect the transducer.
4
PGA450Q1EVM User’s Guide
SLDU007C – March 2012 – Revised November 2015
Submit Documentation Feedback
Copyright © 2012–2015, Texas Instruments Incorporated
�Jumper Settings
www.ti.com
4
Jumper Settings
There are several jumpers and 0-Ω resistors located on the board, which are used to configure the
connections to the PGA450-Q1 device and the rest of the EVM. The default settings and their effects are
listed below.
4.1
Jumpers
Table 1 shows the function of each specific jumper setting on the EVM.
Table 1. Jumpers
Reference
Jumper Setting
Closed
VPWR:VOTP
Open
Closed
VPWR:VLIN
Open
Closed
JP3
Open
Closed
JP4
Open
Closed
JP5
Open
(1)
4.2
Function
VP_OTP power supply input on the PGA450-Q1 device is connected to the 8-V voltage supply on the EVM.
VP_OTP power supply input on the PGA450-Q1 device is not connected to the 8-V voltage supply on the
EVM.
VPWR is connected to V_LIN, which is the LIN bus voltage.
VPWR is not connected to V_LIN, which is the LIN bus voltage.
The secondary of the transformer on the EVM is connected to the PGA450-Q1 device on the EVM.
The secondary of the transformer on the EVM is not connected to the PGA450-Q1 device on the EVM.
The transformer primary top terminal is connected to the OUTA pin on the PGA450-Q1 device, for push-pull
configuration. (1)
The transformer primary top terminal is not connected to the OUTA pin on the PGA450-Q1 device.
The transformer primary top terminal is connected to the VREG pin on the PGA450-Q1 device, for singleended configuration.
The transformer primary top terminal is not connected to the VREG pin on the PGA450-Q1 device.
The transformer provided with the EVM is push-pull. When using the single-ended configuration, JP4 must be disconnected and
JP5 must be closed
Default Jumper Settings
Table 2. Default Jumper Settings (1)
Reference
(1)
4.3
Jumper Position
Function
VP_OTP power supply input on the PGA450-Q1 device is not connected to the 8-V voltage supply on the
EVM.
VPWR:VOTP
Open
VPWR:VLIN
Closed
VPWR is connected to V_LIN, which is the LIN bus voltage.
JP3
Closed
The secondary of the transformer on the EVM is connected to the PGA450-Q1 device on the EVM.
JP4
Closed
The transformer primary terminal 1 is connected to the OUTA pin on the PGA450-Q1 device for push-pull
configuration.
JP5
Open
The transformer primary terminal 1 is not connected to the VREG pin on the PGA450-Q1 device.
Ensure the TI-GER USB Interface board has no jumpers populated except for the 5-V digital I/O-level option located adjacent to
the red 5-V test-point. The HEX jumper should not be installed, nor should any of the pins on pin block P3 be shorted; these are
reserved for TI only.
0-Ω Resistors
The 0-Ω resistor R2 is used to connect the programming voltage to the PGA450-Q1 device that is
soldered to the PCB. This resistor is not populated on the PCB. The soldered device has had the OTP
programmed for DEVRAM usage.
Table 3. Default 0-Ω Resistor Setting
Reference
Install
R2
DNP
Function
The VP_OTP pin of the device does not have OTP programming voltage.
Although they are installed to default settings in the factory, it is recommended that the user verify that the
jumpers and 0-Ω resistors are installed to their default settings before powering on the EVM.
SLDU007C – March 2012 – Revised November 2015
Submit Documentation Feedback
Copyright © 2012–2015, Texas Instruments Incorporated
PGA450Q1EVM User’s Guide
5
�Socket for Programming OTP
5
www.ti.com
Socket for Programming OTP
The PGA450Q1EVM runs from the PGA450-Q1 device that is soldered to the board. In addition, the EVM
provides a footprint for a socket to enable programming the OTP in devices that are for customer-board
use. The socket is not populated by default on the EVM. The part number for the recommended socket is
OTS-28-0.65-01.
The GUI then can be used to select the target PGA450-Q1 device when programming OTP (the two
options are the soldered device, or the device in the socket). More details of how to do this are described
in the OTP section.
6
Transformer and Transducer
A matched transformer-transducer pair is included on the PGA450Q1EVM.
XFMR RETURN
0.1uF,0603,50V,10%,X7R
XFMR RETURN
R9
3.3k,1210,1/4W,5%,+-200ppm/C
LIM
SH3
SH4
C19
OUTA
JP5
IN
TRANSFORMER
TI to supply
1 TR1 6
JP4
C21
XFRM
SH5 JP3
P5
C20
VREG
2
2
1
OUTB
100uF,SMT,35V,20%,AL
3
4
1
1
OUTPUT
2000pF,0805,1kV,10%,X7R
GND
P6
2
2
2
1
DO NOT POPULATE
GND
NOTE: C20 is a temperature compensation capacitor for the XDCR. Match C20 to the selected XDCR. If XDCR is
Murata MA58MF14-7N, 2000-pF capacitance is installed, and 1500-pF capacitance is provided as an
alternative. If XDCR is Murata MA58AF14-0N. 1500-pF capacitance is installed. Alternative specifications
include: 1500 pF, 0805, 250 V, 20%, NPO
Figure 2. Transformer and Connector for the Transducer
A matched transformer-transducer pair is included on the PGA450Q1EVM. Table 4 lists closed-top
transducers and tunable push-pull transformers from various manufacturer numbers that can be matched
with a tuning capacitor to create a sensor pair. By default, the transducer and transformer provided with
the EVM are the Murata MA58MF14-7N and Mitsumi K5-R4, respectively.
Table 4. Transducer and Transformer Manufacturer
Part Numbers
Manufacturer
Part Number
Transducer (at P5 or P6)
Murata
Murata
MA58MF14-7N
MA58AF14-0N
Transformer (TR1)
Mitsumi
K5-R4
Toko
N1342DEA-0008BQE=P3
Murata has provided the following note with regard to the availability and ability to order their ultrasonic
sensors:
• For small quantity sample requests, inquire online at the Murata website: https://www.murata.com/enus/contactform.
• For consumer-grade applications exposed to controlled environments, consider open-structure
sensors, such as the Murata MA40H1S-R. Distributors will typically have these sensors readily
available for purchase online.
• For automotive-grade sensors (such as the transducers listed in Table 4 for applications exposed to
6
PGA450Q1EVM User’s Guide
SLDU007C – March 2012 – Revised November 2015
Submit Documentation Feedback
Copyright © 2012–2015, Texas Instruments Incorporated
�PGA450-Q1 Communication Interfaces
www.ti.com
harsh environments, consider closed-top waterproof sensors, and inquire with distributors. The
distributors will then request an order with Murata. Lead times for these sensors may vary up to
several weeks.
Key ultrasonic sensor specifications are frequency, sensitivity, and directivity. The transformer is used to
excite the transducer. The transformer is center tapped to double the voltage. Typically, a tuning capacitor
is needed to match the resonant frequency between the transducer and transformer.
C ´ LT
CTUNE = T
- C PT
L SEC
(1)
CPT, RT, LT, and CT are characteristics of the transducer, LSEC is the secondary inductance of the
transformer, and CTUNE is an external capacitor placed across the terminals of the transducer.
LSEC
RT
CTUNE
CPT
LT
CT
Figure 3. Equivalent Circuit of Transformer-Transducer Sensor Pair
7
PGA450-Q1 Communication Interfaces
The PGA450-Q1 device has several communication options including: SPI, LIN, and UART. All of these
communication interfaces and related circuitry are present on the PGA450Q1EVM.
7.1
SPI
SPI is the main communication method on the PGA450-Q1 device. The 8051W inside the device must be
put in reset to communicate using SPI. The SPI signals can be monitored with the CS, SCLK, SDI, and
SDO test points on the EVM.
7.2
LIN
C4
GND
5V
BAV3004W-7-F
0,0603,1/10W,5%
V_LIN
0,0603,1/10W,5%
0.1uF,0805,50V,10%,X7R
The EVM includes a LIN transceiver, which is the master transceiver. The PGA450-Q1 device is always a
slave on the LIN bus and has the slave transceiver integrated inside the device.
5V
R3
R4
1.0k,0603,1/10W,5%
V_LIN
D3
LIN RxD
LIN EN
NWAKE
LIN TxD
R6
1
2
3
4
RXD
INH
EN
VSUP
NWAKE LIN
TXD
GND
8
7
6
5
GND
V_LIN
LIN
GND
GND
C5
220pF,0603,50V,10%,X7R
TPIC1021AQDRQ1
FOOTPRINT OK 4/21/10
GND
LIN
R5
1.0k,0603,1/10W,5%
U1
GND
Figure 4. LIN Master Transceiver
The 5-V supply in Figure 4 is provided by the USB communication board.
SLDU007C – March 2012 – Revised November 2015
Submit Documentation Feedback
Copyright © 2012–2015, Texas Instruments Incorporated
PGA450Q1EVM User’s Guide
7
�PGA450-Q1 Communication Interfaces
7.3
www.ti.com
UART
An RS-232 transceiver (MAX3221) is present on the EVM that can be used as a debugging interface from
the 8051 MCU to a host PC. The circuit connects the TXD and RXD pins on the PGA450-Q1 device to the
MAX3221 device. The RX and TX RS-232 signals are routed to a standard DB-9 connector on the EVM.
The RS-232 circuit is shown in Figure 5.
C22
U4
2
0.1uF,0603,50V,10%,X7R
C23
C1+
V+
C1C2+
V-
0.47uF,0805,50V,10%,X7R
3
GND_UART
C24
4
5
0.47uF,0805,50V,10%,X7R
C25
7
0.47uF,0805,50V,10%,X7R
GND_UART
J1
5V
RS232 VCC
6
16
15
R13
0,0603,1/8W,5%
C26
C27
C28
TIN
ROUT
C2~FORCEOFF
VCC TOUT (RS232)
RIN (RS232)
~INVALID
12
14
100uF,SMT,35V,20%,AL
GND_UART
GND_UART
FORCEON
GND
EN
11
9
TXD
RXD
13
8
TX_232
RX_232
10
~INVALID
1
10
Tx
Rx
11
GND_UART
5
9
4
8
3
7
2
6
1
GND_UART
RX_232
TX_232
D Connector 9
MAX3221EUE+
tssop footprint and P/N
0.1uF,0603,50V,10%,X7R
1uF,0603,25V,10%,X7R
L1
BEAD
GND_UART
GND
TXD
GND_UART
R11
5V
10.0k,0603,1/10W,5%
Figure 5. RS232 Transceiver
8
PGA450Q1EVM User’s Guide
SLDU007C – March 2012 – Revised November 2015
Submit Documentation Feedback
Copyright © 2012–2015, Texas Instruments Incorporated
�Controlling the PGA450-Q1 Memory Spaces With the GUI
www.ti.com
8
Controlling the PGA450-Q1 Memory Spaces With the GUI
The PGA450Q1EVM is controlled by the user through a PC with the USB communication board and
associated GUI. The PGA450Q1EVM GUI provides ways to manipulate all of the register spaces present
inside the PGA450-Q1 device (ESFR, EEPROM, RAM, OTP, DEVELOPMENT RAM). The following
sections describe how to manipulate the register spaces.
8.1
Using the Register Grids to Manipulate the Register Spaces
Most of the register spaces have register grids associated with them that provide a simple way to
read/write the registers in the grid. There are eight buttons that are associated with the grid operations:
ZERO GRID, DESELECT GRID, SAVE GRID, RECALL GRID, READ SELECTED, WRITE SELECTED,
READ ALL, and WRITE ALL. These buttons perform operations on whichever register grid is currently
displayed. For example, when the GUI first loads, the ESFR register tab is displayed, if any of the
previously listed buttons are pressed they perform operations on the ESFR register space. Each of the
GRID functions is in one of the following sections.
8.1.1
ZERO GRID
The ZERO GRID button replaces the contents of the entire grid with 0.
8.1.2
DESELECT GRID
The DESELECT GRID button removes any selections that have been made in the grid without performing
any operations on the registers that were selected.
8.1.3
SAVE GRID
The SAVE GRID button takes the contents of the register grid and saves them to a .TXT file. The data is
saved in comma-separated-values format.
8.1.4
RECALL GRID
The RECALL GRID button opens a prompt that allows the user to select a .TXT file that was produced
during the SAVE GRID operation and then loads the grid with the contents from the .TXT file.
8.1.5
READ SELECTED
The READ SELECTED button performs a read operation on any registers in the grid that have been
selected by clicking the desired register number. Any selected registers are displayed blue.
8.1.6
WRITE SELECTED
The WRITE SELECTED button will perform a write operation on any registers in the grid that have been
selected by clicking the register number or modifying the register contents. Any selected registers are
displayed in blue and any modified registers are highlighted in yellow. Any blue or yellow registers are
written to when the WRITE SELECTED button is pressed.
8.1.7
READ ALL
The READ ALL button performs a read operation on every register in the grid.
8.1.8
WRITE ALL
The WRITE ALL button performs a write operation on every register in the grid.
SLDU007C – March 2012 – Revised November 2015
Submit Documentation Feedback
Copyright © 2012–2015, Texas Instruments Incorporated
PGA450Q1EVM User’s Guide
9
�Controlling the PGA450-Q1 Memory Spaces With the GUI
8.2
www.ti.com
ESFR Registers
The ESFR register displays all the function registers that are specific to PGA450-Q1 functionality. The
user can set each register manually through SPI or define register values in 8051W firmware. An
Evaluation tab on the right side helps to set the ESFR registers for quick evaluation. More details of the
Evaluation tab are described in a later section.
8.3
EEPROM Registers
The EEPROM in the PGA450-Q1 device comprises 32 bytes of EEPROM and an EEPROM cache. When
the EEPROM grid is updated in the GUI, only the cache is updated.
8.3.1
Program EEPROM
The Program EEPROM button writes 0x01 to the EE_CTRL ESFR to program the EEPROM memory
cells. The EEPROM memory cells are programmed with the values that are in the EEPROM cache inside
the PGA450-Q1 device.
The contents in the GUI are first transferred to the cache and then the cache is programmed.
8.3.2
Reload EEPROM
The Reload EEPROM button reloads the EEPROM cache inside the PGA450-Q1 device with the values in
the EEPROM memory cells. It then performs a READ ALL to update the grid with the refreshed contents
of the EEPROM bank.
The contents of the EEPROM cache can be updated on the GUI by clicking on the READ SELECTED or
READ ALL button.
8.4
RAM
The RAM tab is set up only for individual register read/writes without the use of the grid. When this tab is
displayed, the READ SELECTED / READ ALL and WRITE SELECTED / WRITE ALL buttons perform the
same operations, respectively.
The PGA450-Q1 device has 512 bytes of general-purpose RAM. This general-purpose RAM is memorymapped into two different memory spaces inside the PGA450-Q1 device: internal memory space
(0x00–0xFF) and external memory space (0x0300–0x03FF).
The user must select the appropriate memory space in the Combo Box before making the Read/Write
request. Note the valid address range for the two RAM sections.
8.5
OTP
The OTP tab is set up only for individual register read/writes without the use of the grid. When this tab is
displayed, the READ SELECTED / READ ALL and WRITE SELECTED / WRITE ALL buttons perform the
same operations, respectively. The OTP tab also contains buttons used to load a .HEX 8051 program file
into the 8051 MCU in the PGA450-Q1 device.
The PGA450Q1EVM could potentially have two devices: a device that is soldered on the EVM and a
device that is in the socket. The GUI allows programming of either device. When the device choice is
made, the GUI automatically resets the microprocessor for the respective device so that it is ready to load
OTP through SPI
NOTE: The OTP program requires R2 to be populated and the VPWR:VOTP jumper to be installed.
This connects the VPROG_OTP 8-V supply on the VP_OTP pin during programming. See
the data sheet for more details.
10
PGA450Q1EVM User’s Guide
SLDU007C – March 2012 – Revised November 2015
Submit Documentation Feedback
Copyright © 2012–2015, Texas Instruments Incorporated
�Controlling the PGA450-Q1 Memory Spaces With the GUI
www.ti.com
8.5.1
Load .HEX File Into GUI
The Load .HEX File into GUI button is used to load the contents of a .HEX file into the GUI RAM for use
with other operations. When the button is pressed, a second window opens that allows the user to locate
and open the desired .HEX file on the PC. See Figure 6 for an example of this operation.
Figure 6. Loading a .HEX File Into the GUI
8.5.2
Program OTP Memory from .HEX File
If the Program OTP Memory from .HEX File check box was checked (default) when the .HEX file was
loaded into the GUI, the OTP memory is programmed with the contents of the .HEX file.
SLDU007C – March 2012 – Revised November 2015
Submit Documentation Feedback
Copyright © 2012–2015, Texas Instruments Incorporated
PGA450Q1EVM User’s Guide
11
�Controlling the PGA450-Q1 Memory Spaces With the GUI
8.5.3
www.ti.com
Verify OTP Programming
If the Verify OTP Programming button was also checked (default), then after the OTP memory is finished
programming, the GUI reads the contents of the OTP memory through SPI and verifies against the .HEX
file. If the OTP memory matches the contents of the .HEX file, the GUI displays the message “OTP
Memory Verification Successful,” as seen in Figure 7.
Figure 7. OTP Memory Successful Programming Verification
8.5.4
Check OTP Status
Press the "Check OTP Status" button to verify what is currently programmed into OTP. The three possible
results are:
• Programmed to Jump to DEVRAM: The jump to DEVRAM statement has been programmed into the
OTP. This means that programs loaded into the DEVRAM will execute.
• OTP Empty: Nothing has been programmed in the OTP.
• Programmed: The OTP has been programmed with something other than the jump to DEVRAM
statement.
12
PGA450Q1EVM User’s Guide
SLDU007C – March 2012 – Revised November 2015
Submit Documentation Feedback
Copyright © 2012–2015, Texas Instruments Incorporated
�Controlling the PGA450-Q1 Memory Spaces With the GUI
www.ti.com
8.6
DEVRAM
The DEVRAM tab is set up only for individual register read/writes, without the use of the grid. When this
tab is displayed, the READ SELECTED / READ ALL and WRITE SELECTED / WRITE ALL buttons
perform the same operations, respectively. The DEVRAM tab also contains buttons used to load a .HEX
8051 program file into the 8051 MCU in the PGA450-Q1 device.
The process of loading the .HEX file into the DEVRAM is identical to that of OTP.
For a pristine IC that has never been programmed (OTP Status reads "OTP Empty"), in order to run
software from DEVRAM, the OTP memory must be programmed with some specific instructions to redirect
the 8051 µP to DEVRAM. This must only be done once. To do this, check the "Program OTP Memory
Also" button, and the GUI will program the OTP with this jump statement as well as program the DEVRAM
with the selected HEX file.
Note that OTP programming may be required if the interrupt vectors are not programmed
Figure 8. OTP Memory can be programmed while programming the Development RAM
SLDU007C – March 2012 – Revised November 2015
Submit Documentation Feedback
Copyright © 2012–2015, Texas Instruments Incorporated
PGA450Q1EVM User’s Guide
13
�Controlling the PGA450-Q1 Memory Spaces With the GUI
8.7
www.ti.com
FIFO/ECHO
8.7.1
FIFO
The PGA450-Q1 device has a FIFO RAM that contains the output of the digital data path. The contents of
the FIFO RAM can be displayed on the GUI and/or can be plotted in Excel.
The FIFO RAM is displayed in the form of a grid. The GUI grid contents can be updated either by clicking
on the READ ALL button or by clicking on the READ SELECTED button.
The FIFO RAM contents can be displayed on the GUI and plotted in Excel by clicking the Read and Save
FIFO Data to File button.
NOTE: Note: Microsoft Office version 2007 or above is required for this function to work properly.
Figure 9. Echo Data Stored in FIFO RAM Plotted in Excel
8.7.2
EVAL Monitor
This tab graphs the output of the digital data path directly in the GUI. The 8051W microcontroller must be
in reset to use this tab.
8.7.2.1
No. of Loops
This option selects how many times the GUI will transmit a burst and plot the echo data.
8.7.2.2
Trigger
If "Auto" is displayed, the GUI will continue sending bursts and plotting the echo data until the "Loops
Complete" count matches the "No. of Loops." If "USER" is displayed, the GUI will stop and wait for the
user to press the green flashing "Trigger" button before continuing.
14
PGA450Q1EVM User’s Guide
SLDU007C – March 2012 – Revised November 2015
Submit Documentation Feedback
Copyright © 2012–2015, Texas Instruments Incorporated
�Controlling the PGA450-Q1 Memory Spaces With the GUI
www.ti.com
8.7.2.3
Resolution
This button has three options, "FULL", "1/2", and "1/4". The "FULL" setting plots all of the echo data
points, but takes more time. The "1/2" and "1/4" options reduce the number of data points plotted which
results in faster plotting.
8.7.2.4
Clear Plot
The "CLR" button clears all data from the graph. If the "Clear Plot" option is checked, echo data will be
cleared from the plot every loop. If "Clear Plot" is not checked, every loop will plot the new echo data in a
new color on top of the existing data on the graph.
8.7.2.5
Export Data to Excel
This option exports the echo data to Excel for each loop.
8.7.2.6
Start/Stop
Click on the "Start" button to start the first loop. Click on "Stop" at any time to stop the program
immediately.
SLDU007C – March 2012 – Revised November 2015
Submit Documentation Feedback
Copyright © 2012–2015, Texas Instruments Incorporated
PGA450Q1EVM User’s Guide
15
�LIN Master
9
www.ti.com
LIN Master
The PGA450Q1EVM GUI communicates with the PGA450-Q1 device using LIN. The USB Communication
board UART is the LIN master, and the PGA450-Q1 device is the LIN slave. The GUI can be used to
configure the LIN frames that are transmitted to the PGA450-Q1 device.
Figure 10. LIN Master on GUI
In order to transmit data to PGA450-Q1 device using a LIN frame, the user must do the following:
1. Enter the Frame PID in Edit Box corresponding to “Tx Frame PID”. The PID must be entered in hex.
Note that valid PID ranges from 0x00 to 0x3F. The GUI software calculates the parity bits using the
LIN 2.1 method before the PID is transmitted to the slave.
2. Enter 0–8 bytes of data in the “Data to be Txed” box. Each data byte must be entered in Hex.
3. Select the CLASSIC or ENHANCED checksum, which must match the LIN checksum setting in the
PGA450-Q1 ESFR LIN_CFG register.
4. Click on the TRANSMIT button
In order to receive data from PGA450-Q1 device using a LIN frame, the user must do the following:
1. Enter the Frame PID in Edit Box corresponding to “Rx Frame PID”. The PID must be entered in hex.
Note that valid PID ranges from 0x00 to 0x3F. The GUI software calculates the parity bits using the
LIN 2.1 method before the PID is transmitted.
2. Enter the number of data bytes the user expects back from the PGA450-Q1 device.
3. Select the CLASSIC or ENHANCED checksum
4. Click on the RECEIVE button
The data received from the PGA450-Q1 device is displayed in the Data Received box.
If the data communication is not working, try Reset This Application, which power-cycles the LIN master
IC on the EVM.
16
PGA450Q1EVM User’s Guide
SLDU007C – March 2012 – Revised November 2015
Submit Documentation Feedback
Copyright © 2012–2015, Texas Instruments Incorporated
�www.ti.com
10
Keil uVision Settings for Programming Firmware to the PGA450-Q1 DEVRAM or OTP Memory
Keil uVision Settings for Programming Firmware to the PGA450-Q1 DEVRAM or OTP
Memory
10.1 Objective
To modify the source code made available through the PGA450Q1EVM firmware installer, download the
Keil C51 Development Tool for all 8051 devices, which includes the uVision IDE necessary to open and
edit the PGA450-Q1 project file. Keil products use a license management system. Without a current
license, the product runs as a lite or evaluation edition with a few limitations.
10.2 Setup
Figure 11. DEVRAM Target Options
To Program to DEVRAM:
1. Change the code range to the DEVRAM memory space.
a. Right click on Target 1 in the project window, and select Options for Target.
b. Go to the BL51 Locate tab, and modify the Code Range to go from 0x2000–0x3FFF.
2. Copy the following to the Code box:
?pr?external1_ISR?PGA450_isrs (0X2100),
?pr?timer0_ISR?PGA450_isrs (0X2400),
?pr?timer1_ISR?PGA450_isrs (0X2800),
?pr?serial_ISR?PGA450_isrs (0X2C00),
?pr?linPID_ISR?PGA450_isrs (0X3000),
?pr?linSciRxData_ISR?PGA450_isrs (0X3400),
?pr?linSciTxData_ISR?PGA450_isrs (0X3800),
?pr?external0_ISR?PGA450_isrs (0X3900),
?pr?linSync_ISR?PGA450_isrs (0X3D00)
3. Comment out the OTP section in STARTUP.A51, and uncomment the OTP section
a. An example of this is shown in Figure 13.
SLDU007C – March 2012 – Revised November 2015
Submit Documentation Feedback
Copyright © 2012–2015, Texas Instruments Incorporated
PGA450Q1EVM User’s Guide
17
�Keil uVision Settings for Programming Firmware to the PGA450-Q1 DEVRAM or OTP Memory
www.ti.com
Figure 12. OTP Target Options
To Program to OTP:
1. Change the code range to the OTP memory space
a. Right click on Target 1 in the project window, and select Options for Target.
b. Go to the BL51 Locate tab, and modify the Code Range to go from 0x0000–0x1FFF.
2. Delete everything in the Code box.
3. Comment out the DEVRAM section in STARTUP.A51, and uncomment the OTP section.
a. An example of this is shown in Figure 14.
Figure 13. DEVRAM STARTUP.A51 Example
Figure 14. OTP STARTUP.A51 Example
Instructions: Build the PGA450.uvproj to generate the custom .HEX file used to program the internal
8051 core. The LIN Demonstration using PGA450Q1EVM Firmware Rev 2.1 provides instructions on how
to upload the .HEX file using the EVM GUI.
18
PGA450Q1EVM User’s Guide
SLDU007C – March 2012 – Revised November 2015
Submit Documentation Feedback
Copyright © 2012–2015, Texas Instruments Incorporated
�Use Case
www.ti.com
11
Use Case
The purpose of this section is to provide step-by-step instructions on the setup and some basic evaluation
procedures.
11.1 Evaluation Through SPI Communication
In order to provide a quick evaluation of the IC performance using the TI EVM and GUI without having to
develop sophisticated 8051 µP software, the GUI provides an intuitive interface tab, Evaluation Tab, that
collects all necessary information regarding the transducer drive and receive. For transducer drive, it
includes: transducer frequency; transducer drive voltage, VREG; transformer configuration; and number of
drive pulses. For transducer signal receive, it includes signal-processing parameters: LNA gain setting;
BPF and LPF coefficient; clock selection; FIFO mode; and FIFO downsample size.
1. Make sure all jumpers are connected according to the default settings, see Section 4.2.
2. Connect the hardware and power supply, see Section 3. Make sure USB cable is connected to the
computer and the interface board. It is recommended to monitor power supply current. Normal idle
current is around 6 mA. Active current is around 15 mA.
3. Launch GUI software on computer.
4. Click the "OFF (Micro Reset)" button to put the Micro in reset, then click READ ALL to read the default
register values. Some default values are loaded in the table grid. If all are 0 or FF values, this means
that there is an error with communication to the device. Check the hardware setup or restart the GUI
software.
Fill out the "Evaluation" tab with the values shown in Figure 15.
Use the "Eval Monitor" tab to send bursts and view the resulting echo data.
Figure 15. Evaluation Tab Setting
After all information is entered, make sure the device is in the micro reset state, then hit the Transducer
Drive and Receive button to start the burst and receive.
SLDU007C – March 2012 – Revised November 2015
Submit Documentation Feedback
Copyright © 2012–2015, Texas Instruments Incorporated
PGA450Q1EVM User’s Guide
19
�Use Case
www.ti.com
11.2 Monitoring the Signal Path
The PGA450-Q1 device has two useful test modes that allow users to quickly observe the echo signal as
an amplified analog signal or from a DAC output which converts a digitally filtered echo signal. In the
Evaluation tab, quick-access buttons Amplifier Output (unfiltered) and Datapath Output (filtered) are
available. The signal is viewable on the DACO pin. Only one mode can be selected at a time. See
Figure 16 and Figure 17 for the captured waveforms.
Figure 16. Echo Analog Waveform Output (Channel1), Drive voltage (Channel 2)
20
PGA450Q1EVM User’s Guide
SLDU007C – March 2012 – Revised November 2015
Submit Documentation Feedback
Copyright © 2012–2015, Texas Instruments Incorporated
�Use Case
www.ti.com
Figure 17. DAC Output of Filtered Signal (Channel 2) and Drive Voltage (Channel 1)
SLDU007C – March 2012 – Revised November 2015
Submit Documentation Feedback
Copyright © 2012–2015, Texas Instruments Incorporated
PGA450Q1EVM User’s Guide
21
�PGA450Q1EVM Schematics and Layout Drawings
V_LIN
GND
5V
R3
R4
1.0k,0603,1/10W,5%
V_LIN
D3
1
2
3
4
R6
RXD
INH
EN
VSUP
NWAKE LIN
TXD
GND
8
7
6
5
LIN
GND
R5
1.0k,0603,1/10W,5%
U1
LIN RxD
LIN EN
NWAKE
LIN TxD
0,0603,1/10W,5%
C4
5V
BAV3004W-7-F
0,0603,1/10W,5%
PGA450Q1EVM Schematics and Layout Drawings
0.1uF,0805,50V,10%,X7R
12
www.ti.com
V_LIN
LIN
GND
GND
C5
220pF,0603,50V,10%,X7R
TPIC1021AQDRQ1
FOOTPRINT OK 4/21/10
GND
GND
Figure 18. Schematic, LIN
spacer
spacer
VPWR
P2
2
1
2
1
P1
VPWR-IN
B260-13-F
1
F PWR-IN 2
CA
D1
F
GND
GND
GND
GND
GND
GND
GND
GND
GND
GND
GND
GND
VPWR
GND VPWR-IN GND
P3
C1
C2
GND
GND
GND
GND
100uF,SMT,35V,20%,AL
0.1uF,0603,50V,10%,X7R
GND
VPWR
620,1210,1/2W,5%
VPWR:VOTP
JP1
VPWR
JP2
5V
V_LIN
5V
R1
VPROG_OTP (8V)
VP_OTP_SOC
C3
D2
FLZ8V2C
R2
VP_OTP
DNP,0805,1/8W,5%
V_LIN
POPULATE RESISTOR TO CONNECT V_OTP
GND
GND
TO THE SOLDERED DOWN PART
1uF,0805,50V,10%,X7R
Figure 19. Schematic, Power
22
PGA450Q1EVM User’s Guide
SLDU007C – March 2012 – Revised November 2015
Submit Documentation Feedback
Copyright © 2012–2015, Texas Instruments Incorporated
�PGA450Q1EVM Schematics and Layout Drawings
www.ti.com
C22
U4
2
0.1uF,0603,50V,10%,X7R
C23
C1+
V+
C1C2+
V-
0.47uF,0805,50V,10%,X7R
3
GND_UART
C24
4
5
0.47uF,0805,50V,10%,X7R
C25
0.47uF,0805,50V,10%,X7R
7
GND_UART
J1
5V
RS232 VCC
6
16
15
R13
0,0603,1/8W,5%
C26
C27
C28
TIN
ROUT
C2~FORCEOFF
VCC TOUT (RS232)
RIN (RS232)
~INVALID
12
14
100uF,SMT,35V,20%,AL
GND_UART
GND_UART
FORCEON
GND
EN
11
9
13
8
10
1
TXD
RXD
TX_232
RX_232
10
Tx
Rx
11
~INVALID
GND_UART
5
9
4
8
3
7
2
6
1
GND_UART
RX_232
TX_232
D Connector 9
MAX3221EUE+
tssop footprint and P/N
0.1uF,0603,50V,10%,X7R
1uF,0603,25V,10%,X7R
L1
BEAD
GND_UART
GND
TXD
GND_UART
R11
5V
10.0k,0603,1/10W,5%
Figure 20. Schematic, RS232
spacer
spacer
SDO
SCLK
CS
SDI
CS_SOCKET
LIN EN
5V
IO-MISO
1
IO-SCLK
3
IO-CS
5
IO-MOSI
7
9
IO-11
IO-0
11
IO-2
13
IO-4
15
17
IO-6
19
V_5.0_WORLD
IO-OSC
21
23
V_3.3_WORLD
V_DVM_1 25
V_DVM_2 27
V_DVM_3 29
MISO, SDA
GND
SCLK, SCL
GND
CS (SS)
GND
MOSI
GND
IO-11
IO-8, TX
IO-0
IO-1
IO-2
TIGER - A
IO-3
IO-4
IO-5
IO-6
IO-7
V_5.0V (OUT)
IO-9, RX
CHIP OSC (OUT) PWR-DWN
V_3.3V (OUT) IO-10 (PIC OSC)
DVM-1
IO-A
DVM-2
IO-B
DVM-3
IO-DAC
2
4
6
8
10
12
14
16
18
20
22
24
26
28
30
GND
GND
GND
GND
IO-8__TX
IO-1
IO-3
IO-5
IO-7
IO-9__RX
PWR-DWN
IO-10 (SLOW OSC)
IO-A
IO-B
DAC_OUT
LIN TxD
LIN RxD
VPWR
TIGER - A
Figure 21. Schematic, USB Controller
SLDU007C – March 2012 – Revised November 2015
Submit Documentation Feedback
Copyright © 2012–2015, Texas Instruments Incorporated
PGA450Q1EVM User’s Guide
23
�PGA450Q1EVM Schematics and Layout Drawings
www.ti.com
U3
U2
AVDD
VREF
VP_OTP
OUTA
GND
OUTB
SDO
SDI
SCLK
CS
TESTO_D
RBIAS
TESTO_A
GND
28
27
26
25
24
23
22
21
20
19
18
17
16
15
VPWR
AVDD
VREG
VREF
LIN
VPROG_OTP
GND
OUTA
DVDD
GND
XIN
OUTB
XOUT
SDO
GPIO1
SDI
GPIO2
SCLK
RxD
NCS
TxD
TESTO_D
CIN
RBIAS
IN
TESTO_A
LIM
GND
VPWR
VREG_SOC
AVDD
VREF
VP_OTP
OUTA
GND
OUTB
SDO
SDI
SCLK
CS
TESTO_D
RBIAS
TESTO_A
GND
GND
DVDD_SOC
1
2
3
4
5
6
7
8
9
10
11
12
13
14
GND
SDO
SDI
SCLK
CS_SOCKET
RBIAS_SOC
GND
VP_OTP AVDD
C14
GND
C15
GND
RBIAS
C16
R7
GND
100.0k,0603,1/10W,
0.1%,+-25ppm/C
R8
RBIAS_SOC
GND
GND
VPWR
C6
100.0k,0603,1/10W,
0.1%,+-25ppm/C
GND
VREG_SOC
0.1uF,0603,50V,10%,X7R
GND
CIN
0.1uF,0603,50V,10%,X7R
GND
C13
0.1uF,0603,50V,10%,X7R
DVDD
R10
0.1uF,0603,50V,10%,X7R
GND
VREG
VP_OTP_SOC
TPIC8500-Q1
TI to supply, NO PIN1 DESIGNATOR - REVERSABLE
0.1uF,0603,50V,10%,X7R
GND
C12
0.1uF,0603,50V,10%,X7R
VREG
C11
0.1uF,0603,50V,10%,X7R
VPWR
200k,0603,1/10W,5%
0.1uF,0603,50V,10%,X7R
0.1uF,0603,50V,10%,X7R
TPIC8500-Q1
AVDD_SOC
28
27
26
25
24
23
22
21
20
19
18
17
16
15
VPWR
AVDD
VREG
VREF
LIN
VPROG_OTP
GND
OUTA
DVDD
GND
XIN
OUTB
XOUT
SDO
GPIO1
SDI
GPIO2
SCLK
RxD
NCS
TxD
TESTO_D
CIN
RBIAS
IN
TESTO_A
LIM
GND
0.1uF,0603,50V,10%,X7R
1
2
3
4
5
6
7
8
9
10
11
12
13
14
0.1uF,0603,50V,10%,X7R
VPWR
VREG
LIN
GND
DVDD
XIN
XOUT
GPIO1
GPIO2
RXD
TXD
CIN
IN
LIM
VPWR
VREG
LIN
GND
DVDD
XIN
XOUT
GPIO1
GPIO2
RXD
TXD
CIN
IN
LIM
DVDD_SOC VP_OTP_SOCAVDD_SOC
C7
GND
C8
GND
C9
GND
C10
GND
XFMR RETURN
X1
16MHz,15ppm,8pF
NX3225SA-16.000000MHZ
R9
3.3k,1210,1/4W,5%,+-200ppm/C
XIN
SH3
SH4
C19
JP5
IN
TRANSFORMER
TI to supply
1 TR1 6
JP4
OUTA
C21
XFRM
SH5 JP3
P5
C20
2
2
VREG
1
OUTB
3
100uF,SMT,35V,20%,AL
GND
4
2000pF,0805,1kV,10%,X7R
1
3
XOUT
C17
C18
2
1
OUTPUT
2
LIM
4
0.1uF,0603,50V,10%,X7R
XFMR RETURN
P6
2
1
GND
12pF,0603,100V,5%,NPO
12pF,0603,100V,5%,NPO
2
GND
1
DO NOT POPULATE
GND
NOTE: C20 is a temperature compensation capacitor for the XDCR. Match C20 to the selected XDCR. If XDCR is
Murata MA58MF14-7N, 2000-pF capacitance is installed, and 1500-pF capacitance is provided as an
alternative. If XDCR is Murata MA58AF14-0N. 1500-pF capacitance is installed. Alternative specifications
include: 1500 pF, 0805, 250 V, 20%, NPO
Figure 22. Schematic, PGA450-Q1 (TPIC8500-Q1)
24
PGA450Q1EVM User’s Guide
SLDU007C – March 2012 – Revised November 2015
Submit Documentation Feedback
Copyright © 2012–2015, Texas Instruments Incorporated
�PGA450Q1EVM Schematics and Layout Drawings
www.ti.com
1
GND
1
PWR-IN
2
PWR-IN
1
GND
1
GND
1
GND
2
VREG_SOC
3
NetU3_3
18
NetU3_18
8
NetU3_8
9
NetU3_9
17
RBIAS_SOC
16
NetU3_16
2
GND
6
NetU3_6
7
NetU3_7
19
CS_SOCKET
1
2
NetC26_1 GND_UART
1
VREG_SOC
4
GND
5
DVDD_SOC
0
21
SDI
20
SCLK
1
VPWR
1
DVDD_SOC
23
NetU3_23
10
NetU3_10
1
RBIAS_SOC
15
GND
1
5V
2
TX_232
2
GND
2
GND
25
NetU3_25
22
SDO
1
GND_UART
1
NetJ1_1
2
GND
1
VPWR
27
NetU3_27
24
GND
2
GND
2
GND
2
GND
6
NetJ1_6
1
VPWR
hole
28
AVDD_SOC
1
26
VP_OTP_SOC VP_OTP_SOC
1
VPWR
2
VPWR
1
VP_OTP_SOC
2
GND
1
VPWR
10
NetJ1_10
1
2
NetC26_1 GND_UART
1
NetJP1_1
2
VP_OTP_SOC
1
GND
1
AVDD_SOC
2
PWR-IN
1
NetJP1_1
1
VP_OTP_SOC
1
GND
1
5V
11
NetU3_11
2
GND
1
VP_OTP_SOC
12
NetU3_12
13
NetU3_13
14
NetU3_14
2
GND
hole
2
NetC26_1
7
NetJ1_7
1
NetC23_1
1
NetC24_1
2
NetC23_2
3
RX_232
2
VP_OTP
2
GND_UART
1
GND
8
NetJ1_8
1
V_LIN
1
V_LIN
1
NetC22_1
4
NetJ1_4
2
V_LIN
2
5V
9
NetJ1_9
2
GND_UART
2
LIN RXD
1
TXD
5
GND_UART
1
GND
1
TX_232
1
RX_232
1
5V
1
NetD3_1
1
LIN
1
V_LIN
1
GND_UART
2
LIN EN
1
5V
1
NWAKE
2
GND
2
LIN
1
LIN
1
NetC26_1
1
VP_OTP_SOC
2
VPWR
1
NetD3_1
2
GND
2
GND
1
IO-MISO
2
GND
3
IO-SCLK
4
GND
5
IO-CS
6
GND
11
NetJ1_11
2
NetJP4_2
1
OUTA
2
NetJP4_2
1
VREG
1
AVDD
1
VREF
1
VP_OTP
1
OUTA
1
GND
1
OUTB
1
SDO
1
SDI
1
VREG
1
AVDD
1
VP_OTP
6
NetC20_1
1
NetJP4_2
5
NA_
2
VREG
4
GND
3
OUTB
1
VREG
2
GND
1
SCLK
1
CS
1
TESTO_D
1
RBIAS
1
VREG
2
GND
1
VREG
2
GND
2
GND
1
XIN
2
GND
1
XOUT
2
GND
2
GND
4
NetX1_4
2
NetX1_2
1
DVDD
1
GPIO1
1
XOUT
1
IN
2
LIM
1
RXD
1
GPIO2
1
CIN
1
TXD
8
GND
9
IO-11
10
IO-8__TX
11
IO-0
12
IO-1
13
IO-2
14
IO-3
15
IO-4
16
IO-5
1
GND
3
XOUT
1
CIN
1
RBIAS
1
LIN
1
XIN
1
XIN
1
DVDD
2
GND
1
GND
1
VPWR
2
GND
2
GND
0
2
GND
1
VPWR
7
IO-MOSI
17
IO-6
18
IO-7
19
V_5.0_WORLD
20
IO-9__RX
21
IO-OSC
22
PWR-DWN
1 2
PWR-DWN
VPWR
2
1
V_5.0_WORLD
5V
0
1
TESTO_A
1
GND
1
LIM
1
IN
23
24
V_3.3_WORLD IO-10 (SLOW OSC)
25
V_DVM_1
26
IO-A
2
XFMR RETURN
1
GND
2
NetC20_1
27
V_DVM_2
28
IO-B
29
V_DVM_3
30
DAC_OUT
1
XFMR RETURN
1
NetC20_1
1
GND
1
GND
2
NetC20_1
Figure 23. PCB Layout, Bottom
1
GND
2
V PWR
1
NetJP1_1
1
V P_OTP_SO C
1
GND
1
GND
1
GND
2
P WR-IN
1
P WR-IN
1
5V
hole
1
V PWR
2
V REG_SOC
27
NetU3_27
3
NetU3_3
4
GND
25
NetU3_25
5
DV DD_SOC
6
NetU3_6
7
NetU3_7
8
NetU3_8
10
NetJ1_10
28
A V DD_SOC
26
V P_OTP_SO C
0
21
SDI
9
NetU3_9
10
NetU3_10
1
GND
1
GND
24
GND
23
NetU3_23
2
GND
1
VPWR
22
SDO
20
SC LK
1
V P WR
19
CS_SOC KET
11
NetU3_11
12
NetU3_12
17
RBIA S _S O C
13
NetU3_13
14
NetU3_14
15
GND
2
GND_UART
1
NetC26_1
18
NetU3_18
1
NetJ1_1
16
NetU3_16
6
NetJ1_6
2
TX_232
hole
2
NetC25_2
2
V PWR
1
V _LIN
7
NetJ1_7
3
RX_232
8
7
6
5
4
3
2
1
RX_232
NetC24_1
NetC25_2
NetC25_1
NetC23_2
NetC22_1
NetC23_1
GND_UART
1
GND
1
V _LIN
1
NetC25_1
8
NetJ1_8
4
NetJ1_4
1
LIN RXD
2
GND
1
IO-MISO
4
GND
3
IO-SCLK
6
GND
5
IO-CS
8
GND
7
IO-MOSI
2 1
IO-MISO
SDO
2 1
IO-SCLK
SCLK
9
NetJ1_9
8
NetU1_8
2
LIN EN
7
V _LIN
3
NWAKE
6
LIN
4
LIN TXD
5
GND
1
LIN
1
GND
5
GND_UART
9 10 11 12 13 14 15 16
RXD
~INVALID
TXD
GND_UART
TX_232
GND_UART
NetC26_1
NetC26_1
1
GND_UA RT
1
RX_232
1
NetC26_1
1
TX_232
2 1
IO-CSCS
11
NetJ1_11
2 1
IO-MOSI
SDI
1 2
IO -8__TX
LIN TXD
10
IO-8__TX
9
IO-11
12
IO -1
11
IO-0
14
IO -3
16
IO -5
2 1
IO-11
C S_SO C KET
1
V PWR
1
V REG
1
V REF
1
A V DD
1
LIN
1
GND
1
OUTA
1
V P _O TP
1
DV DD
1
XIN
1
O UTB
1
GND
1
XO UT
1
GPIO1
1
SDI
1
S DO
1
GPIO2
1
RXD
1
CS
1
S C LK
1
TXD
1
CIN
1
RBIA S
1
TES TO _D
1
IN
1
LIM
1
GND
1
TES TO _A
2 1
IO-0
LIN EN
13
IO-2
15
IO-4
1
GND
18
IO -7
17
IO-6
20
IO -9__RX
19
V _5.0_WO RLD
22
P WR-DWN
21
IO-OSC
1 2
IO -9__RX
LIN RXD
1
V P WR
2
V REG
3
LIN
4
GND
5
DV DD
6
XIN
7
XO UT
8
GP IO1
9
GP IO2
10
RXD
11
TXD
12
C IN
13
IN
14
LIM
28
A V DD
27
V REF
26
V P _OTP
25
O UTA
24
GND
23
O UTB
22
SDO
21
SDI
20
SC LK
19
CS
18
TESTO _D
17
RBIA S
16
TESTO _A
15
GND
1
OUTA
2
NetJP4_2
1
V REG
2
NetJP4_2
0
1
1
NetJP4_2NetJP4_2
6
6
NetC20_1NetC20_1
2
V REG
2
V REG
5
NA_
5
NA_
3
OUTB
3
OUTB
4
GND
4
GND
0
24
23
IO -10 (S LO W O S C ) V _3.3_WO RLD
26
IO -A
25
V _DVM_1
28
IO -B
27
V _DVM_2
30
DA C _O UT
29
V _DVM_3
1
NetC20_1
2
GND
2
XFMR RETURN
2
LIM
1
XFMR RETURN
1
XFMR RETURN
1
NetC20_1
2
NetC20_1
1
GND
1
GND
2
NetC20_1
1
GND
Figure 24. PCB Layout, Top
SLDU007C – March 2012 – Revised November 2015
Submit Documentation Feedback
Copyright © 2012–2015, Texas Instruments Incorporated
PGA450Q1EVM User’s Guide
25
�Revision History
www.ti.com
Revision History
NOTE: Page numbers for previous revisions may differ from page numbers in the current version.
Changes from B Revision (June 2015) to C Revision .................................................................................................... Page
•
•
•
•
•
26
Changed the Transformer and Connector for the Transducer schematic ......................................................... 6
Changed the Murata part numbers for the transducer in the Transformer and Transducer section ........................... 6
Added Murata note on availability of ultrasonic sensors ............................................................................. 7
Changed the Schematic, PGA450-Q1 (TPIC8500-Q1) ............................................................................. 24
Changed the PCB Layout, Top layout image ........................................................................................ 25
Revision History
SLDU007C – March 2012 – Revised November 2015
Submit Documentation Feedback
Copyright © 2012–2015, Texas Instruments Incorporated
�IMPORTANT NOTICE FOR TI DESIGN INFORMATION AND RESOURCES
Texas Instruments Incorporated (‘TI”) technical, application or other design advice, services or information, including, but not limited to,
reference designs and materials relating to evaluation modules, (collectively, “TI Resources”) are intended to assist designers who are
developing applications that incorporate TI products; by downloading, accessing or using any particular TI Resource in any way, you
(individually or, if you are acting on behalf of a company, your company) agree to use it solely for this purpose and subject to the terms of
this Notice.
TI’s provision of TI Resources does not expand or otherwise alter TI’s applicable published warranties or warranty disclaimers for TI
products, and no additional obligations or liabilities arise from TI providing such TI Resources. TI reserves the right to make corrections,
enhancements, improvements and other changes to its TI Resources.
You understand and agree that you remain responsible for using your independent analysis, evaluation and judgment in designing your
applications and that you have full and exclusive responsibility to assure the safety of your applications and compliance of your applications
(and of all TI products used in or for your applications) with all applicable regulations, laws and other applicable requirements. You
represent that, with respect to your applications, you have all the necessary expertise to create and implement safeguards that (1)
anticipate dangerous consequences of failures, (2) monitor failures and their consequences, and (3) lessen the likelihood of failures that
might cause harm and take appropriate actions. You agree that prior to using or distributing any applications that include TI products, you
will thoroughly test such applications and the functionality of such TI products as used in such applications. TI has not conducted any
testing other than that specifically described in the published documentation for a particular TI Resource.
You are authorized to use, copy and modify any individual TI Resource only in connection with the development of applications that include
the TI product(s) identified in such TI Resource. NO OTHER LICENSE, EXPRESS OR IMPLIED, BY ESTOPPEL OR OTHERWISE TO
ANY OTHER TI INTELLECTUAL PROPERTY RIGHT, AND NO LICENSE TO ANY TECHNOLOGY OR INTELLECTUAL PROPERTY
RIGHT OF TI OR ANY THIRD PARTY IS GRANTED HEREIN, including but not limited to any patent right, copyright, mask work right, or
other intellectual property right relating to any combination, machine, or process in which TI products or services are used. Information
regarding or referencing third-party products or services does not constitute a license to use such products or services, or a warranty or
endorsement thereof. Use of TI Resources may require a license from a third party under the patents or other intellectual property of the
third party, or a license from TI under the patents or other intellectual property of TI.
TI RESOURCES ARE PROVIDED “AS IS” AND WITH ALL FAULTS. TI DISCLAIMS ALL OTHER WARRANTIES OR
REPRESENTATIONS, EXPRESS OR IMPLIED, REGARDING TI RESOURCES OR USE THEREOF, INCLUDING BUT NOT LIMITED TO
ACCURACY OR COMPLETENESS, TITLE, ANY EPIDEMIC FAILURE WARRANTY AND ANY IMPLIED WARRANTIES OF
MERCHANTABILITY, FITNESS FOR A PARTICULAR PURPOSE, AND NON-INFRINGEMENT OF ANY THIRD PARTY INTELLECTUAL
PROPERTY RIGHTS.
TI SHALL NOT BE LIABLE FOR AND SHALL NOT DEFEND OR INDEMNIFY YOU AGAINST ANY CLAIM, INCLUDING BUT NOT
LIMITED TO ANY INFRINGEMENT CLAIM THAT RELATES TO OR IS BASED ON ANY COMBINATION OF PRODUCTS EVEN IF
DESCRIBED IN TI RESOURCES OR OTHERWISE. IN NO EVENT SHALL TI BE LIABLE FOR ANY ACTUAL, DIRECT, SPECIAL,
COLLATERAL, INDIRECT, PUNITIVE, INCIDENTAL, CONSEQUENTIAL OR EXEMPLARY DAMAGES IN CONNECTION WITH OR
ARISING OUT OF TI RESOURCES OR USE THEREOF, AND REGARDLESS OF WHETHER TI HAS BEEN ADVISED OF THE
POSSIBILITY OF SUCH DAMAGES.
You agree to fully indemnify TI and its representatives against any damages, costs, losses, and/or liabilities arising out of your noncompliance with the terms and provisions of this Notice.
This Notice applies to TI Resources. Additional terms apply to the use and purchase of certain types of materials, TI products and services.
These include; without limitation, TI’s standard terms for semiconductor products http://www.ti.com/sc/docs/stdterms.htm), evaluation
modules, and samples (http://www.ti.com/sc/docs/sampterms.htm).
Mailing Address: Texas Instruments, Post Office Box 655303, Dallas, Texas 75265
Copyright © 2018, Texas Instruments Incorporated
�


 工商网监
湘ICP备2023018690号
工商网监
湘ICP备2023018690号

